|
Let's start the lesson.
-
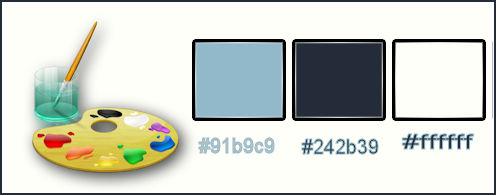
Material Properties:Set your foreground color to:#91b9c9 - Set your background color to: #242b39
1.
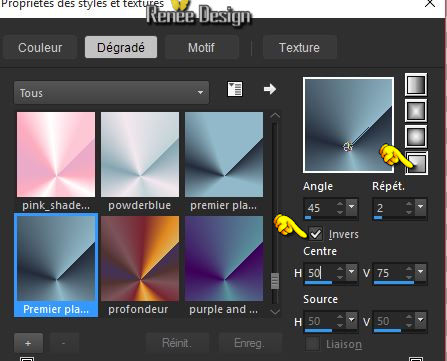
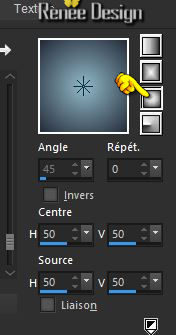
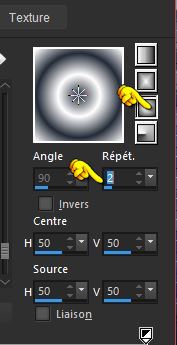
Put your foreground on the radial gradient with settings below
2.
Open a transparent image of 1005 x 655 pixels
3.
Activate Flood Fill Tool and fill the layer with the gradient
4.
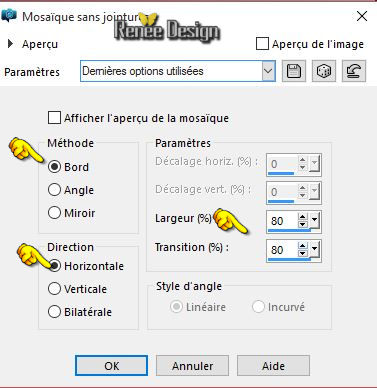
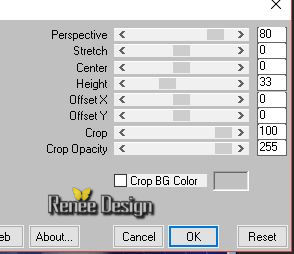
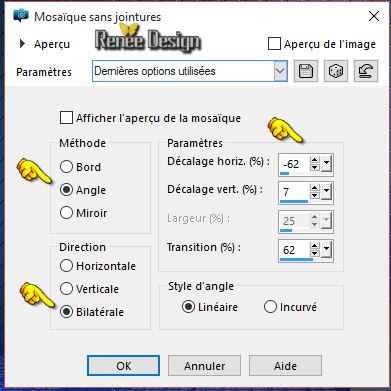
Effects-Image Effects-Seamless Tiling use settings shown below
5. Layers- Duplicate– Image Mirror
-
Double click on this Layer and set the Blend Mode to "Soft Light "
6.
Layers- Merge-Merge Down
7.
Layers- Duplicate
-
Activate the Layer underneath= (Raster
1)
8.
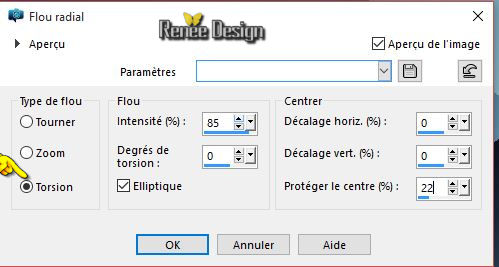
Adjust- Blur-Radial Blur use settings shown below
-
Layer palette – Make Copy of Raster 1 active
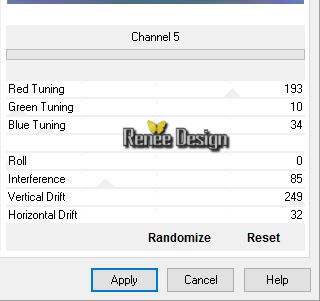
9.
Effects –Plugins- Unlimited – VM Distosion – Chanel 5 use settings shown below
10. Effects- Plugins – Frischluft / Box blur
(This filter needs time)

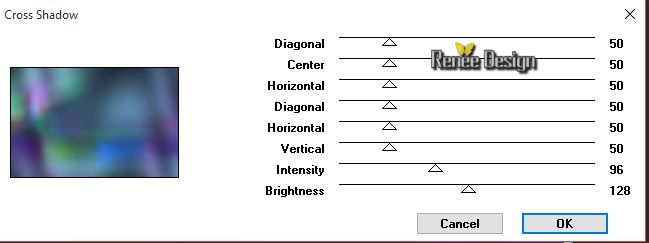
11.
Effects-Plugins - Graphic plus/ Cross
shadow use settings shown below
-
Double click on this Layer and set the Blend Mode to "Hard Light "
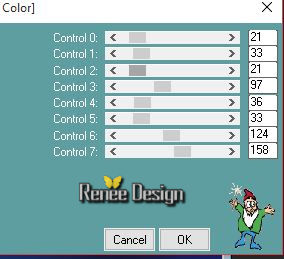
12.
Effects-Plugins -L & K’S –
Paris use settings shown below
13.
Layers- New Raster Layer
14.
Activate Flood Fill Tool and fill the layer with the background color
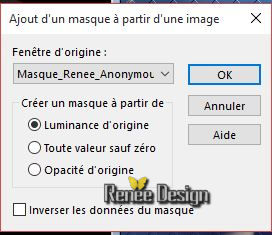
15.
Layers- New Mask layer from Image and choose Mask:« Masque_Renee_Anonymous »
-
Layers- Merge- Merge Group
16.
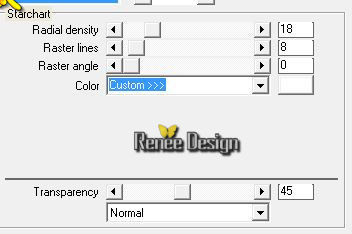
Image – Negative Image
17.
Selections –load/save selection –load selection from disc and choose my selection: ‘’
anonymous_delaupe_1’’
18.
Effects- Plugins – Mura’s Meister – Perspective
Tilling use settings shown below
19.
Effects- Edge Effects- Enhance More
20.
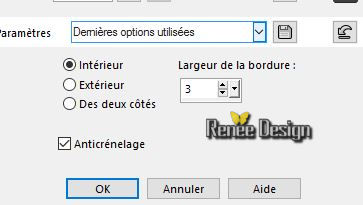
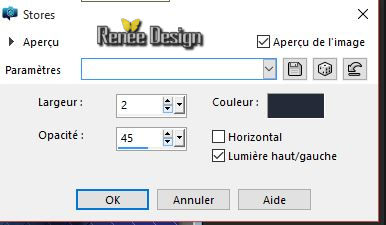
Selections-Modify-Select Selection Borders use settings shown below
21.
Layers- New Raster Layer
22.
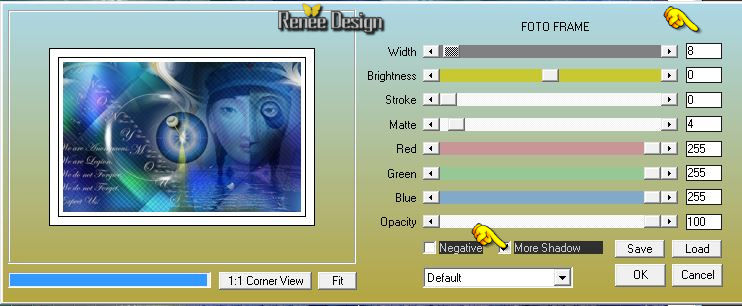
Activate Flood Fill Tool and fill the selection with the background color
Selections- Deselect All
23.
Effects-Plugins – Simple –
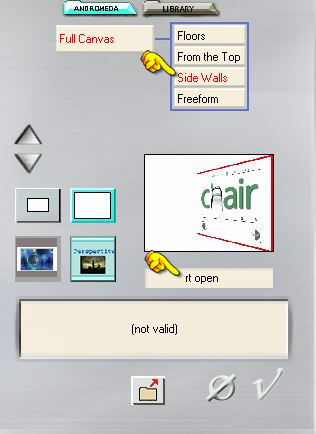
Diamonds
-
Double click on this Layer and set the Blend Mode to "Soft Light "
-
Activate the bottom of the layer palette=(Raster 1)
24.
Selections –load/save selection –load selection from disc and choose my selection:
‘’anonymous_delaupe_2’’
25.
Selections- Promote selection to Layer
Selections- Deselect All
26.
Effects-Image Effects-Seamless Tiling use settings shown below
27.
Layers- Arange- Bring to Top
28.
Effects- Plugins - Eyecandy 5 Impact – Perspective
shadow –
-tab Settings/User settings choose my preset: ‘’
anonymous_shadow »
29. Layers- Arrange- Move 2 x Down
- Double click on this Layer and set the Blend Mode to "Overlay"
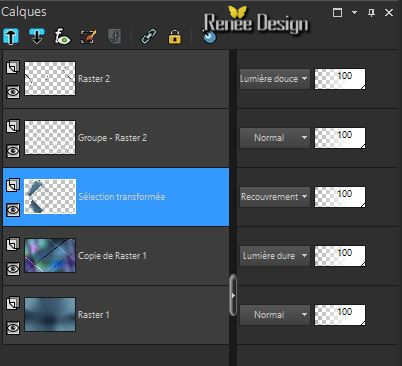
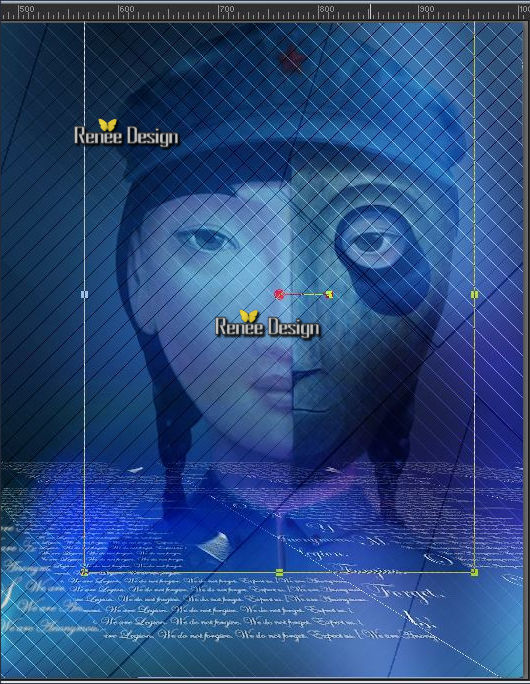
- Layer Palette look like this now-You should have this result
30 .
Activate the tube ‘’ Renee_tube_Delaupe_La
chinoise3.pspimage’’
31. Image
Resize to 65 %
- Edit/ Copy-Edit - Paste as new layer on your working image
-
With your Pick Tool (K) place it in the right place as shown in the example below
32. Double click on this Layer and set the Blend Mode to "Soft Light "
33. Layers- New Raster Layer
34.
Selections –load/save selection –load selection from disc and choose my selection:’’
‘’anonymous_delaupe_3’’
- Properties foreground: Change your radial gradient into a sunburst gradient as configured
35. Activate Flood Fill Tool and fill the selection with the sunburst gradient
36. Effects- Texxture Effects- Blinds use settings shown below (black )
Selections- Deselect All
37.
Effects-Plugins – Simple - 4 Way
Average
38.
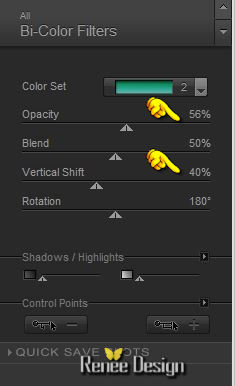
Effects-Plugins – Color Effex pro3.0 – Bicolor – set
Moss - 2 use settings shown below
39. Effects- 3 D Effects- Drop Shadow use settings shown below

40.
Effects –Plugins - Unlimited – Neology- Transparent Pizza -
92
- Activate the Layer underneath = Raster 3 (tube
fille)
41.
Effects- Plugins - Flaming Pear – Flood/click on the red arrow>>select my file :Preset ‘’
Flood settings_Anonymous”
can be used in any folder of your choice by clicking it.
3. Open it will be ok in your filter

- Activate the top of the layer palette
42. Activate the tube’’anonymous_Image1.pspimage’’
- Edit/ Copy-Edit - Paste as new layer on your working image
- Activate Move Tool (M) place against the top edge of your image
- Material Properties:Set your foreground color to:#242b39 - Set your background color to:#ffffff
- Properties foreground:
Same gradient, but now with settings below:
43. Layers- New Raster Layer
44.
Selections –load/save selection –load selection from disc and choose my selection: /
sélection ‘’anonymous_delaupe_4’’
45. Activate Flood Fill Tool and fill the selection with the gradient
46.
Effects –Plugins- Unlimited – Toadies – Posterize
227
47.
Effects-Plugins – Vanderlee – Unplugged x/
Starchart use settings shown below
48. Effects- 3 D Effects- Drop Shadow with these settings: 1/1/100/100 #ffffff
Selections- Deselect All
49. Double click on this Layer and set the Blend Mode to "Luminance" Set the layer opacity of this layer to 59
50. Layers- New Raster Layer
51.
Selections –load/save selection –load selection from disc and choose my selection:
« anonymous_delaupe_5 »
52. Activate Flood Fill Tool and fill the selection with the background color white
Selections- Deselect All
53. Layers- Duplicate-Image Flip
54. Layers- Merge- Merge Down
55. Activate the tube ‘’ anonymous_epingle.pspimage’’
- Edit/ Copy-Edit - Paste as new layer on your working image
- Activate Move Tool (M) move it the right place (see finished image)
56. Activate the Brush« explosion_brushes_6 »in your PSP
- File- Export Custom Brush (Give it a name)
57. Activate the Brush-Tool and choose the brush « explosion_brushes_6 »use settings below

Stamp as shown on the print screen below by using your white background color
58. Effects- Edge Effects- Enhance More
59. Image - Add borders-Symmetric checked:1 pixel #242b39
60. Image - Add borders-Symmetric checked:25 pixels #ffffff
61. Effects- Plugins- AAA Frame Foto frame use settings shown below
Rename -‘’anonymous_delaupe’’ -You may minimize your tube for a moment, but do not close, we will need it again soon
62. Activate the image ‘’anonymous_fond2’’
63. Activate your minimized image : ‘’anonymous_delaupe’’
64. Edit/ Copy-Edit - Paste as new layer on your working image
65.
Effects-Plugins – Andromeda –Perpective/Side walls /
rtopen
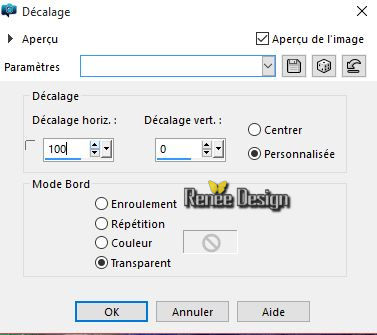
66. Effects-Image Effects-Offset use settings shown below
67. Effects- 3 D Effects- Drop Shadow with these settings 0/0/100/65 black
68. Activate the tube ‘’ Renee_anonymous_iphone.pspimage’’
69. Image
Resize to 50 %
- Edit/ Copy-Edit - Paste as new layer on your working image
- Activate Move Tool (M) move it the right place (see finished image)
70.
Effects- Plugins – Eyecandy 5 Impact –Perspective
shadow-tab Settings/User settings choose my preset: ‘’anonymous_shadow_2”
71.
Activate the tube ‘’renee_anonymous_melon’’
- Edit/ Copy-Edit - Paste as new layer on your working image
- Activate Move Tool (M) move it the right place (see finished image)
72 .Layers- Duplicate
- Activate Move Tool (M) move it a little to the right side (see finished image)
73.
Effects-3D Effects-Drop Shadow using the default settings
74. Image - Add borders-Symmetric checked:2 pixels #242b39
75. Image - Add borders-Symmetric checked:20 pixels #ffffff
76. Image - Add borders-Symmetric checked:2 pixels #242b39
77. Image - Add borders-Symmetric checked:10 pixels #ffffff
78. Activate the er
le tube ‘’ anonymous_texte.pspimage’’
Edit/ Copy-Edit - Paste as new layer on your working image -Activate Move Tool (M) move it the right place at the top of your image
79 .
Layers- Merge- Merge All
Image
Resize to 995 pixels width
Save as JPG
I hope you enjoyed this lesson
Renée
This lesson was written by Renée 29/10/2015
Edited and Update
2015
*
Any resemblance with an existing lesson is merely a coincidence *
* Don't forget to thank the people who work for us and with us. I named the tubeurs - Testers and the translators.
Thanks Renée.
| 

 Translations


 When you see this logo the filter is imported in Unlimited

 All rights reserved