|
Let's start the lesson.
Apocalypse road
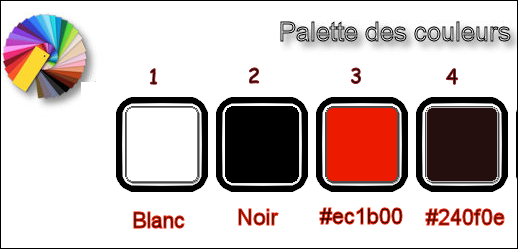
- Preparation/ Material Properties: Set your foreground color to #ffffff- Set your background color to black
1. Open the backgroundimage ‘’Fond_Apoclaypse_road’’- Window - Duplicate (or shift+D) - Close the original and proceed on the copy -Promote Background Layer =Raster 1
2.
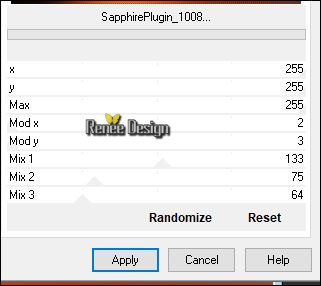
Effects –Plugins- Unlimited _Sapphire Filters
11-SapphirePlugin_1008...
3. Effects- Image Effects- Seamless Tiling-Side by Side
4. Layers- Duplicate
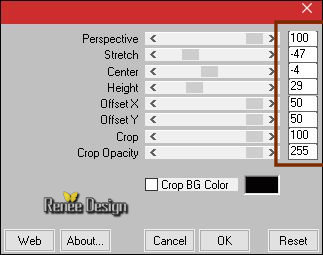
5. Effects –
Plugins - Mura’s Meister – Perspective Tilling use the settings below
- You may minimize your working area for a moment, but do not close.
- We will create railroad tracks
6. File: Open a new transparent layer 790 x 720 Pixels
7. Selections –load/save selection –load selection from disc and select my selection:‘’ APO_ROAD_Rail
1’’
8. Activate the Flood Fill Tool  and fill the selection with the background color black and fill the selection with the background color black
Selections- Deselect All
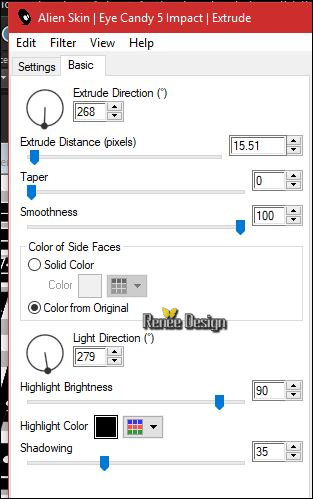
9. Effects –Plugins – Eyecandy 5 Impact – Extrude –tab Settings/User settings and choose my Preset
‘’rail_1’’
10. Layers- New Raster Layer
11.
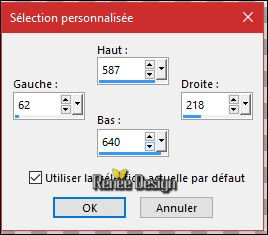
Activate Selection Tool -Custom Selection (S) -Rectangle with these settings
12. Activate the Flood Fill Tool and fill the selection with the background color black
Selections- Deselect All
13. Layers- Duplicate
14. Image - Mirror - Mirror Horizontal (Image - Mirror in older versions of PSP)
15. Layers- Merge- Merge Down
16. Layers- New Raster Layer
17. Selections –load/save selection –load selection from disc and select my selection:‘’ APO_ROAD_Rail
2’’
18. Activate the Flood Fill Tool and fill the selection with the foreground color #ffffff (zoom in)
Selections- Deselect All
19. Selections –load/save selection –load selection from disc and select my selection:‘’ APO_ROAD_Rail
3’’
20. Activate the Flood Fill Tool and fill the selection with the foreground color #ffffff
Selections- Deselect All
21. Layers- New Raster Layer
22. Selections –load/save selection –load selection from disc and select my selection:‘’ APO_ROAD_Rail
4’’
23. Activate the Flood Fill Tool and fill the selection with the foreground color #ffffff
Selections- Deselect All
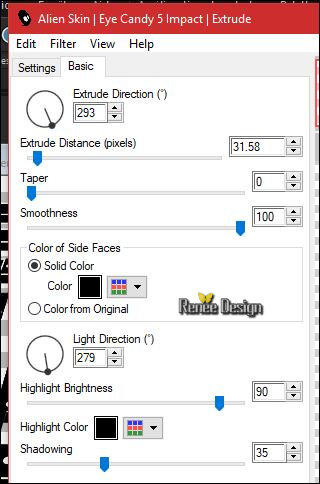
24. Effects
– Plugins – EyeCandy 5 Impact Extrude use the settings below
25. Layers- Duplicate
26. Image - Mirror - Mirror Horizontal (Image - Mirror in older versions of PSP)
27. Layers- Merge- Merge Down
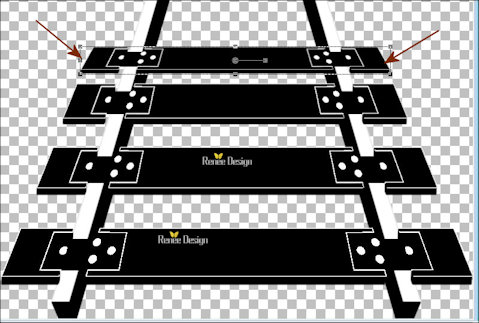
- Layers- Arrange- Move 2 x Down (above raster 1)
-Your work and Layer Palette look like this now-You should have this result
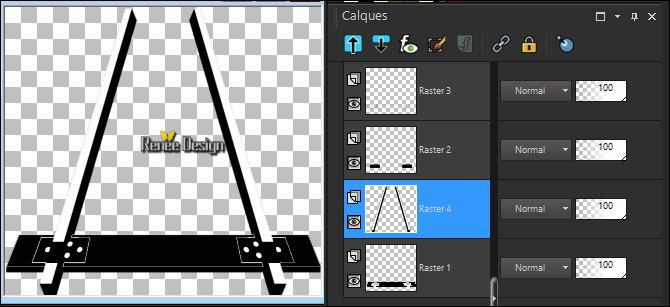
In the Layerpalette - Close layer 4 (rail tracks )
- Layer Palette - Click on the top Layer
–Layers- Merge- Merge Visible (stay on this merged layer )
- Rename this layer : ’’traverse1’’
28.
Layers- Duplicate - Rename this layer ‘’Traverse 2’’
29. Image- Resize to 83%
30. Effects
–Image Effects- Offset : H = 0 and V = 104
31. Layers- Duplicate -Rename this layer ‘’Traverse 3’’
32. Image- Resize to 85%
33. Effets
– Image Effects- Offset H = 0 and V = 102
34.Open the closed layer in the Layers palette
You can also create cross beams in the same way - you understood the principle
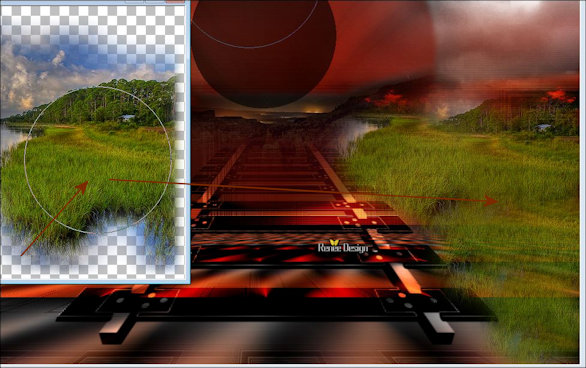
We continue
-I give the last Crossbeam
35. Open the tube ‘’Traverses finales ‘’
- Edit - Copy- Activate your work -Edit - Paste as a new layer
36. Effects
– Image Effects - Offset : H = - 2 and V = 190
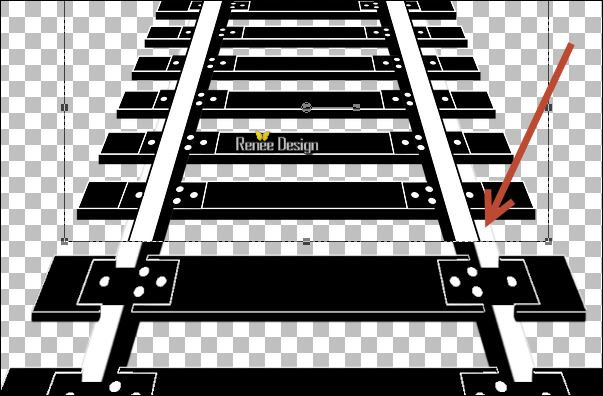 Activate your Pick Tool (K) Mode Scale-stretch on right and left that it fits Activate your Pick Tool (K) Mode Scale-stretch on right and left that it fits
-Your work and Layer Palette look like this now-You should have this result

37.Layers- Merge- Merge Visible
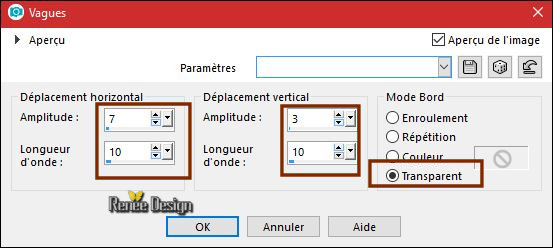
38.
Edit- Copy !
- Activate your minimized image you created earlier on in the lesson ( Point 5 )
39. Edit - Paste as a new layer ( Do not move )
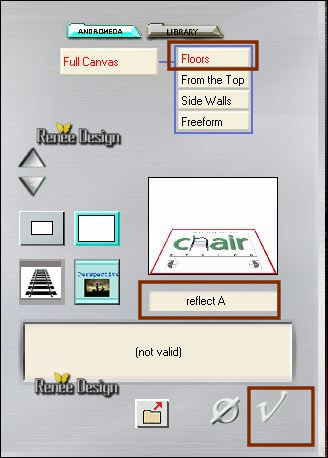
40. Effects
–Plugins – Andromeda – Perspective – Floors-
reflect A
41.
Layers-Properties-Set the Blend Mode to" Overlay "
42. Effects
– Edge Effects -Enhance
43. Open the tube ‘’ Apocalypse road_nuage bleu’’
- Edit - Copy- Activate your work -Edit - Paste as a new layer
-Move Tool(M) move it in the upper right corner
44. Effects
– Plugins – Final Impact – Hotshot use the settings below
45.
Layers-Properties-Set the Blend Mode to" Luminance "
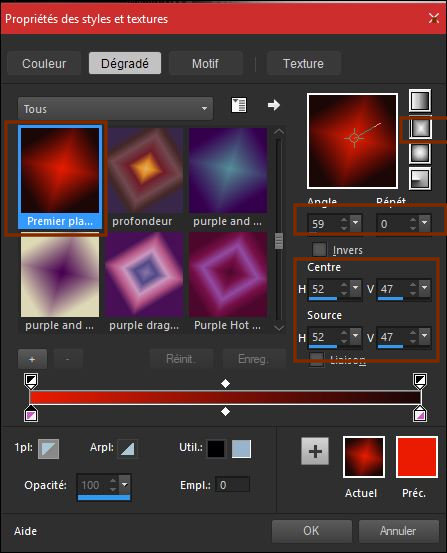
- Color Palette: Set your foreground color to #ec1b00 - Set your background color to #240f0e
- Prepare a foreground/background-Rectangular gradient configured like this
46. Layers- New Raster Layer
47. Selections –load/save selection –load selection from disc and select my selection:’’ APO_ROAD_Rail
5’’
48. Activate the Flood Fill Tool – Opacity 60%- Fill the selection with the gradient
Selections- Deselect All
49. Layers- Duplicate
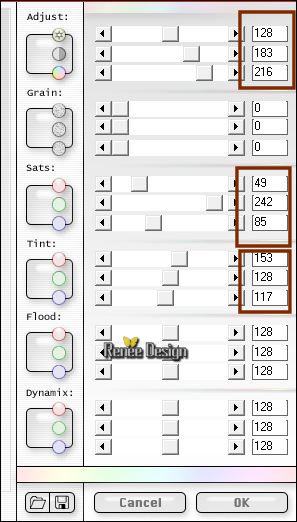
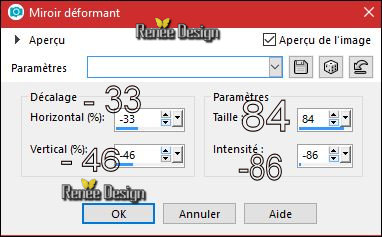
50. Effects- Distortion Effects- Warp use the settings below
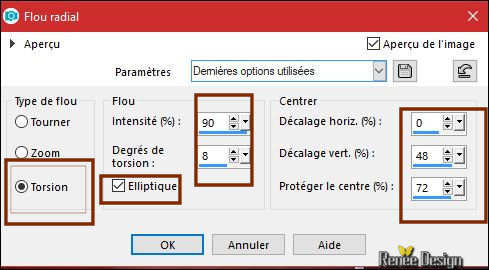
51. Adjust- Blur- Radial Blur with these settings
52.
Layers-Properties-Set the Blend Mode to" Screen "
53. Layers- Duplicate
–
Layers- Merge- Merge Down
54. Layers- Duplicate
55. Image - Mirror - Mirror Horizontal (Image - Mirror in older versions of PSP)
56. Layers- Merge- Merge Down
57. Open the tube ‘’ Apocalypse road_paysage.png’’
- Edit - Copy- Activate your work -Edit - Paste as a new layer
58. Effects- Image Effects- Offset with these settings: H = 0 and V = 82
59. Open the tube ‘’ Apocalypse road_trace_rouge’’
- Edit - Copy- Activate your work -Edit - Paste as a new layer
- Move as shown in the example below
60. Layers- Duplicate
61. Image - Mirror - Mirror Horizontal (Image - Mirror in older versions of PSP)
62. Layers- Merge- Merge Down
63.Set the Opacity of this layer to 95%
64. Layers- New Raster Layer
- Open the tube ‘’Apocalypse_road_image 27680’’ in your Psp
65. Activate your Clone Brush (C) Size between 200 and
150
- A clone source is an area of the image you want to copy to cover up another area.
To select the clone source, right-click with your mouse and a circle will appear around the area. ( she is circled black on capture )
- Go to the place where you need the clone brush then a short left click with the mouse to set the clone brush and you're done
- Here is the result (the result may be slightly different)
66. Open the tube ‘’ citation-Apocalypse_road’’
- Edit - Copy- Activate your work -Edit - Paste as a new layer
- place it in the middle of your work
67. Activate your Text Tool, Font ‘’LOT’’
- Size
72 / Set your foreground color to #ffffff and close the background color
- Write
‘’Apocalypse Road''/ Convert to Raster Layer
- Move Tool/ Move it in the right place ( see finished image )
68.
Layers-Properties-Set the Blend Mode to" Soft Light "
69. Open the tube ‘’ Apocalypse road_Ondes.png’’
- Edit - Copy- Activate your work -Edit - Paste as a new layer
- Effects- Image Effects- Offset with these settings: H = 0 and V = -199
70. Open the tube ‘’ Apocalypse road_arbre’’
- Edit - Copy- Activate your work -Edit - Paste as a new layer
- Move to the left side
71. Layers- New Raster Layer
72. Selections –load/save selection –load selection from disc and select my selection:’’ APO_ROAD_Rail
6’’
- Color Palette: Set your foreground color to #ffffff
73. Activate the Flood Fill Tool – Opacity 100%
Fill the selection with the foreground color #ffffff ( 2 clicks)
Selections- Deselect All
74. Effects- Distortion Effects- Wave use the settings below
75.
Layers-Properties-Set the Blend Mode to" Screen "– Set the Opacity of this layer to 46%
76. Open the tube ‘’ Renee_TUBES_Apocalypse_Road’’
- Image
Resize to 78%
- Edit - Copy- Activate your work -Edit - Paste as a new layer
-Move it in the right place
77.
Effects – Plugins – Eyecandy 5 Impact – Perspective
shadow–tab Settings/User settings and choose my Preset
‘’Apocalypse_road_Shadow.f1s’’
78. Image - Add borders-Symmetric checked 1 Pixel black
79. Image - Add borders-Symmetric checked 10 Pixels #ffffff
80. Image - Add borders-Symmetric checked 2 pixels black
81. Image - Add borders-Symmetric checked 40 Pixels #ffffff
82. Image - Add borders-Symmetric checked 1 Pixel black
83. Image - Add borders-Symmetric checked 35 Pixels #ffffff
84. Open the tube "Text " Edit - Copy- Activate your work -Edit - Paste as a new layer and move
85. Layers- Merge- Merge- All ( Flatten)
86. Image
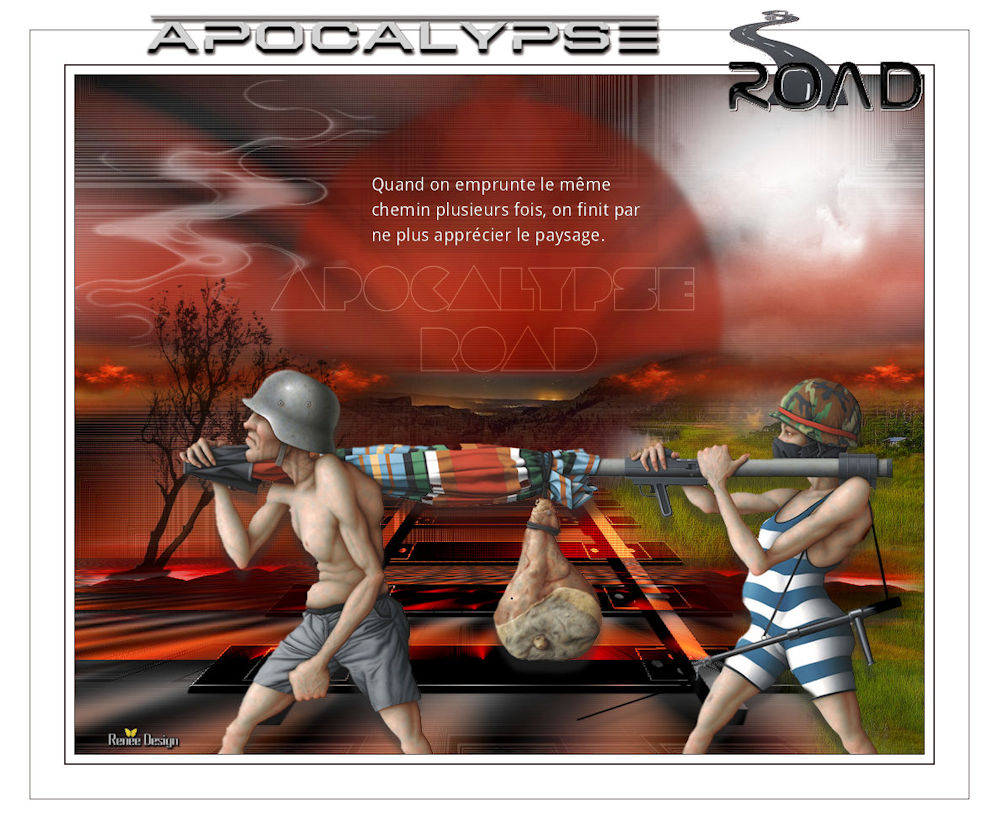
- Resize to 999 Pixels width. Save as JPG
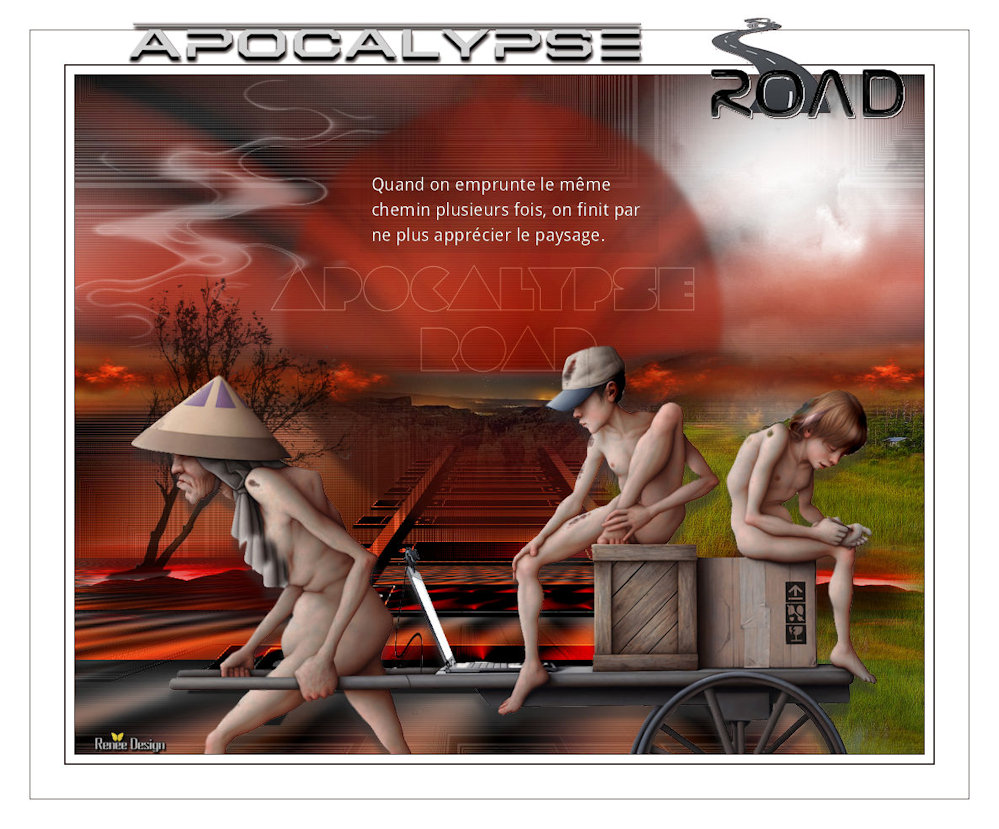
An example with another tube
I hope you enjoyed this lesson
Renée
This lesson was written by Renée- 25 Januar 2018
Edited and Update
2018
*
Any resemblance with an existing lesson is a coincidence
* Do not forget to thank the people who work with us and for us I have appointed the tubeurs and translators
Thanks
*
| 
 Translations


 If a plugin supplied appears with this icon it must necessarily be imported into Unlimited *