|
Let's start the lesson.
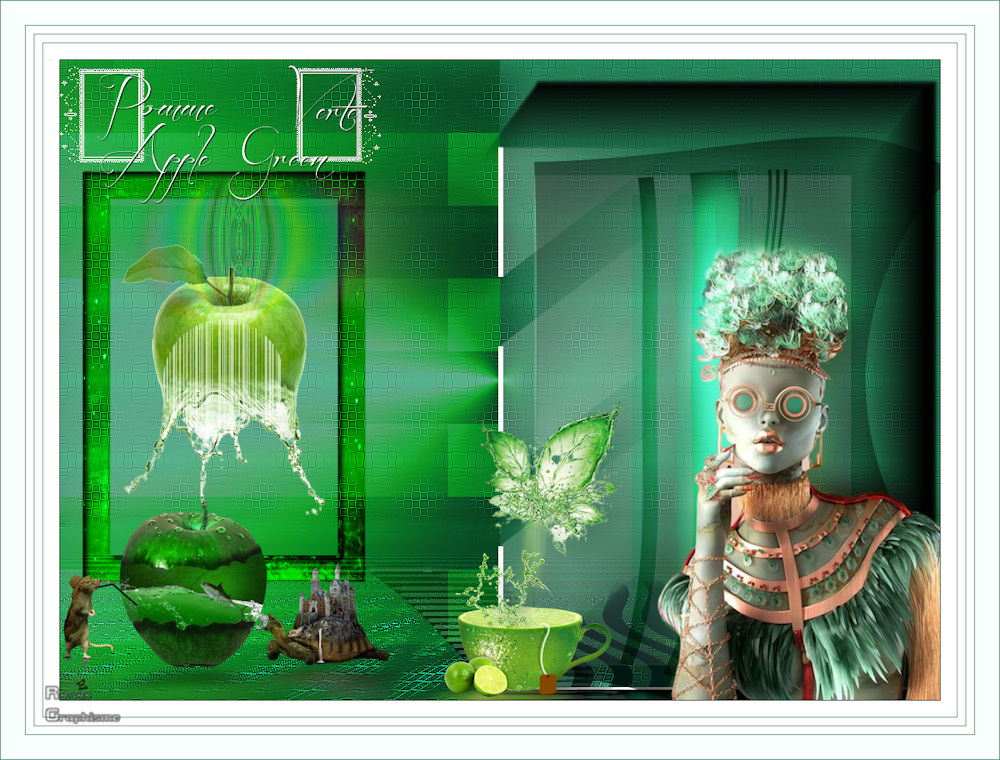
Apple Green - Pomme
verte
Preparation
- Material Properties:
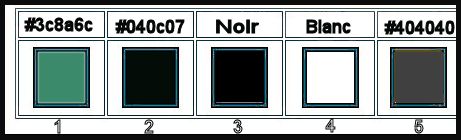
Set your foreground color to color #3c8a6c = 1 – Set your background color to color #040c07= 2
- File-Open a new Transparent image 1100 x 800 Pixels
1. Flood Fill Tool
 –
Fill the Layer with the Foreground color = 1 –
Fill the Layer with the Foreground color = 1
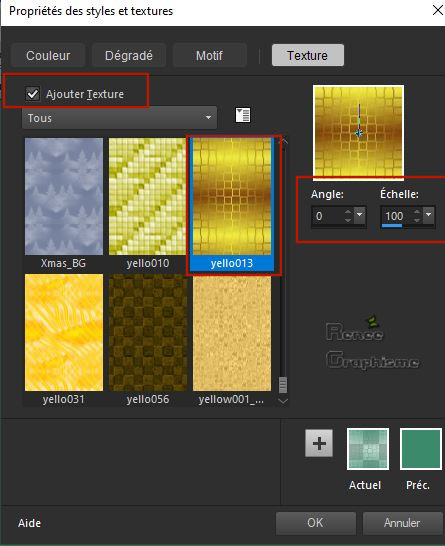
- Set your Color Palette as below with the Texture and select Texture ‘’yello013’’ with these settings
2. Layers- New Raster Layer
3.Flood Fill Tool
–
Fill the layer with the Texture (you see nothing, this is normal )
4. Adjust- Sharpness- Sharpen
5. Adjust-Sharpness-Sharpen More
6. Effects- 3D- Effects- Drop Shadow with these settings: 2/1/55/2 Color Black
7. Layers-Properties-Set the Blend Mode to " Hard Light " – Reduce the Opacity of this layer to 71%
8. Layers- Merge- Merge Down
Uncheck the texture in your Foreground Palette
- Properties Foreground: Set your Foreground color to color #3c8a6c= 1
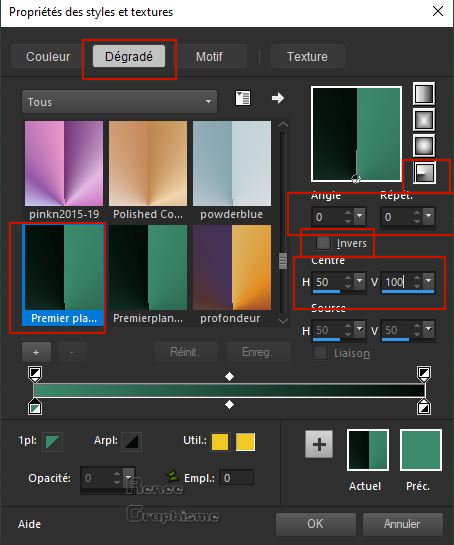
- Set your Foregroundcolor to Foreground-Background Radial Gradient configured like this
9. Layers- New Raster Layer
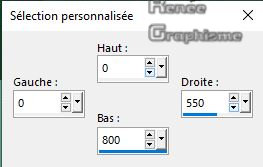
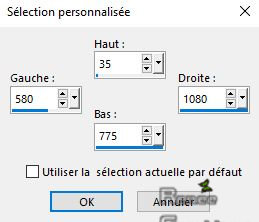
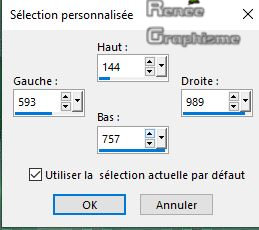
10. Activate Selection Tool -Custom Selection (S) -Rectangle with these settings
11.Flood Fill Tool
–
Opacity 65% – Fill the selection with the gradient
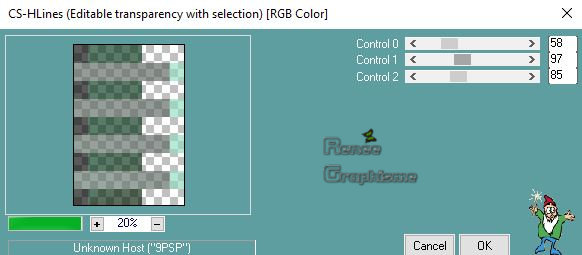
12. Effects – Plugins – Carolaine & Sensibility- CS-HLines use the settings below
Selections- Deselect All
13. Effects- Plugins – Alien skin EyeCandy 5 Impact – Perspective
Shadow- Drop shadow Blury use the default settings
14. Layers-Properties-Set the Blend Mode to " Soft Light "
15. Effects –Plugins-
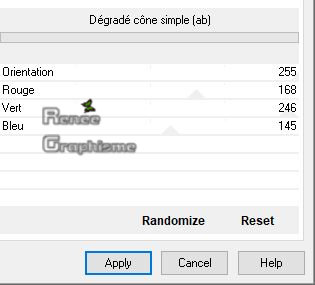
Unlimited 2.0 – Dégradés - Dégradé cône simple (ab) use the settings below
16. Open the tube ‘’Renee_TUBES_Pomme-verte’’ - Edit - Copy- Activate your work -Edit - Paste as a new layer
- Pick Tool: (K) on your keyboard -Enter these parameters for the X: 77,00 and Y:231,00 positions on the Toolbar
-

- Press (M) to close the Pick Tool
17.Selections-Select All- Selections- Float- Selections- Defloat
18. Layers- New Raster Layer
19. Effects – Artistic Effects- Magnifying Lens – Select my Preset ‘’Pomme verte-loupe’’( Put this preset into the default folder of Paint Shop)
20. Layers-Properties-Set the Blend Mode to " Screen " – Reduce the Opacity of this layer to 61%
Selections- Deselect All
21. Effects- Edge Effects -Find Vertical
22. Effects –Plugins-
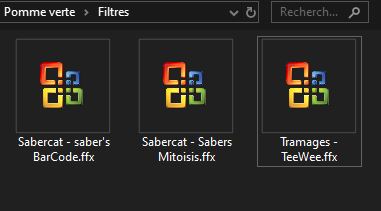
Unlimited 2.0- Sabercat - saber's BarCode... 159
23. Layers- New Raster Layer
24. Selections - Load/Save Selection - Load Selection From Disk and select my Selection : ‘’pomme-verte-1’’
25. Open the tube ‘’
Renee_Image-Pomme-verte 1’’ -Edit - Copy- Activate your work -Edit - Paste into Selection
Selections- Deselect All
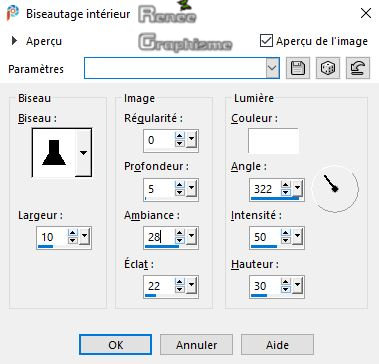
26. Effects- 3 D Effects- Inner Bevel use the settings below
27. Layers-Properties-Set the Blend Mode to " Overlay "
28. Layers- Duplicate
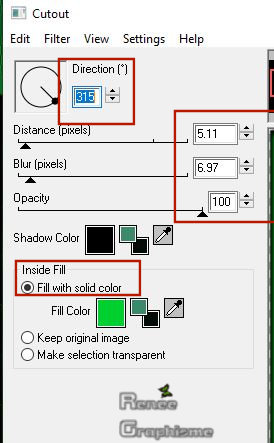
29. Effects – Plugins – EyeCandy 4000 – Cutout use the settings below– Colors Black and
#00d02f
30. Open the tube ‘’Renee_TUBES_Pomme-verte-3 .png’’ - Edit - Copy- Activate your work -Edit - Paste as a new layer
31. Objects - Align-
Left – Objects - Align- Bottom
32. Layers- New Raster Layer
33. Activate Selection Tool -Custom Selection (S) -Rectangle with these settings
34.Effects – 3 D-Effects – Drop Shadow with these settings: - 9/ 16 / 50 / 5 Color Black
Selections- Deselect All
35. Layers- New Raster Layer
36. Selections - Load/Save Selection - Load Selection From Disk and select my Selection : ‘’pomme-verte-2’’
37.Flood Fill Tool
–
Opacity 20 %- Fill the selection with the Background color =2
38. Effects –Plugins-
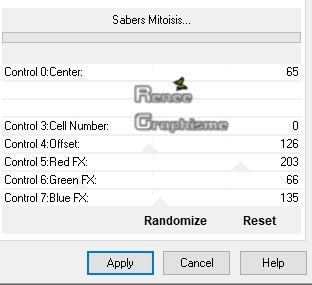
Unlimited 2.0- Sabercat - Sabers Mitoisis..use the settings below .
39. Effects – Edge Effects -Enhance
Selections- Deselect All
Layer-Palette- Activate the layer underneath
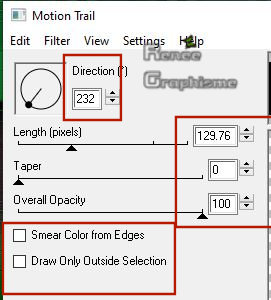
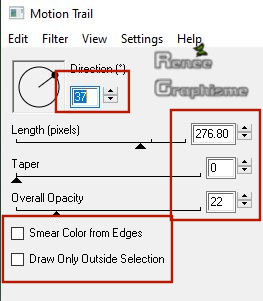
40. Effects – Plugins – Eyecandy 4000- Motion trail use the settings below
- To replace the Top of the Layer-Palette
Color-Palette- Set your Foreground color to color #ffffff =4
41. Layers- New Raster Layer
42. Selections - Load/Save Selection - Load Selection From Disk and select my Selection : ‘’pomme-verte-3’’
43.Flood Fill Tool
–
Opacity 100% –Fill the selection with the Foreground color =4
Selections- Deselect All
44. Effects – Plugins - Eyecandy 4000- Motion Trail use the settings below
45. Selections - Load/Save Selection - Load Selection From Disk and select my Selection : ‘’pomme-verte-4’’
DELETE
Selections- Deselect All
46. Layers- New Raster Layer
47. Activate Selection Tool -Custom Selection (S) -Rectangle with these settings
48.Color-Palette -Set your Foregroundcolor to color # 404040=5
-Flood Fill Tool
-
Opacity 50% - Fill the selection with the Foreground color = 5
49. Layers-Properties-Set the Blend Mode to " Screen "
On the same Layer !!
50. Selections - Load/Save Selection - Load Selection From Disk and select my Selection : ‘’pomme-verte-5’’
DELETE
51. Effects– 3 D Effects – Cutout with these settings

52. Layers- Duplicate
53. Layers-Properties-Set the Blend Mode to " Hard Light "
Selections- Deselect All
54. Effects – Plugins – Flaming pear – Circle to Square
55. Effects – Plugins - Graphic Plus – Cross Shadow using the default settings
- Activate the Bottom of the Layer-Palette = Raster 1
56. Layers- Duplicate
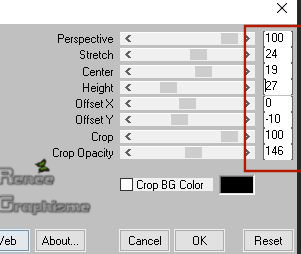
57. Effects – Plugins - Mura’s Meister – Perspective Tiling use the settings below
58. Adjust- Sharpness- Sharpen More
- Repeat : Adjust- Sharpness- Sharpen More
59. Selections - Load/Save Selection - Load Selection From Disk and select my Selection : ‘’pomme-verte-6’’
60. Adjust- Blur- Gaussian Blur-Radius 15
Selections- Deselect All
- Stay on this Layer !!!!
61. Selections - Load/Save Selection - Load Selection From Disk and select my Selection : ‘’pomme-verte-7’’
62. Selections- Promote Selection to Layer
Keep Selected !!!
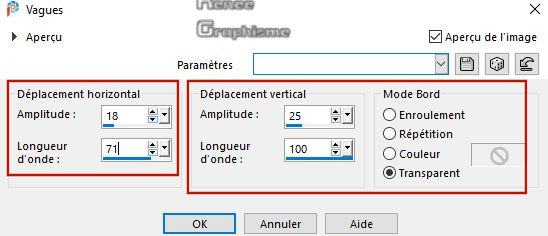
63. Effects - Plugins - Innovations 1.5 –Wavelenght use the settings below

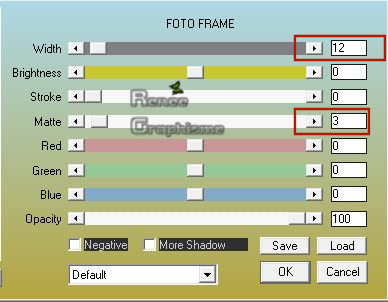
64. Effects – Plugins –AAA Frame – Foto Frame use the settings below
65. Layers- New Raster Layer
66. Color- Palette -Set the Foreground color to color #ffffff=4
-Flood Fill Tool
–
Opacity 100% – Fill the selection with the Foreground color=4
67. Effects -
Plugins – L &K ‘s – Sanne 100/ 255
- Repeat: Effects -
Plugins – L &K ‘s – Sanne 100/ 255
Selections- Deselect All
68. Effects - Distortion Effects- Wave use the settings below
69. Effects –
Plugins -Unlimited 2.0 – Tramages - TeeWee... 11/ 212
- To replace the Top of the Layer-Palette
70. Open the tube ‘’Renee_TUBES_Femme-pomme-verte-tasse.pspimage’’ - Edit - Copy- Activate your work -Edit - Paste as a new layer
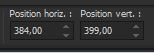
71.Pick Tool: (K) on your keyboard -Enter these parameters for the X:384,00 and Y: 399,00 positions on the Toolbar
72. Open the tube ’’
Renee_TUBES_Femme-pomme-verte’’ -Edit - Copy- Activate your work -Edit - Paste as a new layer
73. Image
Resize to 82 % /Resize all layers not checked
Move Tool / place your tube at the bottom right of your image
74. Layers- Duplicate
75. Layers- Arrange- Move Down
76. Adjust-Blur- Gaussian Blur: Radius 18
77. Layers-Properties-Set the Blend Mode to " Overlay "
- To replace the top of the layer-palette
78. Layers- New Raster Layer
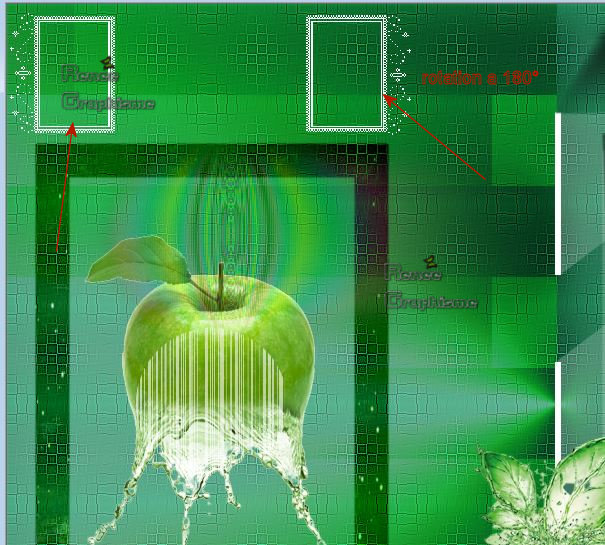
79. Activate the Brush Tool and choose the Brush ‘’ ‘engelixe.buzz 001-pomme’’-Size 229-Step 25

- Apply the Brush with the Foreground color White as shown in the example below
80. Change the rotation of the Brush to 180
Apply the Brush with the Foreground color White as shown in the example below
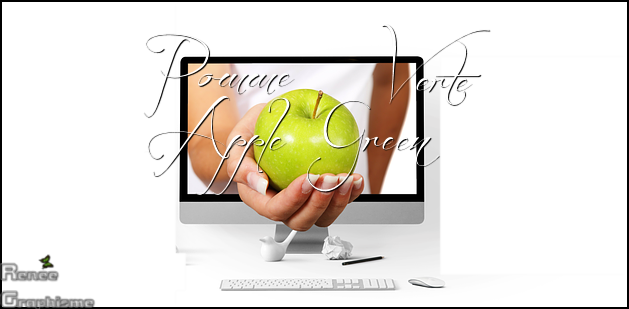
81. Color-Palette- Close your Foreground color - Set your Background color to color white
82. Activate your Text Tool (Included into the zipfile)-For Renée Font - Before the Rain- Size 36- Anti-alias-Off

-Write " Pomme
Verte" and "Apple Green "
-Convert to Raster Layer-Move it in the right place (see finished image )
83. Effects 3 D Effects–
Drop Shadow with these settings : 1/1/100/1 Color Black (on the both texts
)
84. Layers- Merge- Merge Visible
85. View - Toolbars - Script checked in your Psp!!
Activate Toolbar Script, choose my file in the list ''pomme-verte ''Click the little blue arrow and let the Script run
86. Image
Resize to 1000 Pixels width
Apply your signature/Save as JPG
I hope you enjoyed this lesson
Renée
This lesson was written by Renée 20-11-2019
Edited and Update
2019
*
Any resemblance with an existing lesson is merely a coincidence
* Do not forget to thank the people who work with us and for us. I have appointed the tubeurs and translators
Thanks
Renée
*
|
 Translations


 If a plugin supplied appears with this icon it must necessarily be imported into Unlimited *