|
Let's start the lesson
Bel Eté 2024/Beautiful
summer
-Preparation
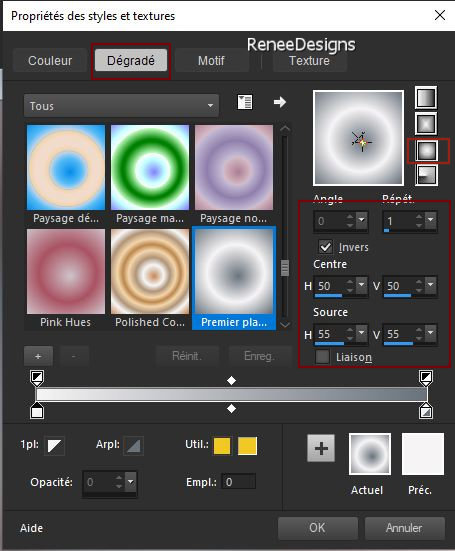
-Material Properties: Set your foreground color to color
1 – Set your background color to color 3
-
Replace
your foreground color with a fore/background sunburst
gradient configured like this

1. Open the Background
image ‘’Fond-Bel-Ete-2024’’-
Promote Background Layer =Raster
1
2. Layers- New Raster Layer
3. Activate Selection Tool
-Custom Selection (S) -Rectangle with these settings


4. Flood Fill Tool
 –
Fill the selection with the gradient –
Fill the selection with the gradient
5. Effects-Plugins– Simple – Center Tiles
6. Effects-3D-Effects- Drop
Shadow with these settings: – 5 / 1 /100
/14 color black

7.
Effects-
Reflection Effects-Rotating Mirror use the settings
below

8. Effects-Plugins– Simple - Zoom out and Flip
9.
Layers-Properties-Set the Blend Mode to " Multiply " -Reduce
the opacity of this layer to 34%
10. Effects-Plugins – Toadies – What are you ?
using the default settings
11.
Layers-
Merge-Merge Visible
12. Effects-Plugins- Filters in Unlimited 2.0 - ICNET-Filters –
Color Filters - Blue Sky using the default settings
13.
Adjust-One Step Photo Fix
14. Selections –load/save
selection –load selection from disc and select my
selection:
‘’Bel-Ete-2024-1’’
15. Selections- Promote
Selection to Layer
16. Effects –Plugins – VM Distorsion – Circulator II
with these settings


17. Effects-3D-Effects-Drop
Shadow with the same settings
18. Layers- Duplicate
19. Image - Mirror - Mirror
Horizontal (Image - Mirror in older versions of PSP)
- Layers- Merge- Merge Down
20. Effects – Plugins – Simple – 4 Way average
21.Effects- Plugins - Filters in Unlimited 2.0 - Toadies - Plain
Mosaic Blur...using the default settings
22. Effects –Edge Effects -Enhance
- Stay on this layer
23. Activate Selection Tool
-Custom Selection (S) -Rectangle with these settings

24. Effects –Plugins – Mura’s Meister – Perspective Tiling -using
the default settings
25. Selections- Promote
Selection to Layer
26. Layers-Properties-Set
the Blend Mode to " Hard Light " -Reduce the opacity of
this layer to 36%

27. Selections –load/save
selection –load selection from disc and select my
selection: ‘’Bel-Ete-2024-2’’
 7 to 8 times

28. Effects –3D- Effects –
Drop Shadow with these settings: 14 / - 6 / 85 /25
color black
-Activate the layer
underneath (promoted selection)
29. Layers-Properties-Set
the Blend Mode to " Screen "
- Activate the top of the
layer palette
30.
Layers-
New Raster Layer
31. Selections –load/save
selection –load selection from disc and select my
selection: ‘’Bel-Ete-2024-3’’
32. Material Properties: Set your Foreground color to
color #ffffff=7
Activate Flood Fill
Tool
 –
Fill the selection with color #ffffff =7 –
Fill the selection with color #ffffff =7

33. Effects – Distortion
Effects– Wind -Wind strength 100° -Wind
direction-From right
34. Effects – Reflection
Effects – Feedback use the settings below

35. Effects- Distortion
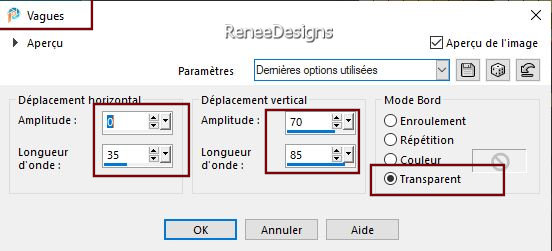
Effects – Wave use the settings below

36. Layers- Duplicate
37. Image - Mirror - Mirror
Horizontal (Image - Mirror in older versions of PSP)
- Layers- Merge- Merge Down
38. Effects –
3D-Effects-Drop Shadow with these settings: 33 / 2 / 85 /20
color black
39.Open the tube:
‘’Bel-Ete-2024-Image-1 ‘’ – Edit - Copy- Activate your
work -Edit - Paste as new layer
- Move to the left site (
see finished image)
40. Open the tube: ‘’Bel-Ete-2024-Image-2’’
- Edit - Copy- Activate your work -Edit - Paste as new
layer
- Move to the right side (
see finished image)
41. Effects –
3D-Effects-Drop Shadow with these settings: 0/2/85/20
color
black
- Material Properties: Set
your Foreground color to color 2 – Set your Background
color to color 5
42.
Layers-
New Raster Layer
43. Selections –load/save
selection –load selection from disc and select my
selection:
‘’Bel-Ete-2024-4’’
44. Flood Fill Tool
 –
Opacity 50% – Fill the
selection with color 2 –
Opacity 50% – Fill the
selection with color 2
45. Effects- Plugins -Filters in Unlimited 2.0 - ICNET-Filters –Tile
&Mirror - XY Offset 50% (negative)

46.Effects- Plugins - Filters in Unlimited 2.0 – Toadies - What are
you? – Overdose : 124

47. Effects – Plugins– Carolaine & Sensibilty – CS-LDots
use the settings below

48. Layers -Arrange - Move
down 3 times
49. Layers-Properties-Set
the Blend Mode to " Hard Light "
- You should have this
result as shown in the print screen below

- Activate the top of the
layer palette
50.
Layers-
New Raster Layer
51. Selections –load/save
selection –load selection from disc and select my
selection:
‘’Bel-Ete-2024-5’’
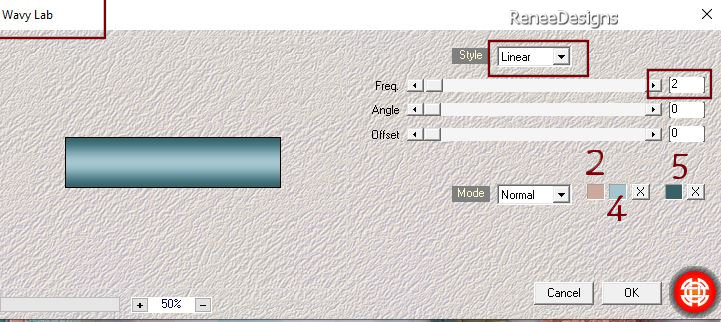
52. Effects-Plugins – Medhi – Wavy Lab use the settings
below
Color 2 / color 4 and color 5


53.Effects- Plugins – VM Extravaganza – shoutin.. !use
the settings below

54. Effects- Plugins -Alien Skin EyeCandy 5 – Impact – Glass
use the settings below

55.Effects- Plugins - Filters in Unlimited 2.0 - Sapphire Filters 01 -
SapphirePlugin_0090...using the default settings
- Activate Raster 2 in the
layer palette
( tube front door )
56. Effects – Illumination
Effects – Sunburst use the settings below – Color 1

57.Open the tube :
‘’Bel-Ete-2024-Image-3’’
-Editer copier – Edit - Copy- Activate your work -Edit -
Paste as new layer
58. Objects – Align-Top
- Objects -Align – Right
59. Open the tube : ‘’ Bel-Ete-2024-Image-texte.png’’ – Editer copier –
Edit - Copy- Activate your work -Edit - Paste as new
layer
Move the text as you
like
60. Image – Add
Borders-Symmetric checked: 1 Pixel -Color 5
61. Selections –
Select All
62. Image - Add
Borders-Symmetric checked: 45 Pixels -Color 7 (white)
63. Effects – Image Effects
–Seamless Tiling using the default settings
64. Selections - Invert
65. Adjust-Blur- Gaussian
Blur- Radius 26 %
66. Effects- Plugins AAA Frame – Foto Frame
use the settings below


67. Image -
Add
Borders-Symmetric checked: 20 Pixels -Color 2
68. Open the tube
‘’Renee-TUBES-ETE-2024-4.pspimage
- Image - Resize 44 %
- Edit - Copy- Activate
your work -Edit - Paste as new layer
- Place this tube to your
own liking
69. Activer le tube ‘’Renee-TUBES-ETE-2024-10.’’
- Image - Resize
44 %
- Edit - Copy- Activate
your work -Edit - Paste as new layer
70.
Pick
Tool: (K) on your keyboard -Enter these parameters on
the Toolbar
 14 / 539
Press ( M ) to close the
Tool
71.Effects -Plugins - Alien Skin EyeCandy 5 – Impact – Perspective
Shadow -Tab-Settings/User Settings-select my file- Preset ‘’Bel-ete-shadow’’
- Add the author's
watermark to your work and your own watermark
72. Layers- Merge- Merge
All (flatten)
73.
Image-Resize, 1000 pixels width
Save as JPG
I hope you enjoyed this
lesson
Renée
Renée wrote this lesson 22 /04 /2024
and put in place
in 2024
*
Any resemblance to an
existing lesson is purely coincidental.
*
And don't forget to thank the people who work with us
and for us - the tubers and translators!
Thank you
*
|


 Translations


