|
Let's start the lesson.
-
Preparation
- Material Properties: Set your foreground color to color #006d8f = 1 – Set your background color to color #000000= 2

1.
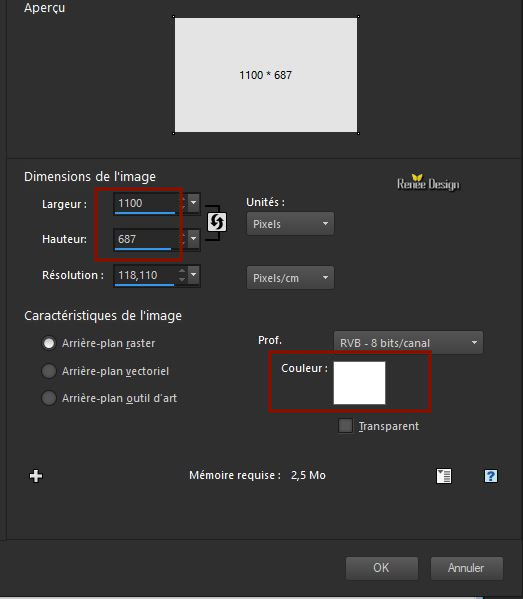
File- Open a New white Image 1100 x 687 – Promote Background Layer
2.
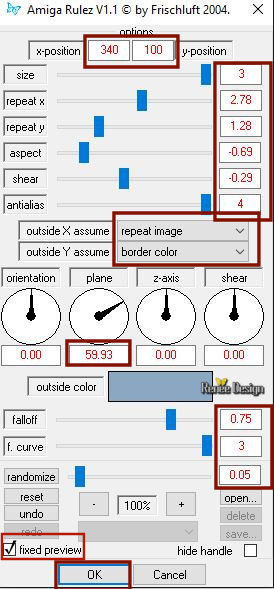
Effects –Plugins – Frishluft – Amiga Rulez use the settings below -
Color #8ba7c1
Attention
:First checked ''fixed preview '' and give the filter time to load before doing ok .Otherwise it will close the psp
3.
Layers- Duplicate
4.
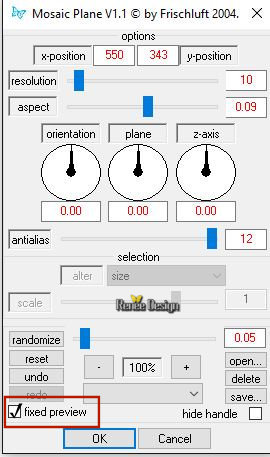
Effects - Plugins– Frishluft- Mosaic plane use the settings below
Same comment for this filter point 2
5.
Image - Mirror - Mirror Vertical ( Image - Flip in previous PSP Versions)
6.
Reduce the opacity of this layer to 53
7.
Effects-Edge Effects- Enhance More
8.
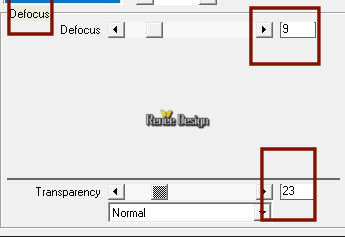
Effects – Plugins – Vanderlee Unplugged X –
Defocus with these settings
9.
Activate the tube ‘’Blanche_image_2’’
-
Edit - Copy- Activate your work -Edit - Paste as a new layer.
10.
Objects - Align- Right
-Set your Foregroundcolor to foreground-background radial gradient configured like this
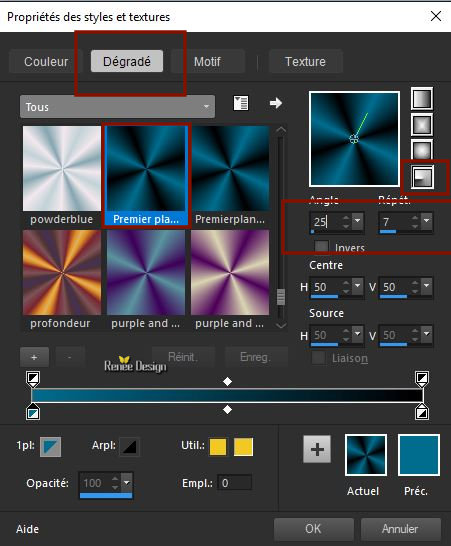
11.
Layers- New Raster Layer
12.
Selections –load/save selection –load selection from disc and select my selection: ’’Blanche_1’’
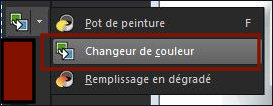
13.
Flood Fill Tool
 Flood Fill the selection with the gradient
Keep Selected
14.
Effects- 3D- Effects- Drop Shadow with these settings: 3/ -4/ 60 /17 black
15.
Effects – Plugins – FM/FF _Energy clouds
use the settings below (attention : patched filter in to the zipfile )
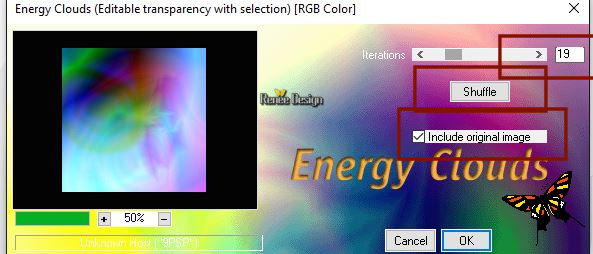
- If your filter does not give the same result/
The effect is included with the material
''enrgy clouds .pspimage''
Paste into selection
16.
Adjust- Blur -Motion Blur with these settings
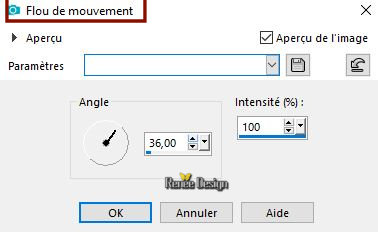
Keep Selected
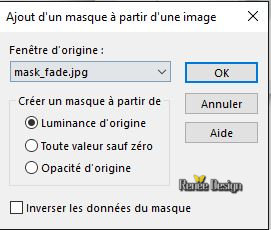
17. Layers- New Mask Layer-From Image and select Mask ''mask_fade''
-
Layers- Merge- Merge Group
Selections- Deselect All
18.
Layers- Duplicate
19.
Image - Resize to 56% all layers not checked
20.
Reduce the opacity of this layer to 79
21. Layers- Duplicate
-
Move as shown as in the example below

22.
Layers- New Raster Layer
23.
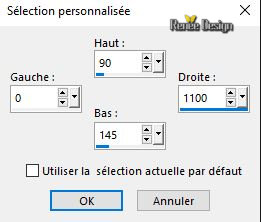
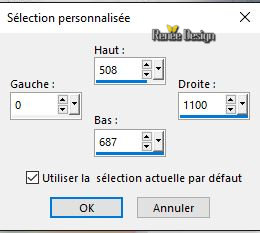
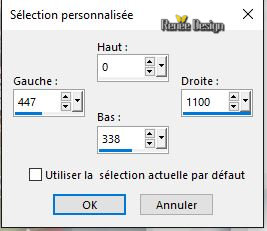
Activate Selection Tool -Custom Selection (S) -Rectangle with these settings
24.Foregroundcolor to: # b9ceb8-Flood Fill Tool
– Opacity to 50 % -Flood Fill the selection with # b9ceb8= 3
Selections Deselect All
25.
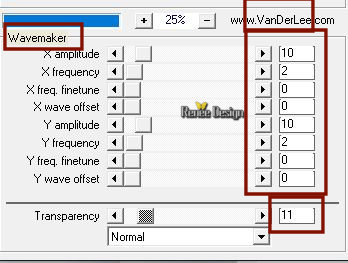
Effects – Plugins– Vanderlee Unplugged X–Wavemaker use the settings below
26.
Effects –Plugins- Eyecandy 5 Impact –
Blacklight –in the settings tab, choose my preset click on the Preset ‘’ Blanche_Blacklight’’
27.
Reduce the opacity of this layer to 72
28.
Activate the tube ‘’Blanche_fleurs’’
-Edit - Copy
-Activate your work
-Edit - paste as a new layer.
29.
Effects – Image Effects – Offset with these settings: H = -22 and V = 172
30.
Effects- Illumination Effects-Sunburst with these settings- Color#203252
- Layerpalette-activate Copy of Raster 1
31.
Activate Selection Tool -Custom Selection (S) -Rectangle with these settings
32.
Selections- Promote Selection to Layer
33.
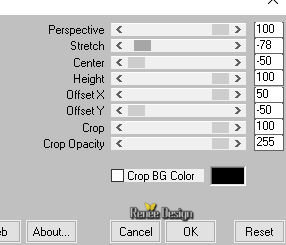
Effects - Plugins- Mura’s Meister – Perspective
Tilling use the settings below
Selections Deselect All
34.
Layers-Properties-Set the Blend Mode to " Darken "
35.
Selections –load/save selection –load selection from disc and select my selection:’’Blanche_2’’
DELETE
 twice on your keyboard twice on your keyboard
Selections Deselect All
- To replace the top of the layer-palette
36.
Layers- New Raster Layer
Set your foreground color to color #b9ceb8 =
3
37.
Flood Fill Tool
Opacity to 100% -
Flood Fill the layer with # b9ceb8= 3
38.
Layers- New Mask Layer-From Image and select Mask ''Narah_mask_Abstarct044''

-
Layers- Merge- Merge Group
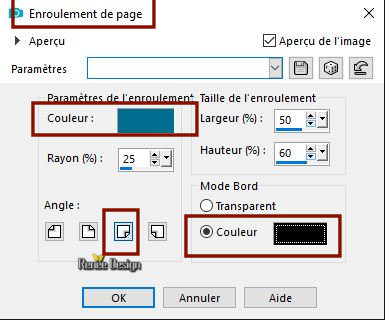
39.
Effects – Image Effects - Page Curl use the settings below
/Color #006d8f=1 and black (Mode Bord)
40.
Layers- New Raster Layer
41.
Selections –load/save selection –load selection from disc and select my selection:’’Blanche_3’’
42.Set your foreground color to color #ffffff-Flood Fill Tool
Flood Fill the selection with #ffffff
Selections Deselect All
43.
Effects – 3 D-Effects – Drop Shadow with these settings: 2/ -2/ 60 / 7 black
44.
Selections –load/save selection –load selection from disc and select my selection:’’Blanche_4’’
DELETE
Selections Deselect All
45.
Layers- New Raster Layer
46.
Effects – Plugins – Dragon fly – Sinedots II use the settings below
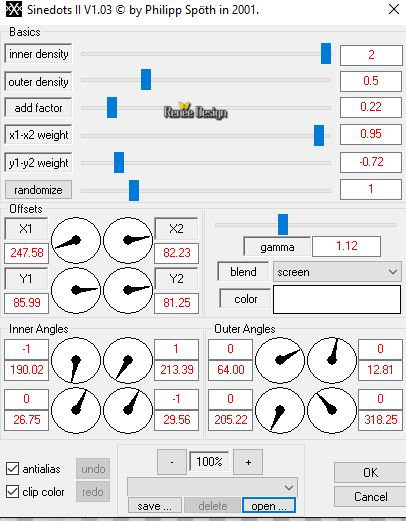
-
Properties foreground: Foregroundcolor to #d0a6c5 = 4
47.
Activate Selection Tool -Custom Selection (S) -Rectangle with these settings
48.
Activate Color Changer Tool
-
Apply one click in the selection
49.
Effects – Distortion Effects – Twirl -Degrees 150
Selections Deselect All
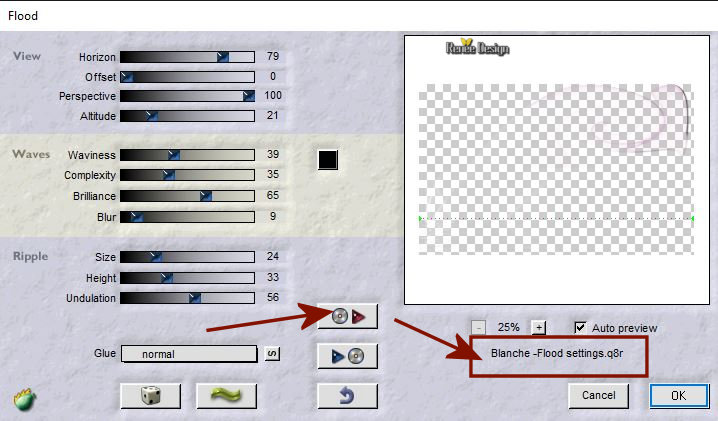
50.
Effects – Plugins - Flaming Pear - Flood –click on the red arrow>>select my file preset
‘’ Blanche-Flood’’can be used in any folder of your choice by clicking it. -3 Open it will be ok in your filter
51.
Effects – 3 D-Effects – Drop Shadow with these settings: 0/0/40/1 black
-
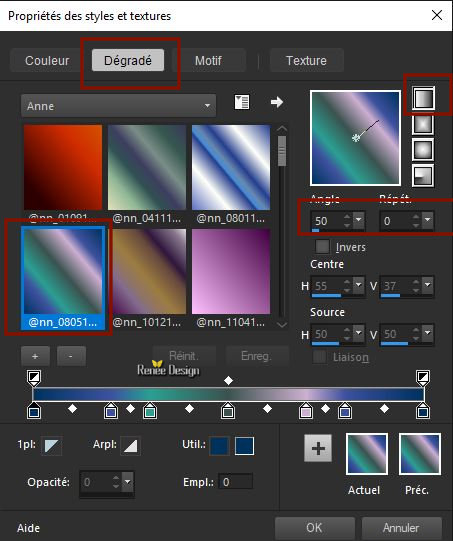
Properties foreground: - Change foreground material into gradient and select : -‘’@nn_080513_GR_130_tdstudiomode ‘’
Prepare a linear gradient configured like this
52.
Layers- New Raster Layer
53.
Selections –load/save selection –load selection from disc and select my selection: ’’Blanche_5’’
54.
Flood Fill Tool(F)
Flood Fill the selection with the gradient
55. Adjust-Blur- Gaussian Blur: Radius 10
56.
Effects –Plugins- Unlimited 2.0 – Déformation – Stars : 255/40
57.
Effects – Distortion Effects – Twirl -Degrees 193
Selections Deselect All
58.
Activate the tube ‘’Blanche_Tube_femme.pspimage’’
-
Edit - Copy- Activate your work -Edit - Paste as a new layer.
59.
Effects – Image Effects – Offset with these settings: H = - 255 and V = 38
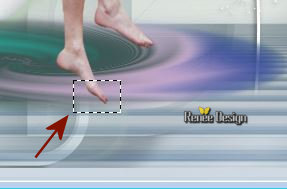
60. Activate Selection Tool (S) -Rectangle
-
Select this part as shown in the example
61.
Adjust- Blur- Gaussian Blur: Radius 10
Selections Deselect All
60.
Activate the tube ‘’Blanche_cadre ‘’
-
Edit - Copy- Activate your work -Edit - Paste as a new layer.
61.
Effects – Image Effects – Offset with the same settings
62.
Layers Duplicate
63.
Effects –Plugins- Unlimited 2.0 - &<Background Designers IV>- @SF!0
RainbowGround
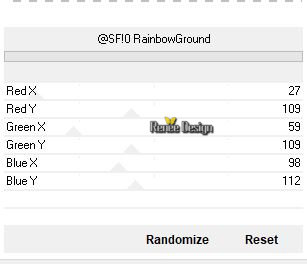
64.
Layers-Properties-Set the Blend Mode to " Hard Light "
65.
Layers- New Raster Layer
66.
Selections –load/save selection –load selection from disc and select my selection:’’Blanche_6’’
67. Set your foreground color to color #ffffff- Flood Fill Tool
–
Flood Fill the selection with #ffffff
68.
Effects- Texture Effects-Blinds use the settings below / Color#006d8f 1
Selections Deselect All
69.
Activate the tube ‘’ Blanche_coeurs’’ and ‘’Blanche_oiseau_nuage’’/
Edit - Copy- Activate your work -Edit - Paste as a new layer and move
70.
Write your sentence or paste in place my sentence
71.
Layers- Merge- Merge Visible
-
View - Toolbars - Script checked in your Psp!!
Activate toolbar Script, choose my file in the list’’ Blanche_renee’’
Click the little blue arrow and let the script run

72.
Or manual settings as below
Image - Add borders-Symmetric checked 1 pixel color # black =2
Image - Add borders-Symmetric checked 3 pixels color #e8e3e0=5
Image - Add borders-Symmetric checked 1 pixel color #006d8f =1
Image - Add borders-Symmetric checked 25 pixels color #e8e3e0=5
Image - Add borders-Symmetric checked 1 pixel color #d0a6c5=4
Image - Add borders-Symmetric checked 25 pixels color #e8e3e0=5
73.
Activate the tube "Titre Blance "/Edit/copy-Edit paste as a new layer on your working area / Ore write your own text
74.
Layers- Merge- Merge All ( flatten)
75.
Image - Resize to 1005 Pixels Width.
Save as JPG
I hope you enjoyed this lesson
Renée
This lesson was written by Renée 15 January 2019
Edited and Update
2019
*
Any resemblance with an existing lesson is a coincidence
* Do not forget to thank the people who work with us and for us I have appointed the tubeurs and translators
Thanks
*
|


 Translations


 If a plugin supplied appears with this icon it must necessarily be imported into Unlimited


