|

Let's start the lesson
Bonne Année 2025
Happy New Year 2025
- Preparation
- Material Properties: Set your foreground color to color No. 1 – Set your background color to color No.2

1. Open the background image ‘’Renee-BA-2025-Fond’’
– Promote background layer = Raster 1
2. Adjust - Blur - Motion Blur with these settings
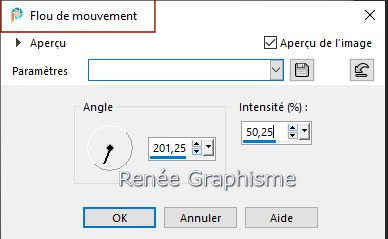
3. Effects –Plugins – Simple – Diamonds
4. Layers- Duplicate
5. Effects -Plugins - Filters in Unlimited 2.0 - Alf's Power Toys
-Mirror Offset: 128/128
6. Effects – Edge Effects- Enhance
7. Effects -Plugins - Filters in Unlimited 2.0 -CPK Designs – Mirror
8. Layers-Properties-Set the Blend Mode to Overlay
9. Effects –Plugins – Simple – Left Right Wrap
10. Effects -Plugins - Filters in Unlimited 2.0 - Distortion Filters
- Scanline Shifter : 198/ 14
11. Layers- New Raster Layer
12. Selections –load/save selection –load selection from disc and select my selection: ‘’BA-2025-1’’
13. Set your Foreground color to color White
Activate Flood Fill Tool  –
Flood fill the selection with color White –
Flood fill the selection with color White

14. Effects -Plugins - Filters in Unlimited 2.0 -Two Moon -
Rip'n'Burn... Angle =0
15. Layers-Properties-Set the Blend Mode to Overlay
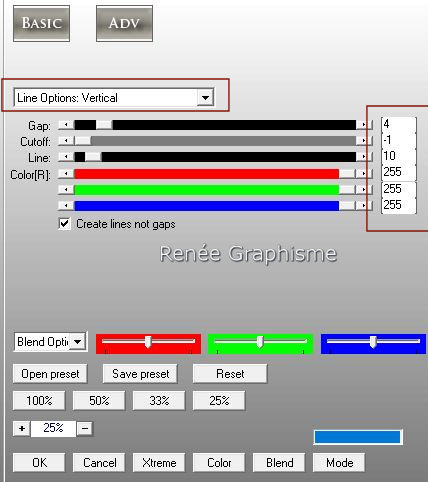
16. Effects -Plugins - AP[Lines] Lines – Silverlining use the settings below
17. Effects – 3D-Effects- Drop Shadow with these settings: 2/2/85/52 Color Black
- Material Properties: Set your foreground color to color No. 1 – Your background remains at color No. 2
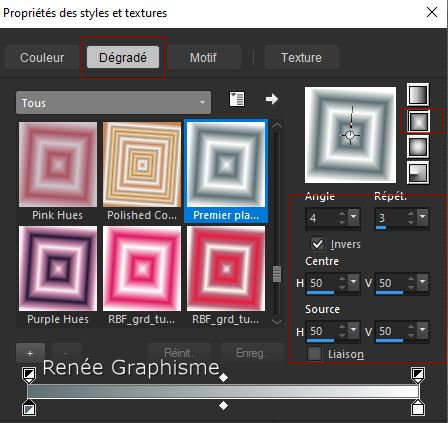
- Replace your foreground color with a rectangular foreground/background gradient configured like this
18. Layers- New Raster Layer
19. Activate Flood Fill Tool
 –
Flood fill the layer with the gradient –
Flood fill the layer with the gradient
20. Activate the tube ‘’
Renee-TUBES-BA2025-Femme’’
- Edit -Copy- Activate your work -Edit - Paste as new layer
21. Effects- Image Effects- Seamless Tiling -Side by side
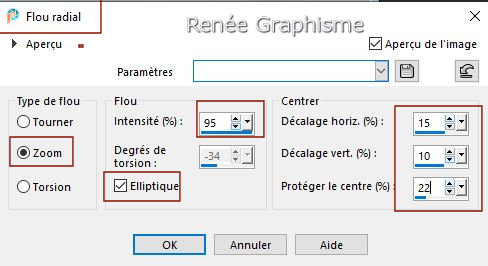
22. Adjust-Blur- Radial Blur with these settings
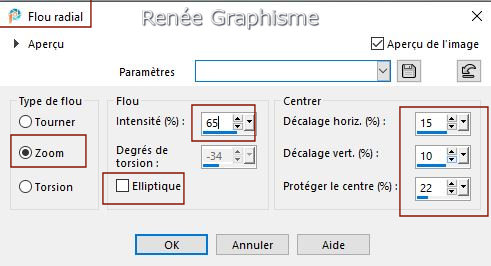
- Adjust-Blur- Radial Blur with these settings
23. Effects –Plugins – FM TileTools – Saturation Emboss using the default settings
24. Layers-Merge- Merge Down
25. Effects -Plugins - Filters in Unlimited 2.0 -VM Distorsion –
Vision Impossible with these settings : 35/72/35/34/142/183
-On the same layer
26. Selections –load/save selection –load selection from disc and select my selection: ‘’BA-2025-2’’
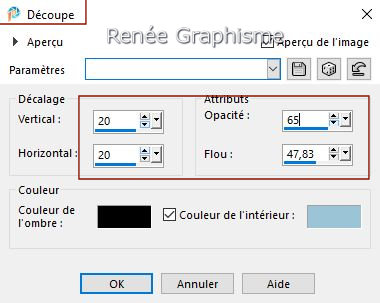
27. Effects-3D-Effects Cutout use the settings below -Colors-Black and #9bc5d7
28. Selections- Modify-Contract 10 Pixels
29. Effects -Plugins - Filters in Unlimited 2.0 - Tramages – Tow The
Line using the default settings
30.
Effects – 3D-Effects- Drop Shadow with the same settings

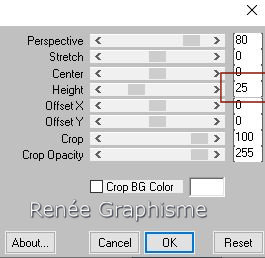
31. Effects –Plugins – Mura’s Meister – Perspective Tiling use the settings below
32. Layers- Duplicate
33. Effects- Image Effects- Seamless Tiling -Side by side
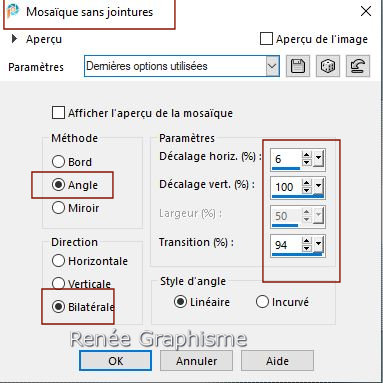
34. Layers-Properties-Set the Blend Mode to Hard Light
35. Layers-Merge- Merge Down
36. Selections –load/save selection –load selection from disc and select my selection: ‘’BA-2025-3’’
37. Adjust- Blur-Gaussian Blur-Radius 8%
38. Effects -Plugins -Filters in Unlimited 2.0 - [AFS IMPORT]
-sqborder2 using the default settings

39. Activate the tube ‘’Renee-Tubes-BA2025-Lune’’ - Edit - Copy- Activate your work -Edit - Paste as new layer
40.
Objects – Align – Top
41.
Objects - Align - Right ( Can be moved up slightly)
42. Adjust- Sharpness-Sharpen
-Activate Copy of Raster 1 in the Layers palette
43. Activate the tube ‘’Renee-Tubes-BA2025-Ballons’’ - Edit - Copy- Activate your work -Edit - Paste as new layer
44. Pick Tool: (K) on your keyboard -Enter these parameters on the toolbar
 -
53 /0 -
53 /0
Press the ( M ) button to close the tool.
- Activate the top of the Layers palette
45. Layers- New Raster Layer
46. Selections –load/save selection –load selection from disc and select my selection: ‘’BA-2025-5’’
- Prepare your Material palette as below :Click on the pattern and select ’’Patry- Back27" use the settings below
(Copy your pattern into the patterns folder of your psp )
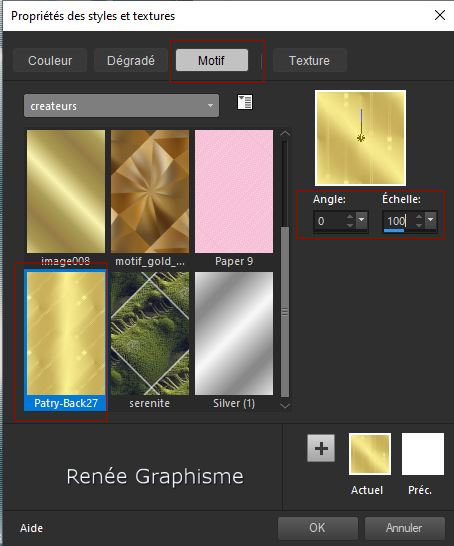
47. Activate Flood Fill Tool
 –
Flood fill the selection with your pattern –
Flood fill the selection with your pattern

48. Effects – 3D-Effects- Drop Shadow with these settings: 1/1/100/1 Color Black
49. Reduce the opacity of this layer to 51%
50.
Activate the tube "Renee-Tubes-BA2025-Horloge.pspimage"
51. Edit - Copy- Activate your work -Edit - Paste as new layer
52. Objects – Align - Top
53. Activate the tube ‘’Renee-TUBES-BA2025-Femme-pour-tuto-BA2025’’ -Edit - Copy- Activate your work -Edit - Paste as new layer
54. Pick Tool: (K) on your keyboard -Enter these parameters on the toolbar
 -
13 /203 -
13 /203
Press the ( M ) button to close the tool.
55. Selections –load/save selection –load selection from disc and select my selection: ‘’BA-2025-4’’
56. Layers- New Raster Layer
57. Activate Flood Fill Tool
 –
Flood fill the selection with the pattern –
Flood fill the selection with the pattern
58. Adjust- Blur-Gaussian Blur-Radius 40%
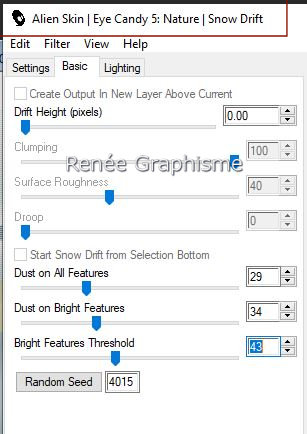
59. Effects -Plugins - Alien Skin EyeCandy 5 – Nature – Snow Drift use the settings below

60. Activate the tube ‘’Renee-Tubes-BA2025-nuage’’ - Edit - Copy- Activate your work -Edit - Paste as new layer
- Place it on the woman's head
61. Activate the tube ‘’Renee-Tubes-BA2025-date’’
- Select one of the 2 tubes –
Edit - Copy- Activate your work -Edit - Paste as new layer ( see finished image )
62. Activate the tube ‘’Renee-Tubes-BA2025-Livre’’ - Edit - Copy- Activate your work -Edit - Paste as new layer
-Move to the bottom right ( see finished image)
63.
Activate the tube ‘’Renee-Tubes-BA2025-vœux’’ - Edit - Copy- Activate your work -Edit - Paste as new layer
- Move the tube in the right place
64. Image - Add Borders-Symmetric checked: 1 Pixel- Color No.1
-Image - Add Borders-Symmetric checked: 25 Pixels - Color White
-Image - Add Borders-Symmetric checked: 2 Pixels - Color No. 3
-Image - Add Borders-Symmetric checked: 40 Pixels - Color White
65. Open the tube ''calque BA-2025-Renee-DECO'' - Edit - Copy- Activate your work -Edit - Paste as new layer
Move the tube to the upper left corner (see finished image)
66. Add the author's watermark to your work and your own watermark
67.
Layers- Merge- Merge All (flatten)
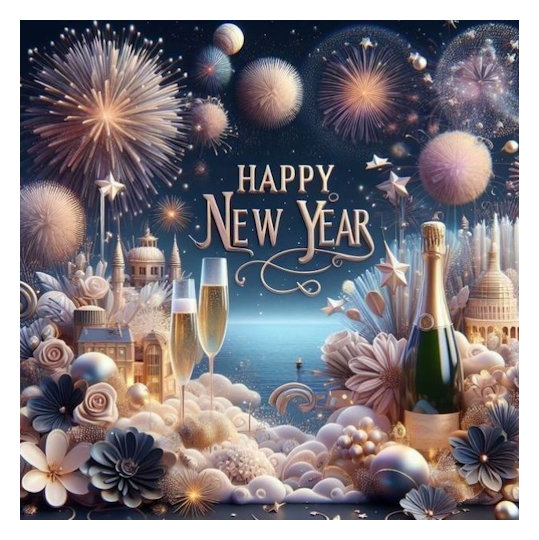
68.Layers - Resize to 1005 pixel width -Resize all layers checked
Save as JPG
I hope you enjoyed this lesson
Renée
This lesson was written by Renée 11/11/2024
Edited and Update
in 2024
*
* Any resemblance to an existing lesson is purely coincidental.
* Don't forget to thank the people who work with us and for us - the testers and translators
Thanks
*
|


 Translations


