|
Let's start the lesson


- Preparation
- Material Properties: Set your foreground color to color #679587= 1 – Set your background color to color #043859= 2

1. Open the Background Image –
Fond-Nouvel-An-2022- Promote Background Layer =Raster 1
2. Layers- New Raster Layer
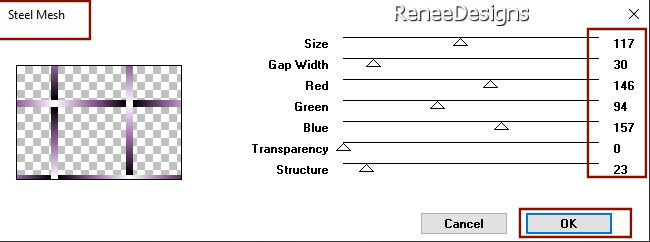
3. Effects – Plugins – VM Instant Art- Steel Mesh use the settings below
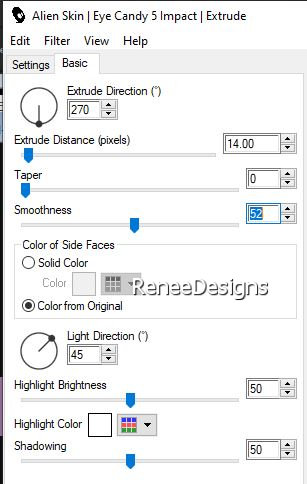
4. Effects – Plugins – Alien Skin EyeCandy 5 Impact – Extrude use the settings below
5. Effects – Plugins – Mura’s Meister – Perspective Tiling using the default settings
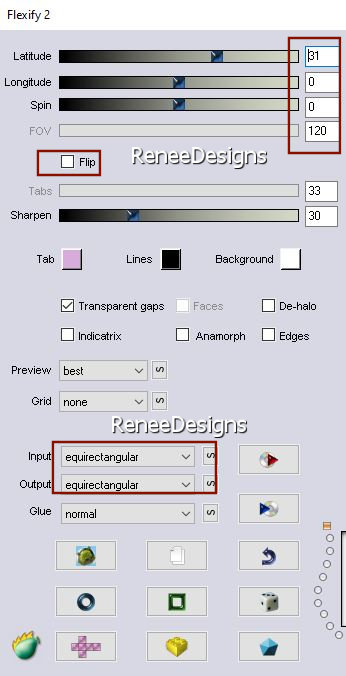
6. Effects – Plugins – Flaming Pear – Flexify 2 use the settings below
7. Objects – Align
- Bottom
8. Select Tool (K) - Scale Mode
9. Press the middle node from top to bottom to 550 Pixels
10. Layers-Properties-Change the Blend Mode to " Overlay "
-Activate the bottom of the Layer Palette= Raster 1
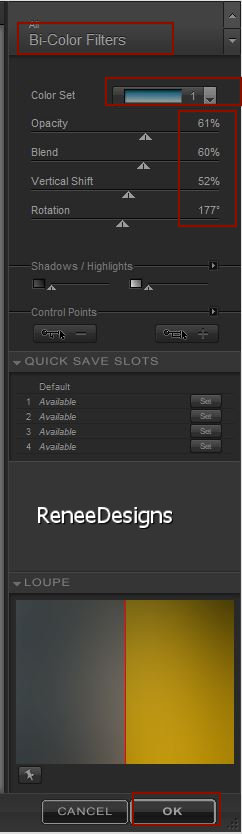
11. Effects -Plugins - Nick Softwar Color Effex Pro.3 0- Bi-Color
Filters /Color set : Cool Warm 1 use the settings below
- To replace the Top of the Layer-Palette
12. Open the Tube ‘’ BA-2022-Image 1’’ -Edit - Copy- Activate your work -Edit - Paste as a new layer
13. Objects- Align-
Bottom
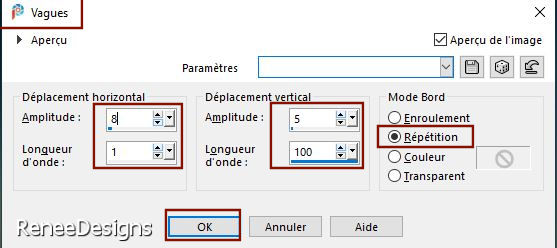
14. Effects - Distortion Effects –Wave use the settings below
15. Selections –load/save selection –load selection from disc and select my selection: ‘’BA-2022-1’’
 Click 4 to 5 times
Selection remains active
16. Effects- 3 D-Effects-Drop Shadow with these settings: -13/10/80/50 Color Black
17. Layers- New Raster Layer
18. Effects- 3 D-Effects-Drop Shadow with these settings: -18/13/35/0 Color Black

19. Layers-Properties-Change the Blend Mode to " Dissolve "
20. Image – Negative Image
21. Pick Tool: (K) on your keyboard -Stretch slightly against the left edge
22. Layers- New Raster Layer
23. Selections –load/save selection –load selection from disc and select my selection: ‘’BA-2022-2’’
24. Activate Flood Fill Tool
 –
Fill the selection with the Foreground color =5 –
Fill the selection with the Foreground color =5
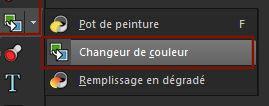
25.Activate Tool - Color Changer
- Place a Foreground color of your choice
-With Selection Tool or Lasso (Freehand Selection Tool) - select balls and change the color to your liking (repeat if desired)
26. Layers- New Raster Layer
27. Selections –load/save selection –load selection from disc and select my selection: ‘’BA-2022-3’’
28. Material Palette: Change Foreground color into color #ffffff=5
Activate Flood Fill Tool
–
Fill the selection with the Foreground color =5
29. Effects- 3 D-Effects-Drop Shadow with these settings: 1/1/80/1 Color Black
30. Layers- New Raster Layer
31. Selections –load/save selection –load selection from disc and select my selection: ‘’BA-2022-4’’
32. Activate Flood Fill Tool
–
Opacity
60%
– Fill the selection with the Foreground color =5
Flood Fill Tool back to 100% on the Toolbar
33. Effects –Plugins-
Unlimited 2.0 - &<Sandflower Specials°v° > -Color
Gradiant using the default settings
34. Effects - Edge Effects- Enhance
35. Open the Tube ‘’BA-2022-Image 2’’ -Edit - Copy- Activate your work -Edit - Paste as a new layer
- Place on the left side of the tree
36. Open the Tube ‘’BA-2022-Image 3’’ -Edit - Copy- Activate your work -Edit - Paste as a new layer
37. Objects - Align -
Top (with the K key - Pull this edge down slightly so that it does NOT touch the top edge)
38. Open the Tube ‘’BA-2022-Image 4’’(remove my watermark) -Edit - Copy- Activate your work -Edit - Paste as a new layer
39. Pick Tool: (K) on your keyboard -Enter these parameters on the toolbar
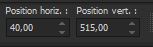 40/
515 40/
515
- Press ( M ) to close the Pick Tool
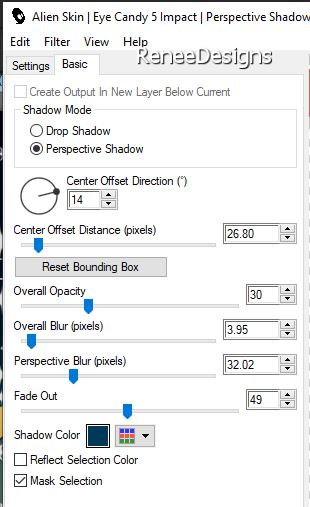
40. Effects –Plugins- Alien Skin EyeCandy 5 Impact- Perspective
Shadow use the settings below
41. Layers- New Raster Layer
42. Selections –load/save selection –load selection from disc and select my selection: ‘’BA-2022-5’’
43. Activate Flood Fill Tool
–
Opacity 100% – Fill the selection with the Foreground color=5
Not required - but if you want to select letters and change the color, do it as in point 25
44. Effects- 3 D-Effects-Drop Shadow with these settings: 1/1/801 Color Black
Repeat:Effects- 3 D-Effects-Drop Shadow with the same settings
45. Open the Tube ‘’ BA2022- Image
–Calendrier’’ -Edit - Copy- Activate your work -Edit - Paste as a new layer
- Place in the right place (see finished image )
46. Effects –Plugins - Alien Skin EyeCandy 5 Impact- Perspective
Shadow with the same settings
47. Open the Tube ‘’BA-2022-Image
Village’’ -Edit - Copy- Activate your work -Edit - Paste as a new layer
- Place in the top right corner ( see finished image)
- Leave Blend Mode in " Overlay "
48. Open the Tube ‘’ Titre-HappyNY’’ -Edit - Copy- Activate your work -Edit - Paste as a new layer
Place according to your taste
Renée chose Blend Mode to Overlay
49.Image - Add borders-Symmetric checked: 2 Pixels - Color No 2
50.Image - Add borders-Symmetric checked: 1 Pixels - Color No 3
51.Image - Add borders-Symmetric checked: 20 Pixels - Color No 5
52. Selections –
Deselect All
53.Image - Add borders-Symmetric checked: 2 Pixels - Color No 2
54.Image - Add borders-Symmetric checked: 1Pixels - Color No 3
55.Image - Add borders-Symmetric checked: 45 Pixels - Color No 5
56. Effects- 3 D-Effects-Drop Shadow with these settings: 0/0/100/40 Color Black
57. Selections -
Deselect All
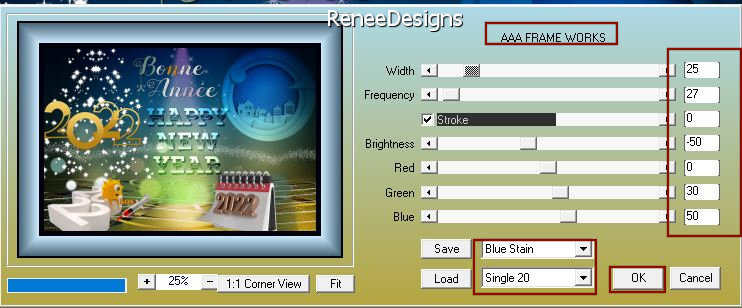
58. Effects – Plugins - AAA Frame Works use the settings below
59. Paste the author's watermark on your work and your own watermark
Layers-Merge-Merge All ( flatten)
Image - Resize - 1105 Pixels Width
-Save as JPG
I wish you all a happy New Year
That's it - Thank you / I hope you enjoyed this lesson
Renée
This lesson was written by Renée
27/10/2021
Edited and Update
in 2021
*
*Any resemblance with an existing lesson is a coincidence
* Do not forget to thank the people who work with us and for us
-I have appointed the tubeurs and translators
Thanks
*
|


 Translations