|
Let's start the lesson
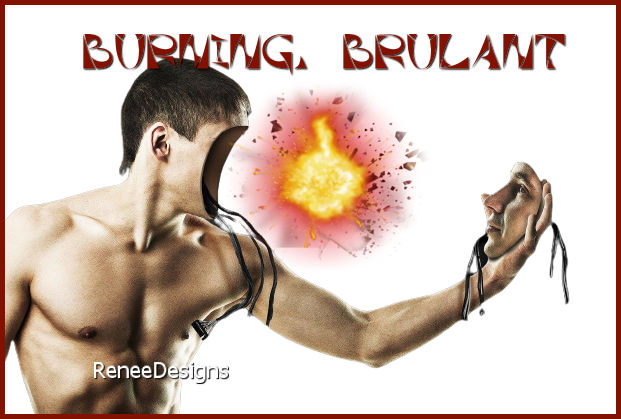
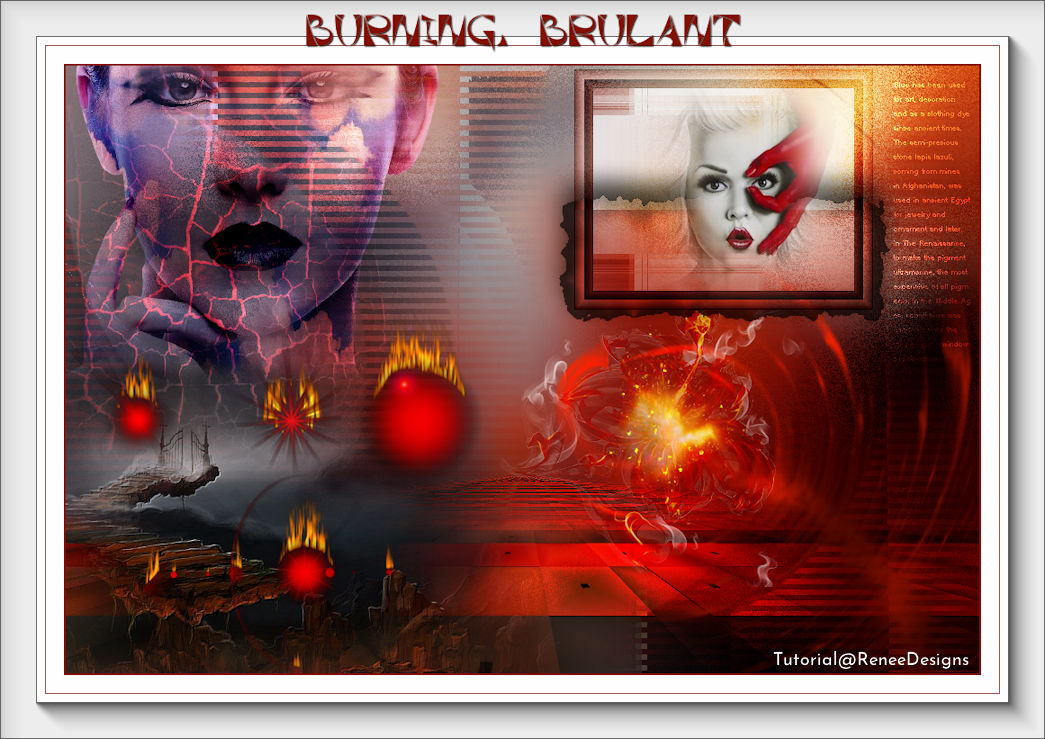
Burning- Brulant
- Preparation
-Material Properties: Set your foreground color to color #831100 =1 - Set your background color to color #dddddd = 2

1. Open the Background Image ‘’Fond-
Burning- Brulant’’- Promote Background Layer =Raster 1
2. Adjust- Blur-Gaussian Blur-Radius 15%
3. Effects –Plugins
Unlimited 2.0- ICNET-Filters- Noise Filters – Noizy
Zoom with these settings: 61/19
4. Activate Selection Tool -Custom Selection (S) -Rectangle with these settings 
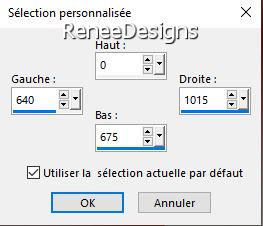
5. Selections- Promote Selection to Layer
6. Effects –Plugins-
Unlimited 2.0- &<Bkg Designer sf10 I>- ALFs Border
Mirror Bevel with these settings: 46 /64
7. Repeat / Effects
–Plugins- Unlimited 2.0- &<Bkg Designer sf10 I>- ALFs Border
Mirror Bevel with these settings:154/64

8. Effects-Plugins Unlimited
– ICNET-Filter - Special Effects 1 – Shiver with these settings: 105/0
9. Effects –Plugins-
Unlimited 2.0 – Scribe – Doughnutz with these settings: 68
10. Activate your Magic Wand /Tolerance 0 and Feather 5
- Click in the gray area as shown in the example below
 (5 times)
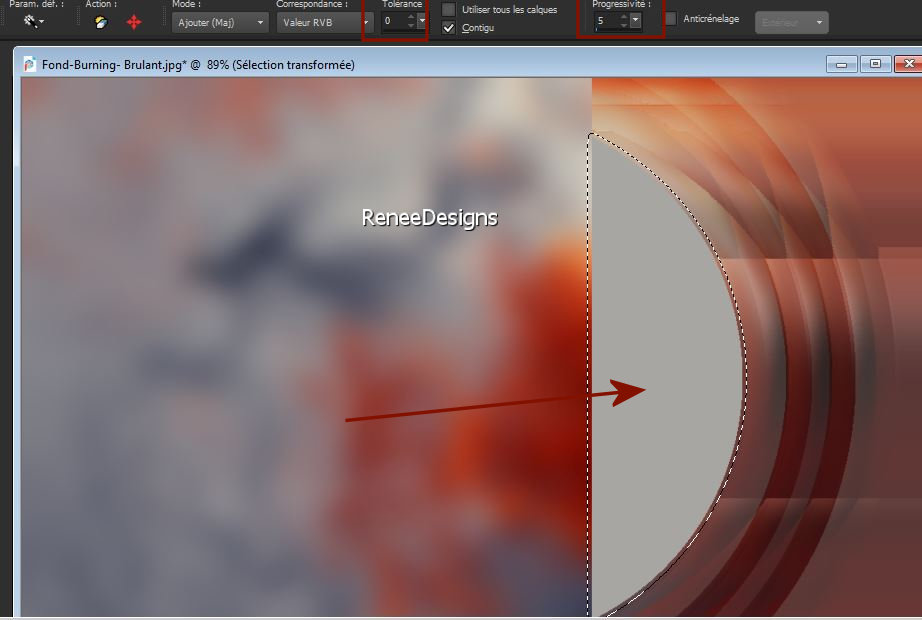

11. Effects - Plugins- Alien Skin EyeCandy 5 - Impact – Perspective
Shadow use the settings below

12. Effects- Image Effects-Seamless Tiling -Side by side
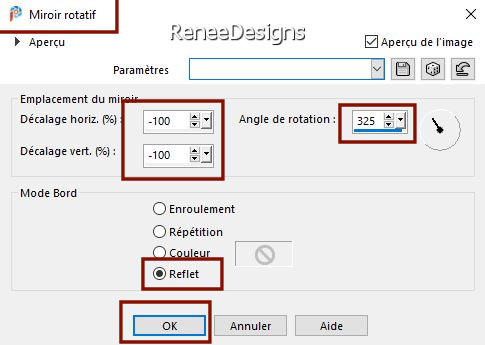
13. Effects – Reflection Effects – Rotating Mirror
14. Effects –Plugins
Unlimited 2.0 - Crescent Moon - FadeOut..using the default settings
15. Effects – Plugins– Carolaine & Sensibilty- CS-Linear – H with these settings:
30/25/0
16. Layers-Properties-Set the Blend Mode to " Hard Light "-Lower the Opacity to 89%
17. Open the Tube ‘’ Tube-Burning-Image1’’ -Edit - Copy- Activate your work -Edit-Paste as a new layer
18. Pick Tool: (K) on your keyboard -Enter these parameters on the toolbar
 -
295/ -142 -
295/ -142
Press ( M ) to close the Pick Tool
- The blend mode on "Overlay" and layer opacity 67% remain unchanged
19. Open the Tube ‘’Tube-Burning-Image2’’ -Edit - Copy- Activate your work -Edit-Paste as a new layer
20 Pick Tool: (K) on your keyboard -Enter these parameters on the toolbar
 -29/
0 -29/
0
Press ( M ) to close the Pick Tool -
21. Layers-Properties-Set the Blend Mode to " Overlay "
22. Open the Tube ‘’Tube-Burning-Image3’’ -Edit - Copy- Activate your work -Edit-Paste as a new layer
23. Objects –
Align- Bottom
24. Effects-Plugins-
Unlimited 2.0 - It@lian Editors Effect – Mosaico with these settings:
135/52/127
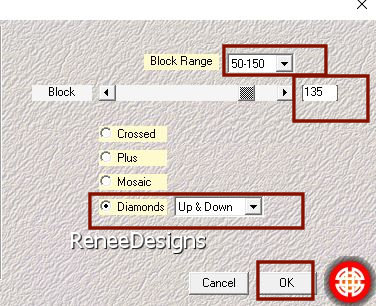
25. Effects - Plugins – Medhi – Sorting Tiles use the settings below
26. Effects-Plugins-Unlimited 2.0 -
&<Background Designers IV>- @Night Shadow using the default settings
27. Effects – Plugins-Mura’s
Meister – Perspective Tiling using the default settings
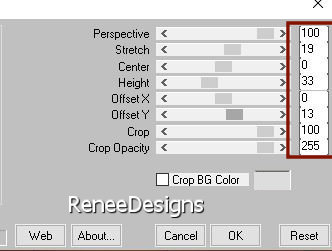
28. Selections –load/save selection –load selection from disc and select my selection: ‘Burning-1’’
 2 times
DON'T DESELECT
29. Adjust- Blur- Radial Blur use the settings below
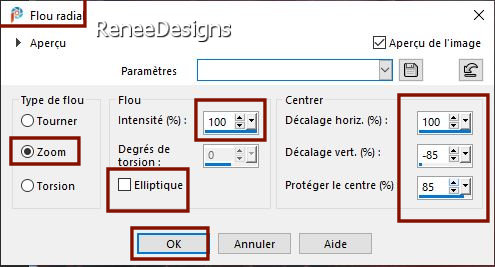
30. Effects –Plugins-
Unlimited 2.0 - Simple – Top Left Mirror
31. Effects – Reflection Effects – Feedback with these settings
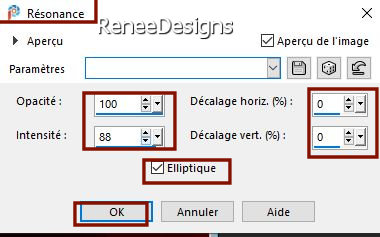
32. Effects -Edge Effects – Enhance
33. Layers-Properties-Change the Blend Mode to " Overlay "

34. Layers- New Raster Layer
35. Activate Flood Fill Tool
 -
Fill the layer with the foreground color #831100= 1 -
Fill the layer with the foreground color #831100= 1
36. Layers- New Mask Layer-From Image and select mask
‘’Narah_mask_0184’’
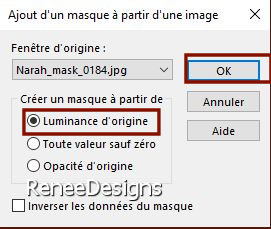
- Layers- Duplicate
- Layers- Merge- Merge Group
37. Effects- Plugins - MuRa’s Meister – Pole Transform use the settings below
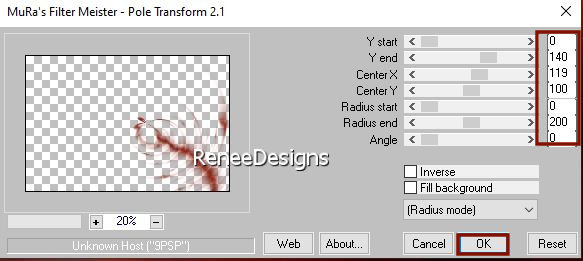
38. Effects –Plugins-
Unlimited 2.0 – Graphic Plus – Cross Shadow use the settings below

39. Open the Tube ‘’Tube-Burning-Image4.’’ -Edit - Copy- Activate your work -Edit-Paste as a new layer
40. Pick Tool: (K) on your keyboard -Enter these parameters on the toolbar
 482/
262 482/
262
Press ( M ) to close the Pick Tool
41. Layers-Properties-Set the Blend Mode to " Hard Light "-Lower the Opacity to 75%
42. Open the Tube ‘’Tube-Burning-Image
5’’ -Edit - Copy- Activate your work -Edit-Paste as a new layer
43. Pick Tool: (K) on your keyboard -Enter these parameters on the toolbar
 -18/ 295
Press ( M ) to close the Pick Tool
44. Effects - Plugins - EyeCandy 7 – Fire
If the filter does not work or you do not have this filter, there is an image "Tube-Burning-Image 5-avec-effet-flame" in the folder. Then paste this image as a new layer and move it.
- I added a preset for the Eyecandy5 Nature filter," Preset effet flamme eye candy 5" which gives a similar effect
In case you have the filter Effects-Plugins-EyeCandy 7-Fire use the settings below
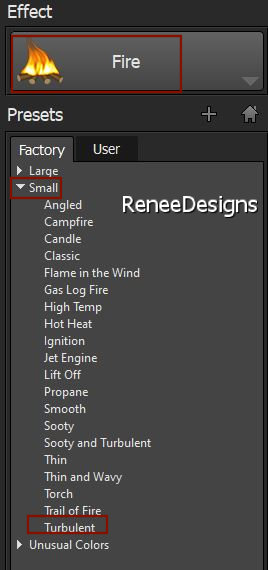 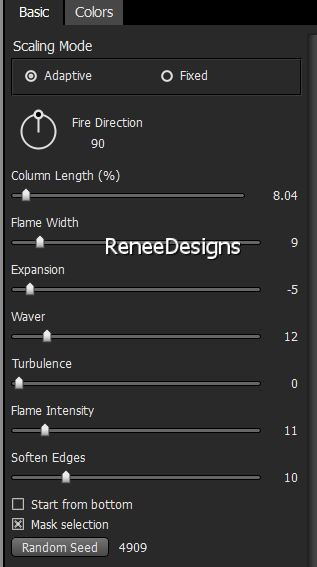
45. Open the Tube ‘’Tube-Burning-Image
6’’ -Edit - Copy- Activate your work -Edit-Paste as a new layer
46. Pick Tool: (K) on your keyboard -Enter these parameters on the toolbar
 -138/358 -138/358
Press ( M ) to close the Pick Tool
47. Layers-Arrange-Move Down
48. Effects –Plugins- FMTile
Tools- Blend Emboss using the default settings
- To replace the top of the Layer-Palette
49. Open the Tube ‘’Tube-Burning-Image
7’’ (texte) -Edit - Copy- Activate your work -Edit-Paste as a new layer
50. Objects –Align
– Right-Objects –Align – Top
- Color Palette: Set your foreground color to color #ffffff=3 – Set your background color to color #831100=1
51. Layers- New Raster Layer
52. Activate Selection Tool -Custom Selection (S) -Rectangle with these settings
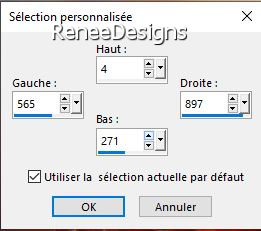
53. Activate Flood Fill Tool
 –
Opacity at 50% -Fill the selection with color #ffffff=3 (Reset the paint pot to 100%.) –
Opacity at 50% -Fill the selection with color #ffffff=3 (Reset the paint pot to 100%.)
54. Effects – Texture Effects – Weave use the settings below-Color #831100=1

55. Effects –
Plugins-Unlimited 2.0 - &<BKg Designer sf10 II>- Hinzeberg's
Mirror 01 with these settings: 14
56. Effects –Plugins-
Unlimited 2.0 &<Bkg Designer sf10 I> - Cruncher with these settings: 6/6
57. Layers-Properties-Change the Blend Mode to " Overlay "
58. Effects – Plugins – AAAFrame – Frame work use the settings below
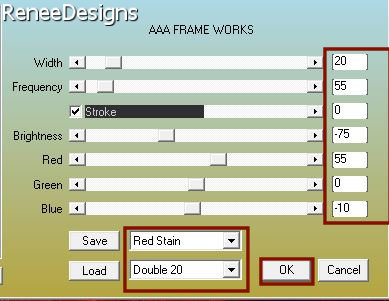

59. Layers- Duplicate
-Color Palette-The foreground color stays at color # ffffff=3 –The background stays at color #831100=1
60. Selections –load/save selection –load selection from disc and select my selection: ‘Burning-2’’
61. Effects –Plugins- Alien Skin Xenofex 2 –Burnt
Edges use the settings below (
change effect to your taste )
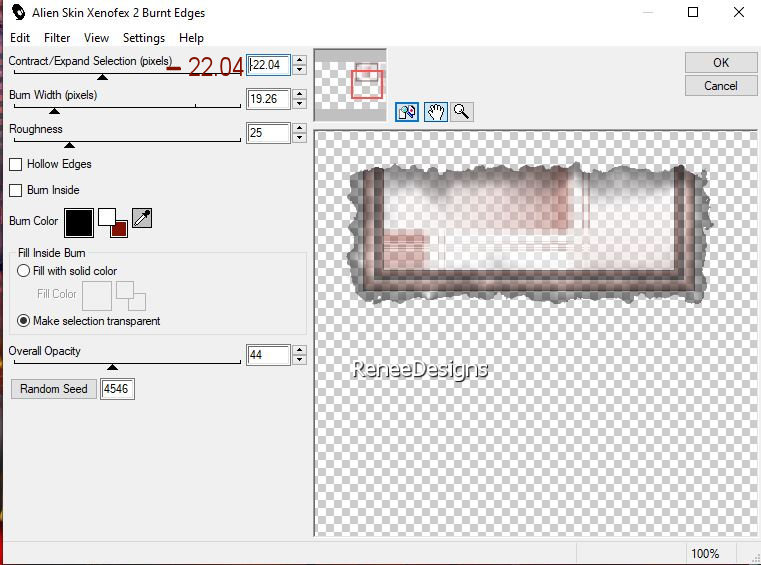
62. Layers-Properties-Set the Blend Mode to " Hard Light"
-Activate the layer underneath


63. Effects- 3 D-Effects-Drop Shadow with these settings: – 14/ 1 /82 /40 Color Black
64. Open the Tube
– ‘’Renee-TUBES-Decembre-48.pspimage’’ Image-
Resize with 40 %
-Edit - Copy- Activate your work -Edit-Paste as a new layer
- Move it in the right place( see finished image)
65. Open the Tube ‘’ Tube-Burning-Image
8’’ -Edit - Copy- Activate your work -Edit-Paste as a new layer
Place to your liking
66. Layers- Merge- Merge Visible
Image - Add borders-Symmetric checked: 2 Pixels Color #831100=1
Image - Add borders-Symmetric checked: 20 Pixels Color #ffffff=3
Image - Add borders-Symmetric checked:1 Pixel Color #831100=1
Image - Add borders-Symmetric checked: 50 Pixels Color #ffffff=3
67. Effects- Plugins - AAA Fame Foto use the settings below
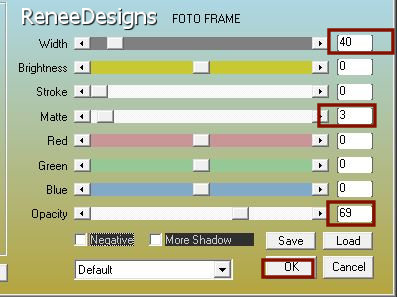
68. Open the Tube "titre
" -Edit - Copy- Activate your work -Edit - Paste as a new layer-
Place at the top of your work
69. Paste the author's watermark on your work and your own watermark
Layers-Merge-Merge All ( flatten)
70.
Image - Resize - 90% -Resize all layers checked
-Save as JPG

That's it - Thank you / I hope you enjoyed this lesson
Renée
This lesson was written by Renée 18/11/2021
Edited and Update
in 2021
*
*Any resemblance with an existing lesson is a coincidence
*
Do not forget to thank the people who work with us and for us
-I have appointed the tubeurs and translators
Thanks
*
|
 Translations


 (5 times)


