|
Let's start the lesson


-Preparation
-Material Properties: Set your Foreground color to color #721a22=color 1 – Set your Background color to color #e5c394=color 2

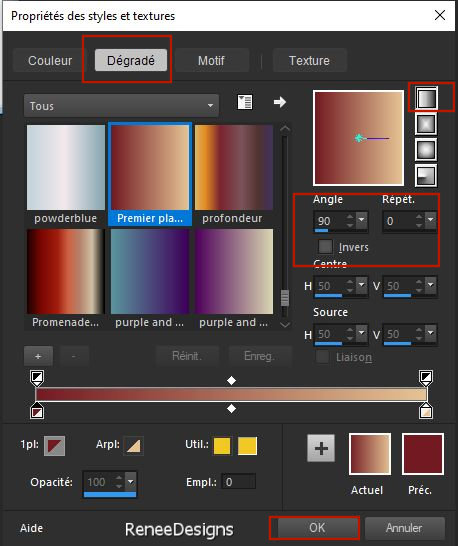
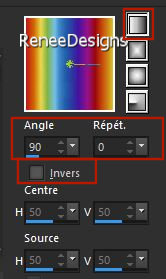
- Properties Foreground- Prepare a Foreground/Background linear Gradient configured like this
1. File: Open a transparent image in this size 1050 x 800 Pixels
2. Flood Fill Tool
 –
Fill the layer with the gradient –
Fill the layer with the gradient
3. Effects– Distortion Effects – Pixelate use the settings below

4. Effects – Edge Effects
– Enhance
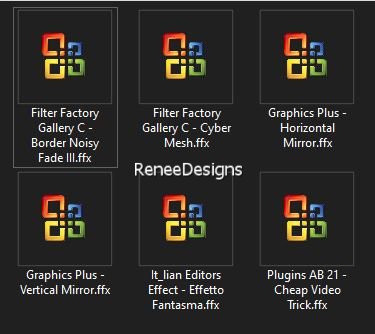
5. Effects – Plugins – Simple- Diamonds
6. Effects – Plugins– Simple – Top left Mirror
7. Effets – Edge Effects – Enhance
8. Layers- New Raster Layer
9. Flood Fill Tool
–
Fill the layer with the gradient
10. Effects – Plugins – Simple- Diamonds
11. Layers-Properties - Reduce the Opacity of this layer to 48%
12. Layers- Merge- Merge All
13. Effects - Plugins - Filters in Unlimited 2.0- It@lian Editors Effect
- Effetto Fantasma with these settings: 50 / 0
14. Layers- Duplicate
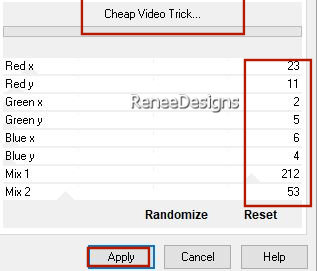
15. Effects - Plugins - Filters in Unlimited 2.0- Plugins AB 21 - Cheap
Video Trick..use the settings below.
16. Layers-Properties-Set the Blend Mode to "Hard Light "
17. Layers- Merge- Merge Down
- Promote Background Layer=Raster 1
18. Layers- New Raster Layer
19. Selections –load/save selection –load selection from disc and select my selection: ‘’Carnaval-2023-1’’
20. Flood Fill Tool
–
Fill the selection with the gradient
21. Effects – Edge Effects – Erode
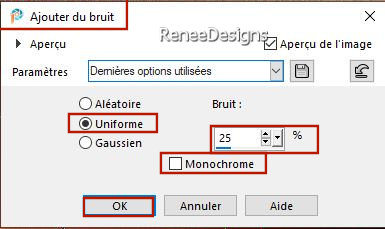
22. Adjust-Add/Remove Noise-Add Noise use the settings below
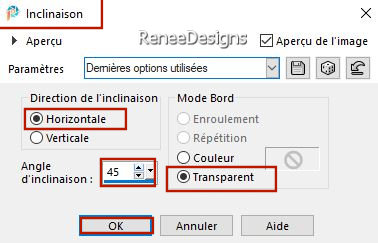
23. Effects – Geometric Effects – Skew use the settings below
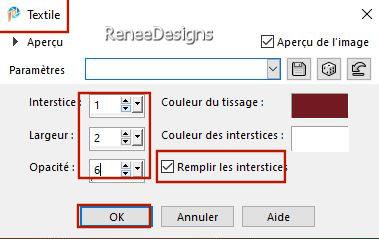
24. Effects – Texture-Effects– Weave use the settings below – Colors /#721a22= 1 and #ffffff=4

25. Effects – 3D-Effects – Drop Shadow with these settings: 0/0/60/60 Black
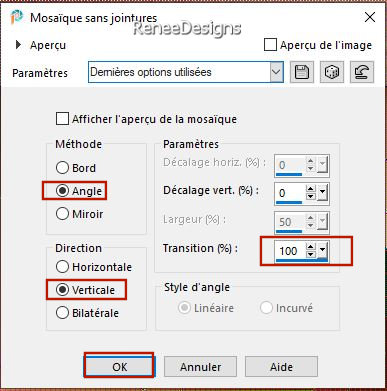
26. Effects- Image Effects- Seamless Tiling use the settings below
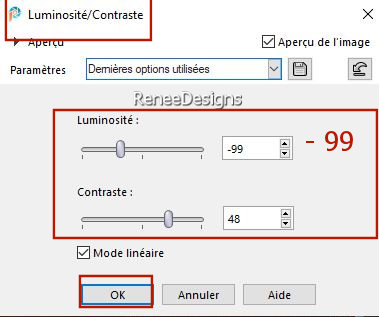
27. Adjust-Brightness and Contrast-Brightness and Contrast use the settings below
28. Layers- Duplicate
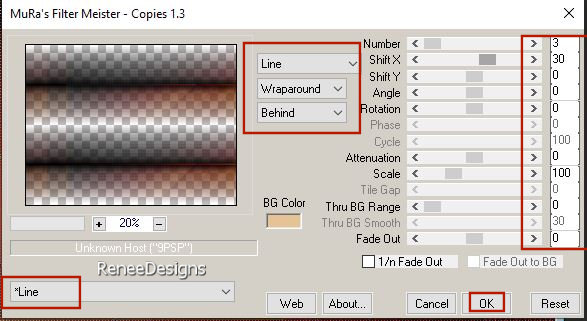
29. Effects – Plugins – Mura’s Meister – Copies use the settings below
30. Effects - Plugins - Filters in Unlimited 2.0 – Graphic Plus -
Horizontal Mirror/using the default settings
31. Effects - Plugins - Filters in Unlimited 2.0 – Graphic Plus -
Vertical Mirror/using the default settings
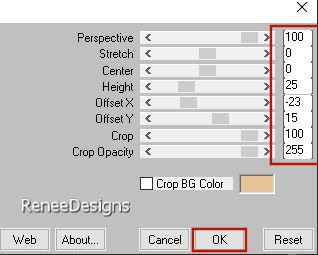
32. Effects - Plugins- Mura’s Meister – Perspective Tiling use the settings below
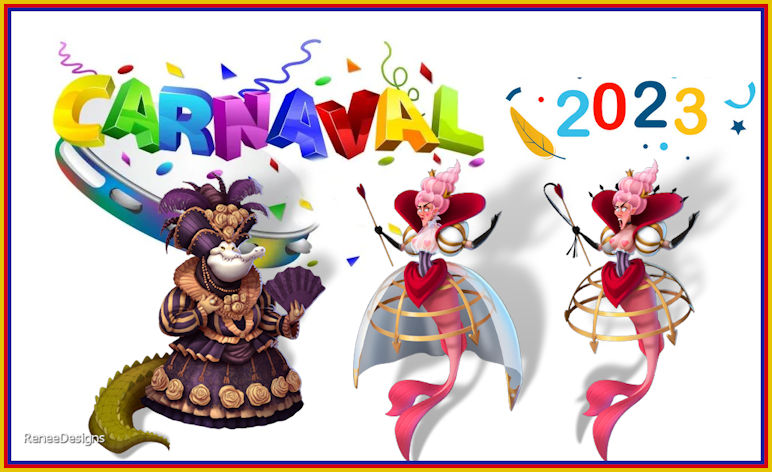
33.Open the Tube ‘’Carnaval-2023-Image 1’’ -Edit - Copy- Activate your work -Edit - Paste as a new layer
34. Pick Tool: (K) on your keyboard -Enter these parameters on the toolbar
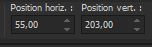 55/ 203
-Press ( M ) to close the Pick Tool
-Layers-Properties-Leave the Blend Mode to "Overlay"
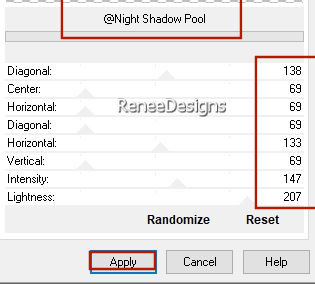
35. Effects - Plugins - Filters Unlimited 2.0 -&<Background Designers
IV>-@Night Shadow Pool use the settings below
36. Effects – 3D-Effects – Drop Shadow with these settings: 2/2/25/2 Black
37. Edit-Copy Special-Copy Merged
38. Edit - Paste as a new layer
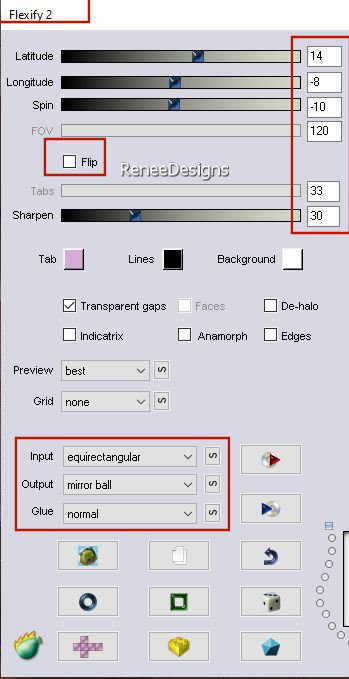
39. Effects – Plugins – Flaming Pear – Flexify 2 use the settings below
40. Image-Resize- 30%-Resize All Layers - Not Checked
41. Pick Tool: (K) on your keyboard -Enter these parameters on the toolbar
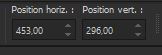 453/296 453/296
42. Effects -Plugins - Alien Skin EyeCandy 5 - Impact – Glass –
use the settings below -Color #e5c394= 2

43. Layers- Duplicate
44. Image- Resize - 40% -Resize All Layers - Not Checked
45. Pick Tool: (K) on your keyboard -Enter these parameters on the toolbar
 198/
265 198/
265
46. Edit-Copy Special-Copy Merged
47. Edit - Paste as New Image !!!!
We will work on this image/ Minimize the original
48. Layers- New Raster Layer
49. Color Palette-Set your foreground color to color #ffffff=4
Flood Fill Tool -Fill the layer with the Foreground color #ffffff-4
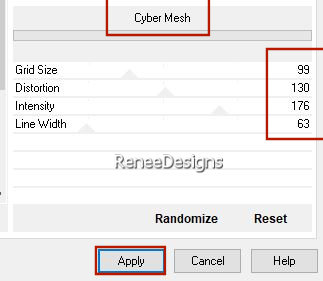
50. Effects - Plugins - Filters in Unlimited 2.0 – Factory C – Cyber
mesh use the settings below
51. Activate the Magic Wand Tool with these settings

- Click in the white part / Selections- Invert

- Selections- Invert
52. Color Palette-Set your foreground color to color #721a22=1
Flood Fill Tool –
Fill the selection with the Foreground color #721a22=1
53. Effects - Plugins - Filters in Unlimited 2.0 – Factory C - Border
Noisy Fade III using the default settings: 97/89/0
54. Effects - Plugins - Alien Skin EyeCandy 5 – Impact- Glass – Tab- Settings-User Settings -choose my file- Preset ‘’Carnaval-2023- Glass’’
55. Layers- Merge- Merge Down
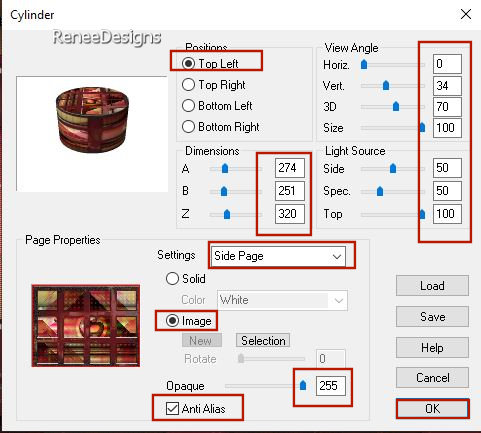
56. Effects – Plugins – Vizros 4 - Cylinder
Vizros 4 use the settings below
Explanation Filter Vizros
To install the filter Vizros
Unzip and install the filter
Write down the number of the filter
Starting the PSP and open a picture.
Go to Filter - Click to Register
Please indicate the number and click again to Register
Now is the filter to use.
If you're lucky, they must set it only once Sign up
Bad luck then you need to enter it when you want to use the filter every time
- Activate the Magic Wand Tool- Click in the white part
Selections- Invert
Selections – Modify –
Contract- 2 Pixels
Selections- Invert
57.Image -Resize to 60 % -Resize all layers checked
- Edit- Copy !!!
Activate your minimized Image (the original)
– Edit - Paste as a new layer
- Place at the bottom right
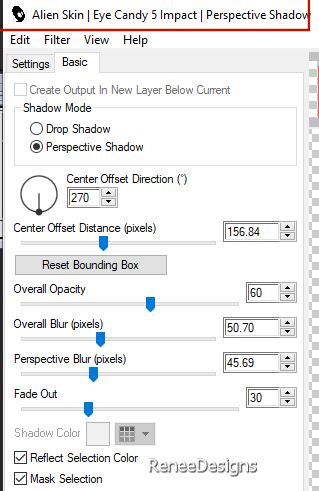
58. Effects - Plugins - Alien Skin EyeCandy 5-Impact - Perspective
Shadow use the settings below
- In the Layer Palette-Activate Copy of Raster 2
59. Open the Tube ‘’ Carnaval-2023-Image 2’’ -Edit - Copy- Activate your work -Edit - Paste as a new layer
60. Effects – 3D-Effects – Drop Shadow with these settings: 1/1/100/1 Black
- Activate the top of the layer palette
- Material Properties: Set your Foreground color to Gradient and select ‘’Anodized Rainbow’’
Style" Linear "configured like this
61. Layers- New Raster Layer
62. Selections –load/save selection –load selection from disc and select my selection: ‘’Carnaval-2023-2’’
63. Flood Fill Tool
–
Fill the selection with the gradient
- Effects – 3D-Effects – Drop Shadow with the same settings
64. Now for the embellishment of our work.
Open a tube of your choice - add it as a new layer on your work/ resize it if necessary/ place it as you like
65. Drop shadow to your own choice
I have applied this one
Effects - Plugins - Alien Skin EyeCandy 5-Impact - Perspective
Shadow use the settings below
(It will depend on the choice of your tubes)

66. Activate your text tool-Renée chose the font -
Jfringmaster-(Included in the material) or choose your own font
Write your text.
Choice of writing fonts/Here

- Image - Add Borders-Symmetric checked: 1 Pixel -Color #20522c=3
- Image - Add Borders-Symmetric checked: 10 Pixels -Color #ffffff=4
- Image - Add Borders-Symmetric checked: 1 Pixel -Color #721a22=1
67. Selections-
Select All
68. Image - Add Borders-Symmetric checked: 50 Pixel -Color #ffffff=4
69. Image - Add Borders-Symmetric checked: 2 Pixels -Color #721a22=1
70. Effects – 3D-Effects – Drop Shadow with these settings: 0/0/100/40 Black
71. Open the Tube ''Tube
Carnaval-2023-Image 3''- Select one or more decorations.
Paste as a new layer- Place to your liking
72. Paste the author's watermark on your work and your own watermark
73. Layers- Merge- Merge All (flatten)
74. Image - Resize - to 85% - Resize all layers- Checked
Save as JPG

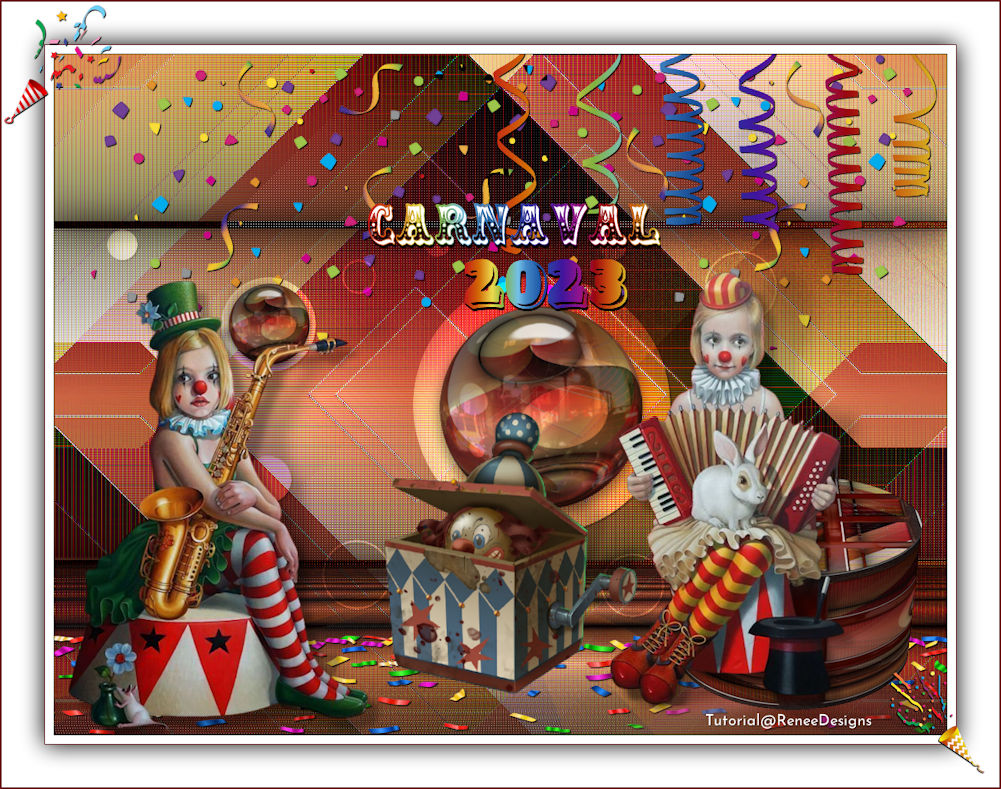
I hope you enjoyed this lesson
Renée
This lesson was written by Renée 2/01/2023
Edited and Update
in 2022
*
Any resemblance with an existing lesson is a coincidence * Do not forget to thank the people who work with us and for us -I have appointed the tubeurs and translators
Thanks
|
 Translations