|
Let's start the lesson.
  2016 2016
-
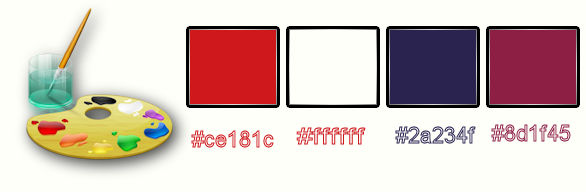
Color-palette:Set your foreground color to#ce181c
-Set your background color to #ffffff
1.
Open the background image ‘’ fond_carnaval_2016’’- Window - Duplicate (or shift+D) - Close the original and proceed on the copy -Promote Background Layer =Raster 1
2.
Effects –Plugins- Unlimited - &<Bkg Designer sf10 I>-AFS
Tangent Waves... use these settings
150/
100
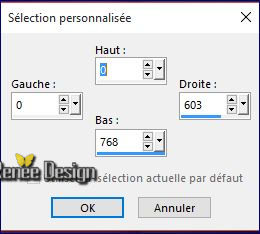
3.
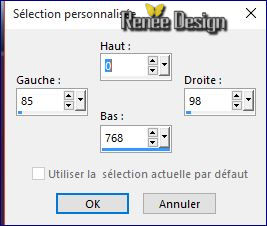
Activate Selection Tool -Custom Selection (S) with these settings
4. Adjust- Blur- Gaussian Blur: Radius:10
Selections- Deselect All
5. Layers- Duplicate
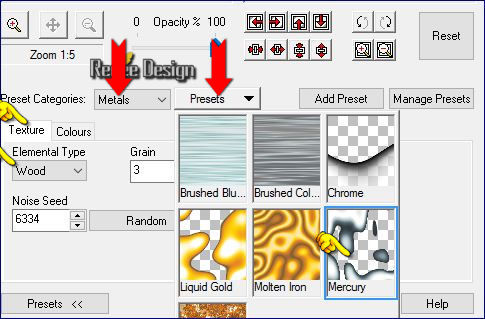
6. Effects -Plugins
- XE Xstras Elemental
- click
sur Metals>>Chrome - Customize
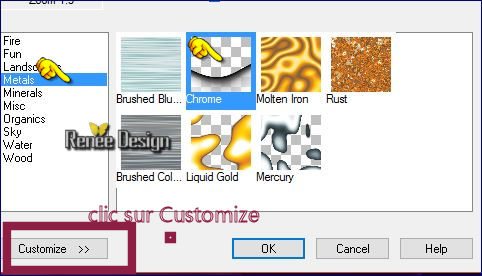
and the window opens
Metals>>Click on the preset >>and select Mercury
- Color-palette:Set your background color to #2a234f
7.
Layers- New Raster Layer
8.
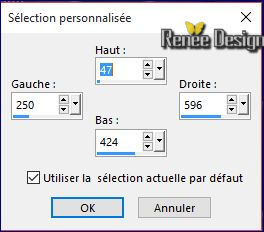
Activate Selection Tool -Custom Selection (S) with these settings
9. Pot of Paint: Change the opacity of the color at 72%- Activate Flood Fill Tool and fill the selection with the background color #2a234f
Selections- Deselect All
10.
Effects –Plugins - Unlimited Toadies Weaver use these settings:
73/19/255
11. Effects- Edge Effects- Enhance More
12. Layers- Duplicate
13. Effects-Image Effects- Offset with these settings H =65 and V = 0
14.
Effects –Plugins- Unlimited – Toadies- Living Sine (Circular )use these settings:
219/229/176 /152
15. Layers- Merge- Merge- Down
16. Effects- 3 D Effects- Drop Shadow with these settings 1/2/100/10 color black
17. Layers- Duplicate
18.
Effects-Plugins- Unlimited - Distortion Filters - Warp
(horizontal)use these settings:21/65/125
Activate the bottom of the layer palette=Raster 1
19.
Activate Selection Tool -Custom Selection (S) with these settings
20.
Selections- Promote selection to Layer
21. Layers- Arrange- Bring to Top
22. Effects
–Plugins- AFS[Import]- sqborder2 use these settings:
77/34/255
23. Double click on this Layer and set the Blend Mode to "Hard Light "
Selections- Deselect All
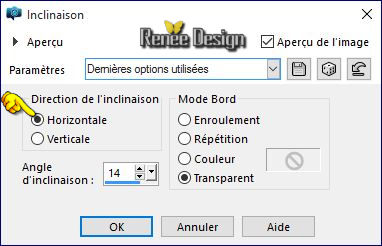
24. Effects- Geometric Effects- Skew with these settings
25. Layers- Duplicate
26. Activate Free hand Selection Tool =Lasso– Mode =point to point-Select this part as shown in the example below
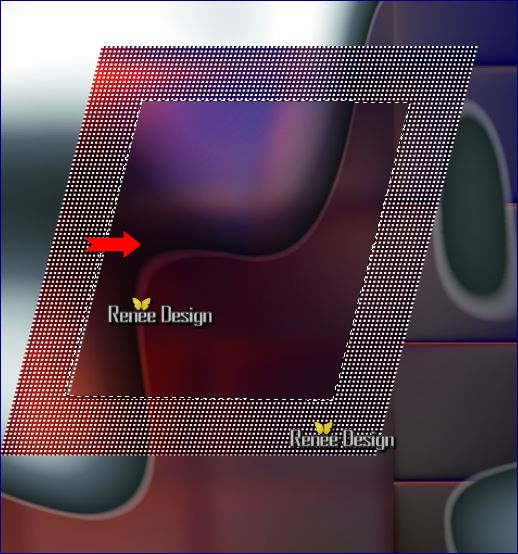
DELETE

Selections- Deselect All
28.
Effects –Plugins- Unlimited - It@lian Editors Effect- Effeto
fantasma use these settings: 22 /47
29. Double click on this Layer and set the Blend Mode to "Screen "
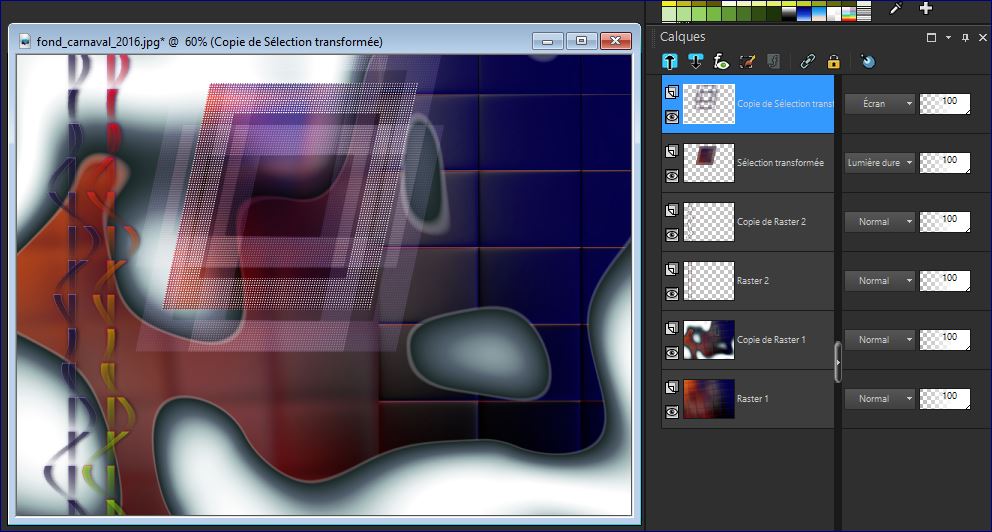
- Your work and Layer Palette look like this now
30. Effects
–Plugins– Graphic plus- Vertical Mirror use these settings: 89/0
- Color-palette:- Set your background color to #ffffff
31. Layers- New Raster Layer
32.
Selections –load/save selection –load selection from disc and choose my selection:‘’ carnaval_1’
32. Pot of Paint: Change the opacity of the color at 100% -Activate Flood Fill Tool and fill the selection with the background color#ffffff
Selections- Deselect All
33. Effects
–Plugins – EyeCandy 5 Impact – Extrude -tab Settings/User settings choose my Preset
« Carnaval_2016_extrude »
-. Activate the tube’’Renee_carnaval_2016_tubes »(do not close)
34. Activate layer ‘’carnaval_1 »of the tube
- Edit/ Copy-Edit - Paste as new layer on your working image
- Activate your Move Tool (M) move it in the right place (see finished image)
35. Activate layer ‘’carnaval_2 »of the tube
- Edit/ Copy-Edit - Paste as new layer on your working image
- With the Move Tool -(M) move it on the upper right corner
36. Activate layer ‘’carnaval_3 »of the tube
- Edit/ Copy-Edit - Paste as new layer on your working image
- With the Move Tool, move into the center
(see finished image)
37. Activate layer ‘’carnaval_4 »of the tube
- Edit/ Copy-Edit - Paste as new layer on your working image
- With the Move Tool -(M) move it on the bottom right corner
-
Do not close we need it later for the rest of the work (some are hidden layers to lighten the weight of the tube simply open)
38. Layers- New Raster Layer
39.
Selections –load/save selection –load selection from disc and choose my selection:‘’ carnaval_2’
40. Pot of Paint: Change the opacity of the color at 35%- Activate Flood Fill Tool and fill the selection with the background color #ffffff
Selections- Deselect All
41.
Effects –Plugins- Unlimited - &<Bkg Designer sf10 I>-
Cruncher use these settings: 20/20
42. Effects- Edge Effects- Enhance
Color-palette:Set your foreground color to#8d1f45
43.
Layers- New Raster Layer
44.
Selections –load/save selection –load selection from disc and choose my selection:‘’ carnaval_3’
45.Pot of Paint: Change the opacity of the color at 65% –Activate Flood Fill Tool and fill the selection with the foreground color #8d1f45
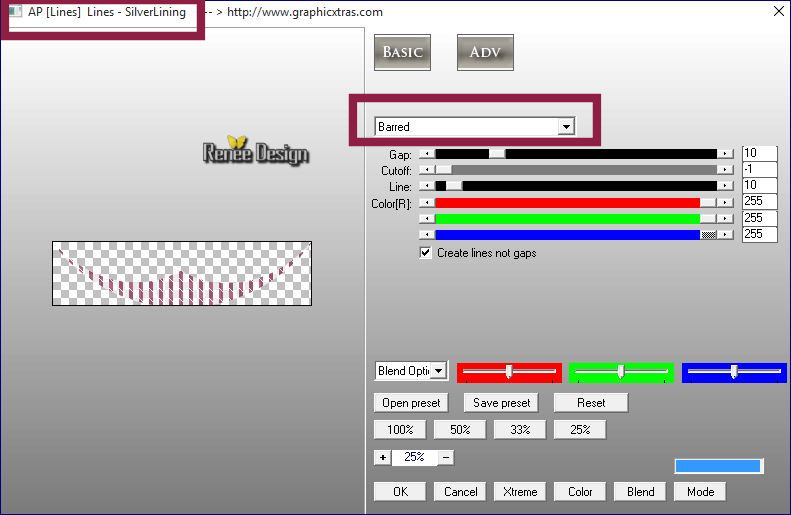
46. Effects
–Plugins – AP[lines]-Silverling with these settings
(If you are user of Windows 10, do not use filter AP01 it will block your psp)
Selections- Deselect All
47. Effects- 3 D Effects- Drop Shadow with these settings 1/1/100/10 color black
48. Layers- Duplicate
49. Image-
Free Rotate / 90 ° to the left
50. Image
Resize 60% resize all Layers not checked
51. With your Pick Tool (K) place it in the right place as shown in the example below

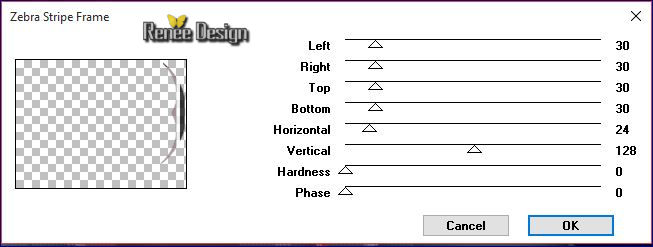
52. Effects
– Plugins- Layout tools- Zebra Stripe
Frame use settings below
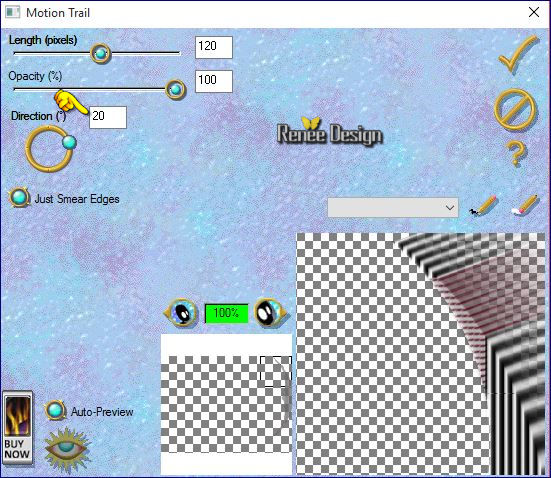
53. Effects
–Plugins– EyeCandy 3.1- Motion Trail
The filter will put you this
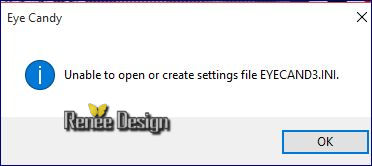 doing OK and it will open doing OK and it will open
54. Double click and set the Blend Mode to "Luminance Legacy"
55. In the Layer- Palette- Activate the layer underneath =Raster 9 / Double click and set the Blend Mode to "Luminance" -Set the layer opacity of this layer to 59%
- To replace the top of the layers palette
- Back on the tube ’’Renee_carnaval_2016_tubes »
56. Activate layer ’’caranaval_5’’of the tube
- Image
Resize 60 %
- Edit/ Copy-Edit - Paste as new layer on your working image
- Activate your Move Tool (M) move it in the right place (see finished image)
57.Selections- Select All-
Selections - Float
-Selections – Defloat.
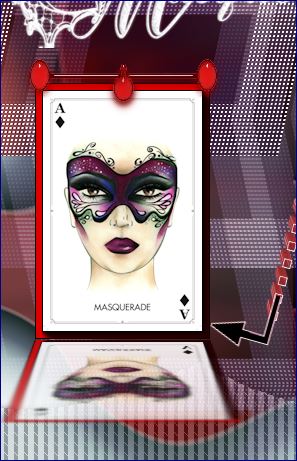
58. Effects
–Plugins– AAA Frame Foto frame use settings below
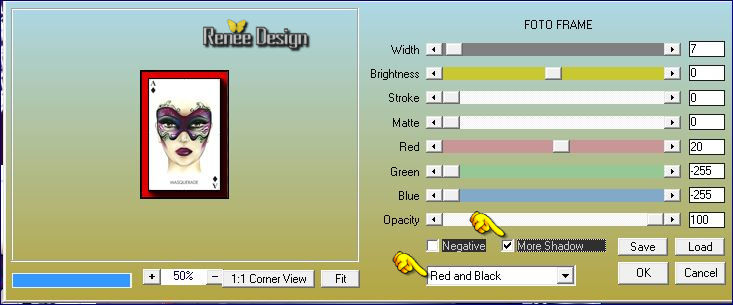
Selections- Deselect All
59.
Effects –Plugins - Eye Candy 5- Impact – Perpective
shadow-tab Settings/User settings choose my- Preset ‘’ renee_carnaval__shadow’’
60. Activate layer ‘’carnaval_6”of the tube
- Edit/ Copy-Edit - Paste as new layer on your working image
-
With your Pick Tool (K) place it in the right place as shown in the example below
61. Activate layer ’carnaval_7” and layer ’carnaval_8” of the tube
- Edit/ Copy-Edit - Paste as new layer on your working image
- With the Move Tool -(M) move it on the left (see finished image )
62. Activate layer ’carnaval_9 »of the tube
- Edit/ Copy-Edit - Paste as new layer on your working image
- With the Move Tool -(M) move it on the bottom right side
63 .Activate layer ’carnaval_10 »of the tube
- Edit/ Copy-Edit - Paste as new layer on your working image
- With the Move Tool -(M) move it on the bottom right side (against the foot of the girl )
64. Layers- Duplicate
- Image
Flip
- With the Move Tool -(M) move it on the bottom right side -Layers- Arrange Move Down -Set the layer opacity of this layer to 57%
65. Image - Add borders-Symmetric checked: 1 pixel foreground color#8d1f45
66. Image - Add borders-Symmetric checked: 45 pixels #ffffff
67. Image - Add borders-Symmetric checked: 2 pixels color#2a234f
68. Image - Add borders-Symmetric checked: 50 pixels #ffffff
69. Activate the tube ‘’deco_titre’’
- Edit/ Copy-Edit - Paste as new layer on your working image (do not move it is in the right place)
70. Layers- Merge- Merge All
71. Image
Resize 999 pixels width
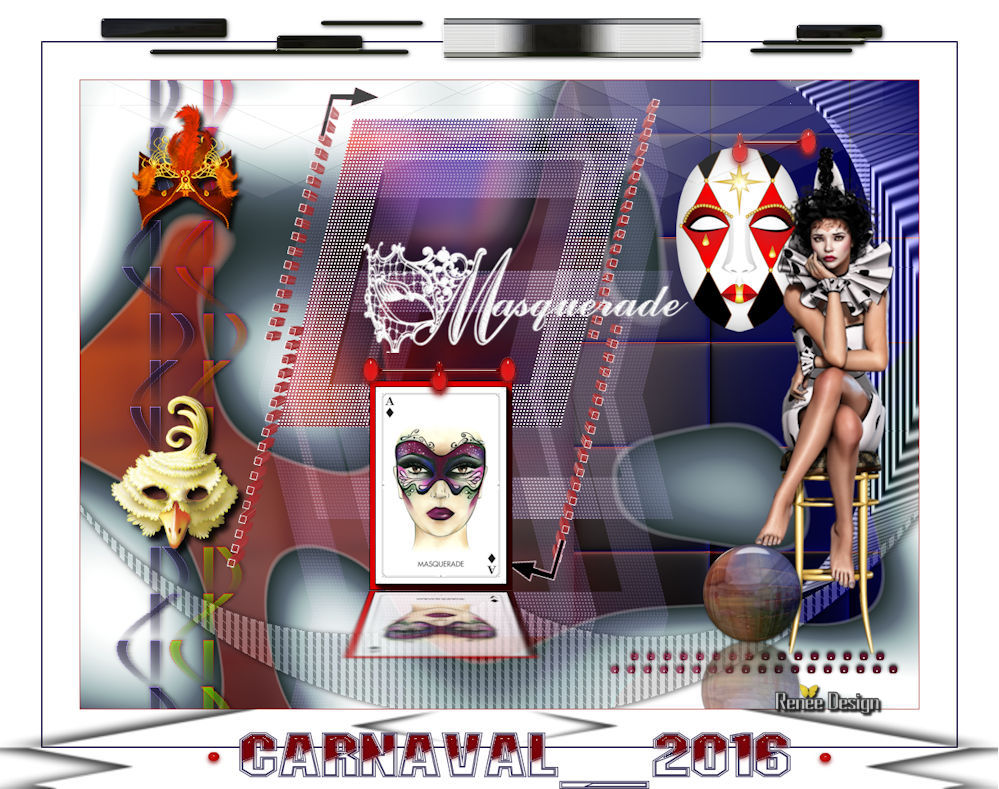
Save as JPG
I hope you enjoyed this lesson
Renée
This lesson was written by Renée 14/01/2016
Edited and Update
2015
*
Any resemblance with an existing lesson is a coincidence
* Do not forget to thank the people who work with us and for us I have appointed the tubeurs and translators
Thanks Renée
| 
 Translations


 When you see this logo the filter is imported in Unlimited

 All rights reserved