|
Let's begin
Materials-Properties: Forgroundcolor to #fefff9 Backgroundcolor to
#ff822a
1.
Open the tube ''Kittys-Chirico'' /Edit/copy/Edit past as a new Image !!!!!
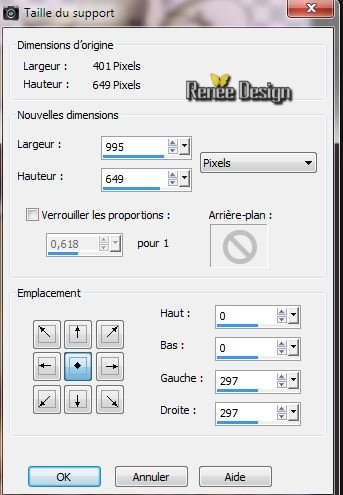
2.
Image-Canvas Size
3.
Adjust-Blur- Radial Blur with these settings 
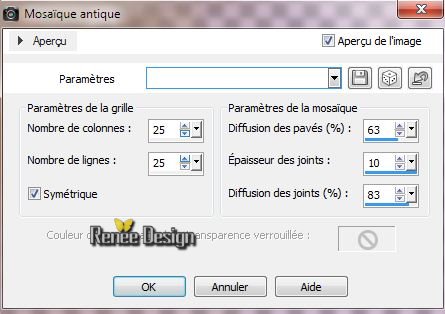
4.
Effects -Texture Effects- Mosaic Antique
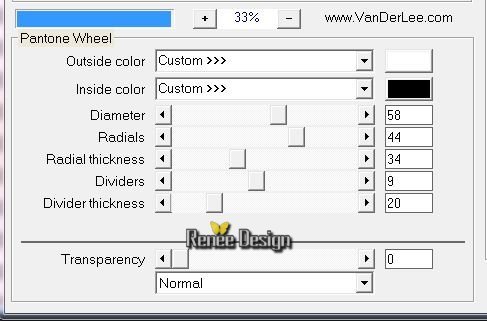
5.
Effects-Plugins Vanderlee -Unplugged X .V2.0/ Pantone Wheel
6.
Effects - Plugins Eye Candy 5 Impact - Glass -Choose: Preset
''chirico_glass''
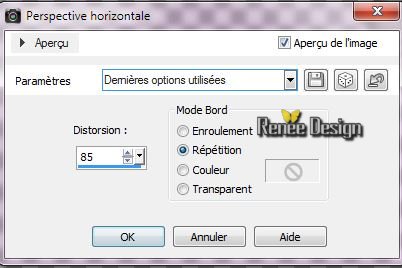
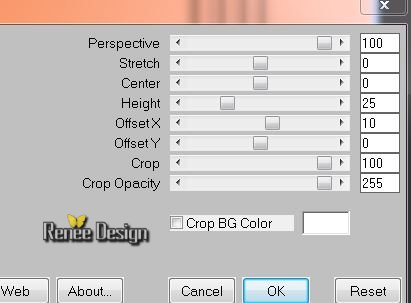
7. Effects-
Geometric Effects-Perspective Horizontal
8. Effects -
3D Effects-Drop Shadow:1/1/100/4 black
Blend Mode to "Hard Light" and the Opacity down to 89%
9. Layers-New Raster Layer. Layers-Arrange-Sent to Bottom
Prepare a sunburst gradient configured like this
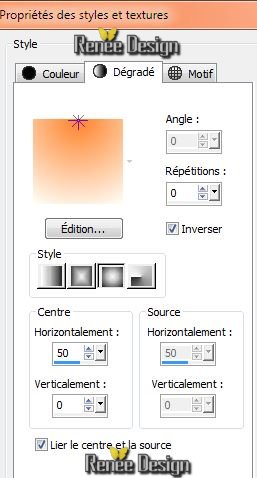
10.
Flood Fill Tool: Fill the selection with the gradient.
11. Layers-New Raster Layer.
12.
Selections-Custom selection with these settings
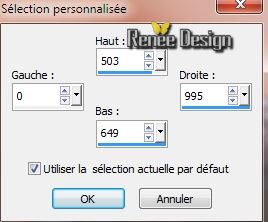
13.
Materials-Properties: Forgroundcolor to: #8eaa70
14.
Flood Fill Tool: Fill the selection with your foregroundcolor: # 8eaa70
Keep Selection
15. Effects
-Plugins L and K's - Jouri 128/129/128
16.
Selection-Select none
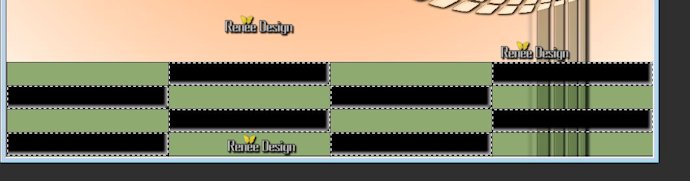
17.
With your Magic Wand select rectangles like this (For example, they are black )
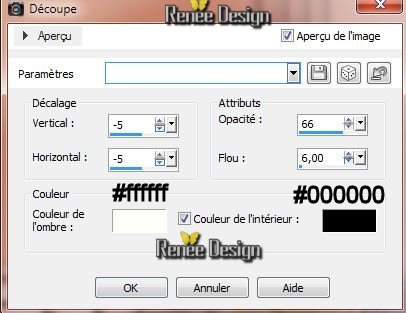
18. Effects
- 3D Effects-Cutout with these settings
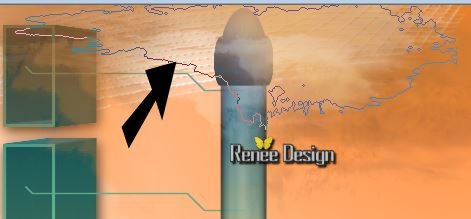
19.
Selection-Select none
20. Effects
- Plugins Mura's Meister -Perspective Tilling
21. Blend Mode to " Luminance Legacy" and the Opacity down to 85%
22. Effects- Edge Effects -Enhance
23. Layers-New Raster Layer / Flood Fill Tool: Fill the layer with color white
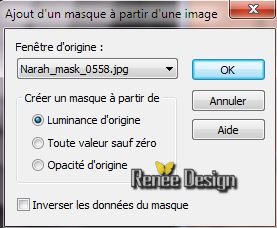
24. Layers / New mask layer / From image / Choose :
''Narah_mask_0558.jpg"
Layers- Merge-Merge Group
25. Effects- Distortion Effects- Wave withe these settings

26. Effects
- Used Defined Filter Emboss 3 - default
Aktivate the top of the Layers palette
27.
Layers-New Raster Layer.
28.
Selections - load/save selection - load selection from disk and choose ''chirico_1''/
Flood Fill Tool: Fill the selection with color :#f6e178
29.
Selections-Select none
30. Layers-Arrange-Move Down/ Blend Mode to "Luminance" and lower the Opacity to 79%
Aktivate the top of the Layers palette
31.
Layers-New Raster Layer.
32.
Selections - load/save selection - load selection from disk and choose ''chirico_2" -Flood Fill Tool: Fill the selection with color :#8eaa70
Selections-Select none
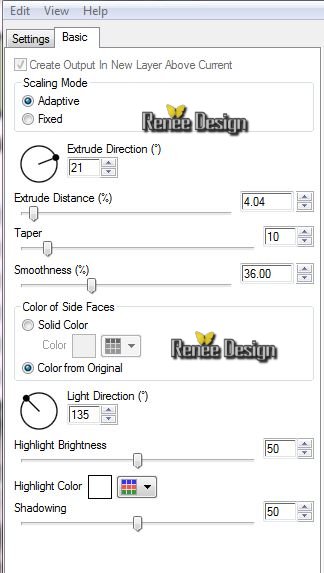
33.
Effects -Plugins EyeCandy 6 - Extrude / choose my Preset - chirco_extrude'' with these settings see screen .( For problems with this filter, the image is in the zipfile)
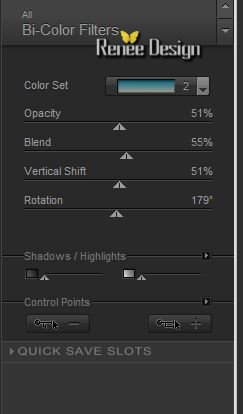
34.
Effects - Plugins Color Effex Pro3.0 /Bi Color - Color set - Cool
Warm 2
35. Effects
- 3D Effects-Drop Shadow: 4/2/45/18 black
36. Open the tube ''chirico_tube_renne_tige '' / Edit/copy-Edit/paste as a new Layer and place
37. Open the tube ''Mariel-2006-09Septembre_DZ04t'' -Edit/copy-Edit/paste as a new Layer
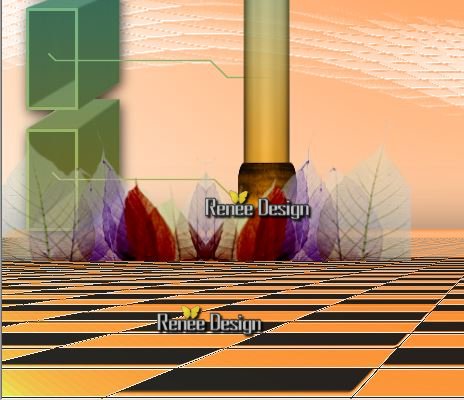
Good placed To the left-
38. Layers-Duplicate-Image-Mirror -Layers Merge-Merge Down
see the example
Material Properties: Set your Foregroundcolor and Backgroundcolor to color: #ff822a
39.
Effects - Plugins - Déformation - Lueur
Diffuse 
40.
Layers-Duplicate-Image-Mirror
41.
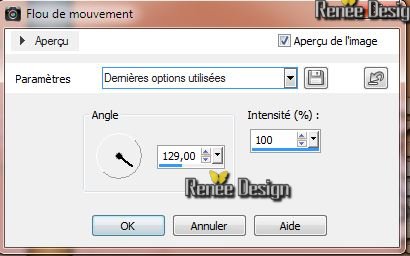
Adjust-Blur -Motion Blur (Blur old version of Psp)
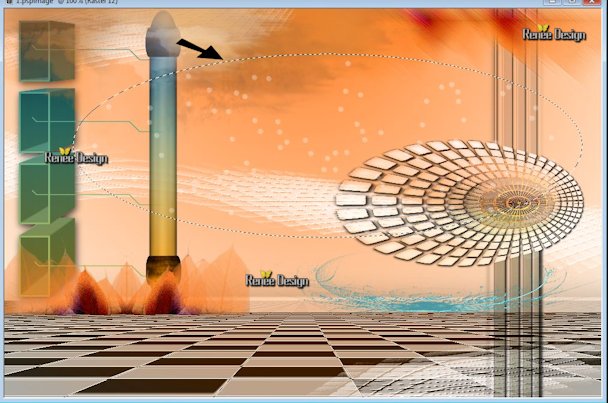
42. Image-
Mirror - Image - Flip- Move to in the upper right corner
43. Effects-User Defined Filter- choose Preset ''High pass'' default (The preset is in the zipfile)
44.
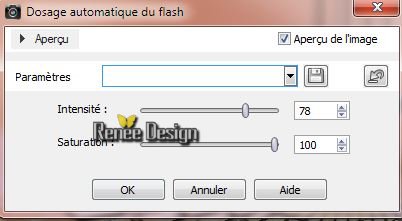
Adjust - Fill Flash Filter with these settings
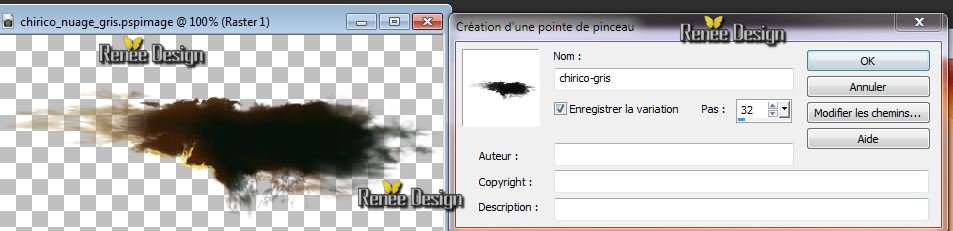
45. Open the Brush ''chirico_nuage_gris in your PSP
File
-Export- Custum Brush enter a name see Example
Material Properties: Foregroundcolor to color black and the backgroundcolor to color: #ff822a
46. Layers-New Raster Layer.
47. Paint Brush Tool -/ Configured as follows:Opacity 25. Blend Mode " Screen " /size 750

48.
Stamp at the top, see the example, 1x with the Foregroundcolor and 1x with the Backgroundcolor. For a better effect.
49.
Selections - load/save selection - load selection from disk and choose ''chirico_3'' / Delete
4 to 5 x for better results
Material Properties: Foregroundcolor to color white
50. Layers-New Raster Layer.
51. Paint Brush Tool Brush ''chirico_nuage_gris '' size 443 /Stamp twice (
see Example)
52. Layers-New Raster Layer.
53.
Selections - load/save selection - load selection from disk and choose ''chirico_4'' .Flood Fill Tool: Fill the selection with color :#4c98a1
54. Effects- Used Defined Filter - Emboss3
Selections-Select none
55.
Layers-New Raster Layer.
56. Selection Tool: Ellipse /draw a selection as shown in the example
57.
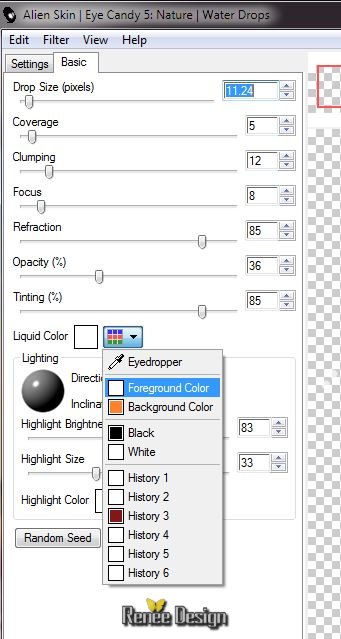
Effects - Plugins EyeCandy5 -Nature - Water Drops
Selections-Select-none
58. Open the tube '' KRYSSURREALISME003.pspimage'' Edit/copy-Edit/paste as a new layer and place
59. Effects- Plugins EyeCandy 5-Impact -Perspective shadow- choose my Preset ''chirico_persp''
60.
Aktivate the Groupe raster 4 layer of the Layers palette /Open the
tube ''nicole-fantaisie3-2013'' /Image Resize twice to 65%
Edit/copy-Edit/paste as a new layer and place
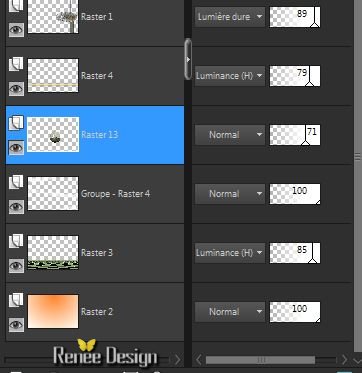
Your Layer Palette looks like this now
61.
The Layer Opacity to 71% ( well see if it is in the right place)
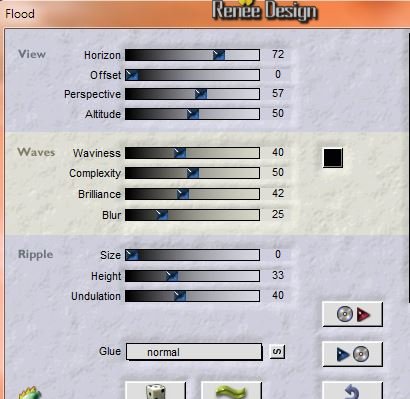
62. Effects
-Plugins Flaming Pear - Flood (only the horizon at 72. If the tube is well placed)
Aktivate the top of the Layers palette
63 Open the tube ''kittys-Chirico'' Image Resize to 76
% -Edit/copy-Edit/paste as a new layer and place
64. Effects
- 3D Effects-Drop Shadow 15/0/100/25 black
65.
Layers-New Raster Layer.
66.
Selections - load/save selection - load selection from disk and choose ''chirico_5''
Material Properties: Foregroundcolor to color #8eaa70 .Flood Fill Tool - Opacity to 65
/Fill the selection with this color
66. Effects-Plugins
Penta Com - Color Dot default (90/2/255/255/255)
67.
Selections-select none
68. Effects
-Plugins Unlimited - Noise Filters -Noisy Rotation a 23
Blend Mode to "Hard Light"
69. Layers-Duplicate-Image-Mirror
70.
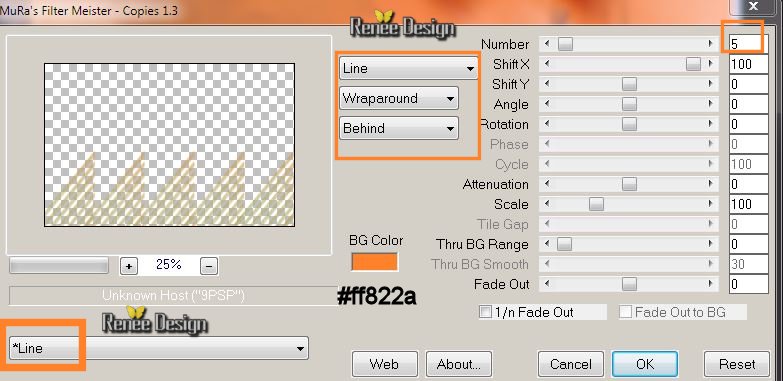
Effects - Plugins Mura's Meister - Copies
71. Image
Mirror - Blend Mode to "Soft Light"
72.
Layers-Merge-Merge Visible
73. Image - Add Borders - Symmetric checked 1 pixel black
74. Image - Add Borders - Symmetric checked 35 pixels white
75. Image - Add Borders - Symmetric checked 1 pixel color #ff822a
76. Image - Add Borders - Symmetric checked 40 pixels white
77. With the magic wand -select the border of 35 pixels
78. Effects
- 3D Effects-Drop Shadow : 15/0/100/25 black
79.
Selections - Select none
Open the tube Text. Edit/copy-Edit/paste as a new layer and place or write your own text
I hope you enjoyed this lesson
Renée
This lesson was written by Renée
20/01/2013
Created the
*
Any resemblance with an existing lesson is merely a coincidence
*
Don't forget to thank the people who work for us and with us. I named the tubeurs - Testers and the translators.
Thanks Renée

| 


 Translations


