|
Let's start the lesson
Claudia Giraudo
here are more tubes for your creations on this theme/You can download these tubes immediately
- Preparation
-Material Properties: Set your foreground color to color #1b3794 =1- Set your background color to color #cac7d5=2

1. Open the Background image
‘’Fond-Claudia-Giraudo – Promote Background Layer =Raster 1
2. Layers- Duplicate
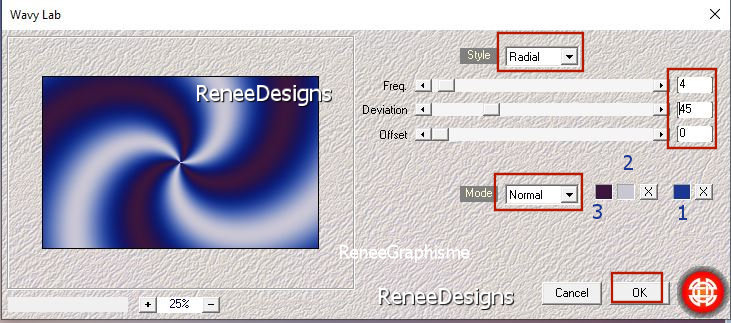
3. Effects – Plugins – Medhi- Wavy Lab use the settings below
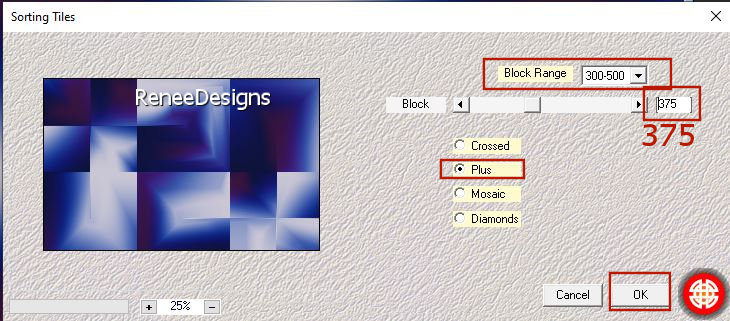
4. Effects – Plugins – Medhi- Sorting Tiles use the settings below
5. Effects –Plugins-
Unlimited 2.0 - &<Bkg Designer sf10 I> - 4 Way Average
6. Effects –Plugins-
Unlimited 2.0 - &<Bkg Designer sf10 I> -Cruncher using the default settings
7. Effects – Edge Effects– Enhance More
8. Effects –Plugins-
Unlimited 2.0 - DC Layer –SideMerge with these settings:13/203/62
9. Effects –Plugins-
Unlimited 2.0 – Tramages - Tow The Line...with these settings: 222/202/48/9
10. Layers-Properties-Change the Blend Mode to " Hard light "
11. Layers- Duplicate
12. Image - Mirror - Mirror Horizontal (Image - Mirror in older versions of PSP)
13. Layers- Duplicate
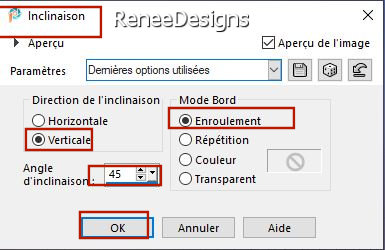
14. Effects-Geometric Effects-Skew use the settings below
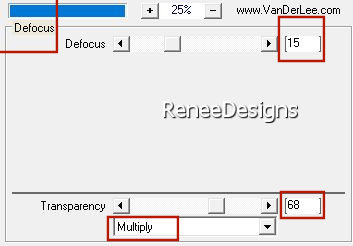
15. Effects – Plugins – Vanderlee- Unplugged X – Defocus use the settings below
16. Layers-Properties-Change the Blend Mode to " Soft Light "
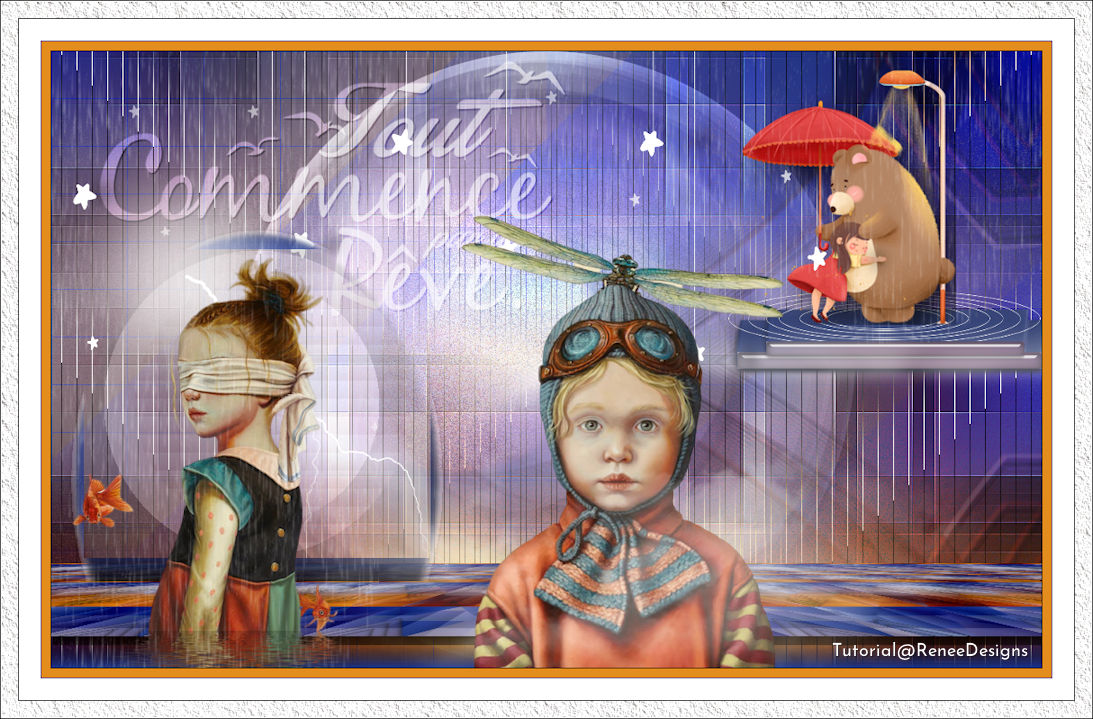
- Your work and Layer Palette look like this now-You should have this result
/Activate Copy (2) of Raster 1
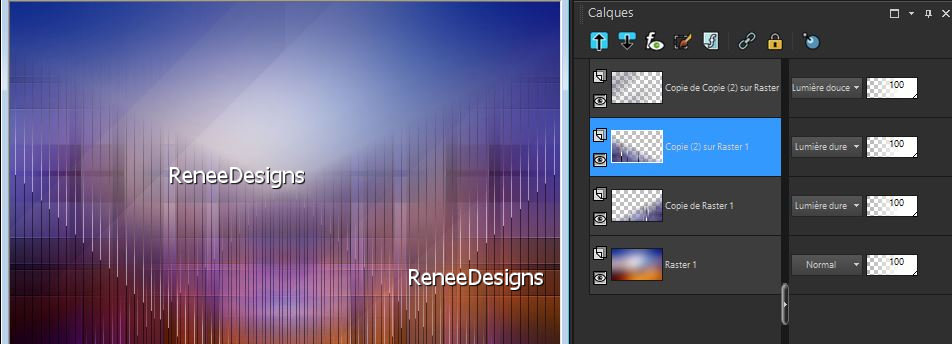
17. Layers- Merge- Merge Down
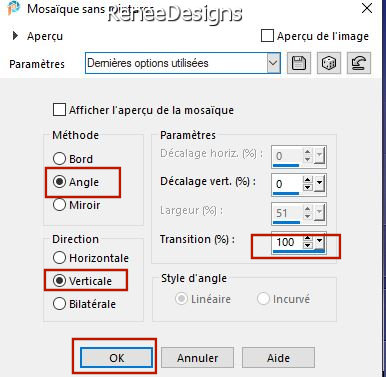
18. Effects-Image Effects-Seamless Tiling use the settings below
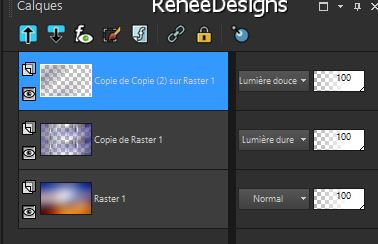
- Activate the top of the layer palette
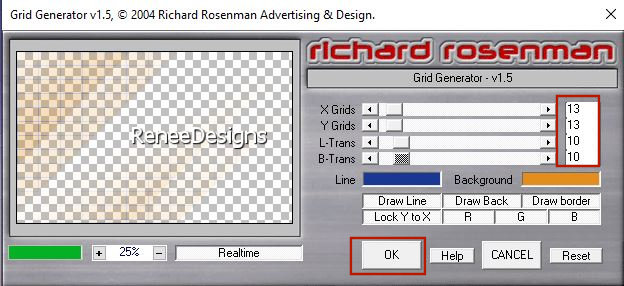
19. Effects – Plugins- Richard Rosenman Grid Generator use the settings below
Colors #1b3794=1 and #e38d1f=4
20. Layers- Duplicate
21. Layers-Properties-Change the Blend Mode to " Hue "
- Activate the bottom of the layer palette =Raster 1
22. Layers- Duplicate
23. Layers- Arrange- Bring to Top
24. Layers- New Mask Layer-From Image and select Mask
''Narah_Mask_1218-vi.jpg''
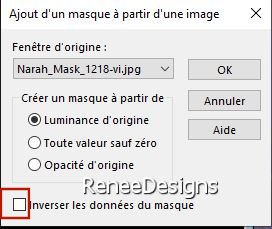
- Layers- Duplicate
- Layers- Merge- Merge Group
25. Effects – Plugins– Toadies – What are you 20 /20
26. Effects
3D-Effects – Drop Shadow with these settings: 5/5/100/3 Color Black
27. Effects – Reflection Effects – Rotating Mirror use the settings below
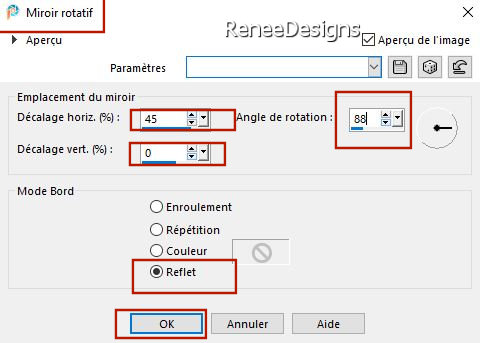
28. Layers-Properties-Change the Blend Mode to "Hard Light " – Lower the Opacity to 75%
- Activate the bottom of the layer palette =Raster 1
29. Activate Selection Tool -Custom Selection (S) -Rectangle with these settings
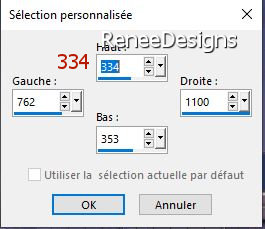
30. Selections- Promote selection to layer
31. Layers- Arrange- Bring to Top
32. Effects – Plugins – Alien Skin EyeCandy 5 Impact – Glass –Tab Settings/User settings select my file-Preset :
Renee-Giraudo-Glass’’

33. Layers- Duplicate
34. Image - Resize to 85%
35. Pick Tool: (K) on your keyboard -Enter these parameters on the toolbar
 788/318 788/318
Press ( M ) to close the Pick Tool
36. Layers- Merge- Merge Down
37. Effects - Plugins - Alien Skin EyeCandy 5 Impact – Extrude –Tab Settings/User settings select my file-
Preset : Renee-Claudia Giraudo
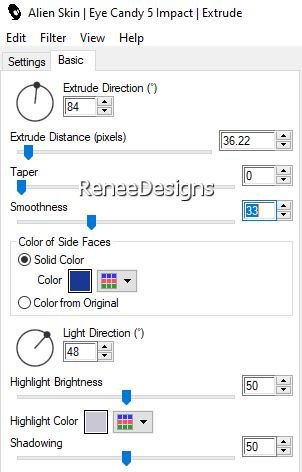
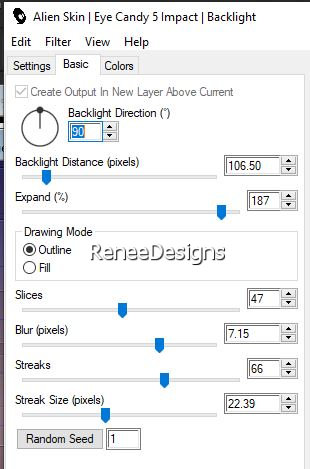
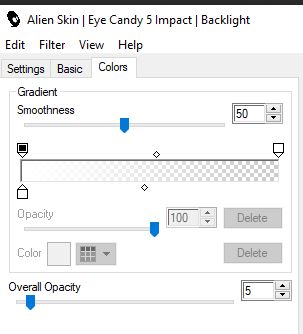
38. Effects - Plugins - Alien Skin EyeCandy 5 Impact- Backlight-Tab Settings/User settings select my file-Preset:
''Renee-CGiraudo-Backlight''
39. Layers- New Raster Layer
40. Selections –load/save selection –load selection from disc and select my selection: ‘’Renee-Claudia Giraudo-1’’
41. Color palette - Change the foreground to #ffffff=5
Flood Fill Tool  -
Fill the selection with #ffffff=5 -
Fill the selection with #ffffff=5

42. Open the tube ‘’ Renee-TUBES-
ClaudiaGiraudo-Image 1’’ -Edit - Copy- Activate your work -Edit - Paste as a new layer
- Move the tube in the right place
43. Layers- New Raster Layer
44. Selections –load/save selection –load selection from disc and select my selection: ‘’Renee-Claudia Giraudo-2’’
45. Flood Fill Tool -
Fill the selection with #ffffff=5 (3 to 4 clicks)

46. Effects - Plugins- Alien Skin EyeCandy 5 - Impact –Perspective
Shadow-Tab Settings/User settings select my file-Preset :Renee-Giraudo-Perspective
47.Layers- New Raster Layer
- Activate the Brush Tool- and choose the brush ‘’reve’’ -Stamp with the WHITE foreground color on your image and move

48. Layers-Properties-Change the Blend Mode to " Overlay " – and Lower the Opacity to 59%
49. Effects- 3D-Effects– Drop Shadow with these settings: 1/1/100/1 Color Black
- Activate the bottom of the layer palette =Raster 1
50. Layers- Duplicate
51. Effects-Plugins-
Unlimited 2.0- &<Background Designers IV>- sf10 Square
Bumps with these settings:48/36
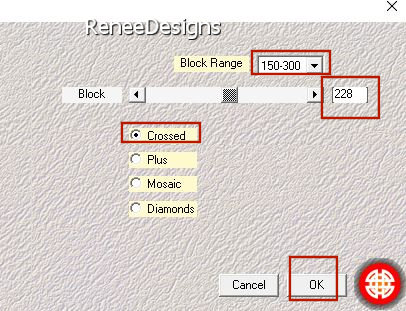
52. Effects – Plugins– Medhi- Sorting Tiles use the settings below
53. Layers- Arrange- Bring to Top
54. Selections –load/save selection –load selection from disc and select my selection: ‘’Renee-Claudia Giraudo-3’’
55. Effects - Plugins - Alien Skin EyeCandy 5 - Impact - Glass-Tab Settings/User settings select my file-
Preset :Renee_Giraudo-Glass
56. Selections-
Modify -Contract by 25 Pixels
57. Effects - Plugins - Alien Skin EyeCandy 5 - Impact - Glass -Tab Settings/User settings select my file-
Preset :Renee_Giraudo-Glass
58. Selections- Modify- Contract by 25 Pixels
59. Effects - Plugins - Alien Skin EyeCandy 5 - Impact - Glass -Tab Settings/User settings select my file-
Preset :Renee_Giraudo-Glass

60. Effects –Plugins – Mura’s Meister – Perspective Tiling-using the default settings
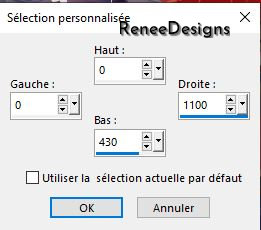
61. Activate Selection Tool -Custom Selection (S) -Rectangle with these settings
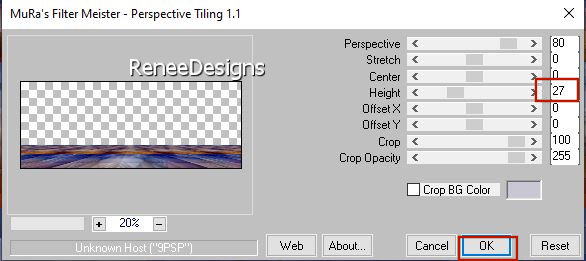
62. Effects – Plugins – Mura’s Meiste ruse the settings below
63. Selections-
Invert
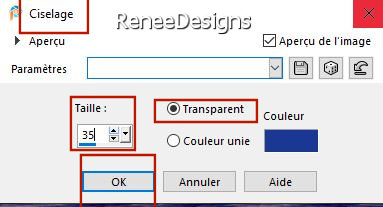
64. Effects – 3D-Effects – Chisel use the settings below
65. Edit-Cut !!! –
Edit -Paste as a new layer

- Activate the layer underneath= Copy of Raster 1
66. Objects
-Align – Bottom
67. Effects-
3D-Effects – Drop Shagow with these setting: 10/1/85/1 Color Black
- Activate the layer above= (Raster 6)
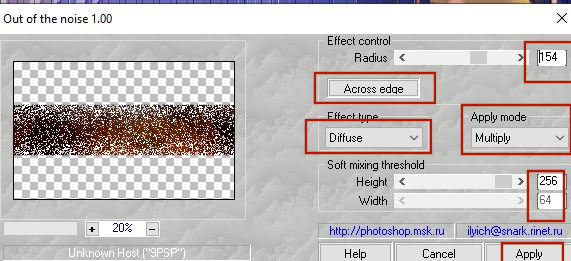
68. Effects – Plugins– Amphisoft- Out of the noise 1.00 use the settings below
69. Layers - Arrange- Move Down-Above Raster 1
70. Layers-Properties-Change the Blend Mode to " Luminance "- Lower the Opacity to 61%
71. Selections –load/save selection –load selection from disc and select my selection: ‘’Renee-Claudia Giraudo-4’’
72. Selections-Promote Selection to Layer
73. Layers-Properties-Change the Blend Mode to " Dodge "

Stay on this layer
74. Open the tube ‘’ Renee-TUBES-
ClaudiaGiraudo-Image 2.’’ -Edit - Copy- Activate your work -Edit - Paste as a new layer
75. Effects – Plugins – Flaming Pear- Flexify2-select my file-Preset : Renee-
CGiraudo-Flexify 2 settings.q2q
76. Layers-Properties-Change the Blend Mode to " Overlay "
- Activate the top of the layer palette
- Material Properties: Set your foreground color to color #641714 = 3 – Set your background color to color #ffffff=5
77. Layers-New Raster Layer
78. Selections –load/save selection –load selection from disc and select my selection: ‘’Renee-Claudia Giraudo-5’’
79.Flood Fill Tool
 –
Opacity at 30 – Fill the selection with #ffffff=5 (Pot of Paint -Opacity 100 % (don't forget it ) –
Opacity at 30 – Fill the selection with #ffffff=5 (Pot of Paint -Opacity 100 % (don't forget it )
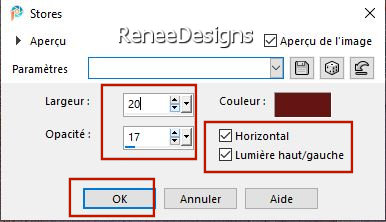
80. Effects –Texture-Effects – Blinds with these settings-Color FG-Color
81. Effects –Plugins-
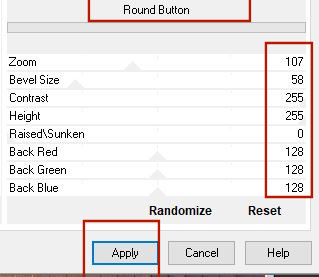
Unlimited 2.0- Harry's Button Tools - Round Button use the settings below
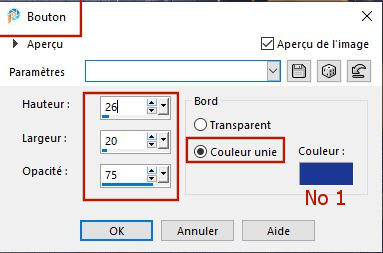
82. Effects– 3D-Effects – Buttonize use the settings below-Color #1b3794=1

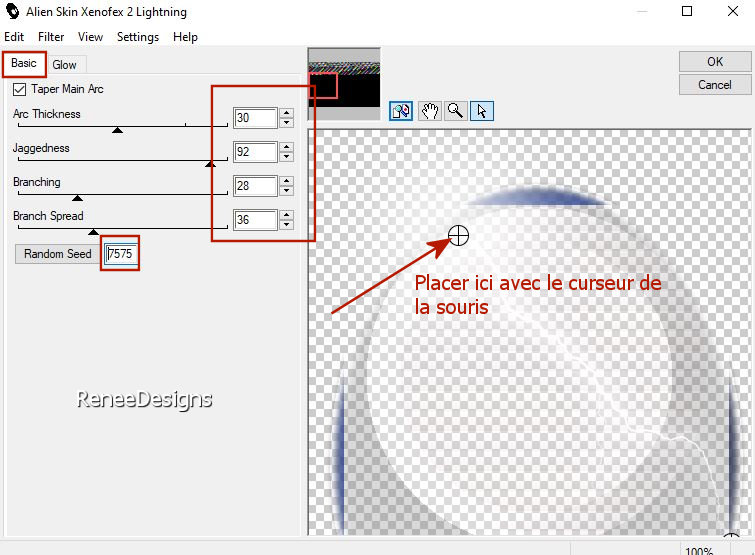
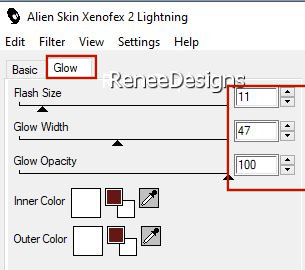
83. Effects – Plugins – Alien Skin- Xenofex2- Lightning use the settings below
84. Open the tube
‘’ Renee-TUBES-claudia giraudo-3.pspimage’’
-Image - Resize by 85 %
85. Edit - Copy- Activate your work -Edit - Paste as a new layer
86.Pick Tool: (K) on your keyboard -Enter these parameters on the toolbar
 23/229
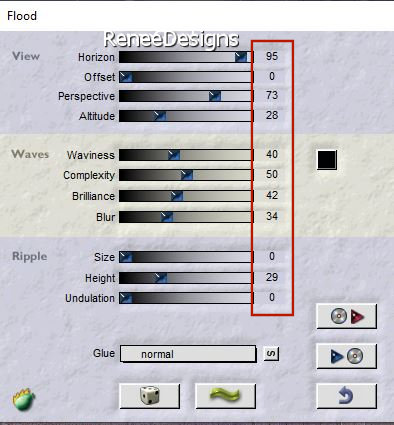
87. Effects- Plugins – Flaming Pear-Flood use the settings below
88. Layers- New Raster Layer
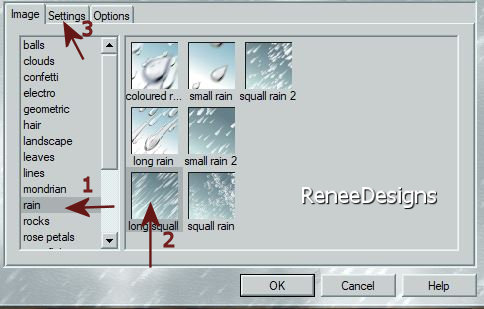
89. Effects – Plugins - Creativity- Splatter
-Image
1. Rain
2. Long Squale
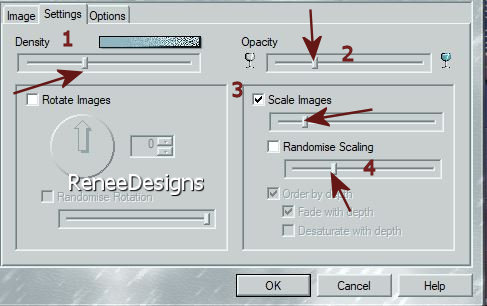
Settings
a) Set parameters as capture
b) Checked:Scale
images
c) Place the cursors as indicated by the arrows
90. With Eraser Tool remove the too much rain to your taste or -Load selection ‘’Renee-Claudia Giraudo-6’’


91.
Layers-Properties -Reduce the Opacity of this layer to 75%
92. Activate a tube of your choice( You can choose from the different tubes you downloaded at the beginning of this lesson, or take your own -Reduce to your own choice- Paste as a new layer and put in the right place
93.Open the tube ’’ Renee-TUBES-claudia
giraudo-4’’-Edit - Copy- Activate your work -Edit - Paste as a new layer
- Place at the bottom right
94. Layers-Properties -Reduce the Opacity of this layer to 51%
95. Image - Add borders-Symmetric checked: 1 Pixel Color Black
Image - Add borders-Symmetric checked: 10 Pixels Color #641714=3
Image - Add borders-Symmetric checked: 1 Pixel Color #1b3794=1
Image - Add borders-Symmetric checked: 45 Pixels Color #ffffff=5
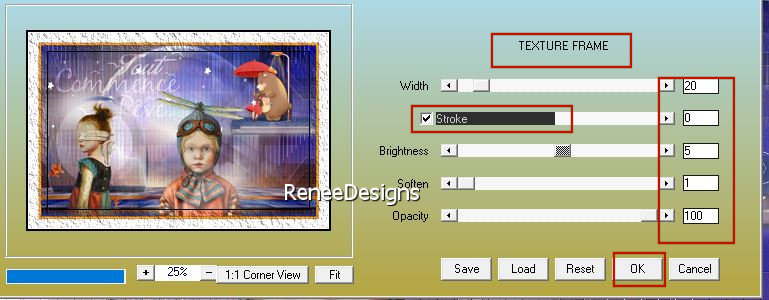
96. Effects – Plugins – AAA Frame- Texture Frame use the settings below
97. Image - Resize 90 % - Resize all layers checked
Save as Jpg
06-09/2021
That's it - Thank you / I hope you enjoyed this lesson
Renée
This lesson was written by Renée 2021
Edited and Update
2021
*
Any resemblance with an existing lesson is a coincidence
* Do not forget to thank the people who work with us and for us -I have appointed the tubeurs and translators
Thanks
*
|
 Translations


