|
Let's start the lesson
Comme un escargot/Like a
snail
Preparation
-Material Properties: Set your Foreground color to color
#254a5d=color 1 – Set your Background color to color
#fff8f0=color 4

1. File-Open a New
Transparent Image in this size : 1000 x 700 Pixels
=Raster 1
2. Flood Fill Tool
 –
Fill the layer with the Foreground color #254a5d=color 1 –
Fill the layer with the Foreground color #254a5d=color 1
3. Layers- New Raster Layer
4. Selections- Select All
5. Open the tube
‘’Renee-TUBES- Escargot7’’
- Edit - Copy- Activate your work -Edit - Paste into Selection

6. Effects- Image Effects-
Seamless Tiling using the default settings
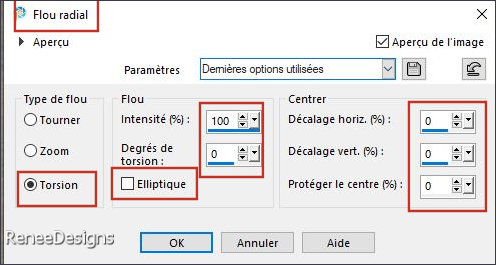
7. Adjust-Blur-Radial Blur
use the settings below
8. Effects- Edge Effects-
Enhance
9. Layers- Merge- Merge
Down
- Repeat: Effects-
Edge Effects- Enhance
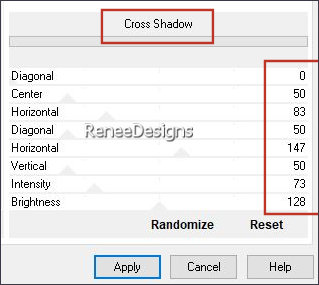
10. Effects- Plugins - Filters
in Unlimited 2.0 - Graphics Plus –
Cross Shadow use the settings below
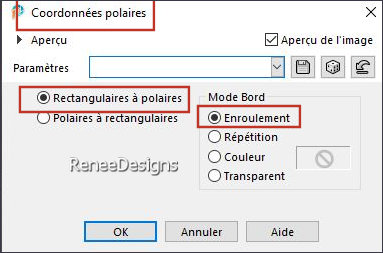
11. Effects–Distortion
Effects– Polar Coordinates-Rectangle to Polar-Wrap
checked
12. Effects- Plugins - Filters
in Unlimited 2.0 - &<Bkg Kaleidoscope>
- 4 QFlip ZBottomL.
- Material Properties: Set
your Foreground color to color #c0736b=color 2 – Set
your Background color to color #fff8f0= 4
13. Layers- New Raster
Layer
14. Selections –load/save
selection –load selection from disc and select my
selection: – ‘’Escargot-1’’
15. Flood Fill Tool
 –
Fill the selection with the with the Foreground color
#c0736b=2 –
Fill the selection with the with the Foreground color
#c0736b=2

16. Effects- Plugins - Filters
in Unlimited 2.0 – Sabercat - Sabers
Convolving Framer...using the default settings
17. Layers- Duplicate
18. Image - Mirror - Mirror
Horizontal (Image - Mirror in older versions of PSP)
– Image - Mirror -
Mirror vertical ( Image - Flip in older versions of PSP)
19. Layers- Merge- Merge
Down
20. Effects- 3D- Effects-
Drop Shadow with these settings: 0/0/100/35 Color
Black
21. Layers- New Raster
Layer
22. Selections –load/save
selection –load selection from disc and select my
selection: – ‘’Escargot-2’’
Material Properties:
Set your Foreground color to color #254a5d 1
23. Flood Fill Tool
 –
Fill the selection with the with the Foreground color
#254a5d=1 –
Fill the selection with the with the Foreground color
#254a5d=1
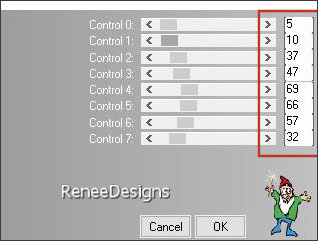
24. Effects – Plugins – L & K’s – Zitah
use the settings below
25. Effects- Edge Effects-
Enhance

26. Effects – Plugins – Toadies – What are you: 20/20
27. Layers-Properties-Set
the Blend Mode to " Hard Light" -Reduce the opacity of
this layer to 55%
Activate the bottom of the
layer palette= Raster 1
28. Layers- New Raster
Layer
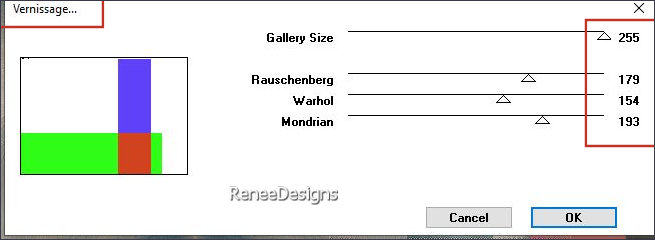
29. Effects – Plugins– VM Instant Art – Vernissage
use the settings below (attention
: Here measurements must be exact)
30. Effects- Plugins – Transparency – Eliminate White
31. Effects- 3D- Effects-
Drop Shadow with these settings: 0/0/50/50 Color Black
DO NOT ADD A NEW LAYER
32. Selections –load/save
selection –load selection from disc and select my
selection: – ‘’Escargot-3’’
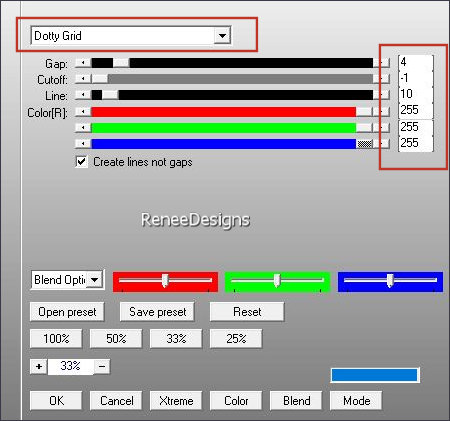
33. Effects- Plugins - AP[Lines] Lines – SilverLining
use the settings below
On the same layer
34 . Selections –load/save
selection –load selection from disc and select my
selection: – ‘’Escargot-4’’
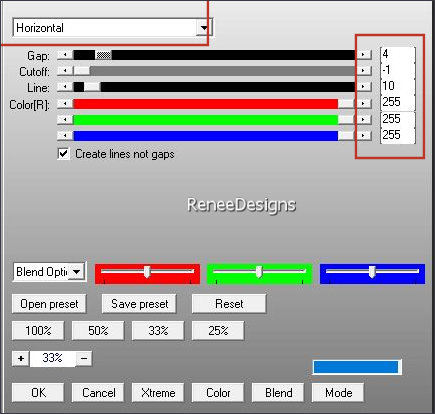
35. Effects- Plugins - AP[Lines] Lines – SilverLining
use the settings below
36.
Layers-Properties-Set the Blend Mode to " Multiply"

Activate the bottom of the
layer palette -Raster 1
37. Selections –load/save
selection –load selection from disc and select my
selection: – ‘’Escargot- 5’’
38. Selections- Promote
Selection to Layer
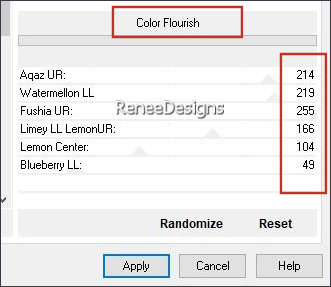
39. Effects- Plugins - Filters
in Unlimited 2.0 - &<Sandflower Specials°v°
> - Color Flourish use the settings below
40.
Layers-Properties-Reduce the opacity of this layer to 63%
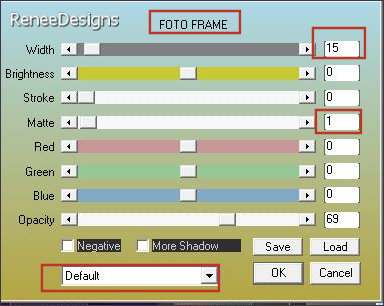
41. Effects- Plugins – AAA Frame – Foto Frame
use the settings below

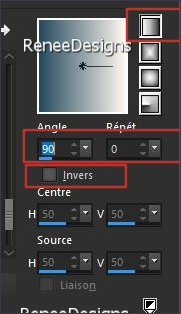
- Material Properties:
Set your Foreground color to color #254a5d=color 1 –Set
your Background color to color #ffffff=5
- Replace your Foreground
color with a Foreground/Background Linear Gradient
configured like this
42. Layers- New Raster
Layer
43. Flood Fill Tool
 –
Fill the layer with the Gradient –
Fill the layer with the Gradient
44. Effects- Plugins - Filters
in Unlimited 2.0 -&<Bkg Designer sf10
III> - SE Shiver : 100/ 22
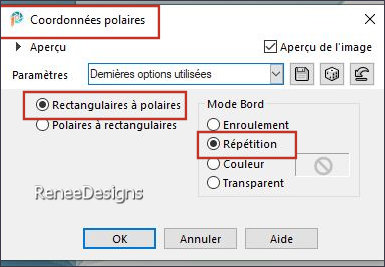
44. Effects- Plugins - Fm Tiles Tools - Saturation Emboss
45. Effects–Distortion
Effects– Polar Coordinates-Rectangle to Polar-Repeat
checked
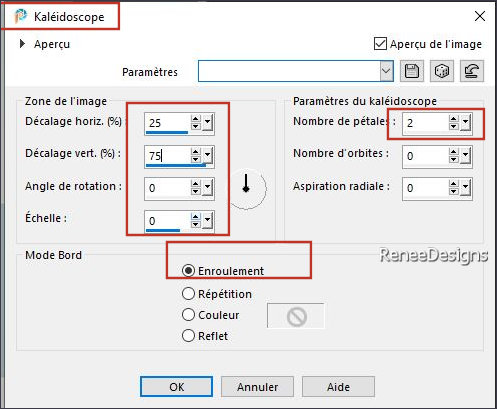
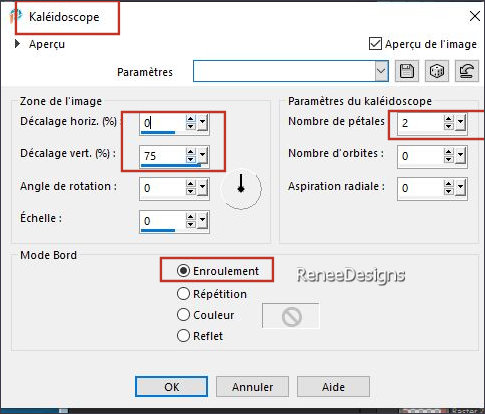
46. Effects- Reflection
Effects- Kaleidoscope use the settings below-Wrap
checked
47. Effects- Plugins - Filters
in Unlimited 2.0 -&<Bkg Designer sf10
III> - SE Shiver : 27/22
48. Effects- Edge Effects-
Enhance
49. Effects- Plugins - Filters
in Unlimited 2.0 - Andrew's Filters 2 -
Curvey Extra Special...use the settings below
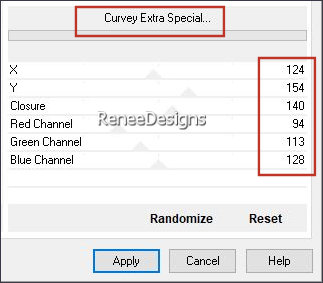
49. Effects- Reflection
Effects- Kaleidoscope use the settings below-Wrap
checked
50. Layers-Properties-Set
the Blend Mode to " Overlay "
50. Effects -User Defined
Filter – Emboss 3 using the default settings
- Layers- Arrange- Bring to
Top
Your work and Layer Palette
look like this now
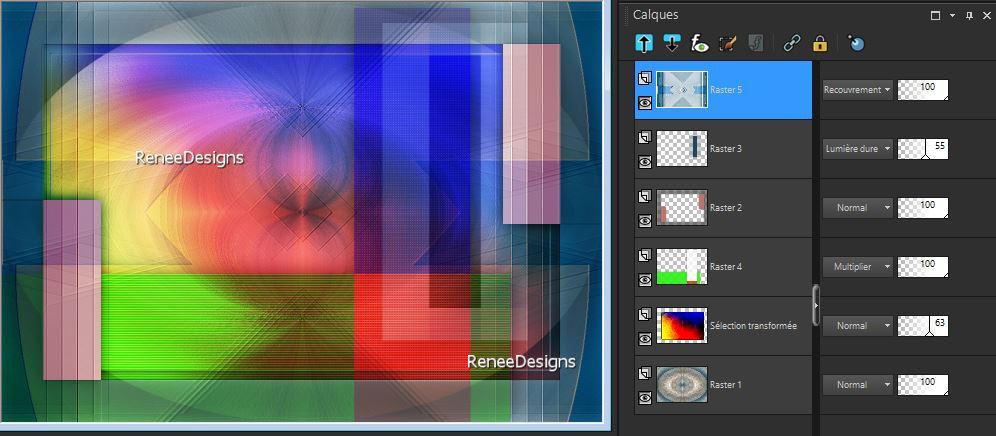
- In the layer palette,
activate the second layer from below (promoted selection)
51. Layers- Duplicate
52. Effects- Plugins – Mura’s Meister – Perspective Tiling
use the settings below
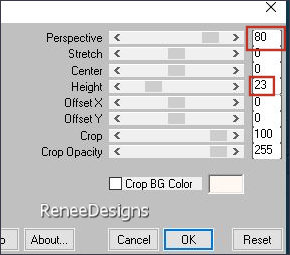
53. Selections –load/save
selection –load selection from disc and select my
selection: – ‘’Escargot- 6’’
54. Adjust-Blur- Gaussian
Blur -Radius 15%

55. Layers-Properties-Set
the Blend Mode to " Hard Light " -Reduce the opacity of
this layer to 100%
56. Effects- Reflections
Effects- Rotating Mirror
using the default settings
57. Layers- Duplicate
58. Image - Mirror - Mirror
vertical ( Image - Flip in older versions of PSP)
59. Effects- Geometric
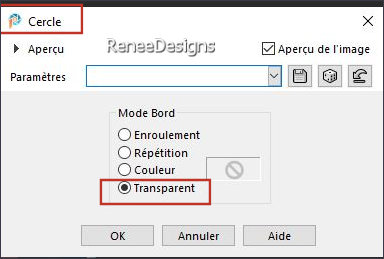
Effects- Circle-Transparent checked
- Activate the top of the
layer palette
60. Layers- New Raster
Layer
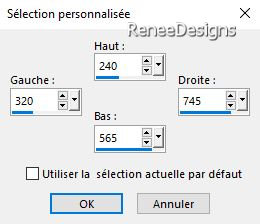
61. Activate Selection Tool
-Custom Selection (S) -Rectangle with these settings 
62. Flood Fill Tool
 –
Opacity 60% - Fill
the selection with the background color #ffffff=5 –
Opacity 60% - Fill
the selection with the background color #ffffff=5
63. Selections - Modify -
Contract 35 Pixels


64. Effects- Plugins – Simple – 4 Way average
65. Effects - Geometric
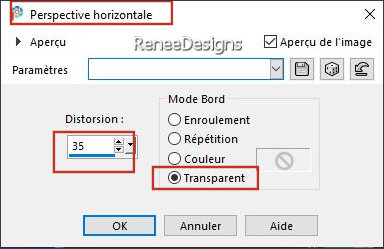
Effects – Perspective Horizontal-Transparent checked
66. Effects–Distortion
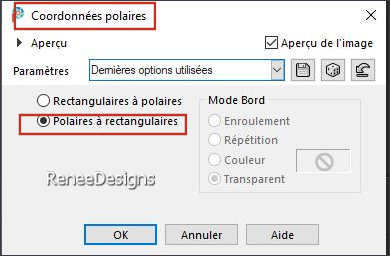
Effects– Polar Coordinates-Polar to Rectangular checked
67. Adjust- Blur- Gaussian
Blur -Radius 15%
67. Effects- Plugins - Filters
in Unlimited 2.0 – Toadies - Living Sine
(linear) using the default settings
68. Layers-Properties-Set
the Blend Mode to " Dodge "
69. Open the Tube ‘’ Renee-TUBES- Escargot10’’
-Edit - Copy- Activate your work -Edit - Paste as new
layer
- Move the tube into the
right place– Drop shadow of your choice
70. Layers- New Raster
Layer
71. Selections –load/save
selection –load selection from disc and select my
selection: – ‘’Escargot- 7’’
72. Effects- 3D- Effects-
Drop Shadow with these settings: 4/4/50/15 Color Black
73. Open the Tube
‘’Texte-Escargot’’ -Edit - Copy- Activate your work -Edit
- Paste as new layer
74. Image - Add
Borders-Symmetric checked: 1 Pixel -Color #254a5d=1
Image - Add Borders-Symmetric checked: 10 Pixels -Color
#fff8f0= 4
Image - Add Borders-Symmetric checked: 1 Pixel -Color#c0736b=2
75. Selections- Select All
76. Image - Add
Borders-Symmetric checked: 50 Pixels -Color #ffffff=5
77. Effects-3D-Effects-
Drop Shadow with these settings : 0/0/50/50 Color
Black

78. Now the embellishment
of our work
Open this folder "Comme-un escargot-Tubes en plus "
Select a tube and add it as a new layer to your work -
Resize if necessary
- Drop shadow of your
choice
- Paste the author's
watermark on your work and your own watermark
79. Layers- Merge -Merge
All ( flatten)
80.
Image -
Resize - 1000 Pixels width - Resize all layers- Checked
Save as JPG
I hope you enjoyed this lesson
Renée
This lesson was written by Renée 20/02/2024
Edited and Update
in 2024
*
Any resemblance with an existing lesson is a coincidence
* Do not forget to thank the people who work with us and
for us - I have appointed the tubeurs and translators
Thanks
*
|

 Translations


