|
Let's start the lesson.
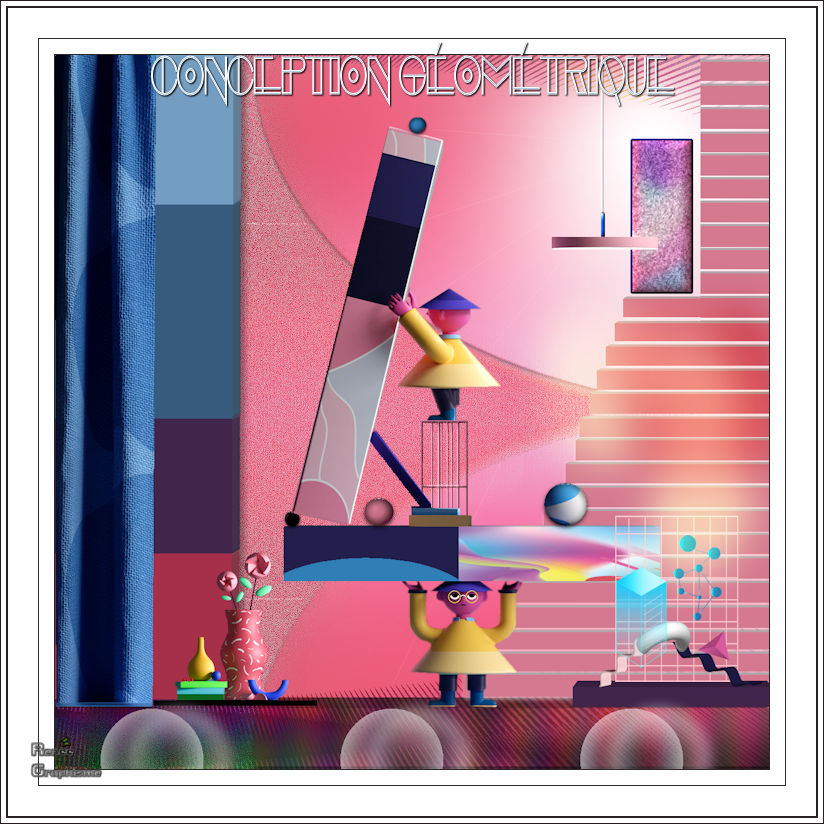
Conception
Géométrique/Geometric Design

-Preparation
-
Color Palette: Set your Foreground color to color #d47990=1 – Set your Background color to color #a62f4a= 7
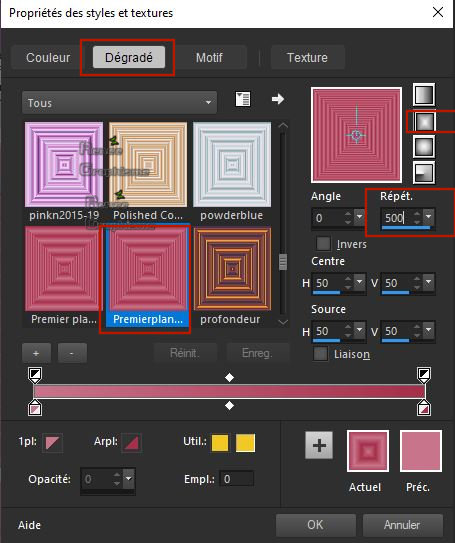
- Set your Foregroundcolor to foreground-background rectangular gradient configured like this
1. File: Open a new Transparent image
1190 x 1190 Pixels (We will work with a large format.
It is easier to work with this tutorial.
I will adapt it later )
2. Activate Flood Fill Tool – Flood fill the layer with the gradient
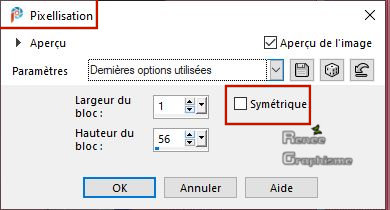
3. Effects – Distortion Effects – Pixelate use the settings below
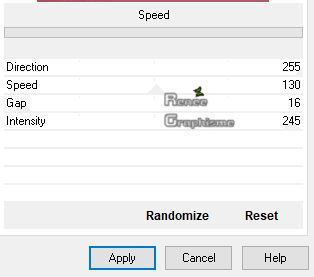
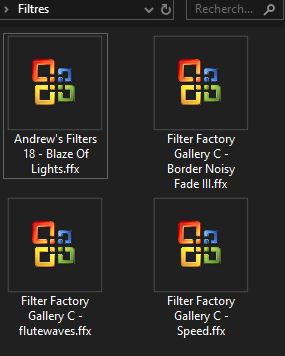
4. Effects –Plugins-
Unlimited 2.0 - Filter Factory Gallery C - Speed use the settings below
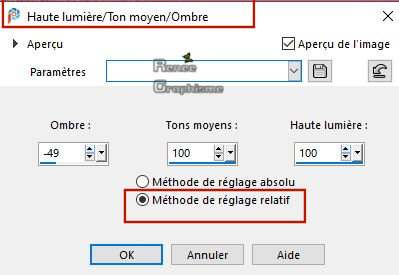
5. Adjust–Brightness
and Contrast-Highlight/Midtone/Shadow
Relative adjustment method checked
6. Effects – Edge Effects-Enhance
7. Adjust-Sharpness- Sharpen
8. Selections –load/save selection –load selection from disc and select my selection: ‘’ Renee_Geometrique 1’’
9. Selections-Promote Selection to Layer
10. Adjust-Blur- Gaussian Blur; Radius 45
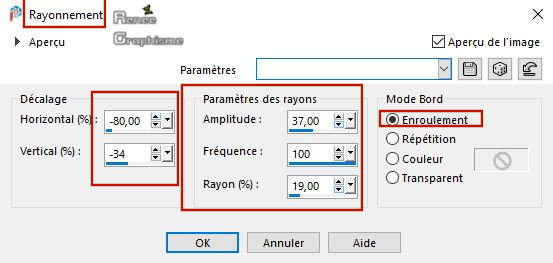
11. Effects – Illumination Effects Sunburst use the settings below

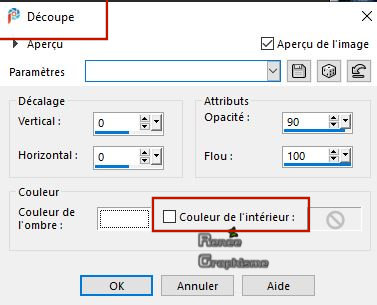
12. Effects - 3 D Effects – Drop Shadow with these settings : 3/2/65/12 Color Black
-Selections-Select None
13. Layers- Duplicate
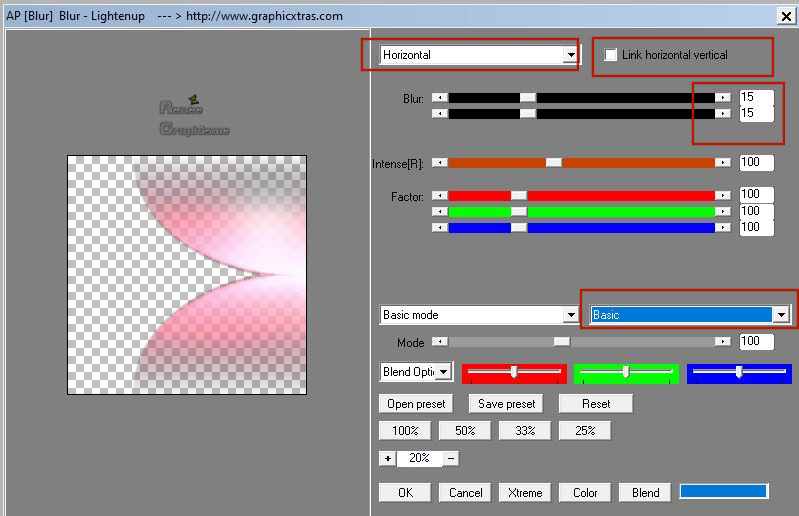
14. Effects -Plugins –AP [ Blur] Blur – Lightenup use the settings below
15.
Layers-Properties-Change the Blend Mode to " Overlay " and Lower the Opacity to 65%
16. Layers- Merge-Merge -Down
17. Open the tube ‘’Geometrique – image
1’’ -Edit - Copy- Activate your work -Edit - Paste as a new layer
18. Objects - Align - Bottom
19. Effects –Plugins-
Unlimited 2.0 - Filter Factory Gallery C – flutewaves with these settings:
150/166/60/146/0
20. Layers-Properties-Change the Blend Mode to " Multiply " and Lower the Opacity to 91%
21. Effects – Plugins– Alien skin Eyecandy 5 Impact – Extrude-Tab-Settings-and select-
Preset ‘Small Offset, No Smoothing
22. Effects – Distortion Effects- Spiky Halo use the settings below
-
Color Palette: Set your Foreground color to color #9ca0aa=4 – Set your Background color to color #307eb6= 3
23. Layers- New Raster Layer
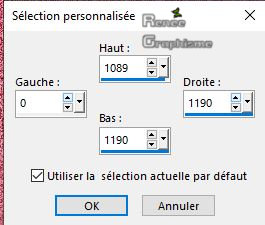
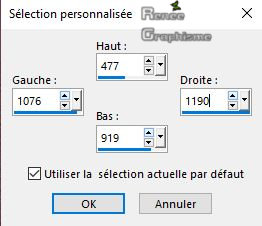
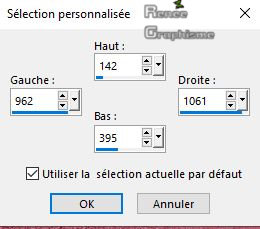
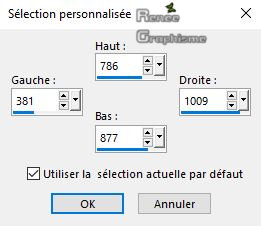
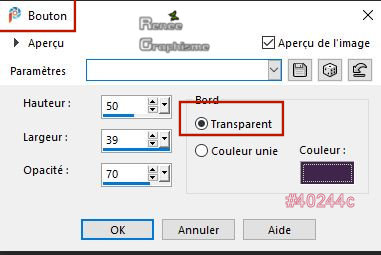
24. Activate Selection Tool -Custom Selection (S) -Rectangle with these settings
25. Activate Flood Fill Tool -Flood fill the selection with the foreground color=4
26. Effects –Plugins-
Unlimited 2.0 - Andrew's Filters 18 -Blaze Of Lights..Using the default settings- Random : 255
27. Adjust- Blur- Gaussian Blur; Radius 20
-Selections-Select None
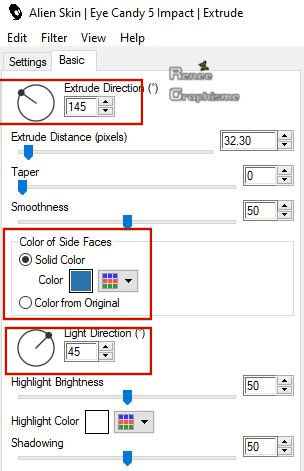
28. Effects –Plugins – Alien skin Eyecandy 5 Impact – Extrude use the settings below-Color #2a72aa
29. Layers-Properties-Change the Blend Mode to " Multiply "
30. Layers- New Raster Layer
31. Selections –load/save selection –load selection from disc and select my selection: ‘’ Renee_Geometrique 2’’
32. Set your Foreground color to color #d47990=1 -Activate Flood Fill Tool - Flood fill the selection with the foreground color=1
33. Effects – Plugins – Alien skin Eyecandy 5 Impact – Extrude use the settings below-Color #f2dee6

-Selections-Select None
34. Effects - 3 D Effects – Drop Shadow with these settings : 3/2/65/12 Color White
35. Activate Selection Tool -Custom Selection (S) -Rectangle with these settings
36.Selections-Promote Selection to Layer
Selections-Select None
37. Effects – Image Effects – Offset with these settings : H = 0 and V = 475
38. Layers- Merge-Merge -Down
39. Layers-New Raster Layer
40. Selections –load/save selection –load selection from disc and select my selection: Renee_Geometrique 3’’
41. Set your Foreground color to color #739dc1=8 -Activate Flood Fill Tool – Flood fill the selection with the foreground color = 8
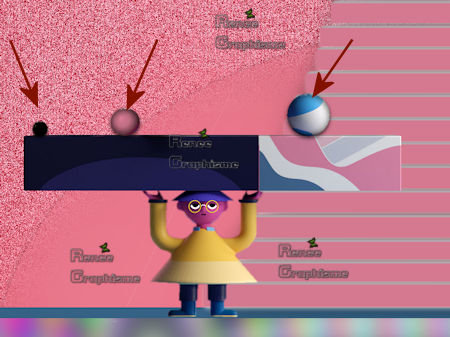
Layers-New Raster Layer
42. Selections –load/save selection –load selection from disc and select my selection: Renee_Geometrique 4’’
- Set your Foreground color to color #365b7d=2 -Activate Flood Fill Tool – Flood fill the selection with the foreground color=2
Layers-New Raster Layer
43. Selections –load/save selection –load selection from disc and select my selection: Renee_Geometrique 5’’
-Set your Foreground color to color #41254b=6 -Activate Flood Fill Tool – Flood fill the selection with the foreground color=6
Layers- New Raster Layer
44. Selections –load/save selection –load selection from disc and select my selection: Renee_Geometrique 6’’
Set your Foreground color to color #a62f4a=7 -Activate Flood Fill Tool – Flood fill the selection with the foreground color=7
Selections-Select None
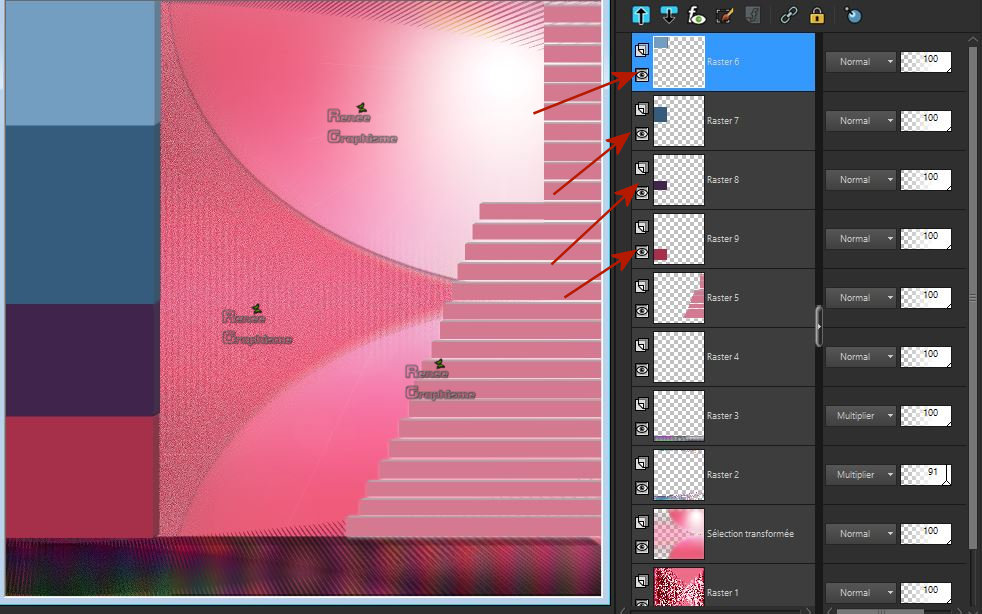
- On this Layers (
raster 5 / 6 / 7 and 8 ) the 4 shapes
45. Effects –
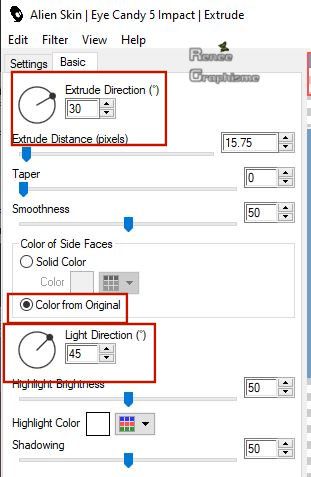
Plugins– Alienskin Eyecandy 5 Impact - Extrude use the settings below
-Your work and Layer Palette look like this now-You should have this result (Arrange the layers correctly)
- To replace the top of the layer-palette
46. Layers- Merge-Merge 3 x Down ( the 4 layers of the cubes)
47. Effects - 3 D Effects – Drop Shadow with these settings : -3/ 8 / 36 /16 Color Black
48. Open the tube ‘’tenture’’ -Edit - Copy- Activate your work -Edit - Paste as a new layer
49. Objects – Align
- Left -Objects-Align– Top
50. Layers- New Raster Layer
51. Activate Selection Tool -Custom Selection (S) -Rectangle with these settings
52. Open the Tube ‘’Geometrique-image-miroir’’ -Edit - Copy- Activate your work -Edit - Paste Into Selection
53. Effects -Plugins-– Alien skin Eyecandy Textures –Tab-Settings and select -Swirl Preset

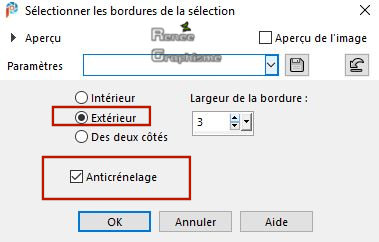
54. Selections- Modify-Select Selection Borders use the settings below
55.Set your Foreground color to color #221f4c=5- Activate Flood Fill Tool – Flood fill the selection with the foreground color= 5
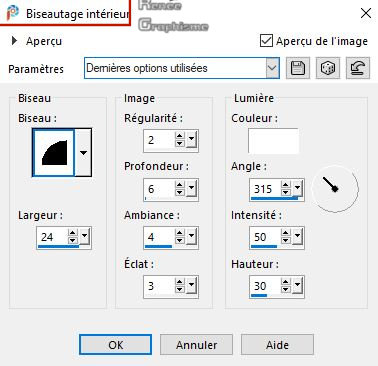
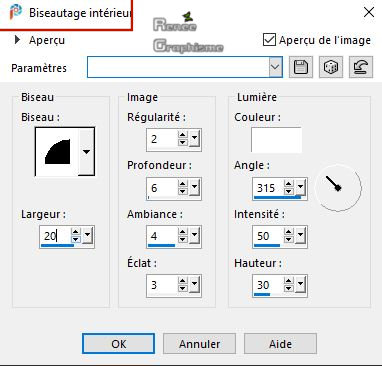
56. Effects – 3D Effects
- Inner Bevel with these settings
Selections-Select None
57. Repeat: Effects – 3D Effects - Inner Bevel with the same settings
58. Open the tube ‘’Geometrique-image-
lampe.png’’ -Edit - Copy- Activate your work -Edit - Paste as a new layer
- Activate your Move Tool (M) move it in the right place (see finished image )
59. Activate Pen Tool -Color White– Line Style -Straight Line-Width 3

Draw the suspension cord of the lamp -Press the Shift Key on your Keybord and draw a white line(see finished image )
60. Effects - 3 D Effects – Drop Shadow with these settings : 1/1/45/ 2 -Color Black
61. Layers- Merge- Merge Down
-
Open the tube ‘’tubes-
geometrique’’ in your PSP
(Don't close it, we'll need it later)
62. On this tube ‘’tubes-
geometrique’’
- Activate the layer
‘’personnage 1 ‘’of the tube
- Edit - Copy- Activate your work -Edit - Paste as a new layer
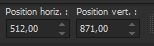
- Pick Tool: (K) on your keyboard -Enter these parameters for the X:512,00 and Y:871,00 positions on the Toolbar
- Press any key to close the Pick Tool
63. Layers- New Raster Layer
64. Activate Selection Tool -Custom Selection (S) -Rectangle with these settings
65. Activate the Flood Fill Tool -Flood fill in the selection with a "Color of Choice" or two Colors or Patterns of your choice
(I added a texture image included into the zipfile )
66. Effects – Plugins -EyeCandy Impact – Extrude use the settings below

67. Make 3 balls like this and place them as shown in the example below
(I have added predefined shapes and image shapes to create these elements)
- You can Colorize or Glass Effect or Pattern to your own taste (3 balls)
- Attention put the tube exactly in the right place with the point on the small ball, you can possibly reduce the balls slightly so that it fits
Back to the tube ‘’tubes-
geometrique’’
68. Open the tube ‘’vase 1’’ -Edit - Copy- Activate your work -Edit - Paste as a new layer
-Activate your Move Tool (M) move to the bottom left
- You may minimize your working area for a moment, but do not close, we will need it again soon
69. File: Open a new Transparent image 100 x 300 Pixels (rename it "Grille")
70. Selections –load/save selection –load selection from disc and select my selection: ‘’ Renee_Geometrique 7’’
71. Activate Flood Fill Tool – Flood fill the selection with the foreground color= 1
72. Effects – 3D Effects - Buttonize with these settings
73. Effects – 3D Effects -Inner Bevel with these settings
Selections-Select None
-Put this image aside as well( "Grille") for a moment, but do not close
- Activate your minimized Image of point 68 (Original)
74. Open the tube ‘’Geometrique-image
colonne penchée .png’’ -Edit - Copy- Activate your work -Edit - Paste as a new layer
- I put the hand on the column, so that you can connect the tube to it later
(Carefully set it on your little ball and the edge of the bottom wall).
Attention put the tube exactly in the right place with the point on the small ball, you can possibly reduce the balls slightly so that it fits
75. Open the
tube’’ personnage 2’’ -Edit - Copy- Activate your work -Edit - Paste as a new layer and move the tube as shown in the example below
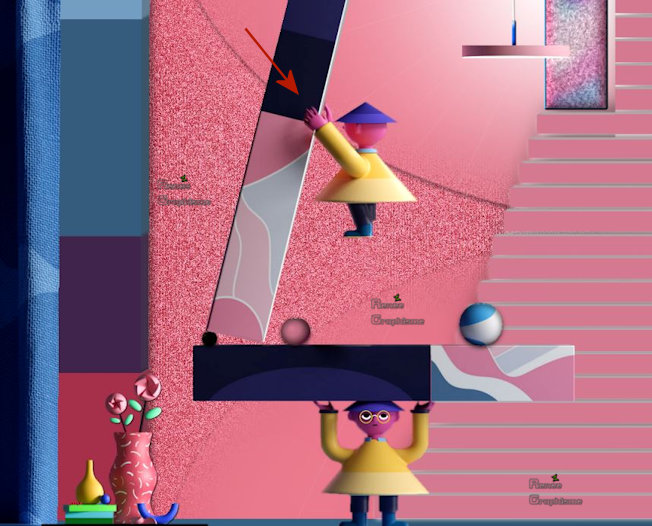
- Activate your minimized Image of point 74 (Grille )
76. Edit - Copy- Activate your work -Edit - Paste as a new layer
Place under the feet of "character 2"
77. Open the tube ‘’Geometrique-Support’’ -Edit - Copy- Activate your work -Edit - Paste as a new layer
-Activate your Move Tool (M) move it in the right place (see finished image)
Be careful to check that everything is in position to have a logical balance effect
Take a good look at the large image, nothing should stick out! If necessary, erase the tube "Grille' at the base if it is too large
78. Layers- New Raster Layer
79. Selections –load/save selection –load selection from disc and select my selection: ‘’ Renee_Geometrique 8’’
80. Set your Foreground color to color #ffffff -Activate Flood Fill Tool – Opacity 40% – Flood fill the selection with the foreground color #ffffff
81. Effects – 3D Effects -Cutout with these settings
- Settings to the paint pot at 100%
Selections-Select None
82. Effects – Plugins – ECWS halftone – Random noise: 188/165
83. Effects - 3 D Effects – Drop Shadow with these settings : - 2/ 46 /100 /32 Color White
- We are going to make Geometric Decorations in the lower right corner of the work
- Open the tube ‘’pour décors géométrique final ‘’
- I have 8 levels of decorations that you can use. (or a tube of your choice), Copy it and Paste it as a new Layer .
Make sure everything is in the right place (see finished image )
84. Open de tube ‘’Geometrique-image-tache’’ -Edit - Copy- Activate your work -Edit - Paste as a new layer
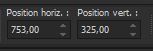
Pick Tool: (K) on your keyboard -Enter these parameters for the X:753,00 and Y:325,00 positions on the Toolbar
- Press any key to close the Pick Tool
85. Layers-Properties-Set the Blend Mode to " Overlay "
86. Attention !! Put a small ball to the top of the crooked column (see finished image )
87. Layers- Merge- Merge Visible
88. Image-
Resize -60% -Resize All Layers -Checked !!
89 Put the Script in your Script folder –Restricted script from PSP-
View - Toolbars - Script checked !! in your psp
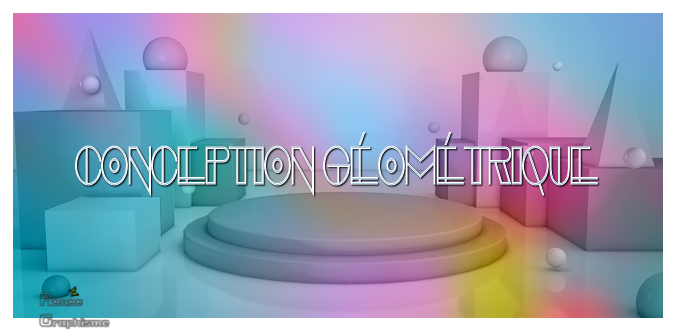
Activate toolbar Script, choose my file in the list
"Conception Géométrique" click the little blue arrow and let the script run
90. Activate your Text Tool- For Renée Font "Evensong Hollow.ttf" (Included into the zipfile)
Size and Colors to your taste -Write your text
-Layers- Merge- Merge All (Flatten)
Save as JPG
I hope you enjoyed this lesson
Renée
This lesson was written by 20-09-2019
Edited and Update
2019
*
Any resemblance with an existing lesson is merely a coincidence
*
Do not forget to thank the people who work with us and for us. I have appointed the tubeurs and translators
Thanks
*
|
 Translations


 If a plugin supplied appears with this icon it must necessarily be imported into Unlimited *