|
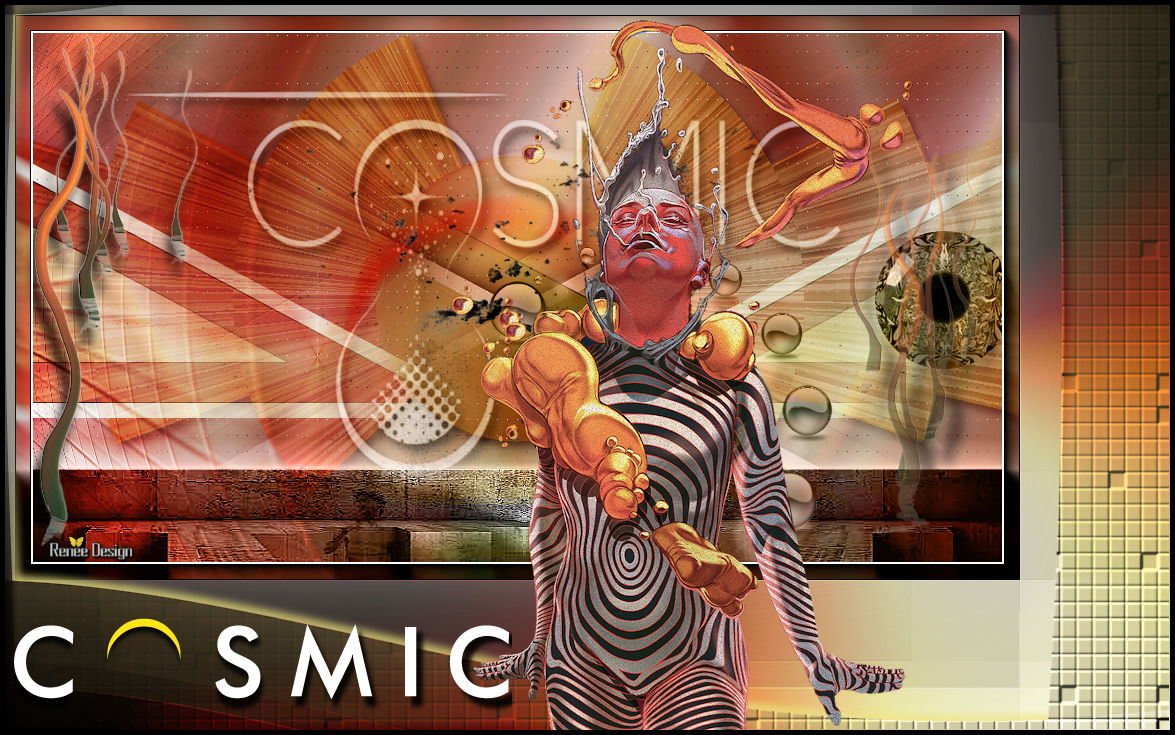
Let's start the lesson " Cosmic"
Used Colors
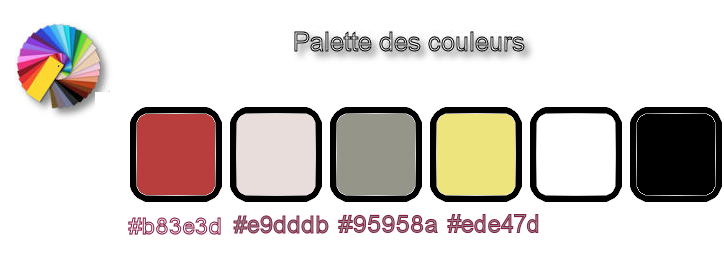
- Preparation - Color Palette: Set your Foreground color to #e9dddb -Set your Background color to#b83e3d
-
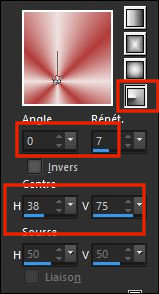
Prepare a radial gradient configured like this
1.
File: Open a transparent image 1005 x 565 Pixels
2.
Activate the Flood Fill Tool and fill the layer with the gradient
3.
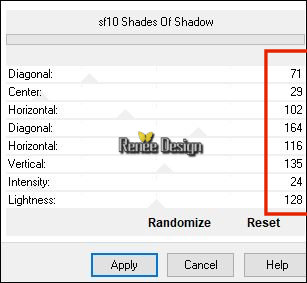
Effecte- Plugins – Unlimited - &<Background Designers IV >sf10
Shades of Shadow
4.
Effects –Plugins -Unlimited ICNETFILTERS / Button & frame – 3 D
Glass Frame (rounded) 255 /78
5.
Effects –Plugins -Unlimited – It@lian Editors Effect- Effeto
Fantasma 41/ 75
6. Effects-
Edge Effects- Enhance More
7.
Effects –Plugins- Unlimited – It@lian Editors Effect- Effeto
Fantasma 41/ 41
8.
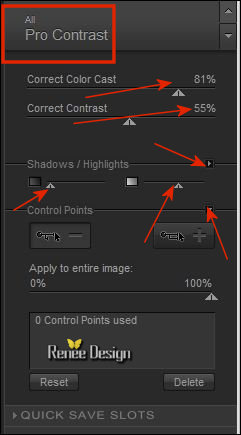
Effects –Plugins– Nick Color Effex Pro 3.0/Pro
Contrast use the settings below
9.
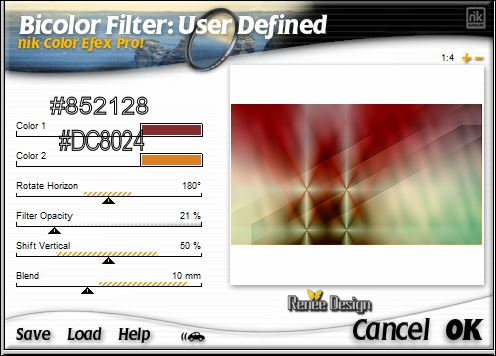
Effects –Plugins – NICK COLOR EFEX PRO 1- Bicolor
Filter /User Defined( Filter are included in the zip file )
10.
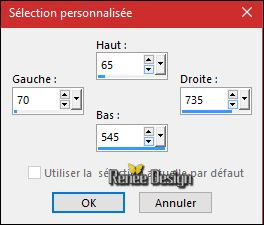
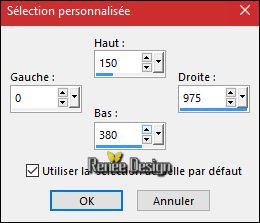
Activate Selection Tool -Custom Selection (S) -Rectangle with these settings
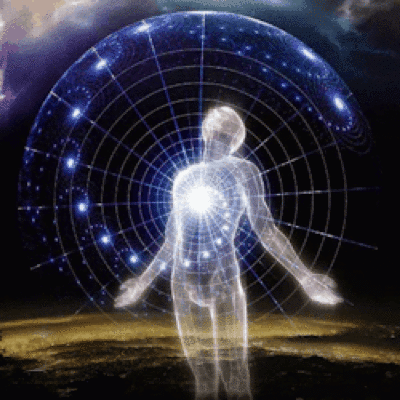
11.
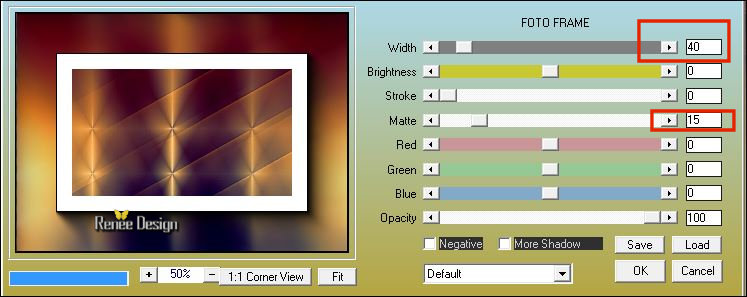
Effects –Plugins – AAA Frame – Foto Frame use the settings below
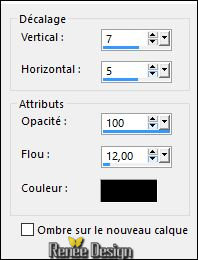
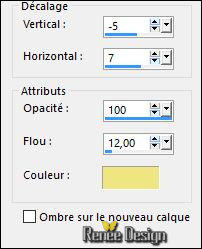
12. Effects – 3D Effects –Drop Shadow use the settings below
13.
Selections- Promote Selections to Layer
Selections- Deselect All
14. Effects>Distorsion Effect>Wind - From Left Right -Wind strength 100
15. Effects>Distorsion Effect>Wind - From Right - Wind strength 100
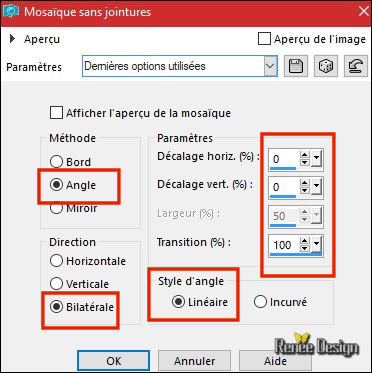
16. Effects- Image Effects- Seamless tiling use the settings below
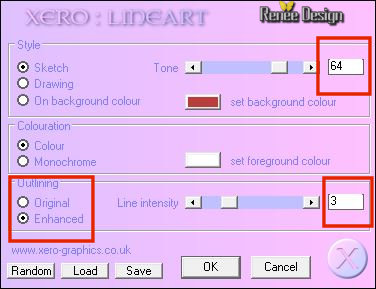
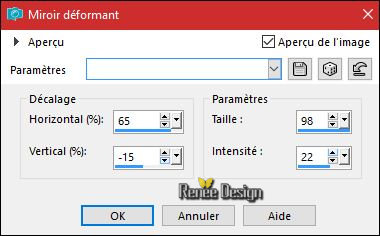
17. Effects
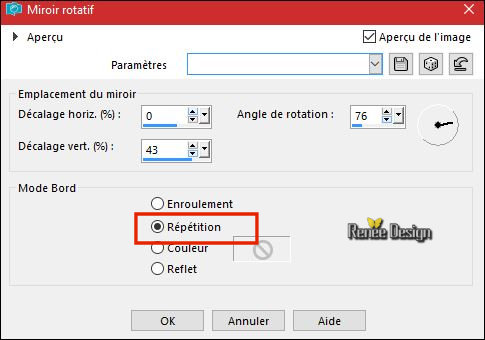
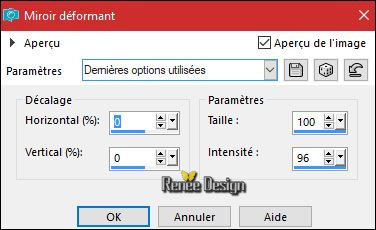
– Reflection Effects – Rotating Mirroir
18.
Layers- Duplicate
19. Image - Mirror - Mirror Horizontal (Image - Mirror in older versions of PSP)
-Layers- Merge- Merge Down
- Color-Palette-Change your foreground color into #ffffff
20. Layers- New Raster Layer
21. Activate the Flood Fill Tool and fill the layer with the foreground color #ffffff
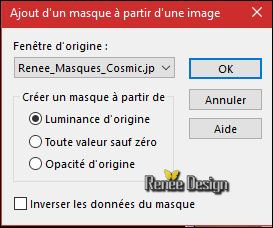
22. Layers- New Mask Layer from Image and select Mask:
‘’Renee_Masque_Cosmic’’
- Layers- Merge- Merge Group
23. Effects – 3D Effects –Drop Shadow with the same settings
24.
Set the Opacity of this layer to 36%
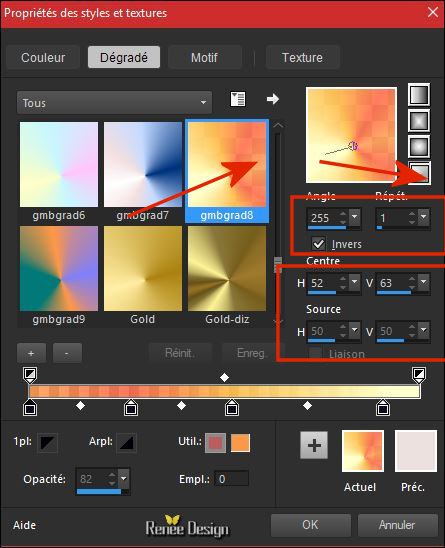
- Properties Foreground - Set your foreground material into gradient and select ‘’gmbgrad8’’ /
Prepare a radial gradient configured like this.
25. Layers- New Raster Layer
26.
Activate Selection Tool -Custom Selection (S) -Rectangle with these settings
27. Activate the Flood Fill Tool and fill the selection with the gradient
Selections- Deselect All
28. Effects
-Plugins -or /Unlimited – VM Toolbox – Brightness
noise 128/0
29. Effects
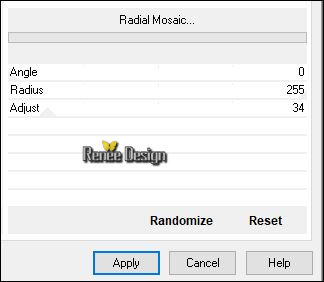
-Plugins -or/ Unlimited – VM Toolbox – Radial
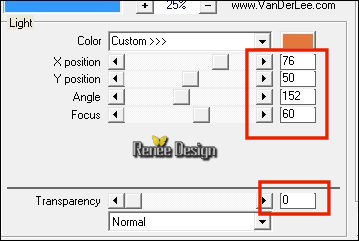
Mosaic
30.
Layers-Properties-Set the Blend Mode to " Soft Light "
31. Effects – 3D Effects –Drop Shadow with the same settings
32. Open your tube ‘’ Renee_Cosmic_Image 1.png’’
- Edit - Copy- Activate your work -Edit - Paste as a new layer.
- Move Tool / place your tube to the bottom of your image
33. Layers-Properties-Set the Blend Mode to "Luminance (Legacy)"
34. Effects- Edge Effects- Enhance
35. Open the tube ‘’Cosmic_Oeil ‘’
- Edit - Copy- Activate your work -Edit - Paste as a new layer.
- Move Tool / place your tube to the right side of your image
- Layers-Properties-Set the Blend Mode to "Luminance (Legacy)"
36. Open the tube ‘’Renee_Tube_GM’’(Do not close)
- Image
-Resize to 42%
- Edit - Copy- Activate your work -Edit - Paste as a new layer.
37.
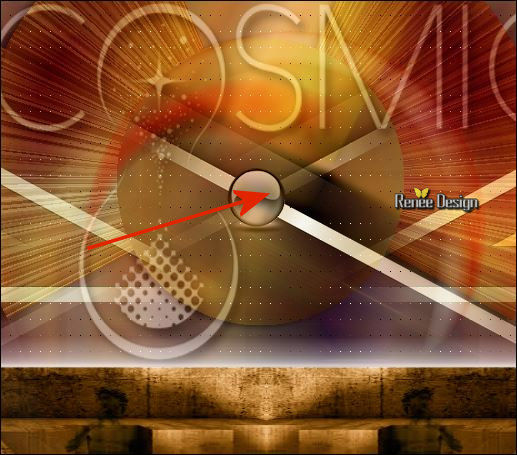
Effects- Image Effects- Offset with these settings: H = - 275 and V = -
25
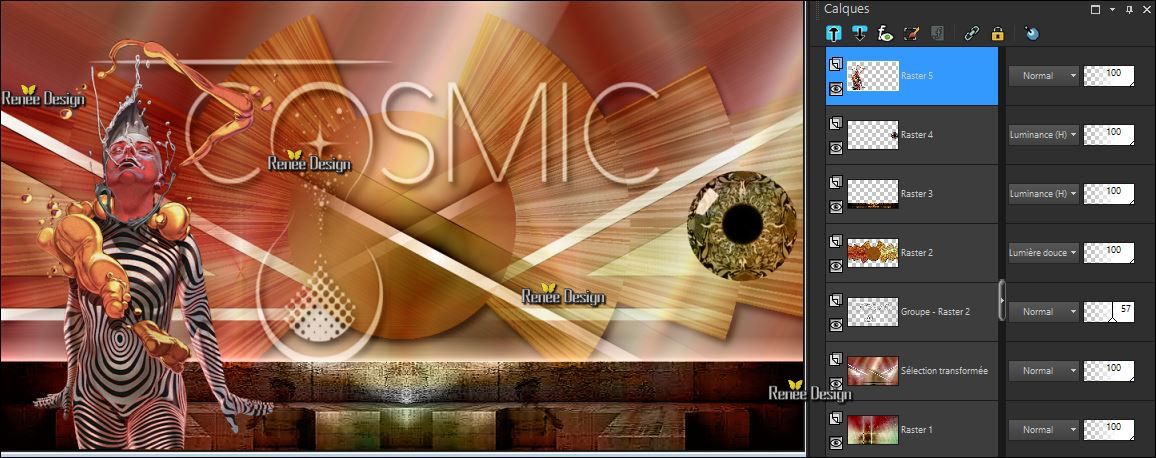
Your work and Layer Palette look like this now-You should have this result
38. Effects
–Plugins - Unlimited – Toadies - Ommadawn... 62/48/156/17
39. Effects- Edge Effects- Enhance More
40. Effects
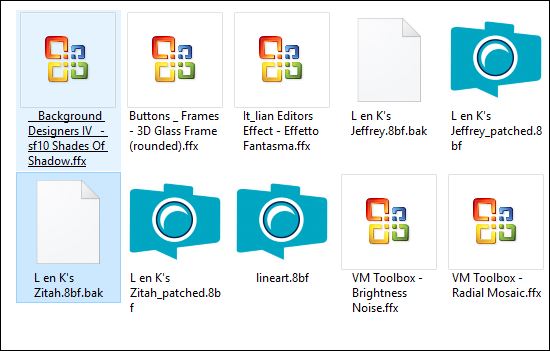
– Plugins – L & K’s – Jeffrey
45
41. Effects
– Plugins – Xero – Lineart
-Color-Palette-Change your foreground color into #ffffff
42. Effects- User Defined Filter – Emboss 3 using the default settings
43. Effects- Distortion Effects- Warp with these settings
44.Layers-Properties-Set the Blend Mode to " Overlay"
45. Open the tube ‘’Renee_Cosmic_image 2.pspimage’’
- Edit - Copy- Activate your work -Edit - Paste as a new layer.
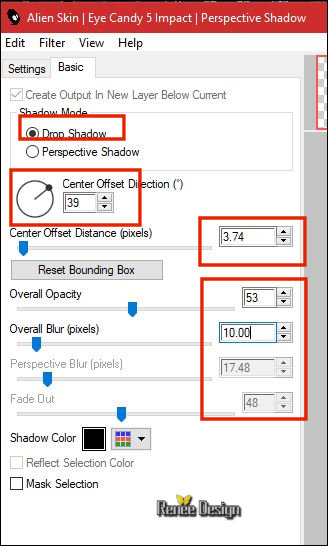
46.
Effects -Plugins – EyeCandy 6 – perspective Shadow-
Setiing tour ( Drop height 1)
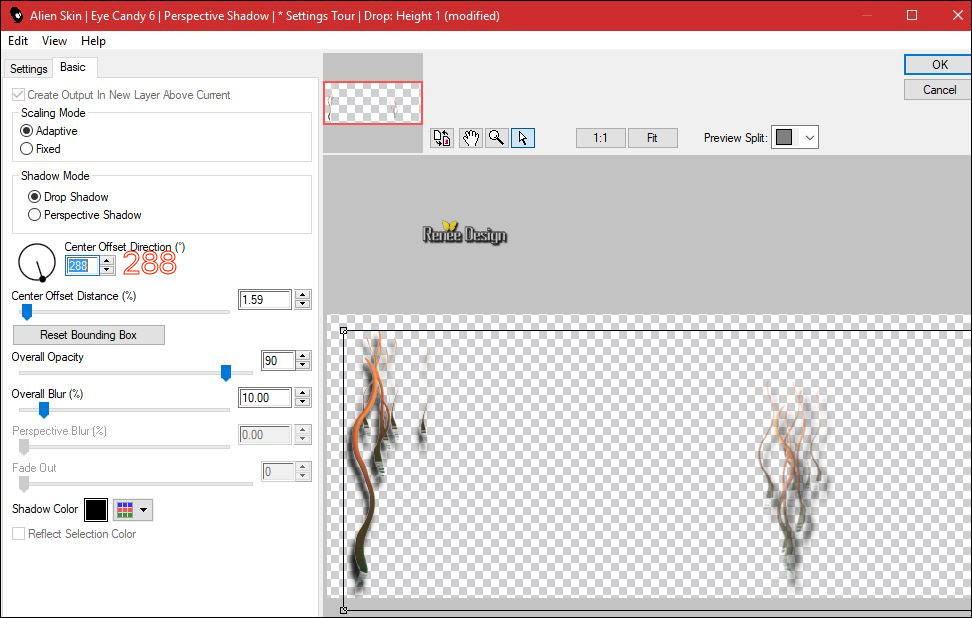
Or in
EyeCandy 5 - Impact- Perspective Shadow with these settings
47. Open the tube ‘’Renee_Cosmic_image3’’
- Edit - Copy- Activate your work -Edit - Paste as a new layer.
- Layers-Properties-Set the Blend Mode to " Soft Light "
48. Effects- Image Effects- Offset with these settings: H = 25 and V = - 57
- Activate the second layer from the bottom (Promoted Selection )
49. Effects
– Plugins – L & K’s – Zitah use the settings below
49. Activate Picture Tube Tool and select ‘’ Corel_10_181.PspTube’’- with these settings

- Layers- New Raster Layer - Put the Picture Tube in the middle of your image
- Adjust-Hue and Saturation Colorize : Hue 58 and Saturation 66 (Attention this is for the red ball )
- Layers-Properties-Set the Blend Mode to "Luminance (Legacy)"
( Do you have problems with this?
Tube are included in the zipfile''
tube_corel.png''/ and paste as a new layer on your working area
)
50. Layers- Duplicate
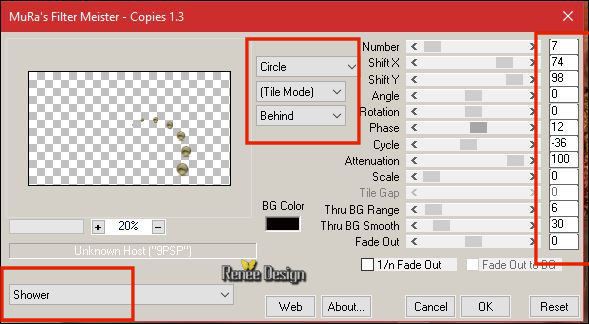
51. Effects
–Plugins - Mura’s Meister – Copies use settings below
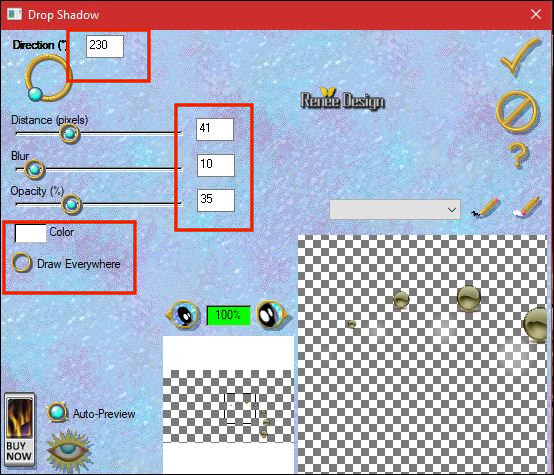
52. Effects
–Plugins – EyeCandy 3 – Drop shadow/ Color #ffffff
.jpg) If you want to use your filter
and this image appears If you want to use your filter
and this image appears
Simply click on OK and the filter window opens and you can use the filter
53. Open the tube ‘’Renee_cosmic_image 4’’
- Edit - Copy- Activate your work -Edit - Paste as a new layer.
- Color-Palette-Change your foreground color into
#95958a
54. Activate Change To Target Tool with these settings
Place the brush(carefully) on this part of the tube in order to clarify the area

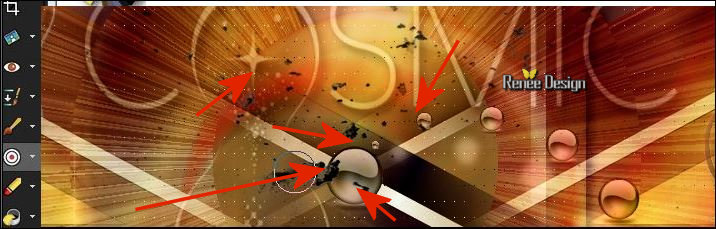
55. Layers- Merge- Merge Visible
56. Image - Add borders-Symmetric checked 1 Pixel black
Edit-Copy!!
57.
Selections- Select All
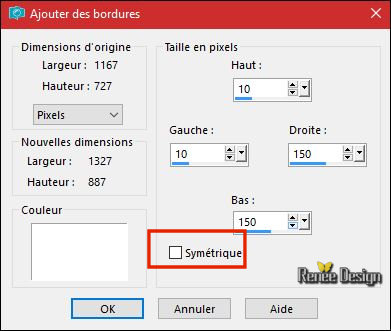
58. Image - Add borders-No Symmetric / Color #ffffff
59. Layers- New Raster Layer
60.
Selection - Invert
61. Paste into selection (Image is still in your PSP memory)
62. Adjust- Blur- Gaussian Blur: Radius: 45
63. Effects
–Plugins – Vanderlee Unplugged X – Defocus
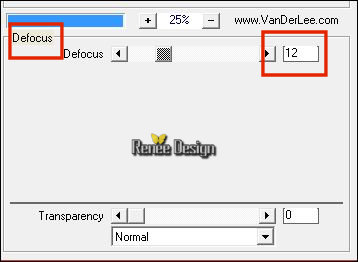
64. Repeat: Effects -Plugins Vanderlee Unplugged X – Defocus 16
65. Effects- Edge Effects- Enhance
66.
Selection - Invert
- In the Layer- Palette: activate the layer underneath
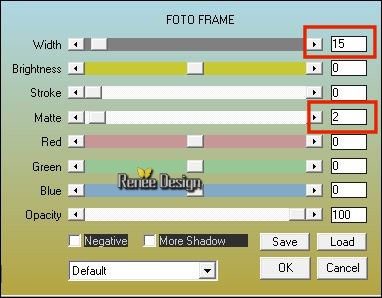
67. Effects
–Plugins – AAA Frame – Foto frame
Selections- Deselect All
- In the Layer- Palette: activate the layer above
68.
Effcets –Plugins – Vanderlee unplugged X – Light/
Color #e2783c
69. Layers- Duplicate
70. Effects- Distortion Effects- Warp with these settings
71. Effects
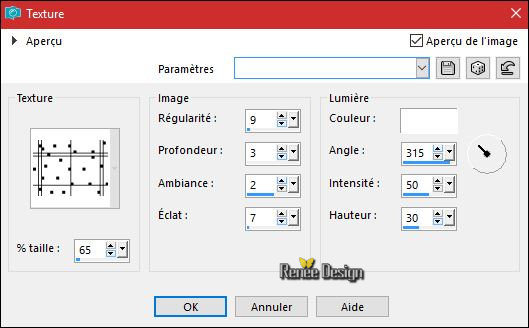
– Texture Effects -Texture and select‘’ @nn_textuur__bloco’’
Place in texturefolder of PSP
72. Effects – 3D Effects –Drop Shadow use the settings below -Color # ede47d
73. Open the tube ‘’Renee_Tubes_GM’’
- Image
-Resize to 60%
- Edit - Copy- Activate your work -Edit - Paste as a new layer.
-
Move it in the right place
74. Add one of the two texts as new Layer
75. Image - Add borders-Symmetric checked 5 Pixels black.
Save as JPG
I hope you enjoyed this lesson
Renée
This lesson was written by Renée 08/08/2017
Edited and Update
2017
*
Any resemblance with an existing lesson is a coincidence
*
Do not forget to thank the people who work with us and for us I have appointed the tubeurs and translators
Thanks
Renée
*
| 

 Translations


 If a plugin supplied appears with this icon it must necessarily be imported into Unlimited *

 All rights reserved