|
Let's start the lesson.
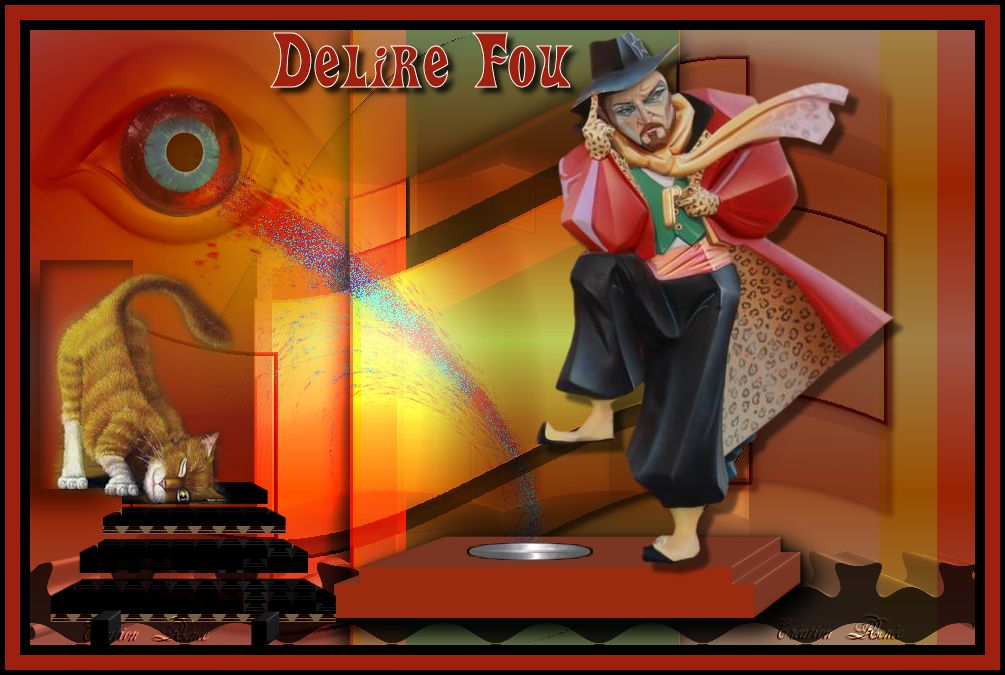
Crazy delirium
1. File - New - New Image 945 x 615 pixels transparent
2. Material Properties: Foreground color to color: #8d97a2 Background color to color:#87665F
3.
Prepare a Linear Gradient as configured like this
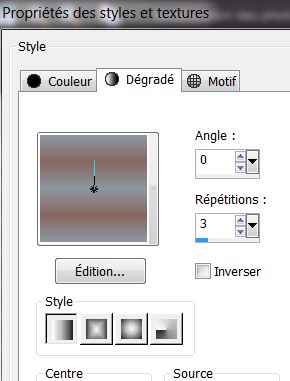
4
Activate Flood Fill Tool and fill the layer with the gradient
5. Layers- Duplicate
6.
Effects- Plugins -Unlimited - Andrew's Filters 24- In Between The
Graps - clic reset and oké
-Repeat this filter a second time the same settings
7.
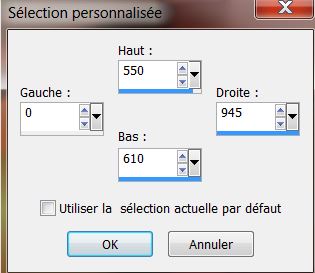
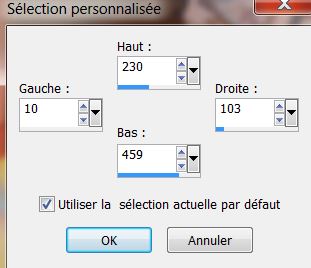
Selection Tool ( S ) Custom selection use settings below
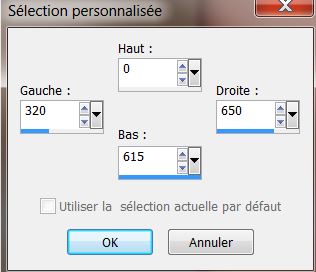
8.
Selections- Promote selection to layer
9.
Selections- Deselect All
10 Effects - 3D Effects - Drop shadow use settings below
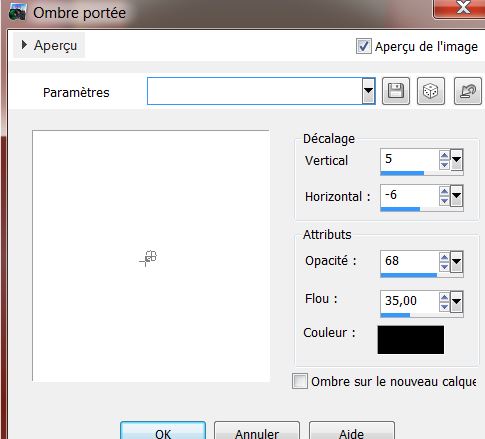
11.
Layer Palette -double click on this layer and set the Blend Mode to "Hard Light"
12.
Layers- Duplicate
13.
Image - Free Rotate 90° Right
14.
Effects- Plugins - Toadies - What are you mettre / 38/38
15. Selections - load/save selection - load selection from disk and select my file ''renee_delire_fou_1''
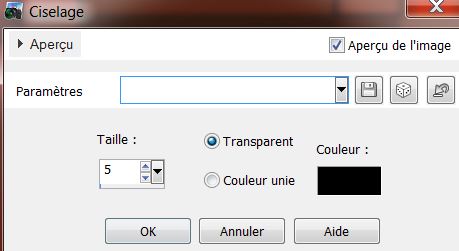
16. Effects
- 3D Effects-
Chisel use settings below
17.
Selections- Deselect All
18.
Effects- Plugins - &<Bkj Designer sf10 II> Murus Wave Default
19.
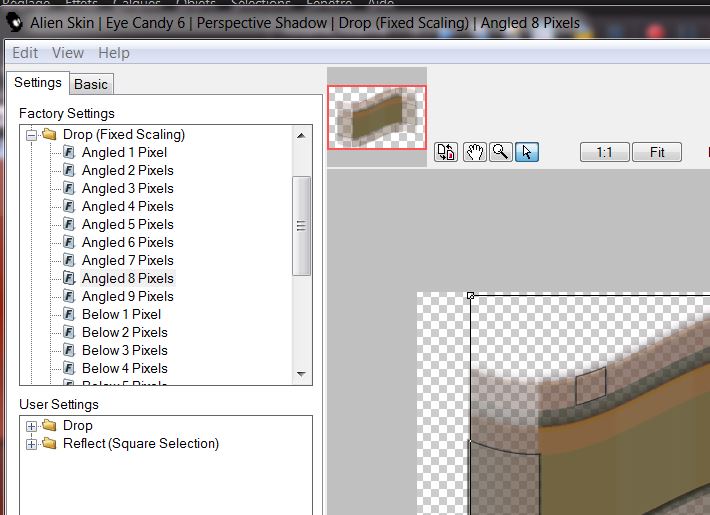
Effects- Plugins EyeCandy 6 -Perspective Shadow/Drop (fixed scaling)
Angled 8 pixels
( Effects- Plugins Eyecandy 5/drop blury shadow and slightly stretched outwards)
20.
Layer Palette -double click on this layer and set the Blendmode to "Overlay "
-
Your Layer Palette look like this now:

21.
Layers- Duplicate
22.
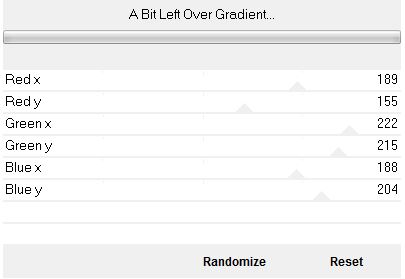
Effects- Plugins - Unlimited - Andrew's Filter Collection 56 –
Abit left Over Gradient
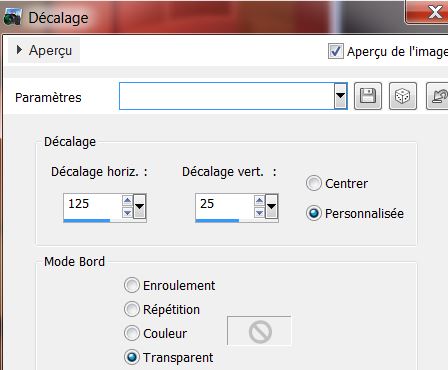
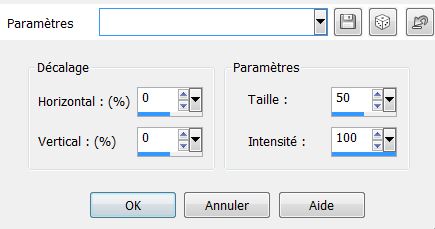
23. Effects- Image Effects- Offset use settings below
24.
Layers- Duplicate
25.
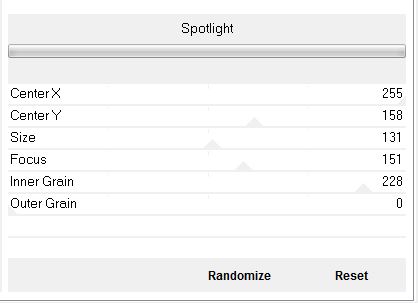
Effects- Plugins - Unlimited – Filter Factory A -Spoolight
26.
Image - Mirror
-
Your Layer Palette look like this now:
27. Layer Palette: activate the layer underneath (Copy (2)= Promoted selection)
28.
Effects-Plugins - &<Bkj Kaleidoscope /4Q Flip UpperL
29.
Activate the top of the layer-palette
30.
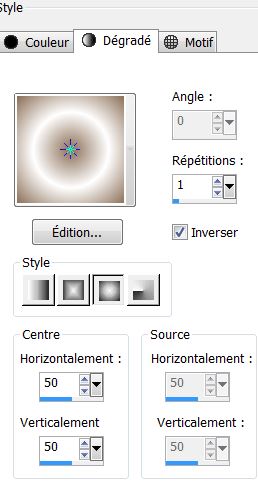
Layers- New raster layer
31.
Selection Tool ( S ) Custom selection use settings below

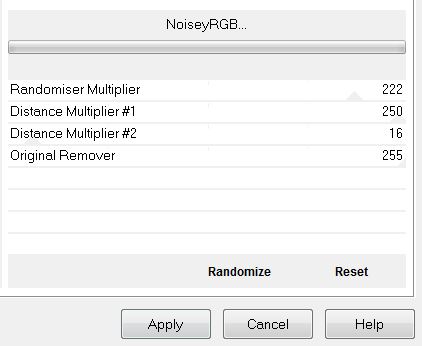
32.
Activate Flood Fill Tool and fill selection with color black
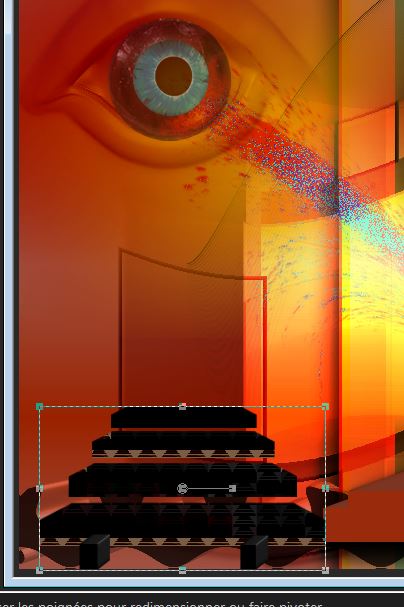
33.
Selections- Deselect All
34.
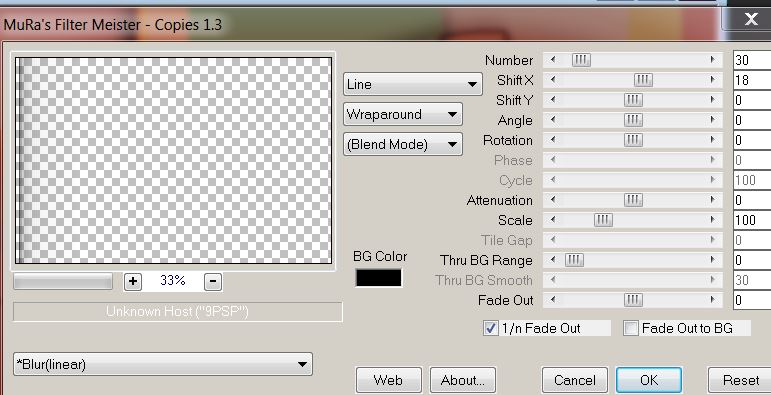
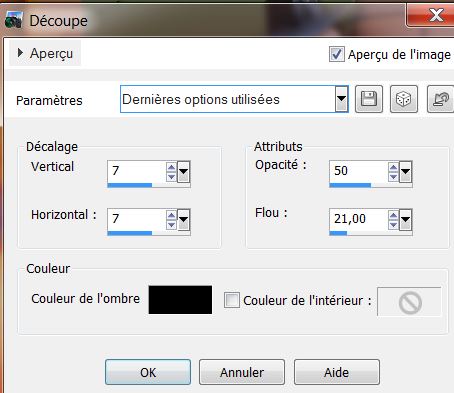
Effects- Plugins - Mura's Meister – Copies with these settings
35.
Effects- Geometric Effects-Skew use setting below

36.
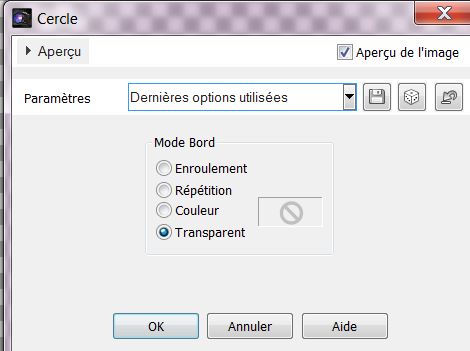
Effects- Geometric Effects-Circle/
Transparent
37.
Activate the tube ''renee_delire_fou_oeil ''Edit/copy-Edit paste as a new layer. With your move tool move to the left
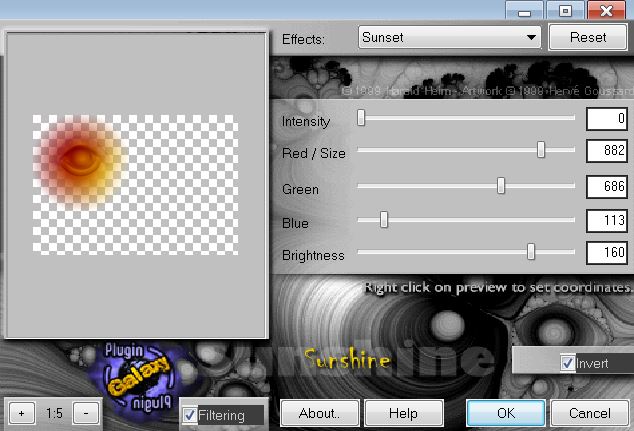
38. Effects- Plugins
- Plugin Galaxy - Sunshine
39.
Layers- New raster layer
40.
Selection Tool ( S ) Custom selection use settings below
41.
Activate Flood Fill Tool and fill selection with color black
42.
Selections- Deselect All
43.
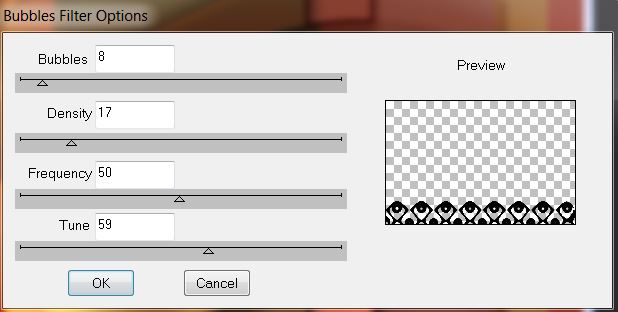
Effects- Plugins– DBS Flux- Bubbles Filter Option
44. Effects
-Plugins EyeCandy 5- Impact - Extrude -in the settings tab, click on the preset ''renee_delire_fou_extrude''
45.
Layer Palette -double click on this layer and set the Blendmode to "Luminance" and the opacity 75%
46. Effects
- Distortion Effects-Warp use setting below
47. Layers- New raster layer
48. Selections - load/save selection - load selection from disk and select my file''renee_delire_fou_2''
49.
Activate Flood Fill Tool and fill selection with this color #9a2b0e
50.
Selections- Deselect All
51. Effects-Plugins
EyeCandy - Extrude -in the settings tab, click on the Preset '' renee_delire_fou_extrude-2F1s'
52. Effects- Plugins
– EyeCandy 5 Impact -Perspective shadow /Preset- Drop
shadow lowest
53.
Repeat this filter/Perspective shadow /Preset-Drop
shadow lowest
54.
Layers- New raster layer
55. Selections - load/save selection - load selection from disk and select my file'' renee_delire_fou_3''
56.
Activate Flood Fill Tool and fill selection with color black
57.
Effects- Plugins - EyeCandy 5- chrome in the settings tab, click on the Preset-''renee_delire_fou-chrome''
58.
Selections- Deselect All
59.
Activate the tube '''logane_personnage de foire''
Edit/copy-Edit paste as a new layer and move
60. Effects- 3D Effects-Drop Shadow:10/10/50/5 color black
61.
Activate the tube ''renee_delire_fou_centre oeil'' opacity 51% - / Edit/copy-Edit paste as a new layer and move
62.
Layers- New raster layer
63 Selections - load/save selection - load selection from disk and select my file''renee_delire_fou_4''
64. Material Properties: foreground color to color: #ffffff. Background color to color: #8b6e56
65.
Prepare a Radial Gradient as configured
- Pot of Paint - Opacity 50%

66.
Activate flood fill tool and fill the selection with the gradient
(Pot of Paint :set the opacity of the colors to 100%)
67.
Selections- Deselect All
68. Effects- Plugins
- Unlimited - Filter Factory Gallery H- NoiseyRGB
69.
Layer Palette :double click on this layer and set the Blendmode to "Hue"
70.
Activate the tube ''escalier'' Edit/copy-Edit paste as a new layer and move like this
71.Layers- New raster layer
72.
Selection Tool ( S ) Custom selection use settings below
73.Effects- 3D Effects- Cutout use setting below
74. Effects - 3D Effects - Drop shadow:18/-25/50/36 color black
75.
Selections- Deselect All
76.
Activate the tube ''Purplemagic_11'' Image Resize 80%
77. Edit/copy-Edit paste as a new layer.With your move tool place it in the right place
78.
Layers- Arrange- Move Down
79
Layers-Merge-Merge Visible
80. Image - Add borders-Symmetric checked 10 pixels color black
81. Image - Add borders-Symmetric checked 15 pixels color #9f200f
82. Image - Add borders-Symmetric checked 5 pixels color black
83
Activate the tube Text : Edit - Copy - Edit - Paste as new layer and move
I hope you enjoyed this lesson
This lesson was written by Renée the
21/04/2013

|

 Translations