|
Reading - Proposals - Dream - Exchanges
Let's start the lesson.
Books and Wings

- Preparation - Material Properties: Set your foreground color to color #3f5af1 = No1 – Set your background color to color #071359 = No 2
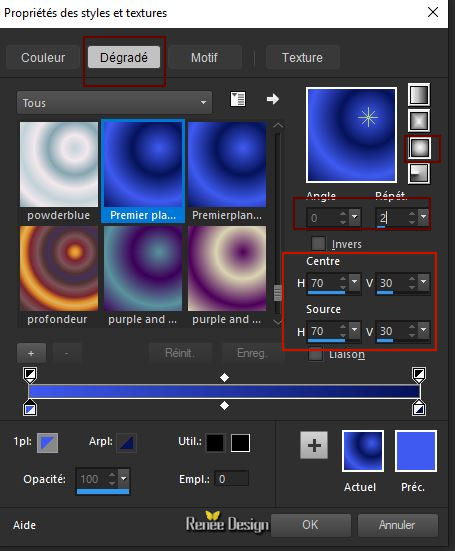
- Material of the foreground:Set your foreground to gradient 'foreground-background' sunburst gradient configured like this.
1. File-Open a new transparent Image 1100 x 800 pixels
2. Activate Flood Fill Tool – Flood Fill the layer with the gradient
3. Adjust- Blur- Gaussian Blur: Radius 45
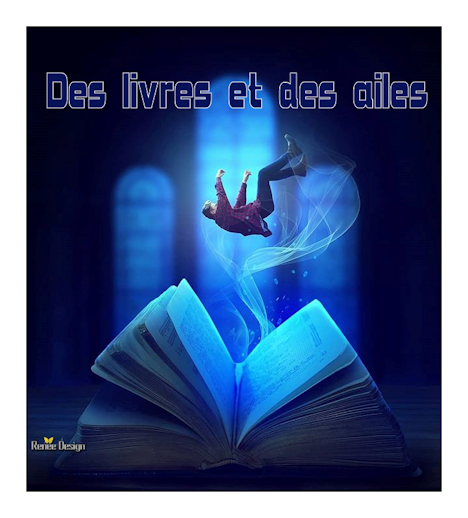
4. Open the tube ‘’
Renee_TUBES_des-livres-et -des-ailes.png’’( Do not close !!)
-Edit - Copy- Activate your work -Edit - Paste as a new layer
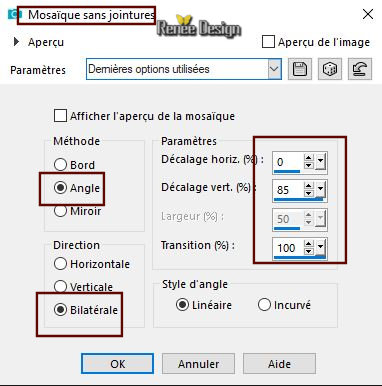
5. Effects- Image Effects-Seamless Tiling use the settings below
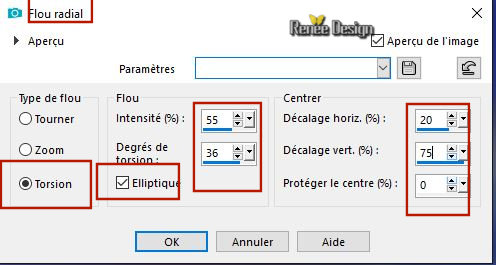
6. Adjust-Blur- Radial Blur use the settings below
7. Layers- Merge- Merge Down
8.Layers- Duplicate
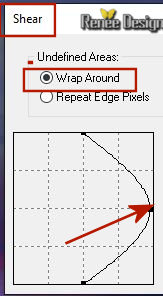
9. Effects –Plugins – Distort – Shear (pull to the right)
10. Layers-Properties-Set the Blend Mode to " Hard Light " –Lower the Opacity of the layer to
63
- Properties foreground: Set your Foreground color to color #ffffff
11. Layers- New Raster Layer
12.Activate Flood Fill Tool – Flood Fill the layer with #ffffff
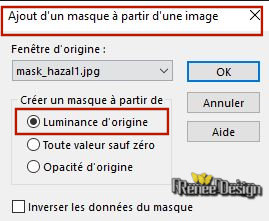
13. Layers- New Mask Layer - From Image and select Mask ‘’mask_hazal1.jg’’
- Layers- Merge - Merge Group
14. Effects –Plugins – Simple- Pizza slice
mirror
- Repeat: Effects-Plugins Simple- Pizza slice mirror
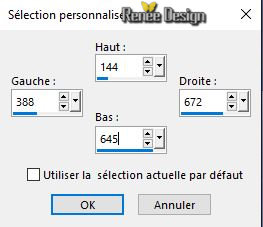
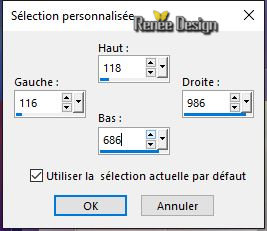
15. Activate Selection Tool -Custom Selection (S) -Rectangle with these settings

16. Edit- Cut !!!! Edit -Paste as a new layer
Selections- Deselect All
17. Image Free Rotate 90° Direction - Right
18. Effects – Plugins – Mura’s Meister –
Perpsective Tiling use the settings below

19. Layers-Properties-Set the Blend Mode to " Overlay "
- Activate the layer underneath = ( Group-Raster 2)
20. Selections –load/save selection –load selection from disc and select my selection: ‘’
Livres_ailes_1’’
21. Effects- Texture-Effects- Blinds use the settings below -Color black

22. Selections-Invert
23. Edit-Cut !!!!
24. Layers- New Raster Layer
25.Edit- Paste- Into Selection
Selections- Deselect All
26. Activate Selection Tool -Custom Selection (S) -Rectangle with these settings
27. Selections – Invert
28. Effects –Distortion Effects -Wind _Wind direction -From Left- Wind Strength 100
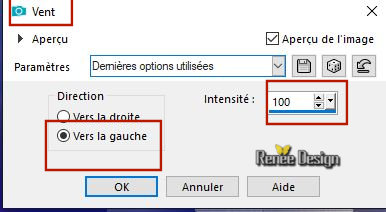
- Repeat: Effects –Distortion Effects -Wind with the same settings
29. Selections - Invert
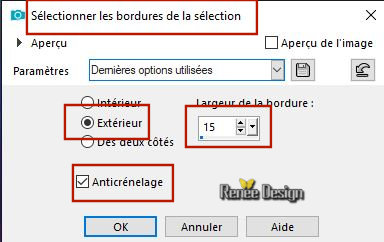
30. Selections- Modify- Select Selections Borders use the settings below
31. Activate Flood Fill Tool - Flood fill the selection with the BG-Color
32. Effects – Plugins - Toadies – What are you
20/20
33. Effects- Edge Effects- Enhance More
Selections- Deselect All
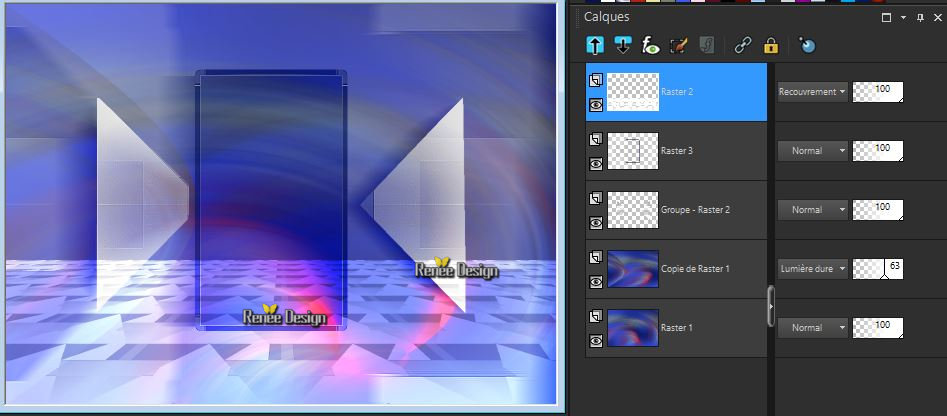
- To replace the top of the layer-palette
- Your work and Layer Palette look like this now-You should have this result
34. Layers- New Raster Layer
35. Selections –load/save selection –load selection from disc and select my selection: ‘’
Livres_ailes_2’’
36. Pot of Paint: Change the opacity of the color to 70% - Flood Fill the selection with #ffffff
Selections- Deselect All
- In the Layer-Palette-Activate Raster 1
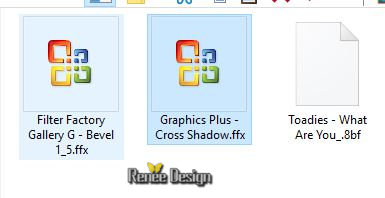
37. Effects –Plugins-Unlimited 2. – Filter Factory Gallery G –
Bevel 1.5 using the default settings
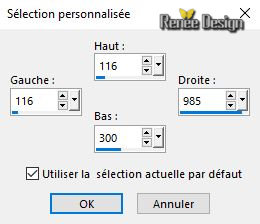
38. Activate Selection Tool -Custom Selection (S) -Rectangle with these settings
39. Selections- Promote selection to Layer
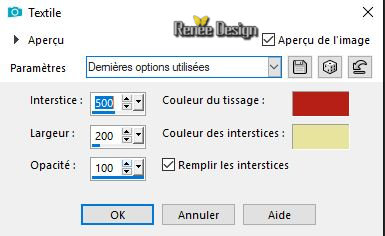
40. Effects – Texture Effects – Weave use the settings below - Color no 5
and no 4
Selections- Deselect All
41. Effects – Geometric Effects- Cylinder-Vertical-Strength 100
42. Activate Selection Tool -Custom Selection (S) -Rectangle with these settings
43. Selections- Promote Selection to Layer
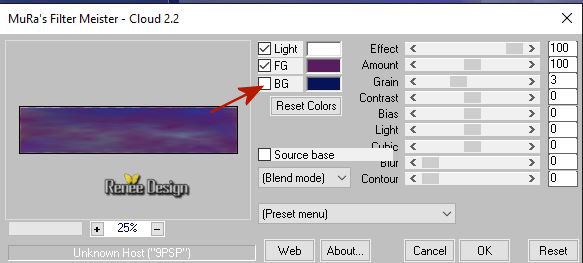
44. Effects – Plugins – Mura’s Meister - Cloud
/Color #ffffff and #581c60
Selections- Deselect All
45. Effects –Plugins- Unlimited – Graphic plus – Cross Shadow using the default settings
46. Layers-Properties-Set the Blend Mode to " Hard Light "
47. Effects – Plugins – Eyecandy 5 Nature – Drip
-tab Settings/User settings choose my –Preset ‘’Des livres et des ailes’’
48. Effects –3D Effects- Drop Shadow with these settings: 1/1/100/3 black
To replace the top of the layer-palette
49. Activate the tube ‘’
Renee_TUBES_des-livres-et -des-ailes.png’’
50. Image Resize to 65 %
-Edit - Copy- Activate your work -Edit - Paste as a new layer
51. Effects – Image Effects – Offset with these settings: H = 295 and V =
106
52. Layers-Properties-Set the Blend Mode to " Overlay "
53. Open the tube ‘’Des livres et des ailes -livre-ouvert’’
Edit - Copy- Activate your work -Edit - Paste as a new layer and move it in the right place
54. Open the tube ‘’Des livres et des ailes –fleur’’
Edit - Copy- Activate your work -Edit - Paste as a new layer– Move as shown in the example below (hidden the mushroom of the book with the tube of the flower )
55. Activate the tube ‘’Renee_TUBES_La_liseuse’’
-Edit - Copy- Activate your work -Edit - Paste as a new layer
56. Effects – Image Effects -Offset with these settings ; H = - 336 and V =
- 64
57. Layers- New Raster Layer
58. Selections –load/save selection –load selection from disc and select my selection: ‘’
Livres_ailes_3’’
59. Pot of Paint: Change the opacity of the color to 100%- Flood Fill the selection with #ffffff ( 2
or 3 clicks)
Selections- Deselect All
60. Open the tube ‘’Mot-Lire ‘’
–
Edit - Copy- Activate your work -Edit - Paste as a new layer- Place at the Top ( see finished image )
61. Opacity of the layer of your choise ( for me 87)
62. Activate Text Tool -With a font of your choice ( for me Arial ) and a color of your choice
Direction > Vertical and Left !!!!!!!!
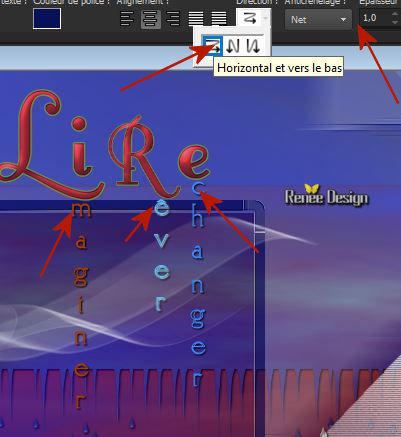
Write the words to be placed under the letters
I >> write > maginer = Imaginer
R >> write > êver = Rêver
E >>write > changer = Echanger
63. I applied a drop shadow : 1/1/100/2 Black on these words
64. Open the tube ‘’
Des livres et des ailes -petits_cadres’’
Edit - Copy- Activate your work -Edit - Paste as a new layer ( place to your choise )
- Layers-Properties-Set the Blend Mode to " Screen "-Lower the Opacity of the layer to 75
65. Layers- New Raster Layer
66. Activate Brush Tool and select my file: ‘’pinceau-lecture ‘’ Size 300- Stamp your brush at the top right corner by using your foreground color white
67. Use a Drop shadow of your choice
68. Open the tube ‘’
Des livres et des ailes- deco.png’’
-Edit - Copy- Activate your work -Edit - Paste as a new layer
- Activate your Move Tool (M) place it in the bottom right corner
69. Layers- Duplicate- Layers- Arrange Move Down
70. Effects –Distortion Effects -Wind _Wind direction -From Left- Wind Strength 100
71. Image - Add borders-Symmetric checked 1 Pixel Color #e8e39d = no 4
72. Image - Add borders-Symmetric checked 3 Pixels Color # ffffff = no 6
73. Image - Add borders-Symmetric checked 1 Pixel Color # 75806c = no 3
74. Image - Add borders-Symmetric checked 40 Pixels Color #ffffff = no 6
75. Image Resize to 999 Pixels width.
Save as JPG
I hope you enjoyed this lesson
Renée
This lesson was written by Renée 10-10- 2018
Edited and Update
le 2018
*
Any resemblance with an existing lesson is a coincidence
* Do not forget to thank the people who work with us and for us I have appointed the tubeurs and translators
Thanks
*
|


 Translations


 If a plugin supplied appears with this icon it must necessarily be imported into Unlimited *