|
Let's start the lesson. Open the Color-Palette
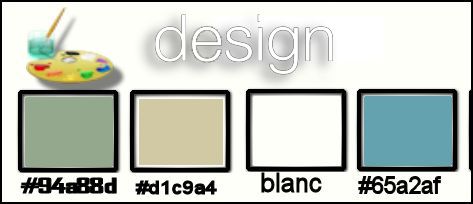
- Material Properties: Foreground color to this color:#ffffff- Background color to this color :#94a88d
1. Open the Background Image ''fond_design''/
Promote Background Layer =Raster1
2. Layer-New Raster Layer
3. Selections - load/save selection - load selection from disk and choose my selection:''design_1'- Activate Flood Fill Tool and fill the selection with the Background color #94a88d
Selections- Deselect All
4. Layers- Duplicate
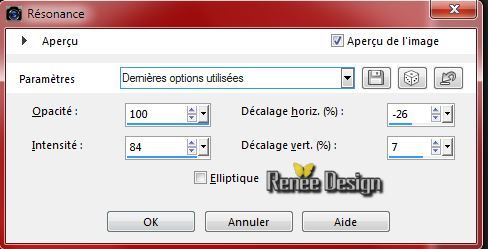
5. Effects- Reflection Effects- Feedback with these settings
6. Layers- Merge- Merge Down
7.Effects-Distortion Effects -Wind 100 Left
8.Effects-Distortion Effects -Wind 100 Right
9. Layers- Duplicate -Image
Mirror
10. Layers- Merge- Merge Down
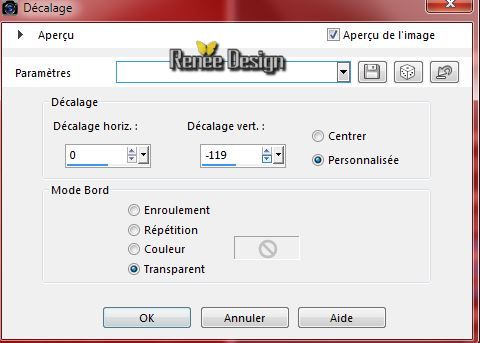
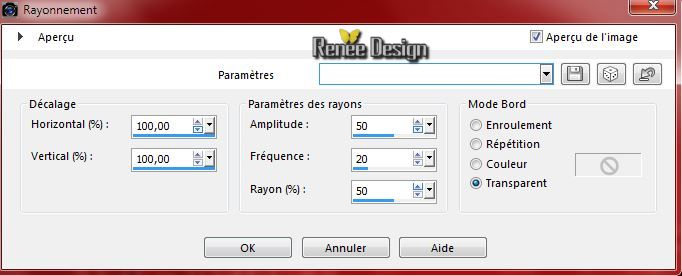
11. Effects- Image Effects- Offset with these settings
- Layer Palette -Double click on this layer and set the Blendmode to "Difference"
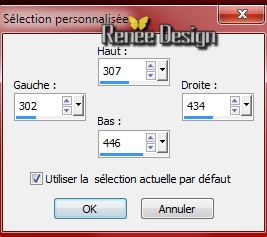
12. Selection Tool ( S ) Custom selection use settings below
13. Selections- Promote selection to Layer
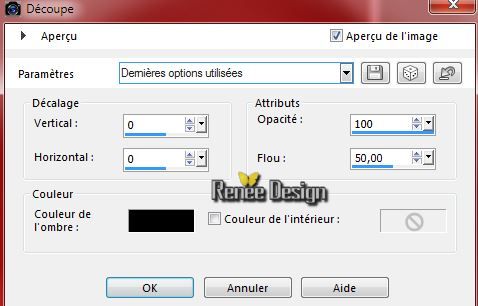
14. Effects- 3D Effects- Cutout with these settings
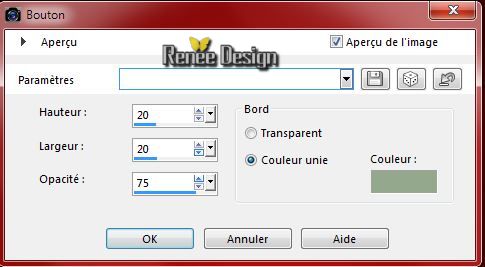
15. Effects- 3D Effects-Buttonize with these settings- Background color
Selections- Deselect All
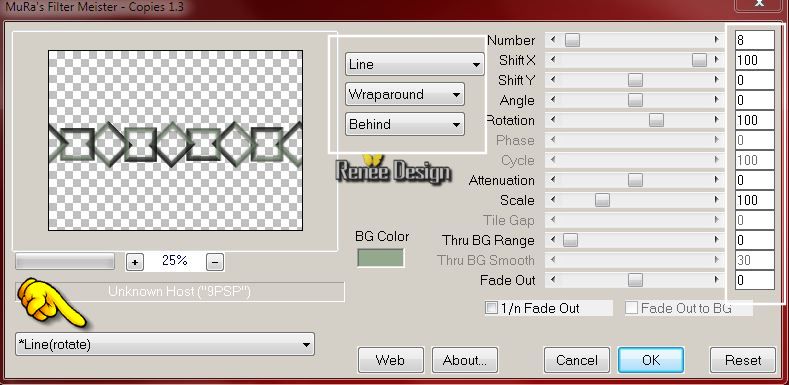
16. Effects- Plugins -Mura's Meister -Copies use settings below
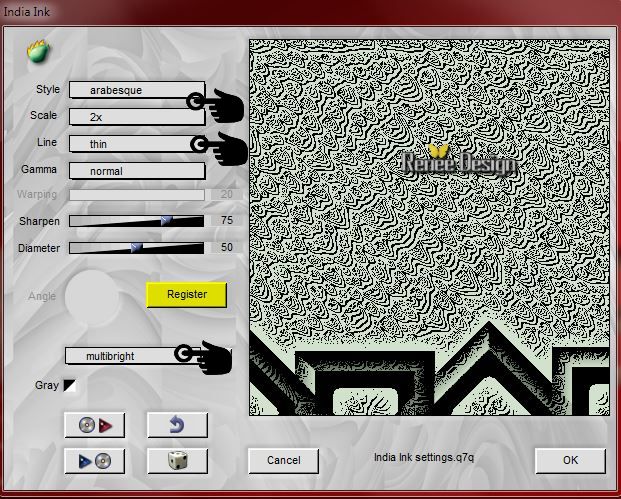
17. Effects- Plugins - Flaming Pear - India Ink
18. Effects- Plugins - Unlimited 2.0
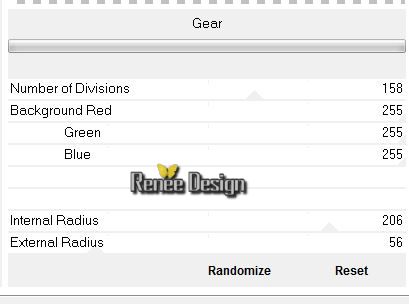
- Alf's Border FX - Gear
- Layer Palette - Double click on this layer and set the Blendmode to "Soft Light "
19. Layer-New Raster Layer
20. Pot of Paint : Opacity 60 -Activate Flood Fill Tool and fill the layer with color white
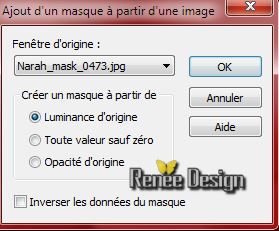
21. Layers- New Mask layer from Image and choose Mask: "Narah_mask_0473.jpg"
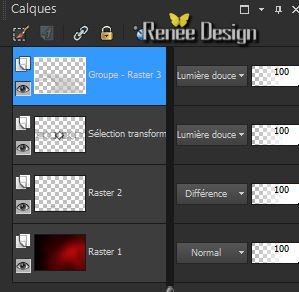
- Layers- Merge-Merge Group
- Layer Palette - Double click on this layer and set the Blendmode to "Soft Light "
22. Layers- Duplicate
23. Effects- Image Effects- Offset with these settings
24. Layers- Merge- Merge Down
25.Effects- 3D Effects-Drop Shadow with these settings: 5/ -8 /62 / 17 color black
The result
26. Open the tube ''tube_design_ecris''
-Edit/copy-Edit paste as a new layer. Do not move it is in the right place
-Layer Palette: set the layer opacity of this layer to 38%
27. Layer-New Raster Layer
28. Selections - load/save selection - load selection from disk and choose my selection:''design_2''
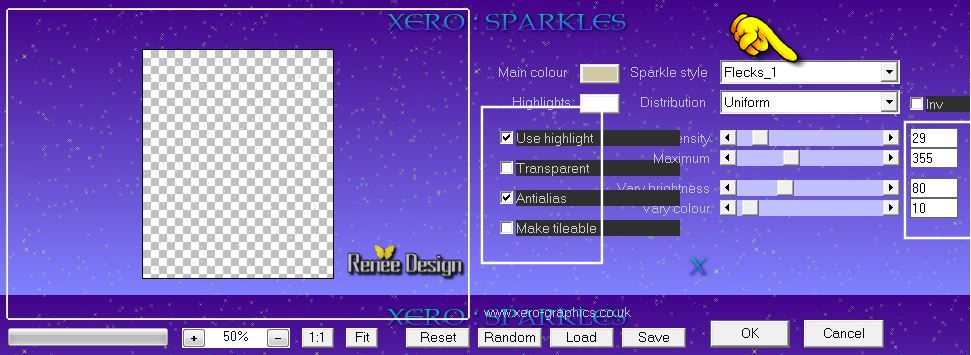
29. Effects- Plugins - Xero Sparkles with these settings
Selections- Deselect All
30. Layer-New Raster Layer
31. Selections - load/save selection - load selection from disk and choose my selection:"design_3"
32. Pot of Paint -Opacity 100 %- Activate Flood Fill Tool and fill the selection with color white
Selections- Deselect All
33. Effects- Edge Effects- Enhance More
34. Layers- Duplicate
35. Effects- Distortion Effects-Spiky Halo with these settings
36. Layers- Merge-Merge Visible
37. Layers- Duplicate
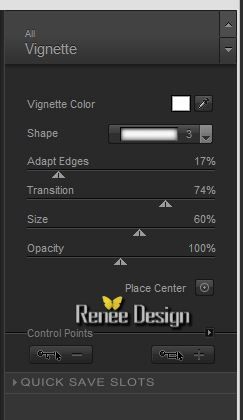
38. Effects- Plugins -Nick Color Effex Pro3/Vignette
39. Image -Free Rotate 90 to the right
40. Effects- Plugins -Unlimited 2.0 -
Deformation -Mosaïques de verre(hr)

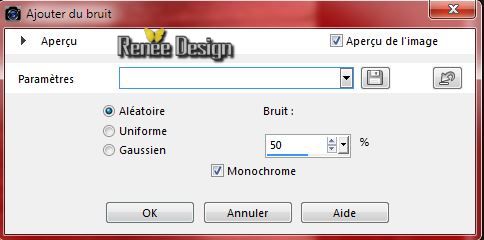
41. Adjust- Add /Remove Noise-Add Noise with these settings
42. Image Resize 65 % Resize all Layers not checked
43. Effects- Plugins - VM Natural with these settings
- Layer Palette -Double click on this layer and set the Blendmode to "Overlay"
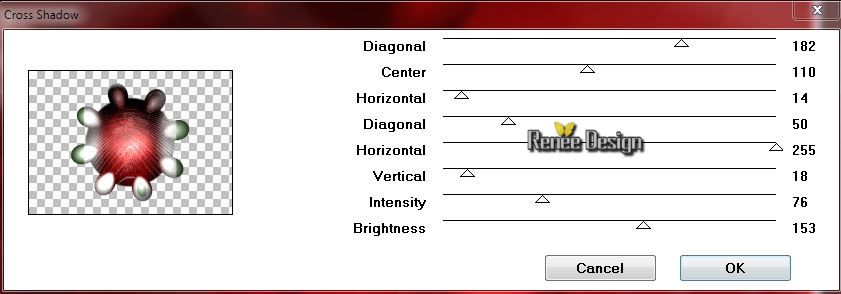
44. Effects- Plugins - Graphic plus - Cross Shadow with these settings
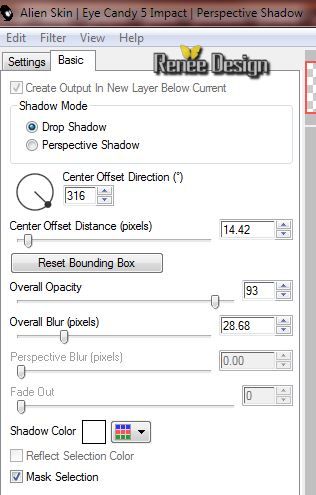
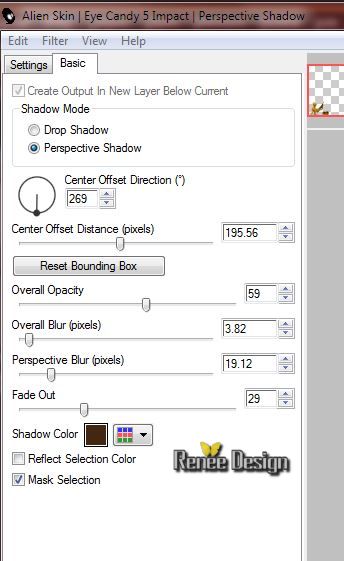
45. Effects- Plugins -Eye candy 5-Perpspective shadow -Drop Shadow
Blury
46.
Open the tube ''design_ecris_2'' -Edit/copy-Edit paste as a new layer. With your move tool move to the upper right corner
47.
Layer Palette -Double click on this layer and set the Blendmode to "Dodge " and set the layer opacity of this layer to 79%
48.
Open the tube ''Design_points_cercle''-Edit/copy-Edit paste as a new layer do not move
49.
Open the tube ''krys_design....../ Image
Resize 70% -Edit/copy-Edit paste as a new layer. With your move tool move to the right side
50.
Effects- Plugins -Eye candy 5-Perpsective shadow
-Drop Shadow Blury
-Activate the bottom of the layer-Palette
51. Effects- Plugins - Nick Color effex Pro3.0-Color Brown- set 3
-
Material Properties: Foreground color to color white - Background color to this color :#65a2af
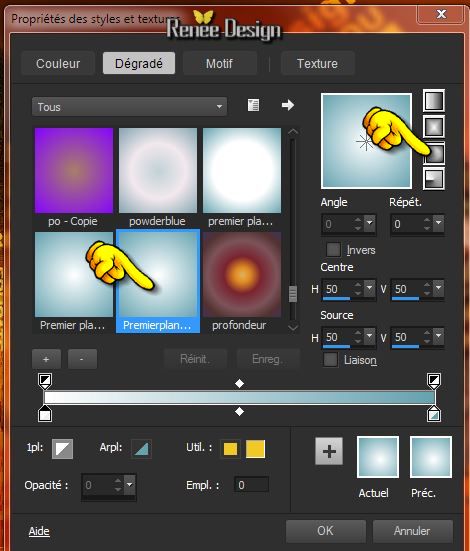
52.Put your foreground/background into a sunburst gradient as configured
53.
Layers- New Raster layer
54 .
Selections - load/save selection - load selection from disk and choose my selection:''design_4''- Activate Flood Fill Tool and fill the selection with the gradient
Selections- Deselect All
55.
Layer Palette -Double click on this layer and set the Blendmode to "Hard Light " and set the layer opacity of this layer to 57%
56.
Adjust-Sharpness-Sharpen More
57.
Image - Add borders-Symmetric checked:10 pixels color black
58.
Open the tube ''cadre_tuto_design_renee''-Edit/copy-Edit paste as a new layer. Do not move it is in the right place
59.
Open the tube ''design-Renee_logopeintre''Edit/copy-Edit paste as a new layer. With your move tool move to the left
60.
Effects- Plugins -Eyecandy 5- Perspective shadow-Tab-Settings-User Settings and choose my Preset
''design_persp_renee'' or manually
-color #442710
61.
Open the tube ''design_loupe'' Edit/copy-Edit paste as a new layer. With your move tool and move what you like
62.
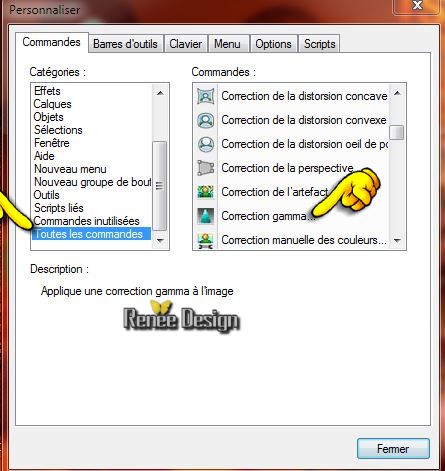
Gamma Correction with these settings
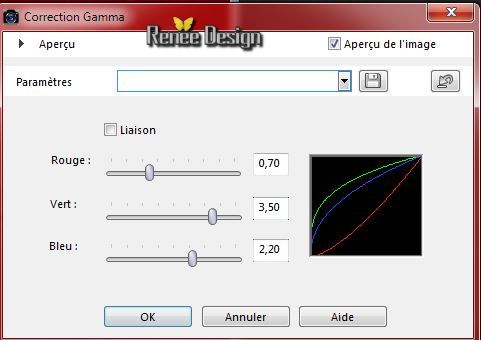
Adjust-Gamma Correction
Effects- Gamma Correction-Shift+ G
on your keyboard
Is Gamma Correction not listed ?-
View -Customize-Commands-All Commands select Correction
Gamma on the right side .With the mouse button pressed drag it between the other tools in your psp see screen
63.
Layers- Merge- Merge All
64.
Image Resize 995 pixels Width
I hope you enjoyed this lesson
Renée
This lesson was written by Renée 1/11/2014
Placing
11/2014
*
Any resemblance with an existing lesson is merely a coincidence *
* Don't forget to thank the people who work for us and with us. I named the tubeurs - Testers and the translators.
Thanks Renée.
*
|
 Translations


 All rights reserved