|
Let's start the lesson.
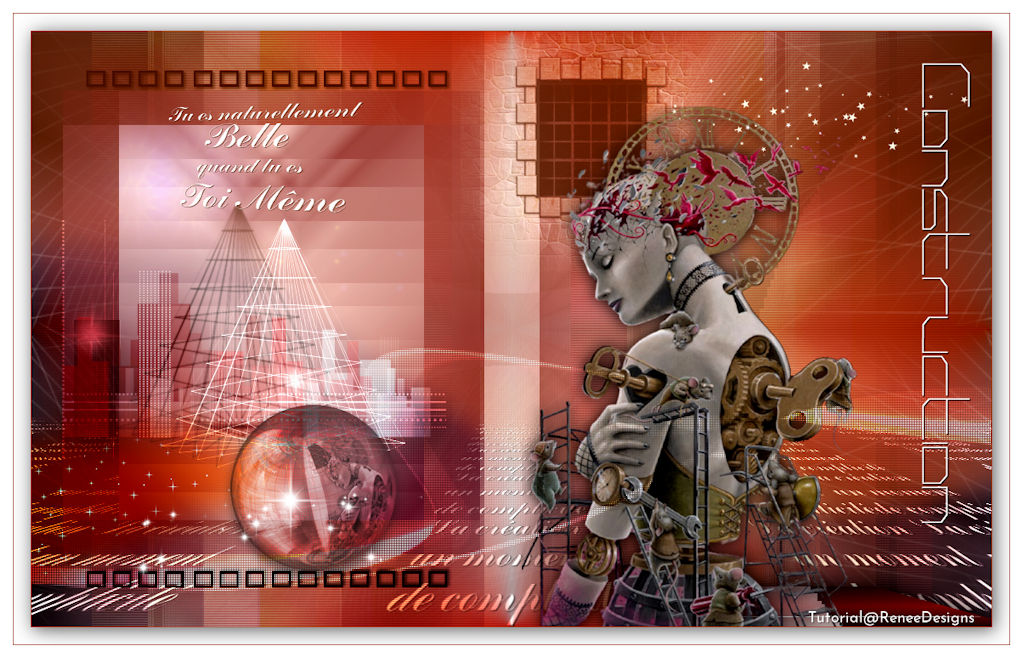
Under construction

- Preparation
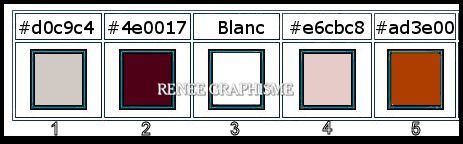
- Material Properties: Set your foreground color to color #d0c9c4 =1 – Set your background color to color #4e0017=2
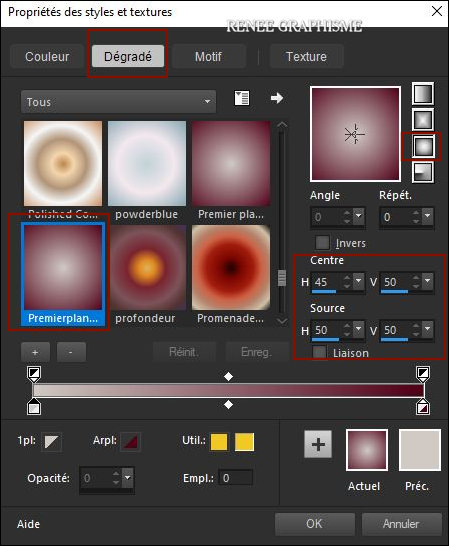
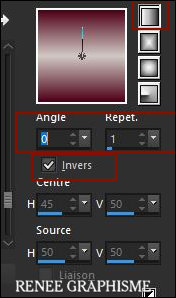
- Set your Foregroundcolor to foreground-background Sunburst gradient configured like this
1. File: Open a new transparent Image of 1000 x 700 Pixels
2. Flood Fill Tool
 –
Fill the layer with the gradient –
Fill the layer with the gradient
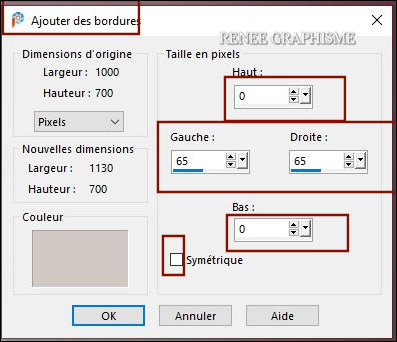
3. Image - Add borders-Symmetric NOT checked– Color #d0c9c4 =1
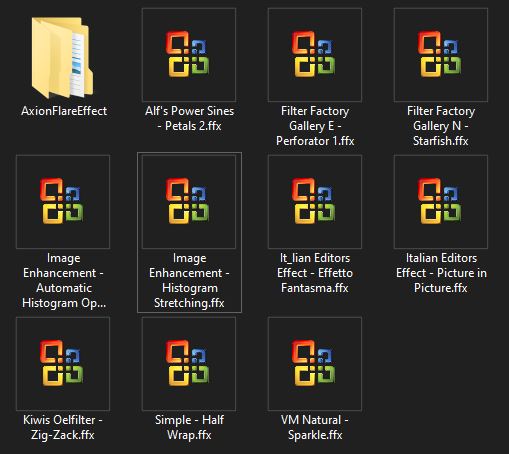
4. Effects –Plugins-
Unlimited 2.0 - Italian Editors Effect - Picture in
Picture: 186/111
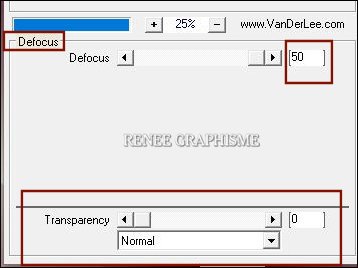
5. Effects – Plugins – Vanderlee – Unplugged X/Defocus use the settings below
Layers- Promote Background Layer = Raster 1
Change the material of the foreground to a linear FG /Background gradient with these settings
6. Layers- New Raster Layer
7. Flood Fill Tool
–
fill this layer with the gradient
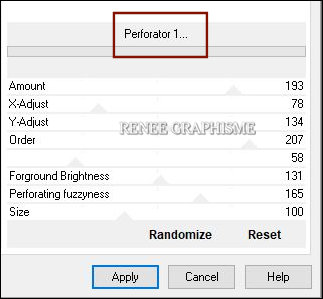
8. Effects –Plugins-
Unlimited 2.0 - Factory Gallery E – Perforator 1…use the settings below
9. Effects –Plugins-
Unlimited 2.0 - Alf's Power Sines – Petals 2…with these settings:
255/255/0/0/0/255
10. Effects – Edge Effects- Enhance
11. Selections –load/save selection –load selection from disc and select my selection: ’’Construction
1’’
12. Layers- Promote selection to layer
13. Effects –Plugins – Vanderlee- Unplugged X
– Colorize use the settings below
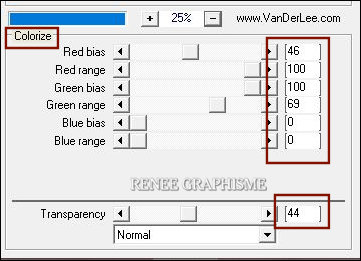
14. Layers-Properties-Change the Blend Mode to " Overlay " and Lower the Opacity to
59%
Selections- Deselect All
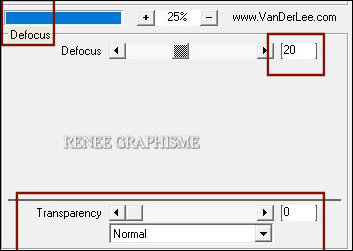
15. Effects – Plugins – Vanderlee- Unplugged X
– Defocus use the settings below
16. Effects – Plugins – Carolaine & Sensibility
– CS-Linear–H with these settings: 5/15/0
17. Layers- Duplicate
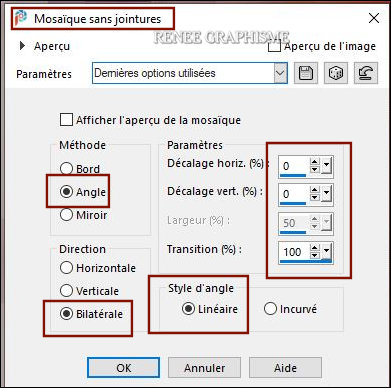
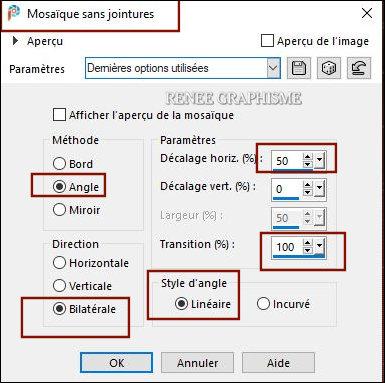
18. Effects- Image Effects- Seamless tiling use the settings below
19. Layers-Properties-Change the Blend Mode to "Hard Light " Opacity
100%
- In the Layer Palette- Activate the layer underneath (Promoted Selection )
20. Effects –Plugins- Unlimited 2.0 - Filter Factory Gallery N –
Starfish using the default settings
- Color Palette-
Foreground color to color # ffffff
-To replace the top of the Layer Palette
21. Layers- New Raster Layer
22. Flood Fill Tool
–
fill the layer with the foreground color #ffffff
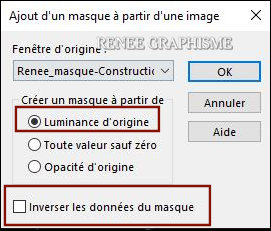
23. Layers- New Mask Layer- From Image and select Mask ‘’Renee-masque-Construction’’
- Layers- Merge- Merge Group
- Stay on this layer
24. Layers- Load/Save Mask-Load Mask From Disc and select Mask ‘’20/20’’
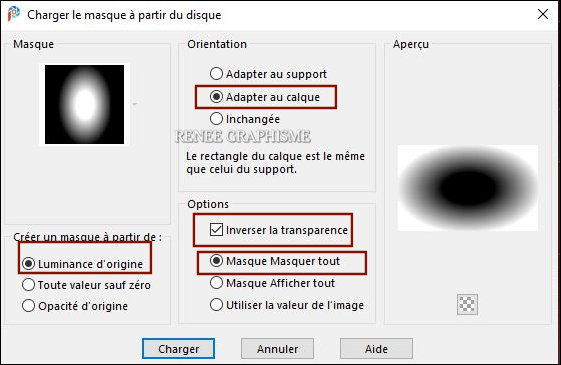
- Layers- Merge- Merge Group
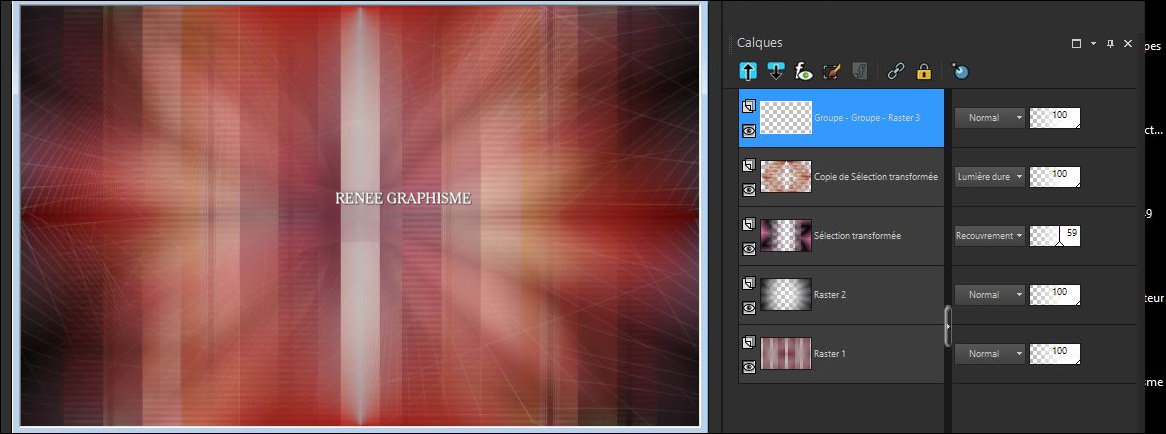
25. Effects- Image Effects- Seamless tiling use the settings below
Your work and Layer Palette look like this now-You should have this result
26. Open the tube ‘’Construction-Image
1’’ - Edit - Copy- Activate your work -Edit - Paste as a new layer
27. Pick Tool (K) Enter these parameters for the X: and Y: positions on the Toolbar
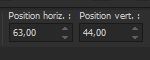 63
/44 63
/44
- Press ( M ) to close the Pick Tool
- Material Properties: Set your foreground color to color #e6cbc8=4 – Set your background color to color #4e0017= 2
- Set your Foregroundcolor to foreground-background radial gradient configured like this
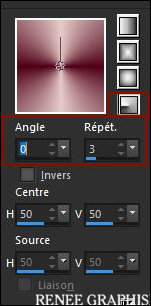
28. Layers-New Raster Layer
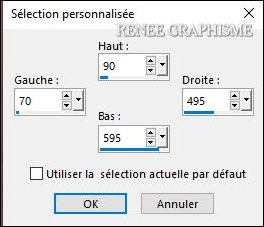
29.Activate Selection Tool -Custom Selection (S) -Rectangle with these settings 
30. Flood Fill Tool
–
Fill the selection with the gradient
31. Effects –Plugins- Unlimited 2.0- Kiwis Oelfilter – Zig-Zack with these settings: 44/217/164/80
KEEP SELECTION
32. Effects –Plugins- Unlimited 2.0 - Simple- Half Wrap
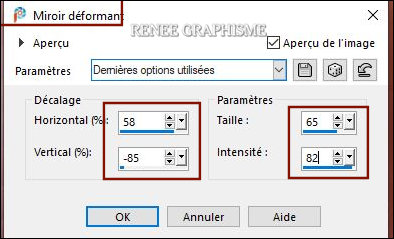
33. Effects – Reflection Effects-Rotating Mirror use the settings below
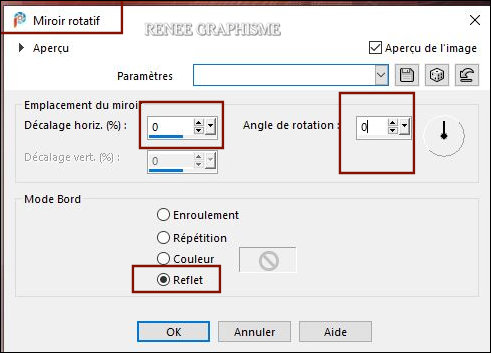
Selections- Deselect All
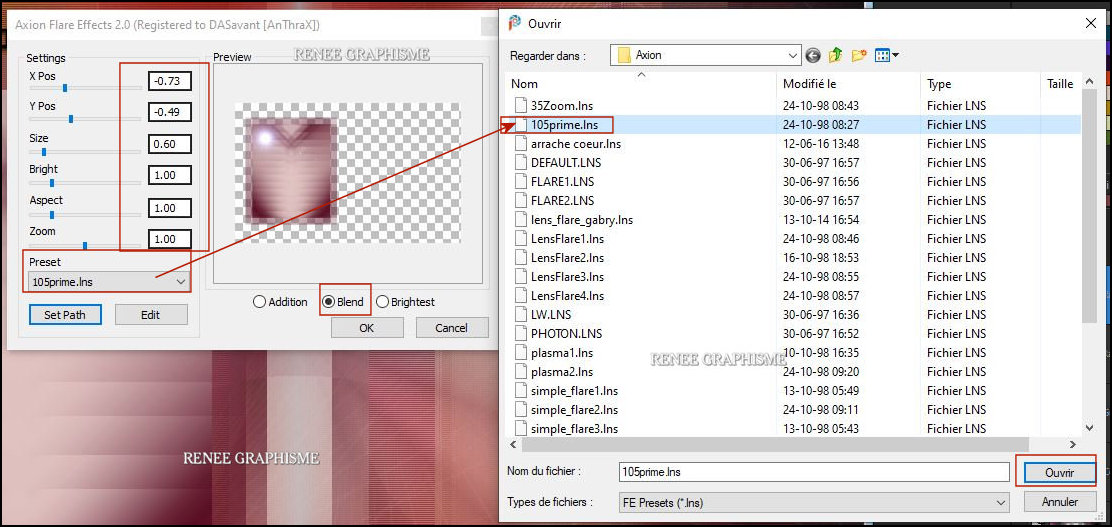
34. Effects – Plugins – Axion – Flare Effects
Will explain to you how this works
1. Place the filter in the filter folder
2. Start PSP
- And open a picture
- Go to Filters Axion Flare Effects - click on Register (window opens)
– –Enter the name and code (the code is attached to the filter)
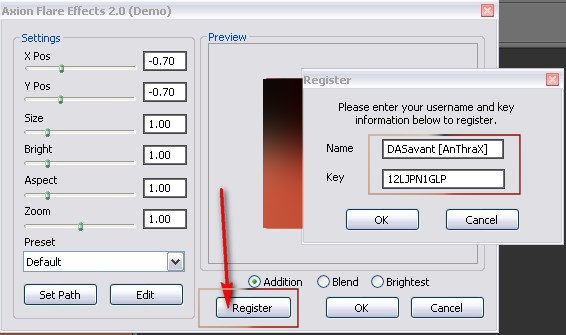
- Click on Set Path -Set Path A window will open and look for the default setting and select : 105prime.Ins (as
shown in the example below)
-
Set the settings correctly and OK
- If the filter does not work there is an
image in the folder. Insert this image ''effet
filtre axion si probleme'' as a new layer and move it in the right place
35. Effects –Plugins-
Unlimited 2.0 - It@lian Editors Effect-Effetto Fantasma with these settings:
15 /15
- Color Palette- Foreground color to color # ffffff
36. Layers- New Raster Layer
37. Selections –load/save selection –load selection from disc and select my selection: ’’Construction
2’’
38. Flood Fill Tool
–Fill the selection with the foreground color #ffffff (2 or 3 clicks)
Selections- Deselect All
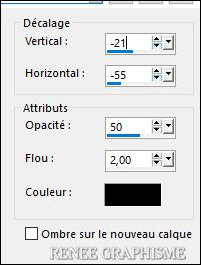
39. Effects – 3 D Effects – Drop Shadow with these settings- Color Black
40. Open the tube ‘’ Renee_texte-Creation.pspimage’’ -Edit - Copy- Activate your work -Edit - Paste as a new layer
41. Effects – Geometric Effects– Perspective
Horizontal use the settings below
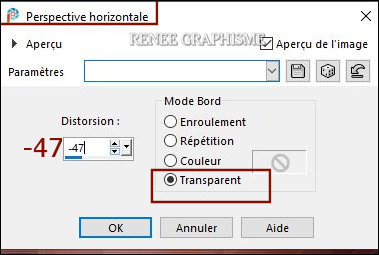
- Place to your liking
- In the Layer Palette- activate Raster 2
42. Open the tube ‘’ Construction-Image 2.pspimage’’ -Edit - Copy- Activate your work -Edit - Paste as a new layer
43. Objects- Align - Bottom
-To replace the Top of the Layer Palette
44. Open the tube ‘’
Renee_TUBES_Fenetres’’ – -Edit - Copy- Activate your work -Edit - Paste as a new layer (a window of your choice- For Renée Raster 4)
-Change Blend Mode - Resize if needed and Opacity depending on the choice of your window
(For Renée Bland Mode "Hard Light – Opacity 73 %)
- With the Move Tool (M), move it in the right place
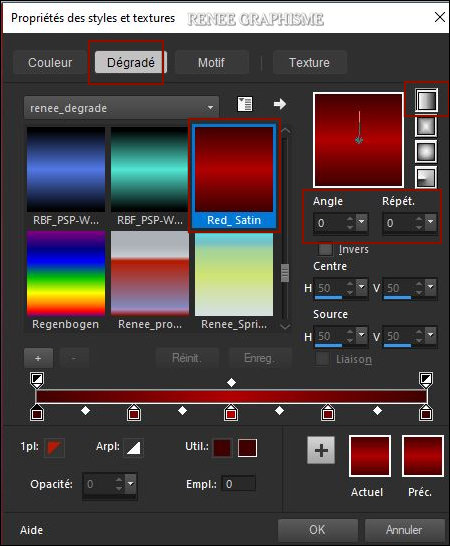
- Material Properties: Set your foreground to gradient and select gradient
‘’Red-Satin’’– Prepare a foreground linear gradient use the settings below
45. Layers- New Raster Layer
46. Selections –load/save selection –load selection from disc and select my selection: ‘’ ’’Construction 3’’
47. Flood Fill Tool
-
Fill the selection with the gradient
Selections- Deselect All
48. Selections –load/save selection –load selection from disc and select my selection: ‘’ ’’Construction 4’’
49. Color Palette- Foreground color to color # ffffff
-Flood Fill Tool
- Fill the selection with the Foreground color #ffffff
Selections- Deselect All
50. Image – Rotate Right
51. Effects –Plugins-
Unlimited 2.0 – Graphic Plus – Page Curl with these settings:
240/170/220/49/150
52. Image - Rotate Left
53. Effects – 3 D Effects
-Drop Shadow with these settings: 1/1/96/42 Color Black
54. Layers- Merge- Merge Visible
55. Effects - Plugins-
Unlimited 2.0 - ICNET –Filters – Image Enhancement -
Automatic Histogram Optimizer 238
56. Layers- New Raster Layer
57. Selections –load/save selection –load selection from disc and select my selection: ‘’ ’’Construction 5’’
-Material Properties: Set your foreground color to color #ad3e00 = 5
58. Flood Fill Tool
–
Fill the selection with the foreground color #ad3e00 = 5
Selections- Deselect All
59. Effects – Distortion Effects– Warp use the settings below
60.Layers-Properties-Change the Blend Mode to " Screen "
61. Layers- New Raster Layer
62. Selections –load/save selection –load selection from disc and select my selection: ‘’ ’’Construction 6’’
63. Flood Fill Tool
–
Opacity 62% –Fill the selection with the foreground color #ad3e00 = 5
64. Effects –Plugins-
Unlimited 2.0 – VM Naturel – Sparkle use the settings below
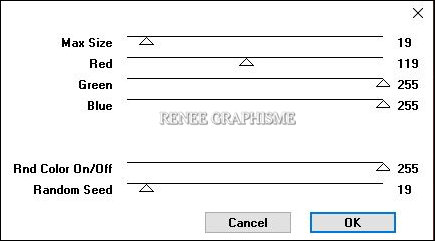
Selections- Deselect All
65. Layers-Properties-Change the Blend Mode to " Hard Light "
(Reset the opacity of the Flood Fill Tool to 100)
66. Open the tube ‘’Construction-Image
3.pspimage’’ -Edit - Copy- Activate your work -Edit - Paste as a new layer
Pick Tool (K) Enter these parameters for the X: and Y: positions on the Toolbar 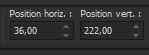 36
/ 222 36
/ 222
67. Effects - Plugins –Alien skin Eye Candy 5 Impact- Perspective
Shadow- Drop shadow Blury use the settings below
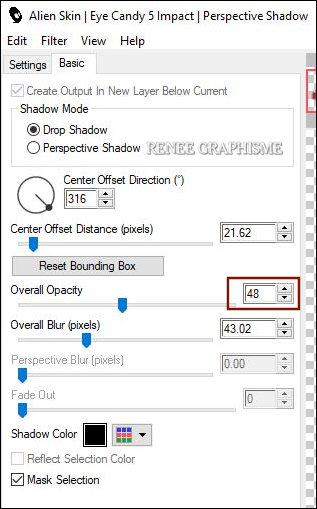
68. Layers-Properties-Change the Blend Mode to "Overlay" and Lower the Opacity to 71
69. Open the tube
‘’Renee_TUBES_En-construction’’
70. Image
Resize 78 %
- Edit - Copy- Activate your work -Edit - Paste as a new layer
71. Layers- New Raster Layer
Material Properties: Set your foreground color to color #ffffff
72. Pot de peinture
–
Opacity 100% – Fill this layer with the foreground color #ffffff
73. Layers- New Mask Layer- From Image and select Mask ‘’
Narah_mask_0421’’
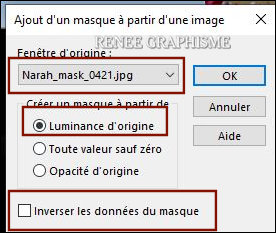
- Layers- Merge- Merge Group
74. Effects – Plugins – Richard Rosenmann – Halftone with these settings ( White and Black)

75. Layers-Properties-Change the Blend Mode to " Dodge " and Lower the Opacity to 81%
76.
Image - Mirror - Mirror Horizontal (Image - Mirror in older versions of PSP)
77. Layers- Merge- Merge Visible
78. Effects –Plugins-
Unlimited 2.0 – ICNET-Filters - Image Enhancement-
Histogram Stretching with these settings: 100/162/106
79. Window-Duplicate
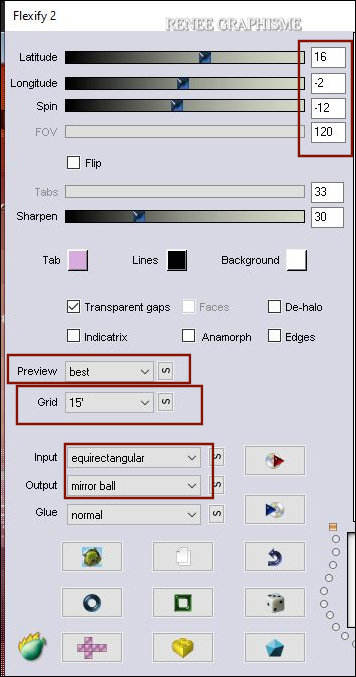
80. Effects – Plugins – Flaming Pear Flexify 2-click on the red arrow>>select my file - Preset : Flexify 2
settings- Construction
Or manual settings as shown in the example below
81. Image -
Resize 28 %
82. Edit - Copy- Activate your work -Edit - Paste as a new layer
83. Pick Tool (K) Enter these parameters for the X: and Y: positions on the Toolbar
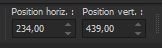 234 /439
Press ( M ) to close the Pick Tool
84. Effects – Plugins– Alien skin EyeCandy 5
Impact – Glass –Tab- Settings- User Settings and select my file–Preset :
‘’Renee-Construction_Glass’’
85. Layers-Properties-Change the Blend Mode to "Luminance" and Lower the Opacity to 75
86. Open the tube ‘’Construction-Image 4’’ -Edit - Copy- Activate your work -Edit - Paste as a new layer
87. Pick Tool (K) Enter these parameters for the X: and Y: positions on the Toolbar
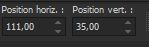 111
/ 35 111
/ 35
88. Image - Add borders-Symmetric checked 1 Pixel Color #ad3e00 =5
89. Selections -
Select All
90. Image - Add borders-Symmetric checked 20 Pixels Color #ffffff
91. Effects – 3 D Effects – Drop Shadow with these settings: 3/3/36/45 Color Black
Selections- Deselect All
92. Image - Add borders-Symmetric checked 1 Pixel Color #ad3e00 =5
93. Image - Add borders-Symmetric checked 15 Pixels Color # d0c9c4 =1
94. Image - Rotate Left
95. Activate Text Tool - Renée choose Font
‘’Phuture Squared Closed Fine’’use the settings below (Color White)(The font is included into the zipfile)

-Write the text
=CONSTRUCTION
–Convert to Raster Layer
96. Image- Rotate Right ( Place the text on the right of your image)
97. Effects- 3 D Effects- Drop Shadow with these settings: 1/1/100/1 Color Black
- Place my watermark
98. Layers- Merge- Merge All (flatten)
99. Image - Resize with 85% Resize all layers checked
Save as JPG
I hope you enjoyed this lesson
Renée
This lesson was written by Renée 10-10- 2020
Edited and Update
2020
*
Any resemblance with an existing lesson is a coincidence
* Do not forget to thank the people who work with us and for us I have appointed the tubeurs and translators
Thanks
*
N'oubliez pas de remercier les gens qui travaillent avec
nous et pour nous j'ai nommé les tubeurs et
les traductrices Merci
|


 Translations