|
Let's start the lesson.
Espace lumière/Light space
- Preparation
-
Color Palette: Set your Foreground color to color #ffffff=1 – Set your Background color to color #018ac8= 2

1. Open the BG-Image ’’ Fond_Espace_ lumière ‘’- Window - Duplicate (or shift+D) - Close the original and proceed on the copy -Promote Background Layer =Raster 1
2. Effects –Plugins- Unlimited 2.0 – Graphic plus Cross shadow using the default settings
3. Effects –Plugins- Unlimited 2.0 - Sapphire Filters 07 -
SapphirePlugin_0611... using the default settings
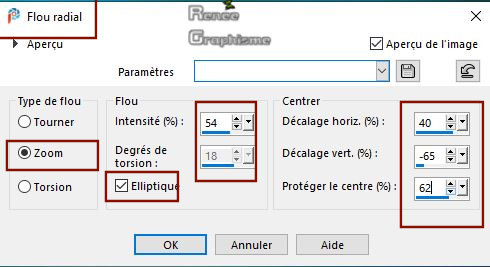
4. Adjust- Blur- Radial Blur use the settings below
5. Layers- New Raster Layer
6. Selections –load/save selection –load selection from disc and select my selection: ‘’Espace_lumiere’’
7. Flood Fill Tool
 –
Fill the selections with the FG-Color =1 ( 5 clicks) –
Fill the selections with the FG-Color =1 ( 5 clicks)
Selections- Deselect All
8. Effects –3D- Effects – Drop Shadow with these settings : 1/1/50/0 Color Black
9.Layers-Properties-Change the Blend Mode to " Screen "
10. Layers- New Raster Layer
11. Selections –load/save selection –load selection from disc and select my selection: ‘’ ’Espace_lumiere’_1’’
12. Open the tube ‘’Renee_TUBES_Espace_lumiere_ville’’- Edit - Copy- Activate your work -Edit - Paste into Selection
13. Effects –3D- Effects – Drop Shadow with these settings 5/1/50/14 Color White !!
Selections- Deselect All
- Color Palette-Set the Foreground color to color #003288= 3
14. Layers- New Raster Layer
15. Selections –load/save selection –load selection from disc and select my selection: ‘’ ’Espace_lumiere’_2’’
16. Flood Fill Tool
 –
Opacity 20% -Fill the selection with the FG-Color = 3( 2 clicks) –
Opacity 20% -Fill the selection with the FG-Color = 3( 2 clicks)
Selections- Deselect All
17.Open the tube ‘’Renee_TUBES_Espace_lumiere_Image 1.png’’ - Edit - Copy- Activate your work -Edit - Paste as a new Layer
18. Effects –Plugins-
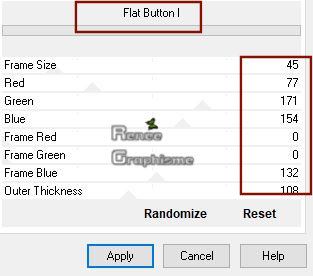
Unlimited 2.0 - Harry's Button Tools - Flat Button I use the settings below
19. Objects – Align- Bottom
20. Effects –3D- Effects – Drop Shadow with these settings : 3/3/72/18 Color Black
21. Layers-Properties-Set the Blend Mode to " Overlay"
22. Open the tube ‘’Renee_TUBES_Espace_lumiere_Image 2.png’’ - Edit - Copy- Activate your work -Edit - Paste as a new layer
23. Pick Tool: (K) on your keyboard -Enter these parameters for the X:-4,00 and Y:389,00 positions on the Toolbar

- Press (M) to close the Pick Tool
24. Layers-Properties-Set the Blend Mode to " Screen "
- Activate the bottom of the Layer-Palette =Raster 1
25. Open the Tube ‘’’Renee_TUBES_Espace_lumiere_Image 3.png’’ -Edit - Copy- Activate your work -Edit - Paste as a new layer
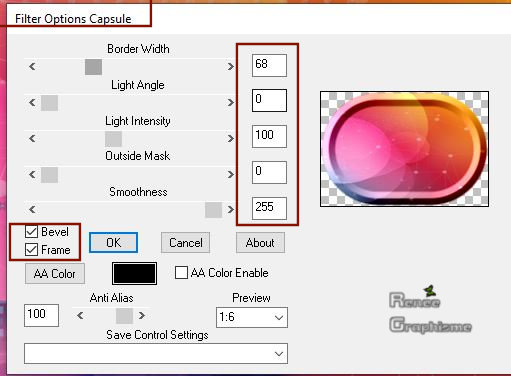
26. Effects – Plugins- Bordermania – Capsule use the settings below
27. Image
Resize to 72% - Resize all Layers not checked
28. Layers-Properties-Set the Blend Mode to " Overlay " – Reduce the Opacity of this layer to 67%
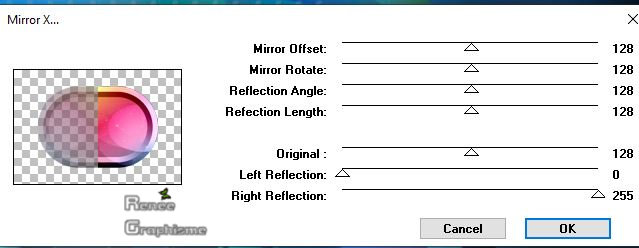
29. Effects – Plugins – Balder Olrik – Mirror X with these settings
30. Layers- Duplicate
31. Effects – Plugins– Balder Olrik- Lens Correction using the default settings
(all= 0)
32. Layers-Properties-Change the Blend Mode to " Screen " – Opacity of this layer 100%
33. Effects – Plugins – Alien skin Eyecandy 5 Impact- Perspective
Shadow use the settings below
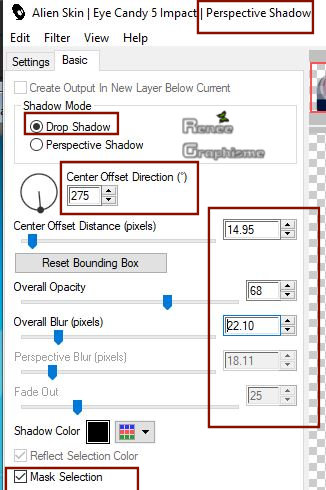
34. Activate the Layer underneath ( Raster 7 )– Repeat: Effects – Plugins – Alien skin Eyecandy 5 Impact- Perspective
Shadow with the same settings
- To replace the Top of the Layer-Palette
- Color-Palette- Set your Foreground color to color #ffffff =1
35. Layers- New Raster Layer
36. Selections –load/save selection –load selection from disc and select my selection: ‘’ ’Espace_lumiere_3’’
37. Flood Fill Tool
 –
Opacity 100% – Fill the selection with the Foreground color =1 ( 3 clicks) –
Opacity 100% – Fill the selection with the Foreground color =1 ( 3 clicks)
Selections- Deselect All
38. Layers-Properties-Set the Blend Mode to " Hard Light "
39. Layers- New Raster Layer
40. Selections –load/save selection –load selection from disc and select my selection: ‘’ ’Espace_lumiere_4’’
41. Flood Fill Tool
 –
Opacity 100% – Fill the selection with the Foreground color =1 (zoom in if necessary) –
Opacity 100% – Fill the selection with the Foreground color =1 (zoom in if necessary)
Selections- Deselect All
42. Effects –3D- Effects – Drop Shadow with these settings : 1/1/72/1 Color Black
43. Open the tube ‘’Renee_TUBES_Espace_lampes.png’’ - Edit - Copy- Activate your work -Edit - Paste as a new layer
- Pick Tool: (K) on your keyboard -Enter these parameters for the X:47,00 and Y:133,00 positions on the Toolbar

44. Selections –load/save selection –load selection from disc and select my selection: ‘’ ’Espace_lumiere_5’’
45. On this Layer (Lamps) !!!!!! Adjust- Blur Gaussian Blur: Radius 36%
Selections- Deselect All
46. Open the tube ‘’
Renee_TUBES_TUBE 78’’
- Image
Resize to 65%
- Edit - Copy- Activate your work -Edit - Paste as a new layer
47. Pick Tool: (K) on your keyboard -Enter these parameters for the X:31,00 and Y:254,00 positions on the Toolbar

- Press (M) to close the Pick Tool
48. Layers- Arrange-Move Down
- To replace the Top of the Layer-Palette
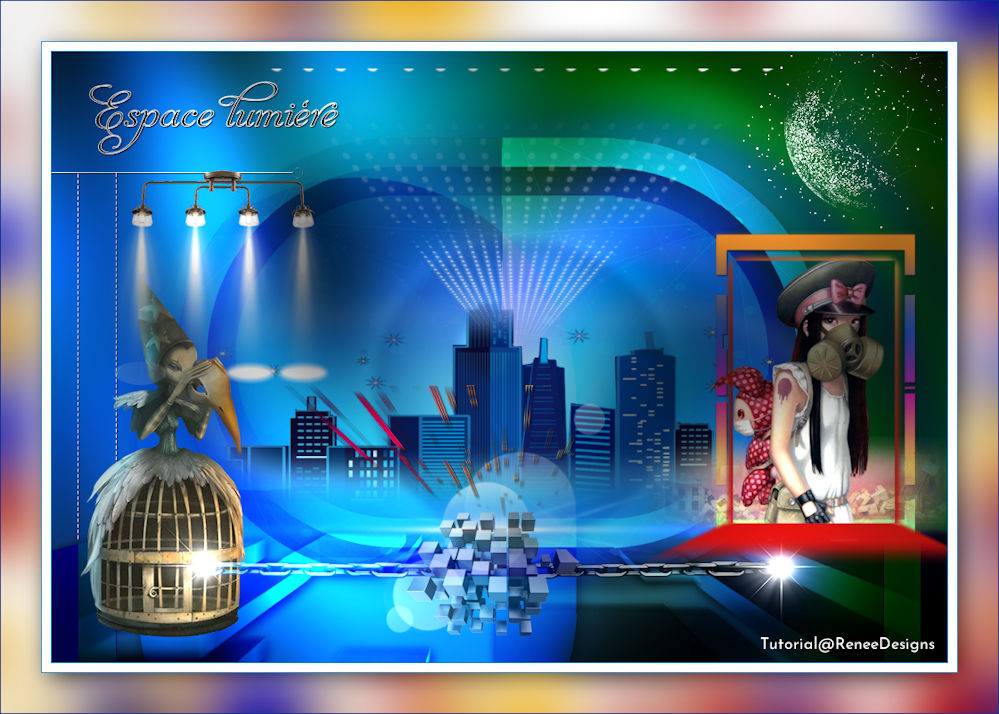
- Your work and Layer Palette look like this now-You should have this result
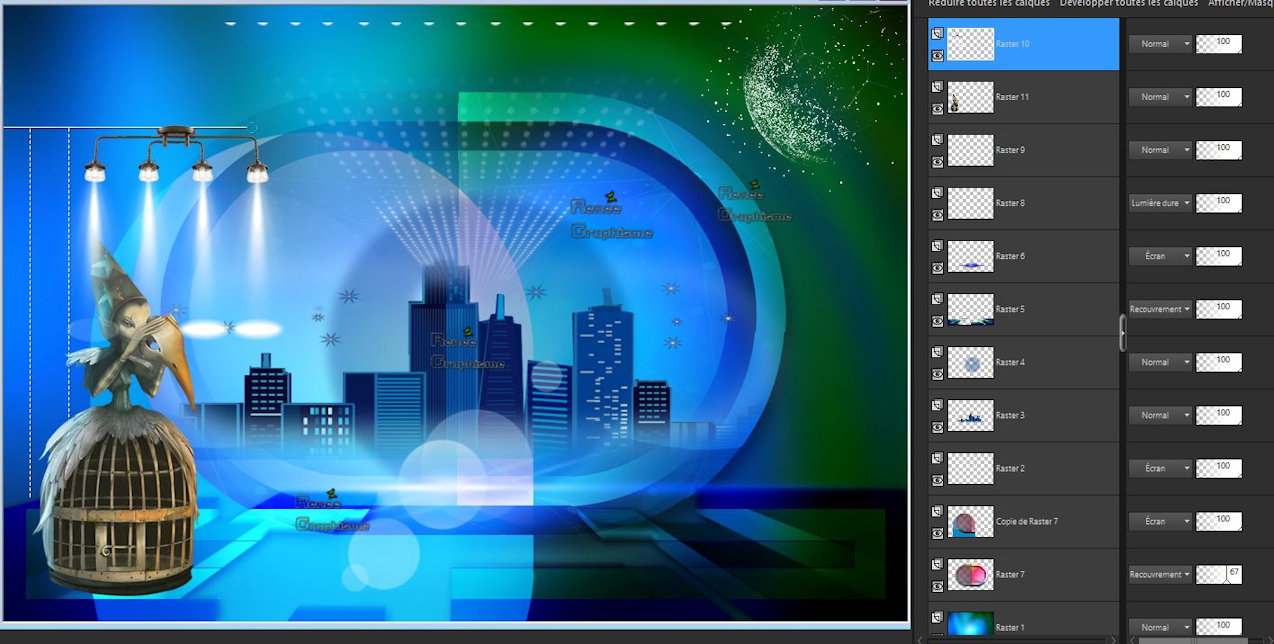
49. Open the tube –‘’Renee_TUBES_Espace_chaine.png’’ - Edit - Copy- Activate your work -Edit - Paste as a new layer
50. Pick Tool: (K) on your keyboard -Enter these parameters for the X:166,00 and Y:516,00 positions on the Toolbar

-Press (M) to close the Pick Tool
51. Reduce the Opacity of this layer to 63%
52. Layers- New Raster Layer
53. Selections –load/save selection –load selection from disc and select my selection: ‘’ ’Espace_lumiere_6’’
54. Flood Fill Tool
– Fill the selection with the FG-Color =1
Selections- Deselect All
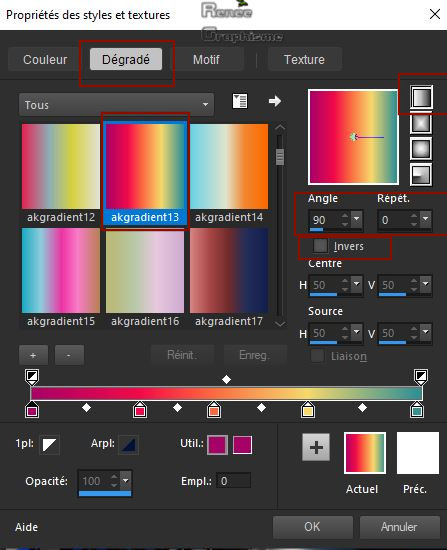
- Color Palette: Set your foreground color to gradient and select : ‘’akgradient13’’-
Prepare a linear gradient configured like this
55. Layers- New Raster Layer
56. Selections –load/save selection –load selection from disc and select my selection: ‘’ ’Espace_lumiere_7’’
57. Flood Fill Tool
 -
Fill the selection with the gradient (click 7 or 8 times) -
Fill the selection with the gradient (click 7 or 8 times)
58. Effects – Edge Effects – Enhance
59. Effects – 3 D-Effects – Drop Shadow with these settings with the same settings
Selections- Deselect All
60. Repeat : Effects – 3 D-Effects – Drop Shadow with the same settings
- Color Palette: Set your foreground color to gradient and select : ‘’ akgradient10’’- Prepare a linear gradient configured like this
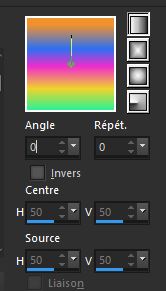
61. Layers- New Raster Layer
62. Selections –load/save selection –load selection from disc and select my selection: ‘’ ’Espace_lumiere_8’’
63. Flood Fill Tool
 -
Fill the selection with the gradient -
Fill the selection with the gradient
Selections- Deselect All
64. Effects – 3 D-Effects – Drop Shadow with the same settings
65. Open the tube
‘’Renee_TUBES_TUBE 4’’
- Image
Resize to 65%
66. Edit - Copy- Activate your work -Edit - Paste as a new layer
67. Pick Tool: (K) on your keyboard -Enter these parameters for the X:688,00 and Y:227,00 positions on the Toolbar

- Press (M) to close the Pick Tool
- Color-Palette -Set your Foregroundcolor to color # 9f0a0b= 5
68. Layers- New Raster Layer
69. Selections –load/save selection –load selection from disc and select my selection: ‘’ ’Espace_lumiere_9’’
70. Flood Fill Tool
 -
Fill the selection with the FG-Color =5 (4 or 5 clicks) -
Fill the selection with the FG-Color =5 (4 or 5 clicks)
Selections- Deselect All
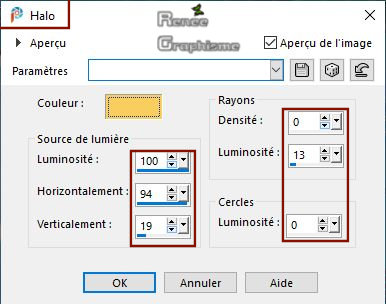
71. Effects – Illumination Effects – Sunburst use the settings below – Color #f8ce5e
72. Open the tube ‘’Titre’’ -Edit - Copy- Activate your work -Edit - Paste as a new layer and move
73. Layers- New Raster Layer
74. Effects-Plugins-
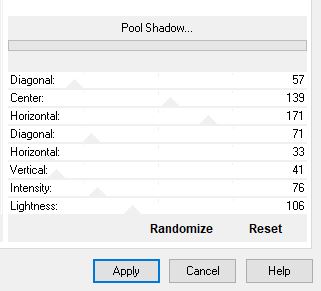
Unlimited 2.0 – Tramages – Pool Shadow…use the settings below
75. Image - Add borders-Symmetric checked 1 Pixel Color #018ac8= 2
76. Image - Add borders-Symmetric checked 10 Pixel Color #ffffff = 1
77. Image - Add borders-Symmetric checked 1 Pixel Color #018ac8= 2
78. Selections-
Select All
79. Image - Add borders-Symmetric checked 45 Pixel Color #ffffff = 1
80. Effects –3D- Effects – Drop Shadow with these settings : 6/7/85/42 Color Black
81. Selections- Invert
82. Layers- New Raster Layer
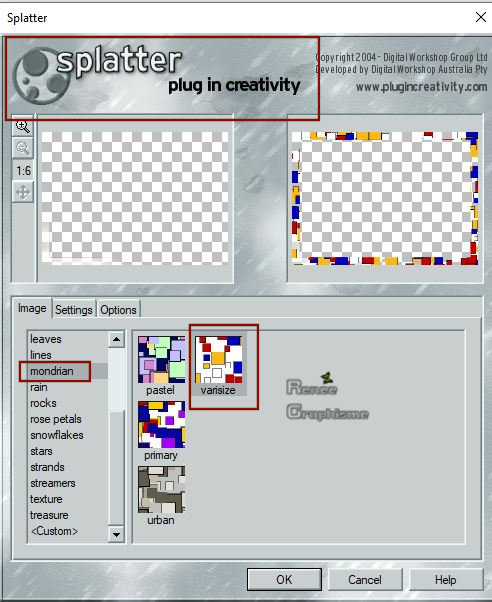
83. Effects – Plugins – Creativity – Splatter – Mondrian with these settings
84. Adjust- Blur- Gaussian Blur: Radius 36
Selections- Deselect All
85. Image - Add borders-Symmetric checked 1 Pixel Color #018ac8= 2
86. Image -
Resize to 999 Pixels Width.
Save as JPG
That's it !! You've done it !!
I hope you enjoyed this lesson
Renée
This lesson was written by Renée 16-12-2019
Edited and Update
in 2020
*
Any resemblance with an existing lesson is merely a coincidence
* Do not forget to thank the people who work with us and for us. I have appointed the tubeurs and translators
Thanks
Renée
*
|
 Translations


