|
Let's start the lesson
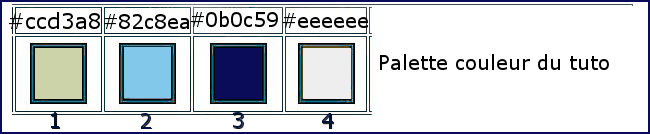
-Open the color palette in your Psp
- Preparation
-Material Properties:Set your Foreground color to color #ccd3a8 =color 1-Set your Background color to color # 82c8ea=color 2
1. Open the background image -‘’Fond-Ete-2022’’-
Promote Background Layer =Raster 1
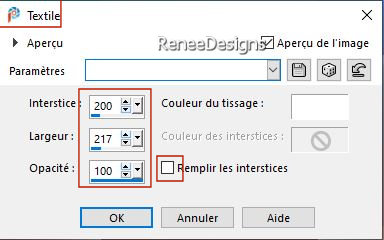
2. Effects – Texture Effects – Weave use the settings below-color white
3. Effects - Plugins - Filter- Unlimited 2.0- &<BKg Designer sf10
II> -DIS Refractor 2 : 35
4. Effects - Plugins- Filter- Unlimited 2.0- &<Bkg Designer sf10 I>
-Cruncher: 6/6
5. Adjust-Sharpness-Sharpen More
6. Layers- New Raster Layer
7. Selections –load/save selection –load selection from disc and select my selection: ‘’Ete-2022-selection 1’’
8. Activate Flood Fill Tool
 –Fill the selection with the foreground color #ccd3a8 =color 1 ( 5 clicks) –Fill the selection with the foreground color #ccd3a8 =color 1 ( 5 clicks)

-Material Properties:Set your Foreground color to color # 0b0c59=color 3-Background color remains at color # 82c8ea=color 2
9. Layers- New Raster Layer
10. Activate Flood Fill Tool
–
Fill the layer with the foreground color #0b0c59=color 3
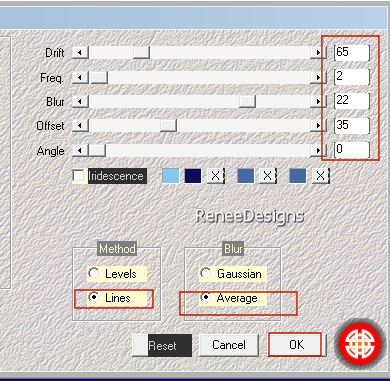
11. Effects – Plugins – Medhi- Vibrations 1.1 use the settings below
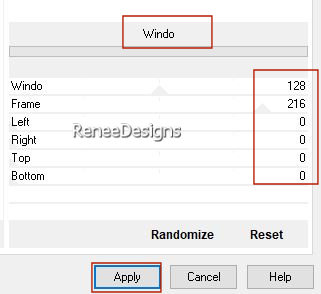
12. Effects - Plugins - Filter- Unlimited 2.0 –Mock – Windo use the settings below
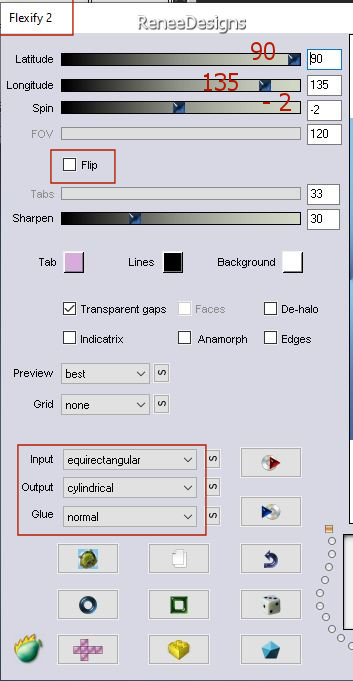
13. Effects – Plugins – Flaming Pear – Flexify 2 use the settings below
14. Selections –load/save selection –load selection from disc and select my selection: ‘’Ete-2022-selection 2’’

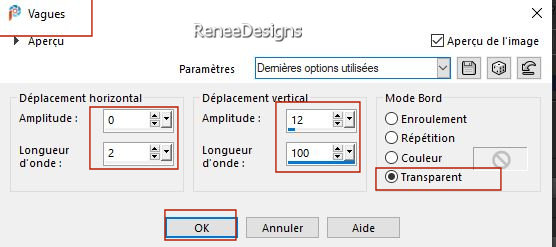
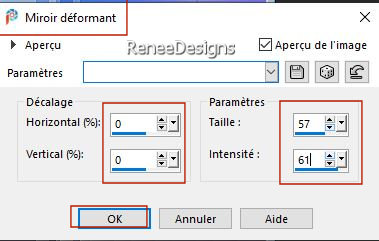
15. Effects- Distortion Effects- Wave use the settings below
16. Layers-Properties-Change the Blend Mode to " Overlay " and Lower the Opacity to 69%
17. Effects - Plugins- Filter- Unlimited 2.0 - RCS Filter Pak 1.0-
RCS TripleExposure- Default settings (255)
- Repeat this filter a second time with the same settings
18. Open the Tube ’’ Ete-2022- Image 1’’ -Edit - Copy- Activate your work -Edit - Paste as a new layer
19. Selections –load/save selection –load selection from disc and select my selection: ‘’Ete-2022-selection 3’’
DO NOT ADD A NEW LAYER
-Material Properties
- Inverting the colors
20. Activate Flood Fill Tool
–
Fill the selection with the foreground color # 82c8ea =color 2
21. Effects - Plugins- Filter- Unlimited 2.0 -Distortion Filters -
Scanline Shifter with these settings: 71/23
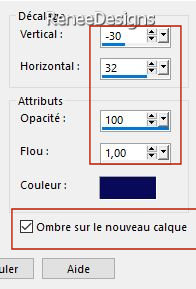
22. Effects-3D-Effects-Drop Shadow use the settings below /with the background color #0b0c59=color 3
Shadow on new layer checked !!!
- Stay on the shadow layer
-Material Properties - Inverting the colors
23. Effects - Plugins - Filter- Unlimited 2.0 -Distortion Filters -
Scanline Shifter -Default settings 9/23
- Activate the layer above
24. Layers- Merge- Merge- Down
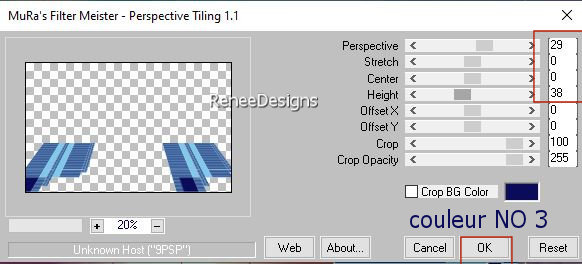
25. Effects – Plugins – Mura’s Meister – Perspective Tiling use the settings below
26. Effects- Distortion Effects– warp use the settings below
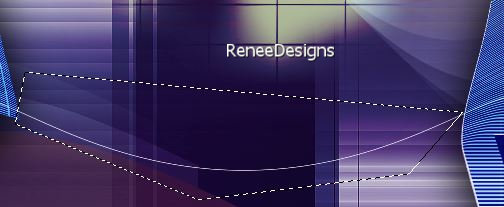
27. With your Freehand Selection Tool or the Eraser - Delete this line
as shown in the example below
28. Effects - Plugins - Alien Skin EyeCandy 5 - Impact – Perspective
Shadow ––Tab- Settings-User Settings -choose my Preset : Ete-2022-Renee-shadow
- Repeat this filter again with the same settings
29. Layer Properties- Change the Blend Mode to "Hard Light"
30. Layers- New Raster Layer
31. Selections –load/save selection –load selection from disc and select my selection: ‘’Ete-2022-selection 4’’
32. Activate Flood Fill Tool
–
Fill the selection with the background color #82c8ea=color 2
33. Effects- User Defined Filter – Emboss 3 using the default settings
34. Decorate with the tube below and paste as a new layer on your creation
Or choose Tube to your own taste
Renée chose these tubes below
-‘’Renee-Tubes-Ete2022- 1’’
-‘’Renee-Tubes-Ete2022- 3’’ / (Image Resize 55%)
-Renee-Tubes-Ete2022-
bulles
-Renee-Tubes-Ete2022-
oiseaux
-Put the tube on the right place ( see finished image)
- On these tubes I applied a shadow
35. Effects - Plugins - Alien Skin EyeCandy 5 - Impact – Perspective
Shadow use the settings below

Put the image aside for now, we will need it later
There are 2 versions of the tube to build
- The bottle (version 1) continue the tutorial
- A goblet or pot (variant 2) continue at point 70
1.
Construction of THE BOTTLE
- Open the file
"construction bouteille"
- Open the color palette –Construction Bouteille in your Psp

36. File: Open a new transparent image in this size: 1015 x 476 Pixels
37. Selections –load/save selection –load selection from disc and select my selection: ‘’Ete-2022-bouteille 1’’
38. Open the Tube ‘’ Ete-2022-Bouteille’’ -Edit - Copy- Activate your work -Edit - Paste into selection
- Properties Foreground:
Set your foreground to the gradient and select: ‘’ # L&K 1 Voorgrond-achtergrond’’ -Style Linear -use the settings below
(Please note that this gradient takes on the colors of the background)
The background color is this color #82c8ea=color 2
You change the foreground with this gradient configured like this and your palette will look like this

39. Layers- New Raster Layer
40. Selections –load/save selection –load selection from disc and select my selection:’’‘’Ete-2022-bouteille 2’’
41. Activate Flood Fill Tool
–Fill the selection with the gradient
DO NOT DESELECT
-Properties Foreground - Close the Gradient- Set your foreground color to color #0753c7= color 2
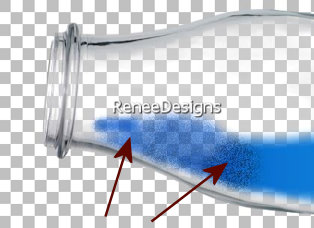
42. Activate Airbrush Tool configured like this
And give a small (soft) click with foreground color #0753c7 = color 2
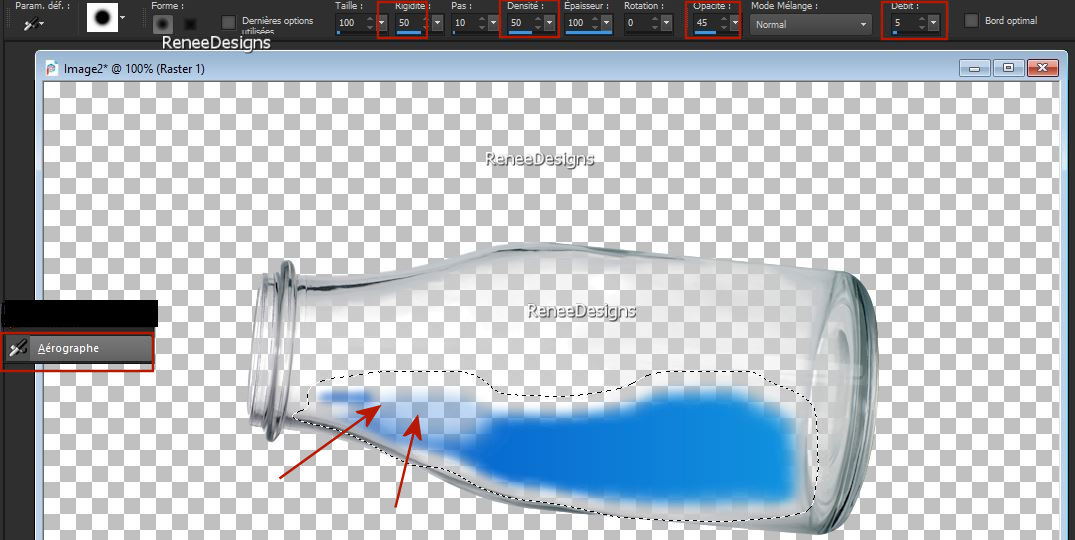
to give this effect
43. Open the Tube ‘’ Ete-2022-Poissons’’ -Edit - Copy- Activate your work -Edit - Paste as a new layer
- Place in the bottom right corner of the bottle
-Properties Foreground - Set your foreground color to color #6bb43a =color 3
44. Layers- New Raster Layer
45. Selections –load/save selection –load selection from disc and select my selection:’’‘’Ete-2022-bouteille 3’’
46. Activate Flood Fill Tool
–Fill the selection with the foreground color #6bb43a =color 3 (3 or 4 clicks)
47. Layers- Duplicate
49. Layers- Merge- Merge- Down
49. Effects- User Defined Filter Emboss 3
50. Layers- New Raster Layer
51. Selections –load/save selection –load selection from disc and select my selection:’’‘’Ete-2022-bouteille 4’’
52. Open the Tube ‘’ Ete-2022-Vagues’’ -Edit - Copy- Activate your work -Edit - Paste into selection
53. Effects – Edge Effects – Enhance
54. Layers- New Raster Layer
55. Selections –load/save selection –load selection from disc and select my selection:’’‘’Ete-2022-bouteille 5’’
56. Properties Foreground-Set the foreground color to color #ebfdff = color 5
Activate Flood Fill Tool
–
Fill the selection with the foreground color #ebfdff =color 5 (2 clicks)
57. Activate one of these two tubes to your taste
Open the Tube ’’Renee-Tubes-Ete2022- nageur 1 or nageur 2’’
- Resize if necessary
- Edit - Copy- Activate your work -Edit - Paste as a new layer / Move the tube to its place ( see finished image)
58. Layers- New Raster Layer
59. Selections –load/save selection –load selection from disc and select my selection:’’‘’Ete-2022-bouteille 6’’
60.Properties Foreground- Set your foreground color to color #b4b7b9=color 6
> Activate Flood Fill Tool
–
Fill the selection with the foreground color #b4b7b9=color 6 (4 or 5 clicks)
61. Layers- Arrange- Sent to Bottom
-Activate the top of the layer palette
62.Open the Tube ‘’Ete-2022-Nuages’’ -Edit - Copy- Activate your work -Edit - Paste as a new layer
Pick Tool: (K) on your keyboard -Enter these parameters on the toolbar
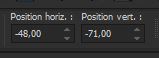 -48/
- 71 -48/
- 71
Is everything in the right place?
63. Layers- Merge- Merge Visible
64. Image - Resize to 72%.
65. Edit-Copy !!!!
- Activate your minimized image from step 35 a
66. Edit - Paste as a new layer
67. Pick Tool: (K) on your keyboard -Enter these parameters on the toolbar
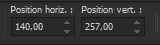 140/
257 140/
257
Press ( M ) to close the Pick Tool
68. Open the Tube ‘’ Renee-Tubes-Ete2022-eau’’ - Edit - Copy- Activate your work -Edit - Paste as a new layer
69. Pick Tool: (K) on your keyboard -Enter these parameters on the toolbar
Postion X
– 34 and Position Y 378
Press ( M ) to close the Pick Tool
- Reduce the opacity of the layer a little bit below the bottle (you can save the bottle as PNG)
70. If you want to build the pot, put the picture aside (do not close it, we will need it again later).
If you keep “the bottle” go directly to step 109
2.
Construction of the Jar
-
Open the file "Construction du Bocal"
- Open the color palette – Construction Bocal

70. File: Open a new transparent image in this size: 412 x 481 Pixels
71.Selections –load/save selection –load selection from disc and select my selection: ‘’Ete-2022-Bocal 1’’
72.Properties Foreground -Set your foreground color to color #3164ce= color 1
- Activate Flood Fill Tool
–
Fill the selection with the foreground color #3164ce= color 1
73. Layers- New Raster Layer
74.Selections –load/save selection –load selection from disc and select my selection: ‘’Ete-2022-Bocal 2’’
75. Properties Foreground- Set your foreground color to color #d3eef2 =color 2
Activate Flood Fill Tool
–Fill the selection with the foreground color #d3eef2 =color 2
76. Adjust -Blur- Gaussian Blur-Radius 8%
77. Layers- New Raster Layer
78. Selections –load/save selection –load selection from disc and select my selection: ‘’Ete-2022-Bocal 3’’
79. Open the Tube ‘’ Ete-Bocal-Image
1’’ -Edit - Copy- Activate your work -Edit - Paste into selection
80. Layers- New Raster Layer
81. Selections –load/save selection –load selection from disc and select my selection: ‘’Ete-2022-Bocal 4’’
82. Properties Foreground -Set your foreground color to color #4f8185=color 3
Activate Flood Fill Tool
–
Fill the selection with the foreground color #4f8185=color 3
83. Adjust -Blur- Gaussian Blur-Radius 5%
84. Layers- New Raster Layer
85. Selections –load/save selection –load selection from disc and select my selection: ‘’Ete-2022-Bocal 5’’
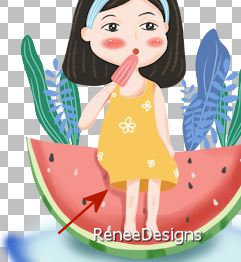
86. Open the Tube ‘’ Ete-Bocal-Image - Pasteque’’ -Edit - Copy- Activate your work -Edit - Paste into selection
87. Open the Tube ’’ Ete-Bocal-Image-
Fillette’’ - Edit - Copy- Activate your work -Edit - Paste as a new layer
Renée made 2 lines for placement on the watermelon and for a shadow effect
Place the girl exactly as shown in the picture below
88. Layers- New Raster Layer
89. Selections –load/save selection –load selection from disc and select my selection: ‘’Ete-2022-Bocal 6’’
90. Open the Tube ’’Ete-Bocal-Image-
Bocal’’ - Edit - Copy- Activate your work -Edit - Paste into selection
91. Layers- Duplicate
92. Layers- Merge- Merge- Down
93. Layers- Duplicate
94. Layers- Merge- Merge- Down
95. Layers- New Raster Layer
96. Selections –load/save selection –load selection from disc and select my selection: ‘’Ete-2022-Bocal 7’’
97.Properties Foreground -Set your foreground color to color #ffbe58 = color 4
Activate Flood Fill Tool
–
Fill the selection with the foreground color #ffbe58 = color 4
98. Layers- New Raster Layer
99. Selections –load/save selection –load selection from disc and select my selection: ‘’Ete-2022-Bocal 8’’
100.Properties Foreground-Set your foreground color to color # 9b6715=color 5
-Activate Flood Fill Tool
–
Fill the selection with the foreground color # 9b6715=color 5
101 Layers- New Raster Layer
102. Selections –load/save selection –load selection from disc and select my selection: ‘’Ete-2022-Bocal 9’’
103. Activate Flood Fill Tool
–
Fill the selection with the foreground color # 9b6715=color 5 (2 clicks)
Is everything in the right place?
104. Layers- Merge- Merge Visible
105. Image -
Resize to 85% (Resize all layers checked)
106. Edit - Copy !!!! -Activate your minimized image at step 70 -Edit - Paste as a new layer
107. Open the Tube ‘’Ete-Bocal-Image- flaque-eau’’ -Edit - Copy- Activate your work -Edit - Paste as a new layer
108. Layers- Arrange- Move Down
109. Open the Tube ‘’Titre’’ two layers !!!(Resize to your liking) Edit - Copy- Activate your work -Edit - Paste as a new layer
- Place to your liking
110. On these two layers Layers-Properties-Set the Blend Mode to " Overlay "
111. Image - Add borders-Symmetric checked: 1 Pixel Color black
112. EDIT- COPY
113. Open the Tube ‘’Cadre’’ in your Psp
114. With your Magic Wand, select the inside of that frame.
115. Edit - Paste Into Selection (Image is still in your PSP memory)
116. Effects -
Plugins - Alien Skin EyeCandy 5 - Impact –Tab- Settings-User Settings -choose my Preset ‘’Ete-2022-Renee-shadow’’
117 Paste the author's watermark on your work and your own watermark
118. Layers- Merge- Merge All (flatten)
119. Image -Resize 1005 Pixels width (Resize all layers checked)
Save as JPG
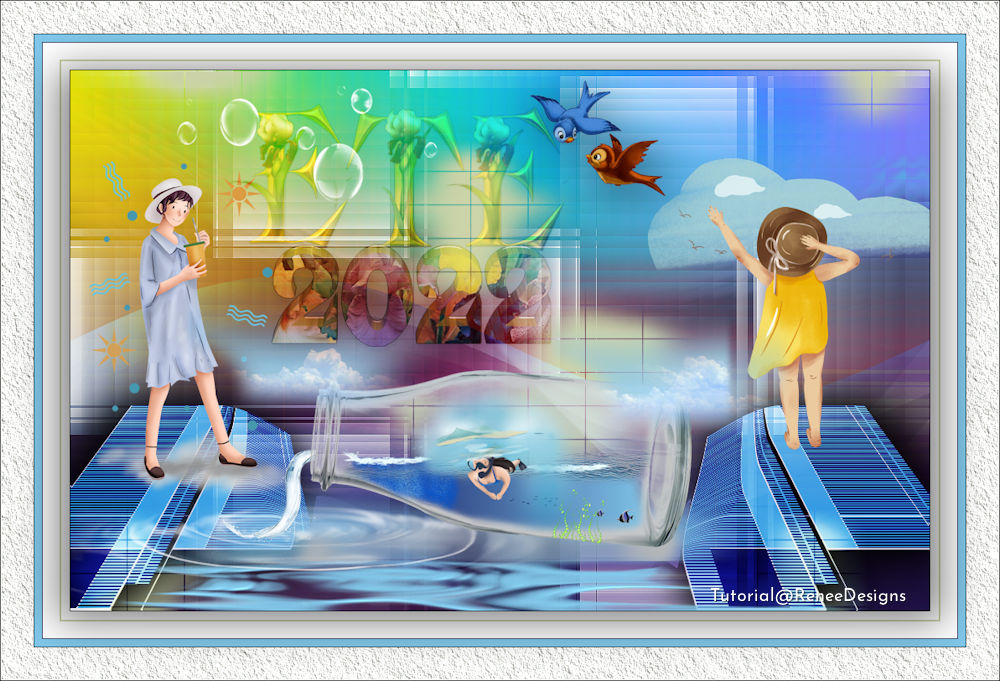
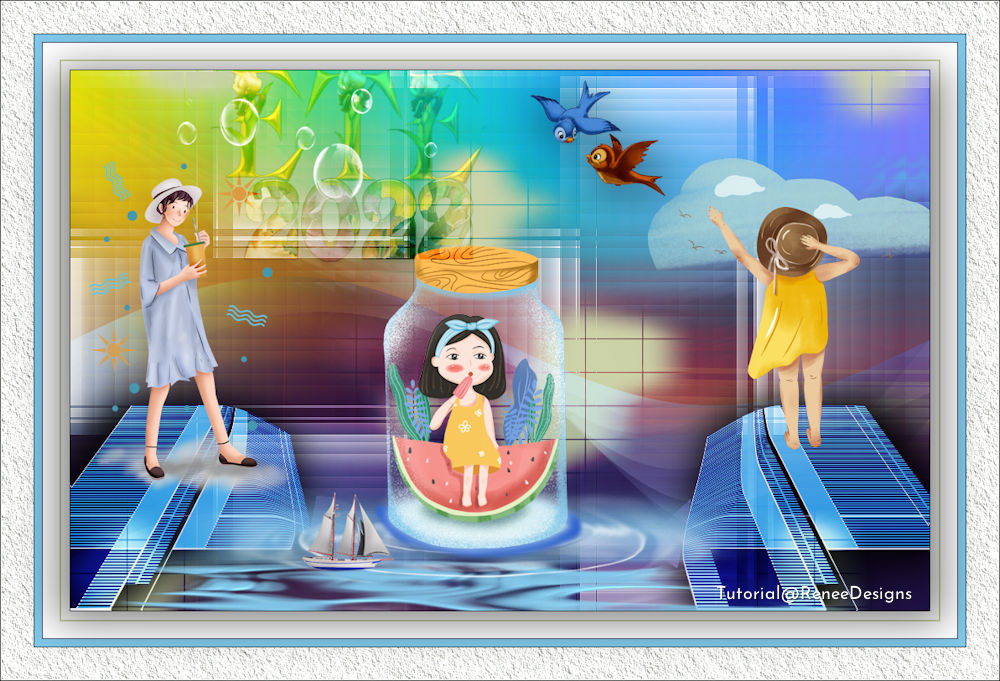
That's it - Thank you / I hope you enjoyed this lesson
Renée
This lesson was written by Renée
02/05/2022
Edited and Update
in 2022
*
*
Any resemblance with an existing lesson is a coincidence
* Do not forget to thank the people who work with us and for us -I have appointed the tubeurs and translators
Thanks
|

 Translations