|
Let's start the lesson.
- Preparation
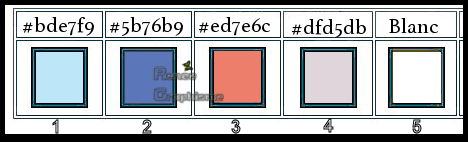
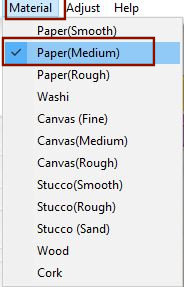
- Material Properties: Set your foreground color to color #bde7f9 = 1 – Set your background color to color #5b76b9=2
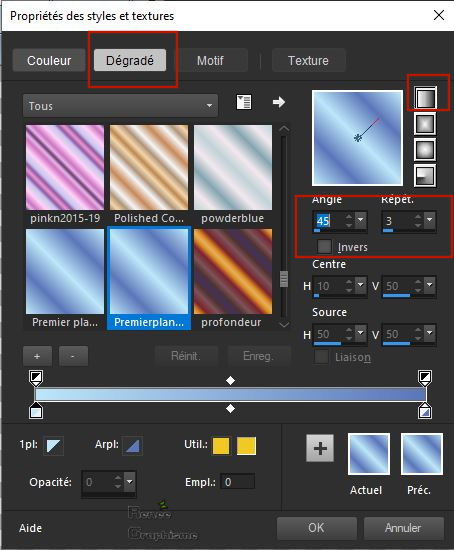
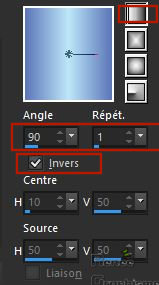
- Set your Foregroundcolor to foreground-background linear gradient configured like this
1. File: Open a transparent Image 1008 x 648 Pixels
2. Flood Fill Tool
 –
Fill the layer with the gradient –
Fill the layer with the gradient
3. Open the tube ‘’Ete-Parfait-Image
1’’ -Edit - Copy- Activate your work -Edit - Paste as a new layer
4. Effects –Plugins-
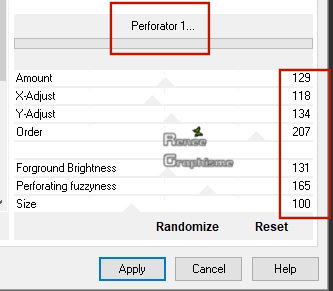
Unlimited 2.0 – Tramages - Perforator 1..use the settings below .
5. Effects - Plugins – Virtual Painter 4 with these settings
-Unzip and install the filter ......Enter the code Ask for using the filter
- A window opens and choose paintshop pro
Please Wait...... and OK. Start PSP and the filter works fine.
6. Layers-Properties-Change the Blend Mode to "Soft Light "
7. Effects – Edge Effects – Enhance
8. Layers- Merge- Merge Down
9. Layers- Duplicate
10. Adjust- Blur- Gaussian Blur-Radius 50.
11. Effects –
Plugins-Unlimited 2.0 - VM Distortion - Vision Impossible using the default settings
12. Effects – Edge Effects- Enhance
- Repeat: Effects- Edge Effects Enhance
13. Layers- Duplicate
14. Image - Mirror - Mirror vertical ( Image - Flip in older versions of PSP)
15. Layers-Properties-Change the Blend Mode to " Overlay "
- Layers- Merge- Merge Down
16. Image -
Resize by 78 % -Uncheck all Layers
Properties foreground -Change the settings of the linear gradient
17. Layers- New Raster Layer
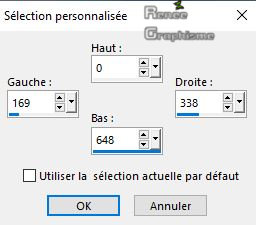
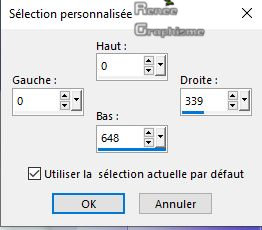
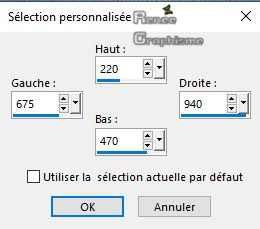
18. Activate Selection Tool -Custom Selection (S) -Rectangle with these settings 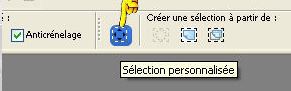
19.Flood Fill Tool
–
Fill the selection with the gradient
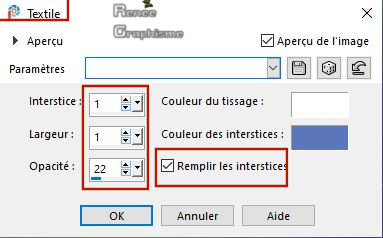
20. Effects – Texture Effects- Weave use the settings below / Color White and Background color =2
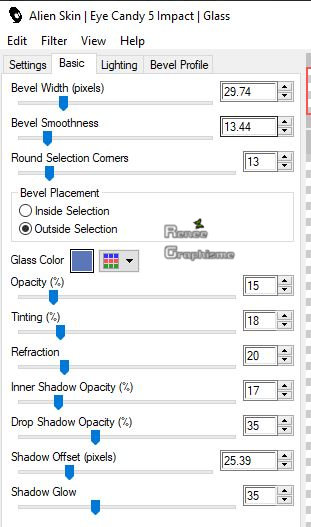
21. Effects – Plugins – Alien Skin EyeCandy 5 Impact – Glass-Tab- Settings- User/Settings and select my file- Preset
‘’Ete-2020’’
Or manual settings as shown in the example below -Color BG-Color=2
Selections- Deselect All
22. Layers- Duplicate
23. Effects – Image Effects- Offset with these settings: – H = 60 and V = 0 – Transparent checked
24. Image - Free Rotate 90° right
25. Effects – Distortion Effects– Polar Coordinates- Polar to Rectangular
26. Activate Selection Tool -Custom Selection (S) -Rectangle with these settings
DELETE
Selections- Deselect All
27. Effects – 3D Effects –Drop Shadow with these settings: 12/ - 9 /60 / 28 Color Black
- Activate the layer underneath ( Raster 2)
28. Layers- Arrange- Bring to Top
29. Layers- Duplicate
30. Effects – Image Effects - Offset use the settings below

- Repeat twice (Duplicate and Offset with the same settings )
- Your work and Layer Palette look like this now-You should have this result (Arrange the layers correctly)
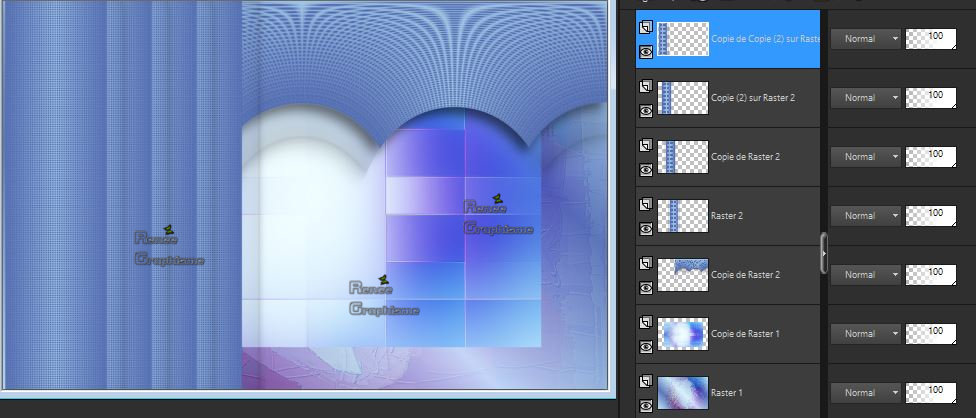
31. Layers- Merge- Merge Down (3 times)
32. Image -Rotate Right
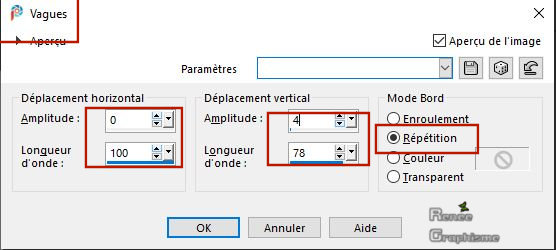
33. Effects – Distortion Effects- Wave use the settings below
34. Image - Rotate Left
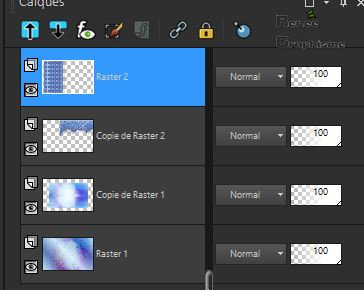
35. Effects – 3D Effects –Drop Shadow with these settings: -3 /- 35/ 50 /30 - Color Background Color =2
- Layer-Palette- Make Copy of Raster 1 active
36. Effects – 3D Effects –Drop Shadow using the default settings / Repeat Drop Shadow- Negative
-10/-10
37. Effects – Plugins – Mura’s Meister – Perspective Tiling using the default settings-but Height at 29
38. Activate the Magic Wand - Attention -Tolerance 20 and Feather 32 -Select the transparent part

DELETE
(4
or 5 times)
Selections- Deselect All
- Color Palette-Set your Foreground color to color #ffffff=5
- To replace the Top of the Layer-Palette
39. Layers- New Raster Layer
40. Activate the Brush Tool and choose the brush ‘’texte-Ete 2020 ‘’ Stamp with the WHITE foreground color on your image
41. Layers- Duplicate
42. Layers- Merge- Merge Down
43. Effects – 3D Effects –Drop Shadow with these settings: 1/1/100/1 Color Black
- Layers- Duplicate
- Layers- Merge- Merge Down
Fonts link below
https://www.onlinewebfonts.com/download/be995941e51bb6988f62ab0d4eb71054
44. Activate your Text Tool -With attached font write the title -Renée have used the font "FireSide ChatNF.ttf ‘’- Or take mine text and put it in the right place (see finished image )
45. Activate ’’Color Changer ‘’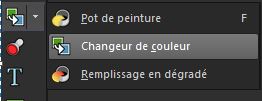
- If you want, color the letters with the color changer
- Place them correctly according to the brush text (see finished image)
- Activate the bottom of the Layer-Palette =Raster 1
46. Activate Selection Tool -Custom Selection (S) -Rectangle with these settings
47. Selections -
Promote Selection to Layer
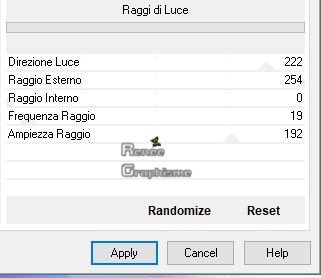
48. Effects –Plugins -
Unlimited 2.0 - It@lian Editors Effect - Raggi di Luce use the settings below
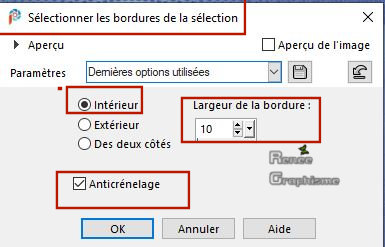
49. Selections-Modify-Select-Selection Borders use the settings below
50. Adjust- Blur- Gaussian Blur-Radius 20
51. Effects- Texture Effects -Emboss
52. Effects – 3D Effects –Drop Shadow with these settings: 7 / 5/ 65 / 22 Color Black
Selections- Deselect All
- Activate the bottom of the Layer-Palette =Raster 1
53. Open the tube ‘’ ETE_P-Image 1’’ - Edit - Copy- Activate your work -Edit - Paste as a new layer
54. Pick Tool: (K) on your keyboard -Enter these parameters for the X: 359,00 and Y: 198,00 positions on the Toolbar
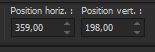
- Press ( M ) to close the Pick Tool
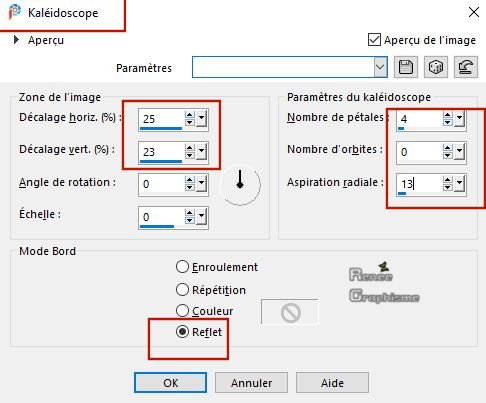
55. Effects-Reflection Effects-Kaleidoscope with these settings
56. Effects – 3D Effects –Drop Shadow with these settings: 1/1/100/10 Color #ed7e6c=3
57.Adjust-Sharpness-Sharpen More
- To replace the Top of the Layer-Palette
58. Open the tube ‘’ete-parfait-bulles
.pspimage’’ Edit - Copy- Activate your work -Edit - Paste as a new layer
- With your Move Tool place it in the right place (see finished image )
59. Open the tube ‘’ete-parfait-perroquet’’ - Edit - Copy- Activate your work -Edit - Paste as a new layer
-
With your Move Tool place it in the right place (see finished image )
60. Layers- New Raster Layer
61.Selections –load/save selection –load selection from disc and select my selection: ‘’ETE-PARFAIT 1’’
62.Flood Fill Tool
– Fill the selection with the Foreground color #ffffff=5 (click 3 times 3 )
Selections- Deselect All
63. Effects –Plugins-
Unlimited 2.0 – Toadies - Band supressing noise at 255
64. Effects – Edge Effects – Enhance
65. Open the tube ‘’Renee_TUBES_ETE
3’’ -Edit - Copy- Activate your work -Edit - Paste as a new layer
With your Move Tool place it in the right place (see finished image )
66. Image - Add borders-Symmetric checked
- 20 Pixels #ffffff
- 1 Pixel #5b76b9=2
- 10 Pixels #ffffff
- 1 Pixel #5b76b9=2
- 40 Pixels #ffffff
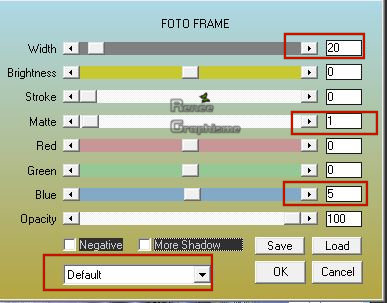
67. Effects – Plugins – AAA Frame – Foto Frame use the settings below
68.Image - Resize- 1015 Width
Save as JPG
I hope you enjoyed this lesson
Renée
This lesson was written by Renée
15-03-2020
Edited and Update
in 2020
*
Any resemblance with an existing lesson is a coincidence * Do not forget to thank the people who work with us and for us
I have appointed the tubeurs and translators
Thanks
*
|


 Translations


