|
Let's begin
1. Open a transparent image of 985 x 625
pixels transparente
2. Material Properties: Foregroundcolor: #d9c69d and your Backgroundcolor to color #4f5352
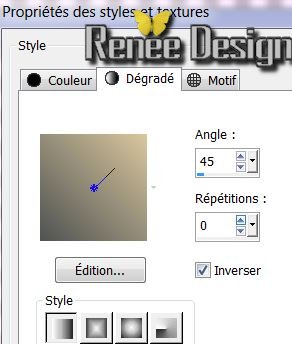
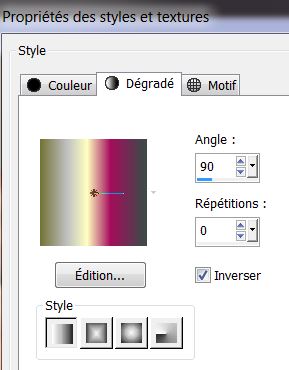
3.Material Properties:Prepare a Linear Gradient as belowconfigured like this
4. Flood Fill tool : Fill the layer with the gradient
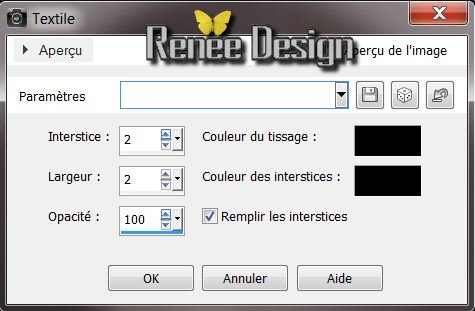
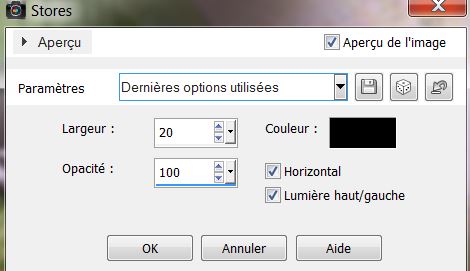
5. Effects - Texture Effects-Weave with these settings
6. Layer - New raster layer. /
Selection-Select All
7. Open the tube ''2148_2013_TReagen'' Edit/copy Edit paste into selection
8. Selections-Select none
9. Effects- Image Effects-Seamless Tilling/
default
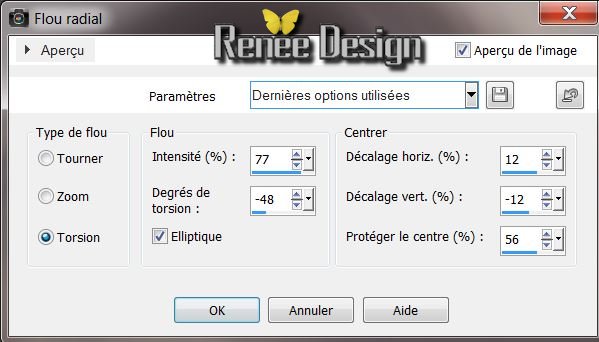
10. Adjust- Blur- Radial Blur
11. Effects - Plugins FM Tile Tools/ Blend Emboss default
12. Effects- Edge Effects-Enhance More
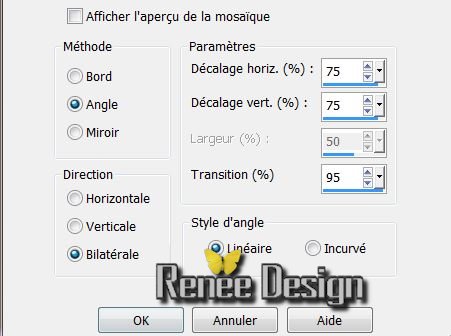
13. Effects- Geometric Effects- -
Perspective Horizontal

14. Layers-Duplicate /Image-Mirror
15. Layers-Merge-Merge Down
16. Effects - 3DEffects- Drop Shadow:
4/-5/66/28 black
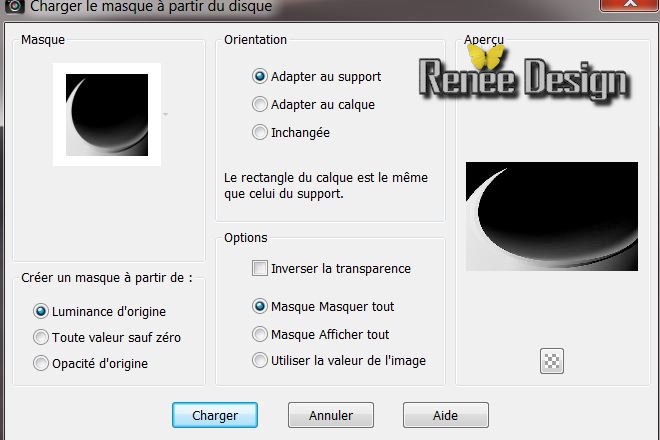
17. Layers-Load/Save Mask-Load Mask From Disk:
''195_msk_por°silvina_vanesa_orsi''
18. Layers-Merge-Merge Group
19. Effects - 3D Effects- Drop Shadow:
4/-5/66/28 black/ refaire -4/ 5
20. Blend Mode on this layer: "Overlay"
21. Open the tube
''''2148_2013_TReagen'' Edit/ copy- Edit/ paste as new layer and place
22. Adjust- Blur-Radial Blur
23. Effects - Edge Effects-Enhance More
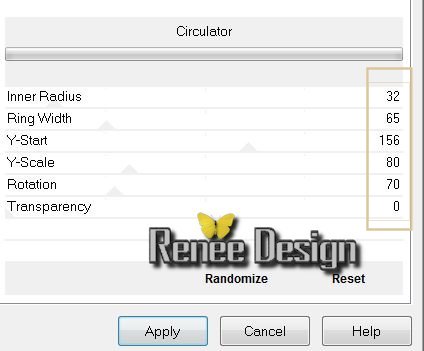
24. Effects -Plugins Unlimited
-Factory gallery B - Circulator
25.Layers-Duplicate /Image- Flip
26. Layers-Merge Merge Down
27. Effects -3D Effects-Drop Shadow - default
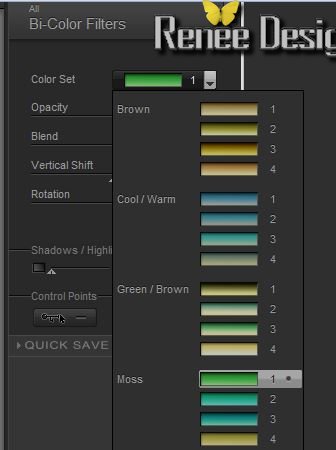
28. Effects-Plugins Nick Color Pro.3/Bi
Color-color Filters / Color set : Moss-1
29. Layers-Duplicate /Image Resize 75% Resize all layers not checked
30. Blend Mode on this layer: "Hard Light"
31. Aktivate raster 3
32. Selections-Select All-Float-Defloat
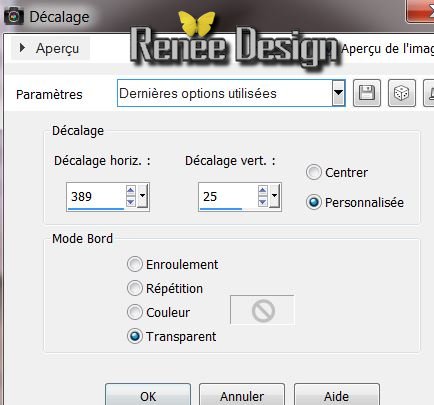
33. Layer - New raster layer.
34. Open the tube ''3410TReagen_03_12'' Edit/copy-Edit paste into selection
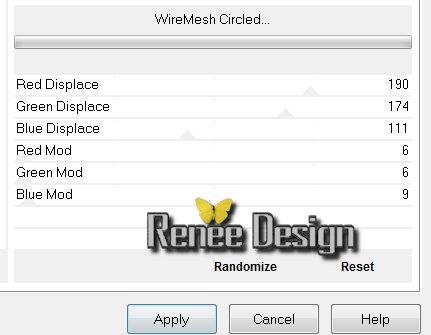
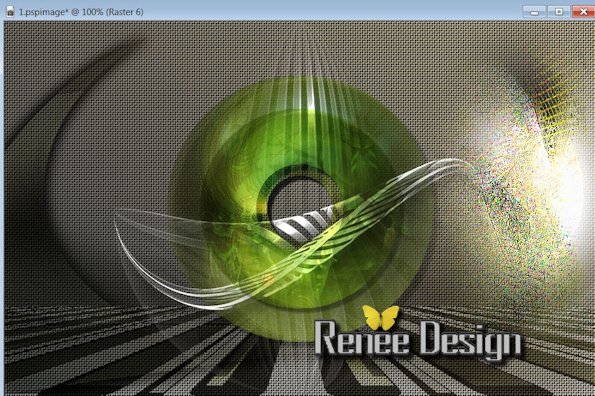
35. Selections-Select none - Blend Mode on this layer: "Hard Light" /Opacity down to 46%
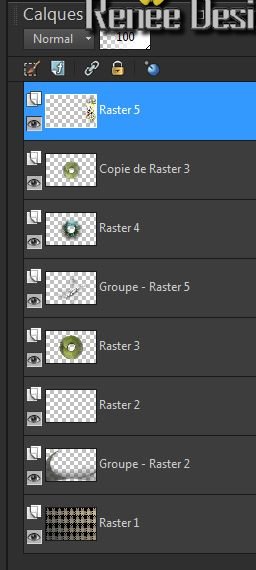
Your work is like this right now
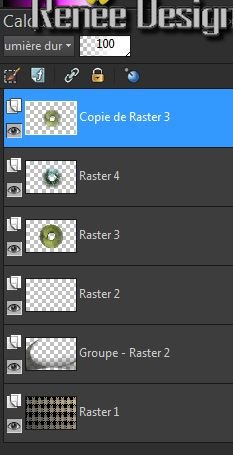
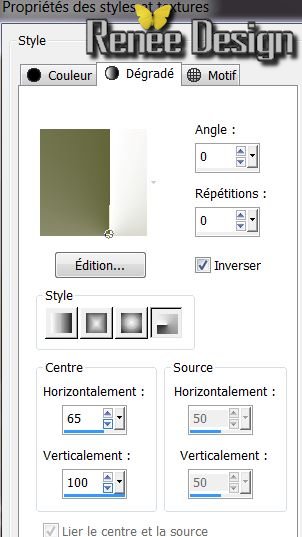
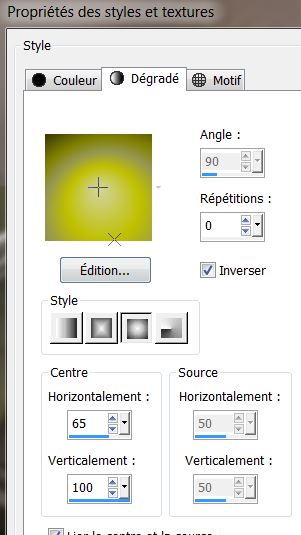
36. Aktivate raster 3
37. Layer - New raster layer. /Flood Fill Toll: Fill the layer with white
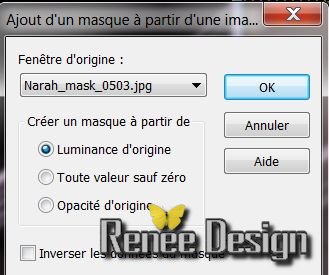
38. Layers- New Mask Layer From Image and choose : ''Narah_msk_0503.jpg''
39. Layers-Merge -Merge Group
40. Effects - Geometric Effects- - Circle -
transparent
41. Aktivate the top of the Layers palette
42. Open the tube ''face_ange_image_1''
Edit/ copy- Edit/ paste as new layer
43. Image- Mirror
44. Effects -Image Effects / Offset
45. Effects- Edge Effects-Enhance More
46. Effects - Plugins Unlimited Andrews
Filters 12 / Wire Mesh Circled
Your work is like this right now
47. Material Properties: Foregroundcolor :
#63653b and your Backgroundcolor to color white
48. Material Properties:Prepare a radial Gradient as below-configured like this
49. Aktivate the top of the Layers palette
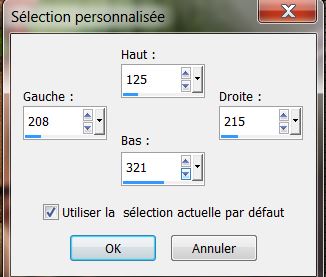
50. Layer - New raster layer. /Flood Fill Tool:Fill the layer with the gradient
51. Effects - Image Effects-Seamless Tilling
52. Effects - Plugins Simple /4 Way Average
53. Selections - load/save selection - load selection from disk and choose
''face_ange_1''
54. Selections-Invert /Delete
55. Selections-Select none
56. Effet - 3D Effects-Drop Shadow 15/ -15/ 75 /30 black
57. Effects -Plugins Italian Editor
Effect/Picture and picture to
135/155
58. Blend Mode to this layer "Soft Light "
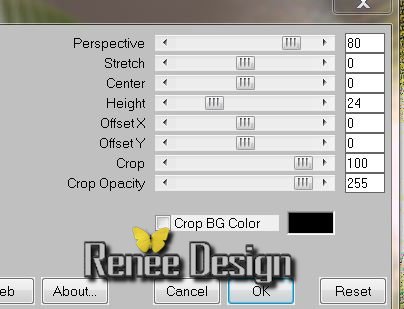
59. Effects-Plugins Mura's Meister - Perspective Tilling
60. Layers-Arrange Move Down- ( above raster 1 )
Your work is like this right now
61. Open the tube ''SaryDoll-GI_Eerie-Hauntings'' Edit/ copy- Edit/ paste as new layer /Image Resize75 % Resize all layers not checked
62. Layer - New raster layer.
63. Selections - load/save selection - load selection from disk and choose ''face_ange_2'' / Flood Fill Tool:Fill the layer with the gradient
64. Selections-Select none
65. Effects- 3D Effects -Drop Shadow /always in memory
66. Layer - New raster layer.
67. Selections-Custom selection with these settings
68. Material Properties: Foregroundcolor Prepare a Linear Gradient as below gradient: ''vbs41'' / configured like this
69. Flood Fill Tool: Fill the selection with the gradient / Selections-Select none
70. Effects - Texture Effects-Blinds
71. Open the tube ''face_ange_attache'' Edit/ copy- Edit/ paste as new layer / Layers-Merge Merge Down
72. Opem the tube ''face_ange_tripletable'' Edit/ copy- Edit/ paste as new layer /and place on the right
73. Open the tube ''grenouille '' Edit/ copy- Edit/ paste as new layer /and place
74. Material Properties: Foregroundcolor: Prepare a Sunburst Gradient as below gradient ''vbs35''
configured like this
75. Layer - New raster layer.
76. Selections - load/save selection - load selection from disk and choose '''face_ange_3'' Flood Fill Tool: Fill the selection with the gradient/ Selections-Select none
77. Layers-Merge-Merge Visible
78. Image-add borders symmetric 5 pixels color: #70a244
79. Image-add borders symmetric 60 pixels color #000000
80. Layer - New raster layer./ Flood Fill Tool: Fill the layer with black
81. Layers-New Mask Layer-From Image and choose:
''6897277maquetiram24.jpg''

82. Layers-Merge Merge Group
83. Activate the bottom layer in your layer palette
84. With the magic wand -select this black border-Selections-Invert
85. Effects -3D Effects - Drop Shadow 10/10/50/13 /white /refaire -10/-10
86. Selections-Select none
87. Open the tube''titre'' and place . Open the tube
"_texte" Edit/ copy- Edit/ paste as new layer /it is the right place
88. Image-add borders symmetric 5 pixels color #70a244

That's it !! You've done it !
Renée
This lesson was written by Renée the 15/10/2013
Created the
23/10/2013
Any resemblance with an existing lesson is merely a coincidence.
* | 


 Translation