|
Let's start the lesson.

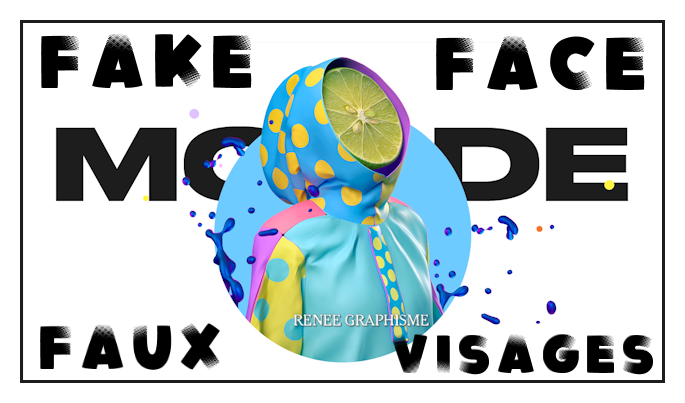
Fake-Face : Faux
visages
ATTENTION Renée has different tubes for decoration - Choose what you like and paste as a new layer on your work - Resize to taste
- Preparation
- Material Properties: Set your foreground color to color #0272c4= 1 – Set your background color to color #ffffff =2

1. Open the Background Image - Fake-
Face- Fond- Promote Background Layer =Raster 1
If you want to change color, I advise you to do here on this background -
Adjust Hue and Saturation -Colorize with your choice of color
2. Layers- New Raster Layer
3.
Selections –load/save selection –load selection from disc and select my selection: ‘’Fake-Face
-1’’
4. Flood Fill Tool
 –
Fill the selection with the FG-Color = 1 –
Fill the selection with the FG-Color = 1
Selections- Deselect All
5. Effects - Image Effects – Offset with these settings
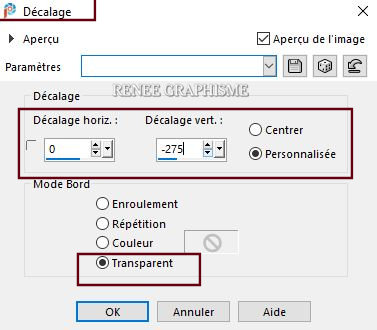
6. Effects –Plugins – Mura’s Meister – Perspective Tiling use the settings below
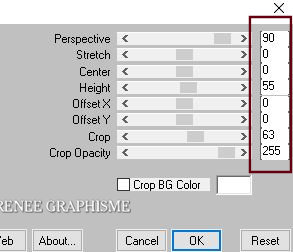
7.Layers-Properties-Set the Blend Mode to " Multiply"
- Activate the bottom of the layer palette =Raster 1
8. Layers- Duplicate
9. Effects – Plugins– Mura’s Meister – Perspective Tiling use the settings below
Change Height to 20
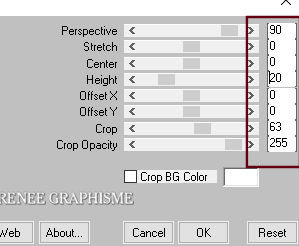
10. Repeat -Effects -Mura’s Meister – Perspective Tiling But
change Height to 35
11.Layers-Properties-Set the Blend Mode to " Overlay "
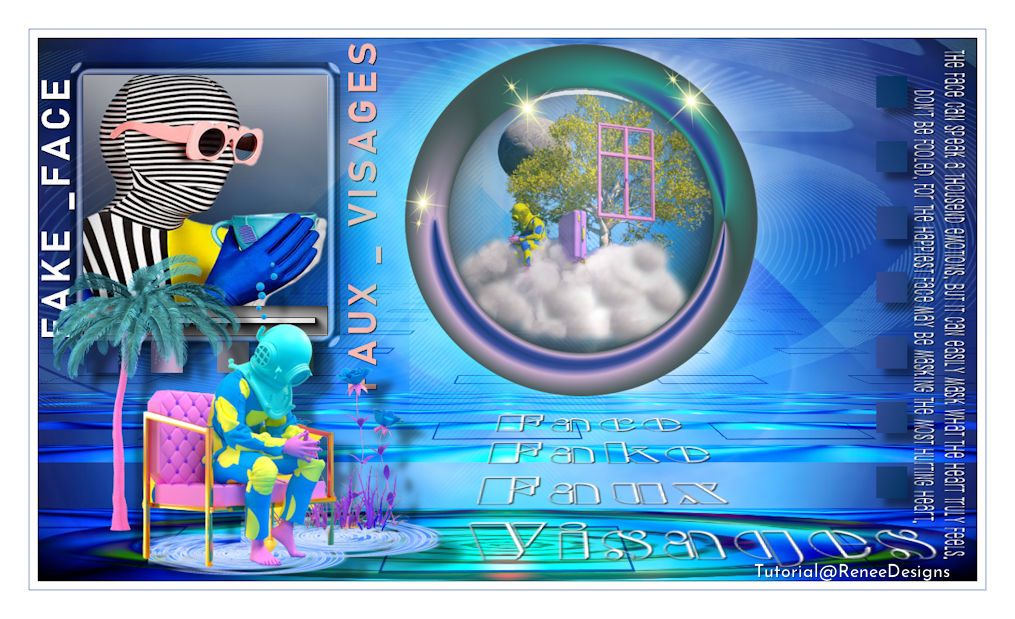
-Your work and Layer Palette look like this now-You should have this result

12. Activate Selection Tool -Custom Selection (S) -Rectangle with these settings

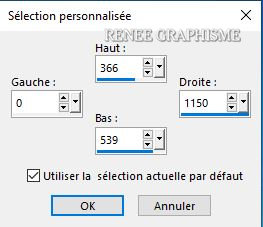
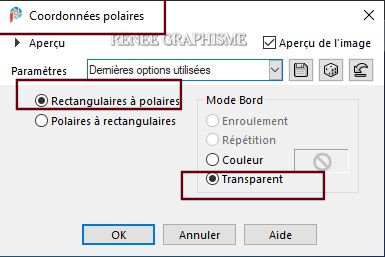
13. Effects- Distortion Effects-Polar Coordinates-Rectangular to Polar-Transparent
14. Selections- Promote selection to layer
Selections- Deselect All
15. Objects – Align
– Bottom
16. Layers-Properties-Change the Blend Mode to " Difference" –Lower the Opacity to 57%
- Activate the top of the layer palette
17. Open the tube
‘’Renee_TUBES_Fake-Face-13.pspimage" -Edit - Copy- Activate your work -Edit - Paste as a new layer
18.Adjust – Blur
– Radial Blur use the settings below
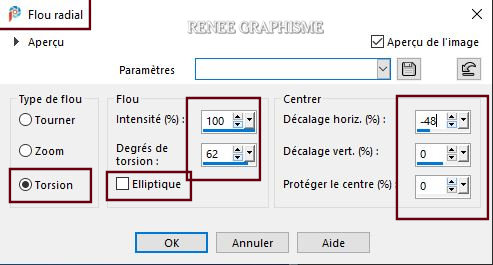
19. Layers- Duplicate
20. Image - Mirror - Mirror Horizontal (Image - Mirror in older versions of PSP)
- Layers- Merge- Merge Down
21. Effects –Plugins-
Unlimited 2.0 –ICNET-Filters– Render - Clouds (white/blue)
: 62/128
22. Layers- Arrange- Move above Raster 1
- Activate the top of the layer palette
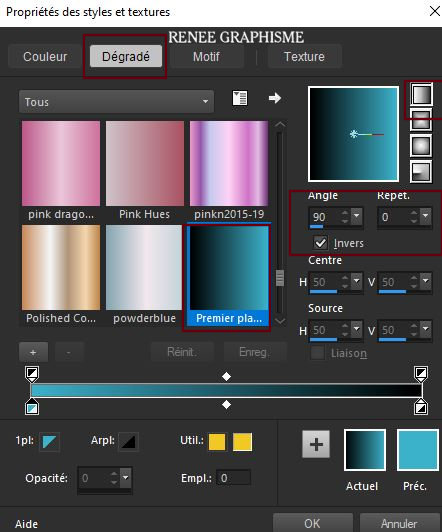
- Material Properties: Set your foreground color to color #3db1ca=3 – Set your background color to color #000000 =
4
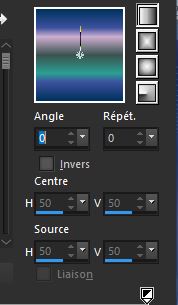
- Prepare a linear gradient configured like this
23. Layers- New Raster Layer
24. Flood Fill Tool
 –
Fill the layer with the gradient –
Fill the layer with the gradient
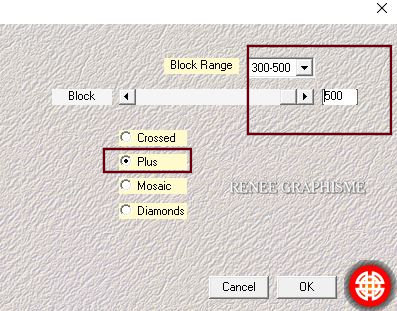
25. Effects- Plugins - Medhi – Sorting Tiles with these settings
26. Effects –Plugins-
Unlimited 2.0- Visual Manipulation – Transmission :
16/10/0
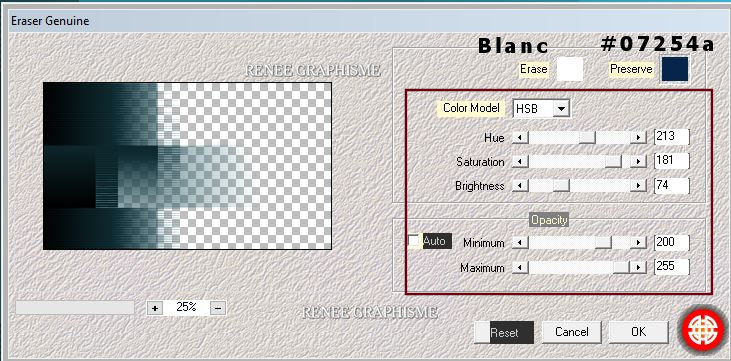
27. Effects – Plugins- Medhi- Erazer Genuine use the settings below
-First the settings and then the colors
(If this does not work, you can find the appropriate tube in the material-paste as a new layer and move to the left side)
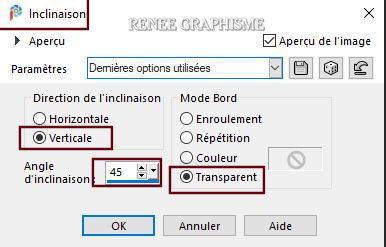
28. Effects – Geometric Effects-Skew with these settings
29. Layers- Duplicate
30. Image - Mirror - Mirror Horizontal (Image - Mirror in older versions of PSP)
- Layers- Merge-Merge Down
31.
Layers- Load/Save Mask-Load Mask from Disk and select Mask ’’ 20/20’’
if you don't have it it is Here
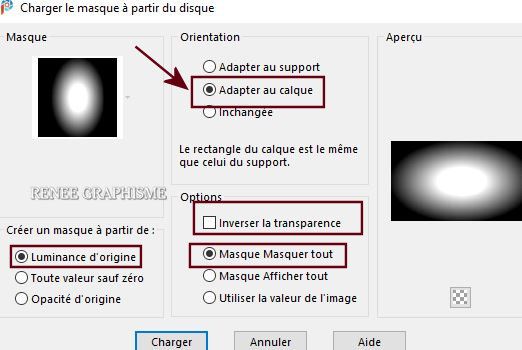
- Layers- Duplicate twice
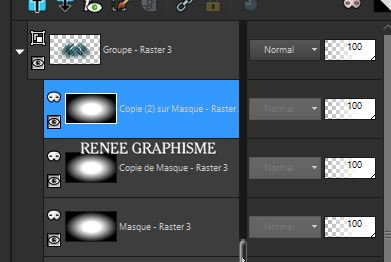
- Layers- Merge- Merge Group
32. Layers-Properties-Change the Blend Mode to " Overlay "
33. Objects - Align- Top
- Activate the bottom of the layer palette =Raster 1
34. Open the tube ‘’Fake-Face-Image 1’’ -Edit - Copy- Activate your work -Edit - Paste as a new layer
35. Objects –Align
– Top
- Leave the Blend Mode to "Screen" – Opacity for Renée 77 % (Adjust the opacity to match your colors)
- Activate the top of the layer palette
36. Layers- New Raster Layer
37. Activate Selection Tool -Custom Selection (S) -Rectangle with these settings
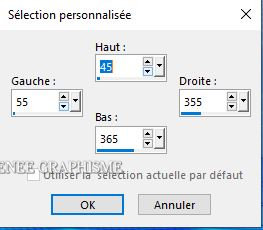
38.Color Palette- Set your Foreground color to color #ffffff=2
Flood Fill Tool  – Fill the selection with the foreground color #ffffff =2 – Fill the selection with the foreground color #ffffff =2
Selections- Deselect All
39. Effects –Plugins-
Unlimited - VM Toolbox – MirrororriM 133/ 0 /255 /182
40. Layers- New Raster Layer
41. Activate Selection Tool -Custom Selection (S) -Rectangle with these settings
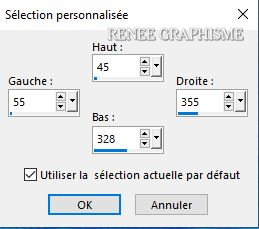
42. Open the tube ‘’
Renee_TUBES_Fake-Face-11.pspimage’’ -Edit - Copy- Activate your work -Edit - Paste into selection
Selections- Deselect All
43. Activate the layer below
Activate the Magic Wand with these settings – With your Magic Wand select the white part

44.. Effects –
Plugins- AAA Frame – Foto Frame use the settings below
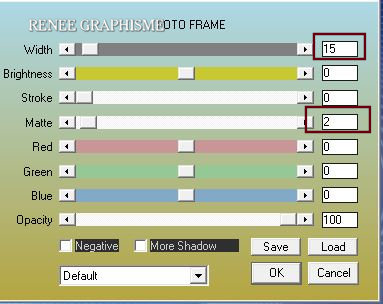
Selections- Deselect All
- Activate the top of the layer palette
45. Layers- Merge- Merge Down
46. Effects -Plugins- Alien
Skin Eye Candy 5 Impact – Perspective Shadow use the settings below
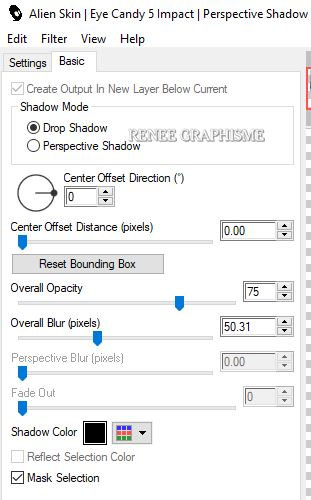
47. Layers- New Raster Layer
48. Selections –load/save selection –load selection from disc and select my selection:
‘’Fake-Face
-3’’
49. Flood Fill Tool
 –
Fill the selection with the FG-Color #ffffff=2 –
Fill the selection with the FG-Color #ffffff=2
50. Effects- Plugins – Amphisoft - ArtiFactor use the settings below
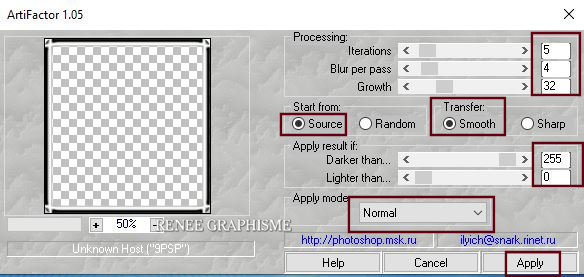
- Layers-Properties-Change the Blend Mode to " Hard Light " –Lower the Opacity to 53%
Selections- Deselect All
51. Image-Rotate Right
52. Activate your text tool and set it as below
I used the font ‘’ BAHNSCHRIFT’’’ Write
FAKE_FACE (Convert to raster layer.)
Write again
FAUX_VISAGES (Convert to raster layer.) (I used different colors to match the colors of my tube)

-Move the text in the right place (see finished image )
53. These two texts are to be merged into one layer
54. Effects- 3 D-Effects- Drop Shadow with these settings: 1/1/100/1 Color Black
55. Image - Rotate Left
56. Open the tube ’’ Fake-Face-Image
–textes’’ -Edit - Copy- Activate your work -Edit - Paste as a new layer
- Move the tube to the bottom right side (see finished image )
- Properties foreground: Change foreground material into gradient and select ‘’
@nn_080513_GR_130_tdstudio’’
- Prepare a foreground sunburst gradient configured like this
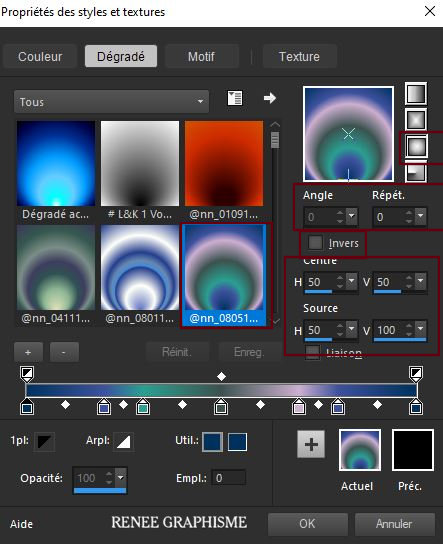
57.Layers- New Raster Layer
58. Flood Fill Tool
 –
Fill the layer with the gradient –
Fill the layer with the gradient
59. Effects – Plugins - Flaming Pear – Flexify 2 use the settings below
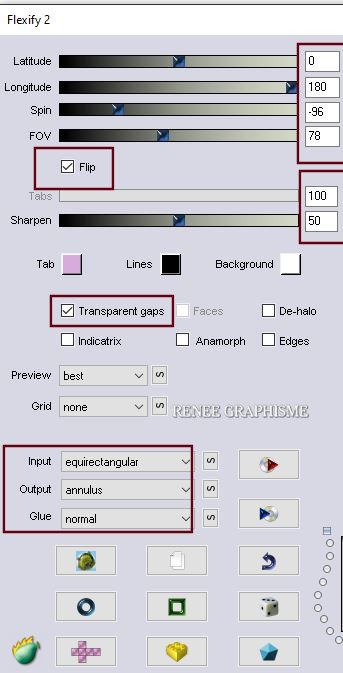
60. Image -Resize 65 % (Resize all layers not checked)
61.
Pick Tool: (K) on your keyboard -Enter these parameters on the toolbar
 449 /7
Press ( M ) to close the Pick Tool
62. Effects- 3 D-Effects- Drop Shadow with these settings: Color #3db1ca =3 (attention shadow on the new layer checked)
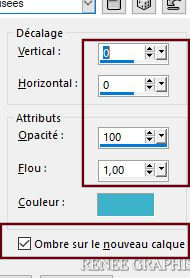
- Stay on the Shadow layer
63. Effects - Distortion Effects - Wind - From right checked - Wind Strength: 100
- Repeat: Effects - Distortion Effects - Wind - From left checked - Wind Strength: 100
-Activate the top of the layer palette
64. Activate the magic wand - click in the middle of the circle
Properties Foreground - Change foreground material into a linear gradient with these settings

65. Layers- New Raster Layer
66. Flood Fill Tool
– Fill the selection with the gradient
67. Adjust- Blur -
Gaussian Blur: Radius 65
68. Effects-
3D-Effects – Cutout use the settings below
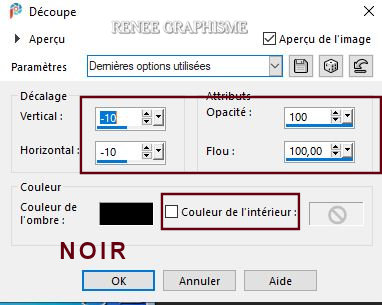
69. Open the tube ‘’
Renee_TUBES_Fake-Face-14.pspimage’’ -Edit - Copy- Activate your work -Edit - Paste into selection
70. Selections –
Modify - Expand with 4 Pixels
71. Effects – Plugins- Alien Skin Eyecandy 5 Glass –Tab-Settings/User Settings and select my file - Preset :
Fake-face-Glass
Selections- Deselect All
72. Layers- Arrange- Move Down
- Activate the top of the layer palette
73. Open the tube ‘’Fake-Face-Image -
etoiles.’’ -Edit - Copy- Activate your work -Edit - Paste as a new layer
-Move the tube in the right place ( see finished image )
- Properties Foreground - Change foreground material into a sunburst gradient with these settings
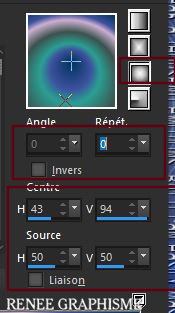
74. Layers- New Raster Layer
75.
Selections –load/save selection –load selection from disc and select my selection: ‘’Fake-Face
-2’’
76. Flood Fill Tool
 -Fill the Selection with the gradient -Fill the Selection with the gradient
77. Effects - Effets 3D-Effects- Drop Shadow with these settings:10/10 /45/12 Color Black
(attention shadow on the new layer NOT checked))
Selections- Deselect All
78. Open the tube ’’
Renee_TUBES_Fake-Face-24.pspimage’’
- Image -
Resize with 55%
- Edit - Copy- Activate your work -Edit - Paste as a new layer
-With your move tool place it in the right place
79. Effects - Effets 3D-Effects- Drop Shadow with these settings: 17/27/45/12 Color Black
Paste the author's watermark on your work and your own watermark
80. Image - Add borders-Symmetric checked: 1 Pixel Color Black
-Image - Add borders-Symmetric checked: 10 Pixels Color White
-Image - Add borders-Symmetric checked:1 Pixel Color #0272c4=1
-Image - Add borders-Symmetric checked: 35 Pixels Color White
Image
Resize 1015 Pixels Width
-Save as JPG
I hope you enjoyed this lesson
Renée
This lesson was written by Renée
14/03/2021
Edited and Update
2021
*
Any resemblance with an existing lesson is a coincidence
*
Do not forget to thank the people who work with us and for us I have appointed the tubeurs and translators
Thanks
*
|
 Translations


