|


- Preparation
- Material Properties: Set your foreground color to color #1e404c =1 – Set your background color to color #b47e2c= 2

1. Open the BG-Image ‘’
Fond-Game-of-thrones.jpg’’- Promote Background Layer =Raster 1
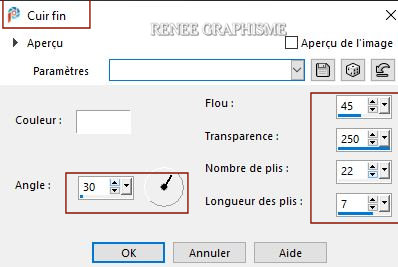
2. Effects- Texture Effects-Fine Leather with these settings - Color White
3. Effects –Plugins-
Unlimited 2.0- Simple – Blintz
- Repeat-Effects-Plugins -Unlimited 2.0- Simple – Blintz
4. Layers- Duplicate
5. Image - Mirror - Mirror Horizontal (Image - Mirror in older versions of PSP)
- Layers-Properties-Lower the Opacity to 50%
6. Layers- Merge- Merge Down
7.
Selections –load/save selection –load selection from disc and select my selection: ’’
game-thrones-1’’
8. Selections- Promote selection to Layer
9. Adjust- Blur- Gaussian Blur: Radius 20
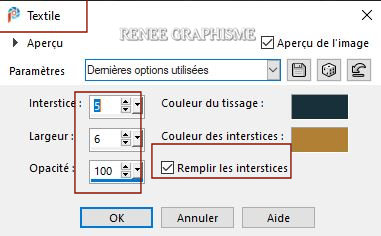
10. Effects – Texture Effects- Weave use the settings below -FG/HG Colors from step 1
Selections- Deselect All
Attention /Obligated /Background color #b47e2c = 2
(It is this which will give the effect color of the following filter)
11. Effects –Plugins ICNET-
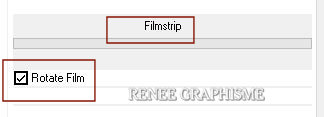
Filters - Special Effects 2- Filmstrip use the settings below
12. Layers- Duplicate
13. Image - Mirror - Mirror Horizontal (Image - Mirror in older versions of PSP)
14. Layers- Merge- Merge Down
15. Effects –Plugins– AlienSkin Eycandy5 Impact – Extrude use the settings below
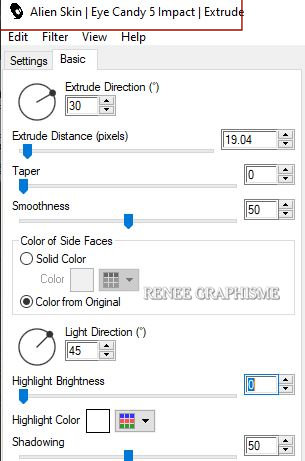
- Stay on this Layer
16. Activate Selection Tool -Custom Selection (S) -Rectangle with these settings
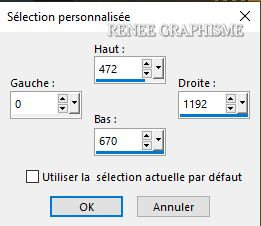
17. Effects – Plugins– Andromeda Perspective with these settings
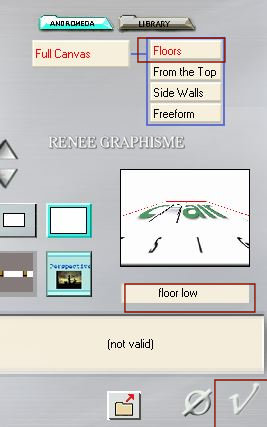
18. Selections- Promote selection to Layer
Selections- Deselect All
19.Effects- Image Effects-Seamless tiling use the settings below
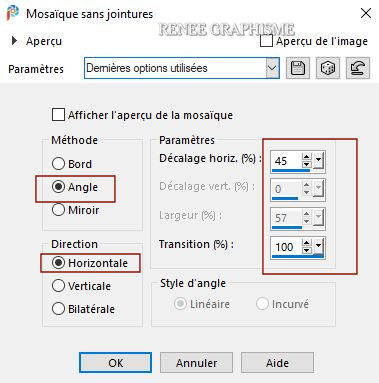
20. Layers- Duplicate
21. Image - Mirror - Mirror Horizontal (Image - Mirror in older versions of PSP)
- Layers- Merge- Merge Down
22. Layers-Properties-Change the Blend Mode to " Hard Light"
-Activate the bottom of the layer palette =Raster1
23. Open the tube ‘’
Renee_Game_Thrones-Image 1’’ -Edit - Copy- Activate your work -Edit - Paste as a new layer
24. Objects –
Align- Bottom
Leave the Blend Mode to Overlay
- Activate the top of the layer palette
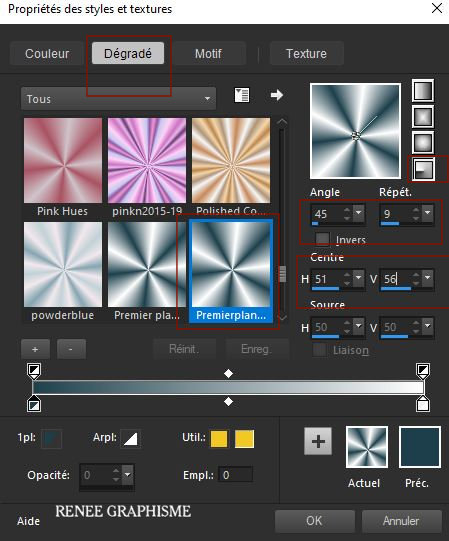
- Material Properties: Set your foreground color to color #1e404c =1 – Set your background color to color #ffffff= 4
-Prepare a foreground/background radial gradient configured like this
25. Layers- New Raster Layer
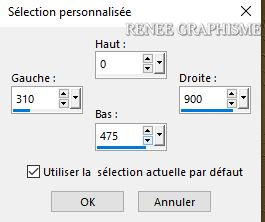
26. Activate Selection Tool -Custom Selection (S) -Rectangle with these settings 
27. Activate Flood Fill Tool
 –
Fill the selection with the gradient –
Fill the selection with the gradient
28. Effects – Distortion Effects Twirl -Degrees 200
29. Adjust- Blur-Gaussian Blur: Radius 25
30. Effects- Edge Effects- Enhance More
Selections- Deselect All
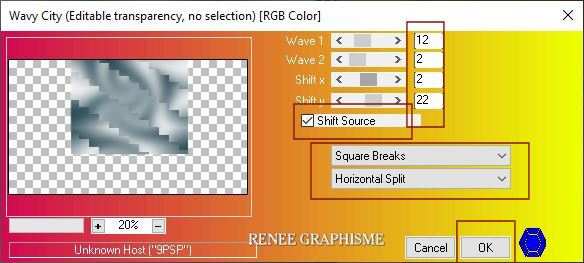
31. Effects – Plugins – Innovations 1.5 – Wave City use the settings below
32. Repeat:
Activate Selection Tool -Custom Selection (S) -Rectangle with the same settings ( Step 26 )
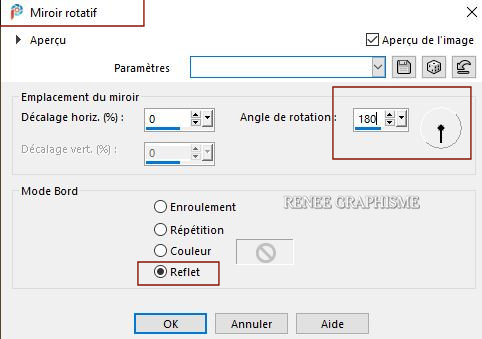
33. Effects – Reflection Effects - Rotating Mirror with these settings
Selections- Deselect All
34. Layers-Properties-Change the Blend Mode to " Overlay "
35. Effects – Edge Effects – Enhance
36. Effects – Plugins - FM Tile Tools- Saturation Emboss use the default settings
37. Open the tube ‘’
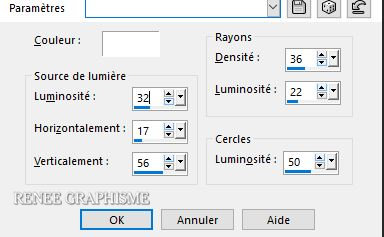
Renee_Game_Thrones-Image 2.pspimage’’ -Edit - Copy- Activate your work -Edit - Paste as a new layer
38.
Pick Tool (K) Enter these parameters for the X: and Y: positions on the Toolbar
 345/-24 345/-24
Press ( M ) to close the Pick Tool
39. Layers-Properties-Change the Blend Mode to " Hard Light" – and Lower the Opacity to 81%
- Material Properties: Set your foreground color to color #121214 =5 – Set your background color to color #717171=6
- Set your Foregroundcolor to foreground-background linear gradient configured like this
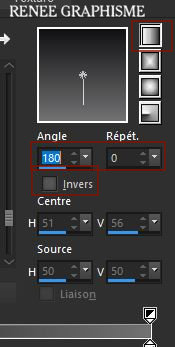
40. Layers- New Raster Layer
41. Activate Selection Tool -Custom Selection (S) -Rectangle with these settings
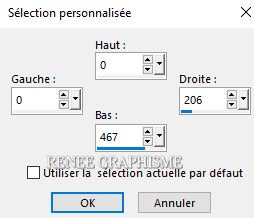
42. Activate Flood Fill Tool
 –
Fill the selection with the gradient –
Fill the selection with the gradient
43. Effects – Plugins– Innovations 1.5 – Wave
City use the settings below
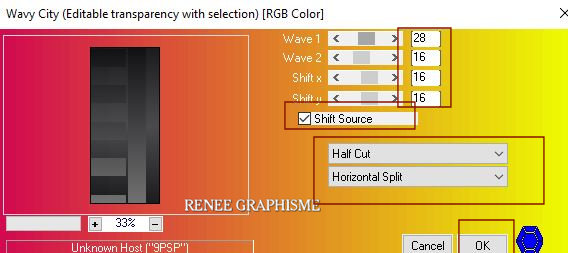
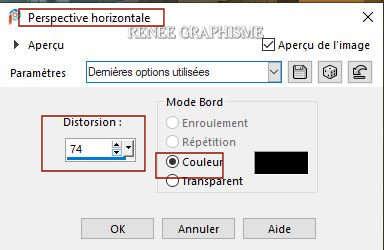
44. Effects -Geometric Effects– Perspective
Horizontal with these settings- ( color does not matter)
45. Selections –load/save selection –load selection from disc and select my selection: ’’
game-thrones-2’’
DELETE

Selections- Deselect All
46. Layers-Properties-Change the Blend Mode to " Overlay "
47. Effects – 3 D Effects – Drop Shadow with these settings ( Shadow on new layer checked !)
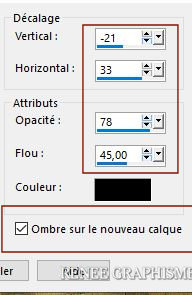
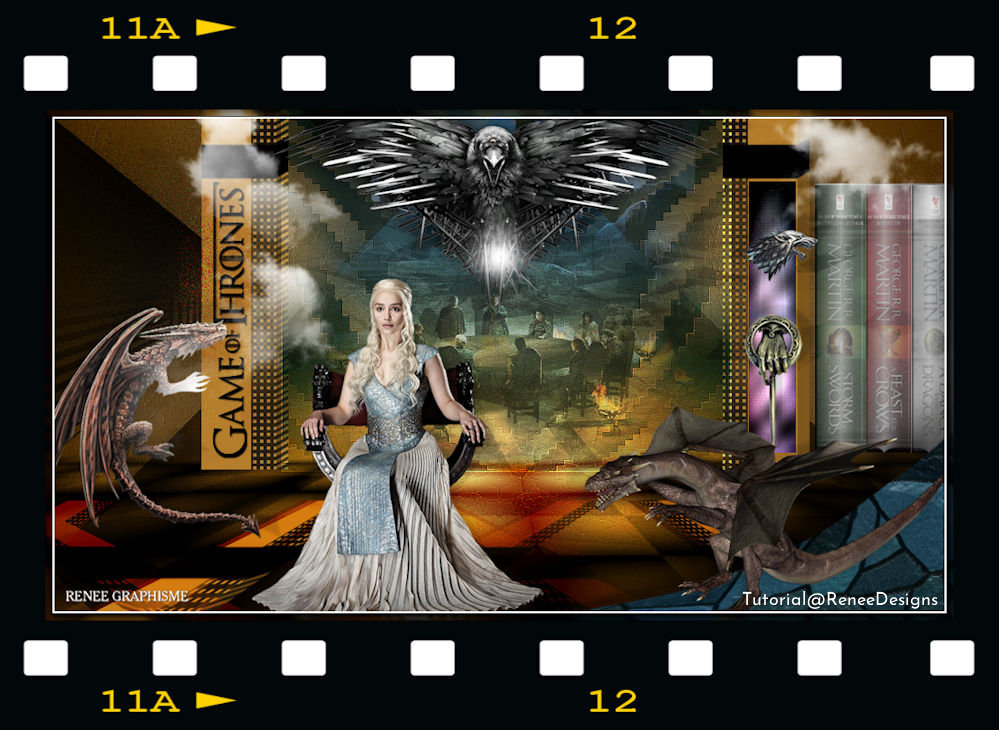
- Stay on Raster 5 Shadow 1
48. Effects –Plugins- Unlimited 2.0 - Filter Factory Gallery J -
Blast 'Em! Blur..: 43
49. Effects- Edge Effects- Enhance
50. Layers-Properties-Change the Blend Mode to " Overlay " – and Lower the Opacity to
71%
- Activate the top of the layer palette
51. Layers- New Raster Layer
52. Selections –load/save selection –load selection from disc and select my selection: ’’
game-thrones-3’’
53. Color Palette- Set your Foreground color to color #ffffff=4
Activate Flood Fill Tool  -
Fil the selection with the Foreground color #ffffff =4 (2 clicks) -
Fil the selection with the Foreground color #ffffff =4 (2 clicks)
Selections- Deselect All
54. Effects – 3 D Effects – Drop Shadow with these settings: 45/0/78/2 Color Black (Shadow on new layer NOT checked !)
55.
Open the tube ‘’ Renee_Game_Thrones-Image 3.pspimage’’ -Edit - Copy- Activate your work -Edit - Paste as a new layer
56.
Pick Tool (K) Enter these parameters for the X: and Y: positions on the Toolbar
 1010
/ 97 1010
/ 97
Press ( M ) to close the Pick Tool
57. Layers-Properties-Change the Blend Mode to " Hard Light"
58. Layers- Arrange- Move Down
- Activate the top of the layer palette
59. Layers- New Raster Layer
60. Selections –load/save selection –load selection from disc and select my selection: ’’
game-thrones-4’’
61.Color Palette- Set your Foreground color to color #000000=3
Activate Flood Fill Tool
 –
Fill the selection with the Foreground color=3 –
Fill the selection with the Foreground color=3
Selections- Deselect All
62. Effects – 3 D Effects – Drop Shadow with these settings : 1/1/100/2 Color Black
(Or write your own text, with a font of your choice or the supplied font )
63. Open the tube ‘’Renee_Game_Thrones-Image 4’’ -Edit - Copy- Activate your work -Edit - Paste as a new layer
64. Pick Tool (K) Enter these parameters for the X: and Y: positions on the Toolbar
 5
/ - 2 5
/ - 2
65. Effects- Illumination Effects-Sunburst use the settings below-Color White
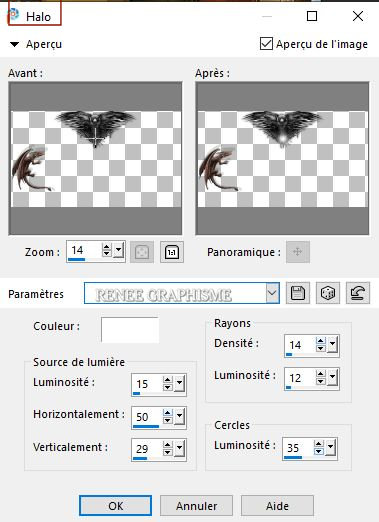
66. Repeat - Effects- Illumination Effects-Sunburst with the same settings
67. Layers- New Raster Layer
68. Material Properties: Your material is as in step 39 of the lesson ( Color 5 and Color 6)
Activate Flood Fill Tool
 –
Fill the layer with the gradient (as above step 39) –
Fill the layer with the gradient (as above step 39)

69. Layers- New Mask Layer- From Image and select Mask -Renee-Masque -Game of thrones
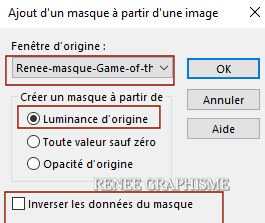
-Layers- Merge- Merge Group
70. Layers-Properties-Change the Blend Mode to " Overlay " - and Lower the Opacity to
75%
- Material Properties: Set your foreground color to color #1e404c= 1 – Set your background color to color #c297bf= 7
-Prepare a foreground/background linear gradient configured like this
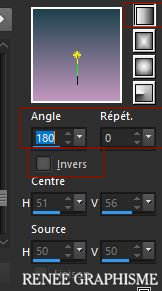
71. Layers- New Raster Layer
72. Selections –load/save selection –load selection from disc and select my selection: ’’
game-thrones-5’’
73. Activate Flood Fill Tool
 -
Fill the selection with the gradient -
Fill the selection with the gradient
74. Effects –Plugins- Unlimited 2.0 - Sapphire Filters 07-
SapphirePlugin_0611..use the settings below .
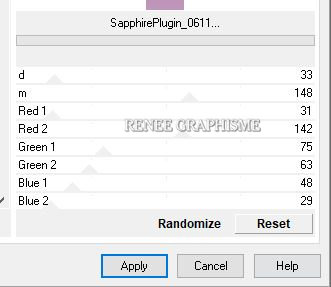
75. Effects –Plugins-
Unlimited .2.0 - UnPlugged Tools- Lomo 55/174
76. Effects- Edge Effects- Enhance More
77. Effects –Plugins-
Unlimited 2.0 – Tramage – Pool Shadow use the settings below
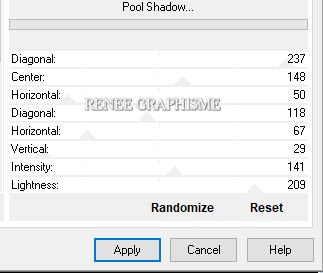
Selections- Deselect All
78. Open the tube ‘’
Renee_Game_Thrones-Image 5.pspimage’ ’-Edit - Copy- Activate your work -Edit - Paste as a new layer
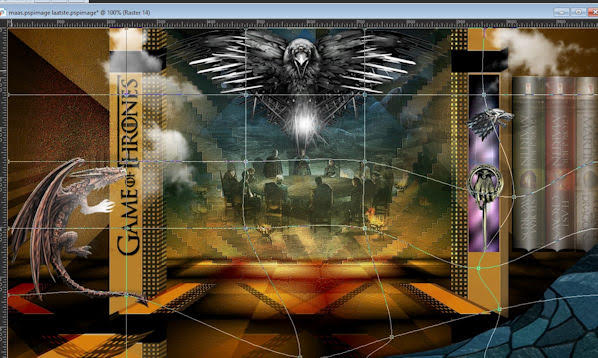
Move Tool (M) place it in the right place (see finished image )
79. Open the tube
‘’Renee_Game-of-throne-TUBES- Nuages’’
Open the tube Nuages/clouds- Select two clouds to your liking and paste as a new layer ( Renée choose 1 and 4)
- Move Tool (M) place it in the right place (see finished image )
80. Layers- New Raster Layer
81.
Selections –load/save selection –load selection from disc and select my selection: ’’
game-thrones-6’’
82. Effects –Plugins – Alien Skin Eyecandy 5 – Textures- Stone Wall-Tab Settings/User settings select my
Preset :
Renee_Game-thrones-Stone wall
83. Adjust-Softness-Soft Focus with these settings
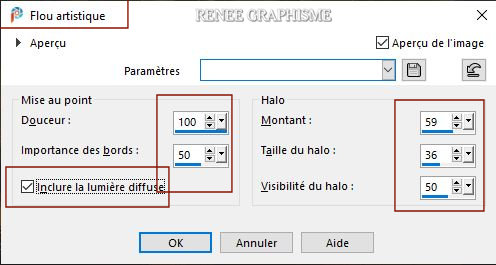
Selections- Deselect All
84. Effects – 3 D Effects – Drop Shadow with these settings: – 56/ 0 /58 /69 Color Black
85. Activate Mesh Warp

– Preset :Preset_MeshWarping_Game-of-thrones’’(
Place in the presets folder)

- Click on preset - Effect will apply
The result

-
Press ( M ) to close the Pick Tool
The following changes are needed to proceed with your Paste New Layer action.
The Mesh Warping Tool must do a final apply
Click Ok and now the edit from step 85 is complete
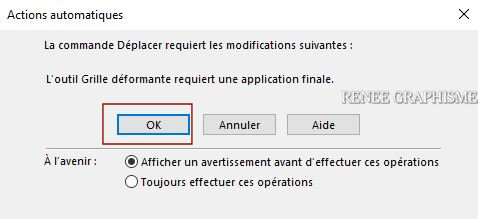
When you are going to paste the tube of the next line (line 86) as a new layer
Only then will the window come to complete the operation
86. Open the tube " Renee_Game_Thrones-Image 7".pspimage and the tube
"Renee_Game_Thrones-Image 6.pspimage"
-Edit - Copy- Activate your work -Edit - Paste as a new layer
87. Drop Shadow of your choice
I have a folder with tubes that you can use ’’ Renee_Game-of-throne-TUBES (some tube levels are closed by the weight) select the tubes according to your wishes!
88. Image - Add borders-Symmetric checked 1 Pixel Color Black
89. Effects – Plugins – AAA Frame Foto frame use the settings below
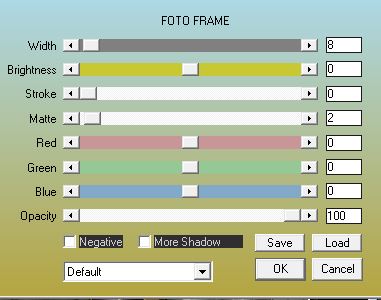
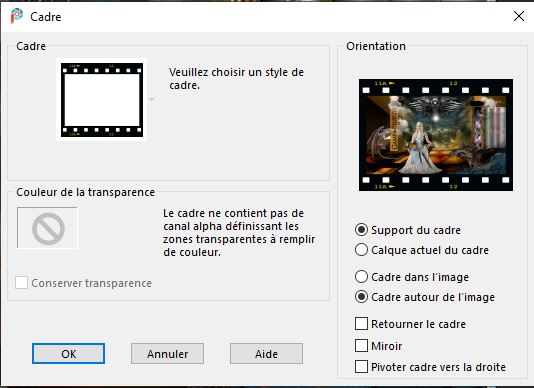
90. Image – Picture Frame -select Frame ‘’
Corel_09_006’’ or select Frame Film with these settings (put the photo frame in the picture frames folder)
91. Layers- Merge- Merge All ( flatten)
92. Image -
Resize to 999 Pixels Width
Save as JPG 
I hope you enjoyed this lesson
Renée
This lesson was written by Renée
17/11/2020
Edited and Update
2020
*
Any resemblance with an existing lesson is a coincidence *
Do not forget to thank the people who work with us and for us
I have appointed the tubeurs and translators
Thanks
|
 Translations


