|
Let's start the lesson

- Preparation
- Material Properties: Set your foreground color to color #be9aad= 1 – Set your background color to color #3b414a =2

1. Open the BG-Image
–‘’Fond-Gothique-36’’- Promote Background Layer =Raster 1
2. Layers- Duplicate
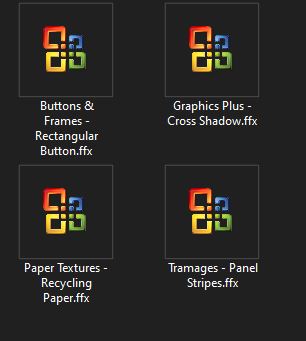
3. Effects –Plugins-
Unlimited 2.0 –ICNET-Filters - Paper Textures -Recycling
Paper with these settings: 53/52
4. Effects – Edge Effects – Enhance
5. Effects –Plugins-Unlimited
2.0 – Graphic Plus- Cross Shadow using the default settings
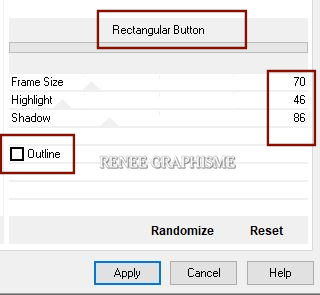
6. Effects –Plugins-
Unlimited 2.0 –ICNET-Filters -Buttons & Frames-
Rectangular Button use the settings below
7. Image - Resize - 85% - Resize all layers not checked
8. Effects- 3D-Effects – Drop shadow with these settings: 0/0/65/60 Black
- In the Layer-Palette- Activate the bottom layer =Raster 1
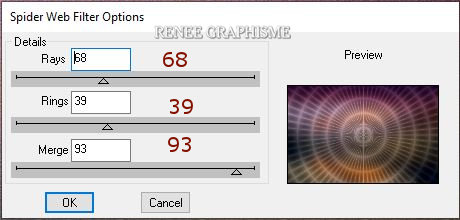
9. Effects – Plugins – DBS Flux- Spider Web use the settings below
10. Adjust- Sharpness-Sharpen More
- Repeat: Adjust- Sharpness-Sharpen More
- Activate the top layer in the layer palette
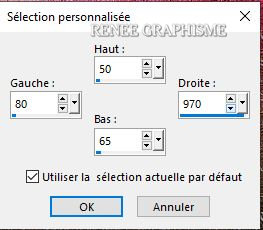
11.Activate Selection Tool -Custom Selection (S) -Rectangle with these settings 

12. Selections- Promote selection tot layer
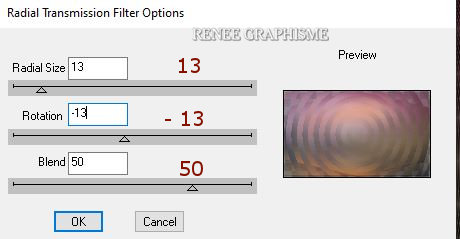
13. Effects – Plugins– DBS Flux- Radial Transmission use the settings below
14. Effects – Edge Effects – Enhance

15. Effects- 3D-Effects -Drop Shadow with the same settings
16. Layers-Properties-Set the Blend Mode to "Multiply"
17. Layers- Duplicate
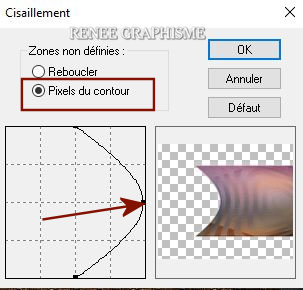
18. Effects – Plugins – Déformation – Cisaillement with these settings
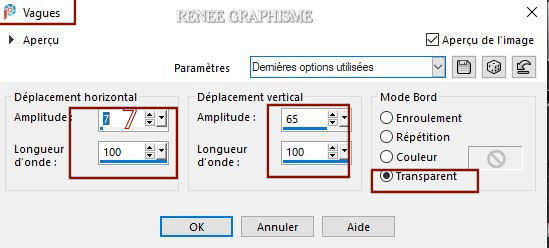
19.
Selections –load/save selection –load selection from disc and select my selection:
‘’Gothique-36-1’’
DELETE
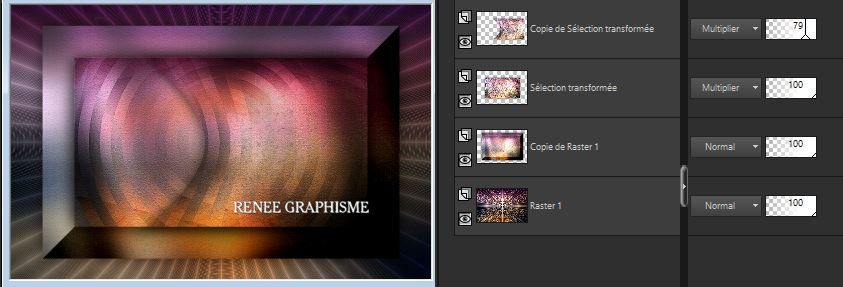
20. Layers-Properties-Set the Blend Mode to Multiply- Lower the opacity to 79%
- Your work and Layer Palette look like this now-You should have this result
-Properties foreground:Set your foreground color to #ffffff=4
21. Layers- New Raster Layer
- Activate the Paint Brush and choose the Brush ‘’Pinceau-Gothique-36’’
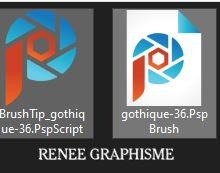 Place the two brush files in the brush folder of your Psp files Place the two brush files in the brush folder of your Psp files
In case of problems
Open the Brush image ‘’Pinceau-Gothique-36’’ in your psp -File- Export Custom Brush-Give it a name

22. Apply the brush with the foreground color #ffffff
- Move the brush to the right side, but stay in the center of your work (See the finished image )
- Press ( M ) to close the Pick Tool
23. Effects – Edge Effects– Enhance
24. Open the ‘’
Renee_Gothique-36-Image1’’ -Edit - Copy- Activate your work -Edit - Paste as a new layer
25. Pick Tool: (K) on your keyboard -Enter these parameters on the toolbar
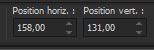 158/
131 158/
131
-Press ( M ) to close the Pick Tool
- Material Properties: Set your foreground color to color #ffffff=4 – Set your background color to color #be9aad = 1
- Prepare a foreground/background linear gradient configured like this
26. Layers- New Raster Layer
27.
Selections –load/save selection –load selection from disc and select my selection:
‘’Gothique-36-2’’
28. Activate Fill Tool
 –
Fill the selection with the gradient –
Fill the selection with the gradient
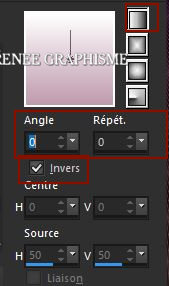
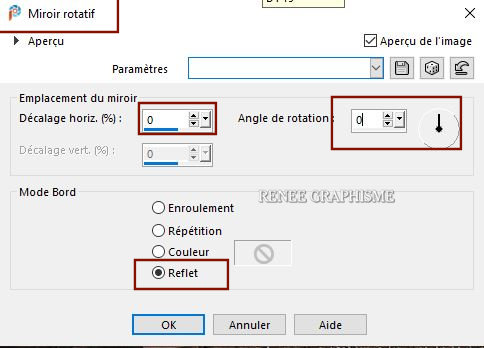
29. Effects- Reflection Effects-Rotating Mirror use the settings below
30. Layers-Duplicate
31. Effects- Distortion Effects – Wave use the settings below
32. Layers- Merge- Merge Down
33. Effects –Plugins-
Unlimited 2.0 – Tramage – Panel Stripes with these settings: 9/143/70
34.Open the tube ‘’
Renee_Gothique-36-Image2.’’ Edit - Copy- Activate your work -Edit - Paste as a new layer
-Do not move it is in the right place
35. Layers-Properties- Lower the Opacity to 79%
36. Layers- New Raster Layer
37.
Selections –load/save selection –load selection from disc and select my selection:
‘’Gothique-36-3’’
38. Activate Fill Tool-
Fill the selection with the foreground color #ffffff=4
39. Layers- New Mask Layer-From Image and select Mask’’
chmasks_rectangle’’
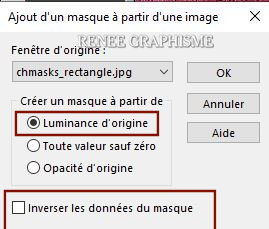
- Layers- Merge Merge Group
40.
Effects –Plugins- Unlimited 2.0 – Tramage - Panel
Stripes... with these settings: 5/ 230/ 70
41. Effects – Plugins – Mura’s Meister – Perspective Tiling using the default settings
42.
Selections –load/save selection –load selection from disc and select my selection:
‘’Gothique-36-4’’
DELETE 2 times
43.
Effects- 3D-Effects – Drop shadow with these settings: 2/3/100/10 Black
44. Layers- New Raster Layer
45. Activate Selection Tool -Custom Selection (S) -Rectangle with these settings
46. Activate Fill Tool
–
Fill the selection with the background color #be9aad =1
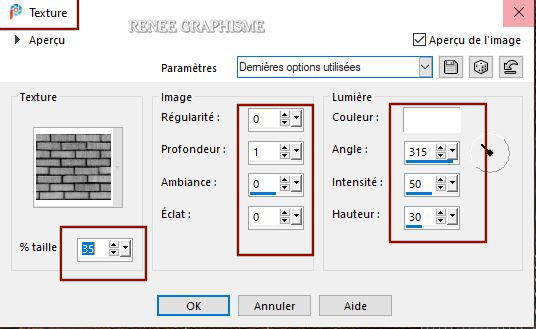
47. Effects – Textureffects – Texture- select ( Corel_ 15_033) Brick Wall with these settings
48. Effects-3D-Effects- Drop Shadow with these settings: 3 / 3 /100 /10 Black
49. Layers-Duplicate
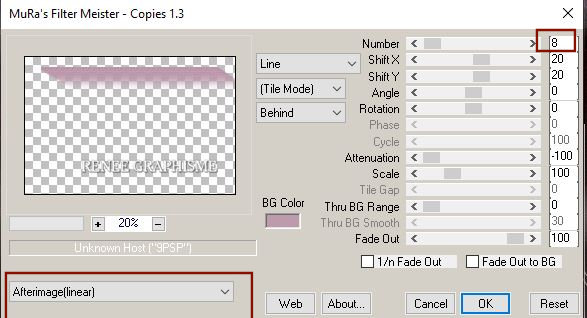
50. Effects – Plugins – Mura’s Meister – Copies with the following settings
Attention this filter remembers the previous settings used before
opening your Psp - To get the good settings, click "Reset " and put the
new settings.
51. Layers- Arrange-Move Down
52. Layers-Properties-Change the Blend Mode to "Difference"
- Activate the top in the layer palette
53. Effects – Plugins– Alien Skin Eyecandy 5 Nature – Drip –Tab-Settings/User settings and select my file Preset :
Gothique-36-Drip
- Activate the bottom in the layer palette=Raster 1
54.
Selections –load/save selection –load selection from disc and select my selection:
‘’Gothique-36-5’’
55. Selections- Promote Selection to layer
56. Layers- Arrange- Bring to Top
57. Effects – Plugins – Vanderlee – Unplugged-X- Interlace use the settings below

58. Layers-Properties-Change the Blend Mode to Multiply
59. Open the tube
‘’ Renee-TUBES-Juin-2021- 3’’
- Image -
Resize 80%
- Edit - Copy- Activate your work -Edit - Paste as a new layer
- Pick Tool: (K) on your keyboard -Enter these parameters on the toolbar
 126/110 126/110
60. Layers- New Raster Layer
61. Selections –load/save selection –load selection from disc and select my selection: ‘’Gothique-36-6’’
62. Activate Fill Tool
–
Fill the selection with the foreground color #ffffff=4
63. Open the tube "Renee_Gothique-36-image3" - Edit - Copy- Activate your work -Edit - Paste as a new layer
64. Pick Tool: (K) on your keyboard -Enter these parameters on the toolbar
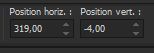 319/
- 4 319/
- 4
Leave this work aside for now, we will build the book's tube
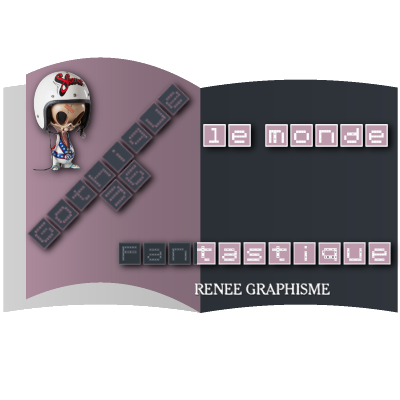
Building the book tube
IF YOU DO NOT WANT TO MAKE THE BOOK, IT IS IN THE FOLDER "POUR CONSTRUIRE LE LIVRE VIZROS FOLDER/ P.S.P. IMAGE
Then continue with point 69
-Material Properties:Set your foreground color to # be9aad=1 -Set your background color to # 3b414a=2
65. File - New image-in size 400 x 400 Pixels- Right-click in the color and choose the BG color
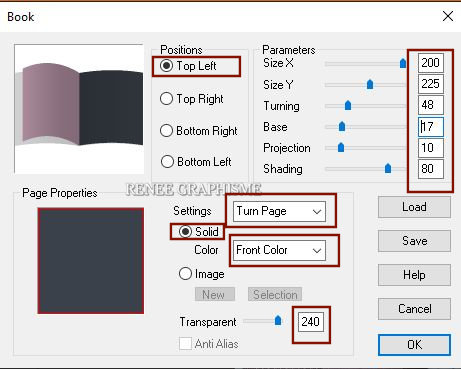
66. Effects – Plugins – Vizros – Book use the settings below
In case of problems there is a tube in the folder
-Promote Background Layer
67. With the Magic Wand - Click in the white part –DELETE
- Selections - Select all - Selections Float -Selections Defloat
Selections- Modify –
Contract with 1 pixels
Selections- Invert
DELETE
Pour un meilleur
travail
68. Activate Tool - Soften Brush– With the brush, gently go along the edges of the book

69. Write the 2 texts still on the book-Font "tomato coffee" is in the folder or choose a font yourself
- Place the texts to your liking
- Open the tube
‘’personnage ‘’ - Edit - Copy- Activate your work -Edit - Paste as a new layer and move
- Layers- Merge-Merge Visible
70. Edit - Copy- Activate the minimized Image -Edit - Paste as a new layer
ATTENTION !!!! Do not move the book yet, until after the following filtering process
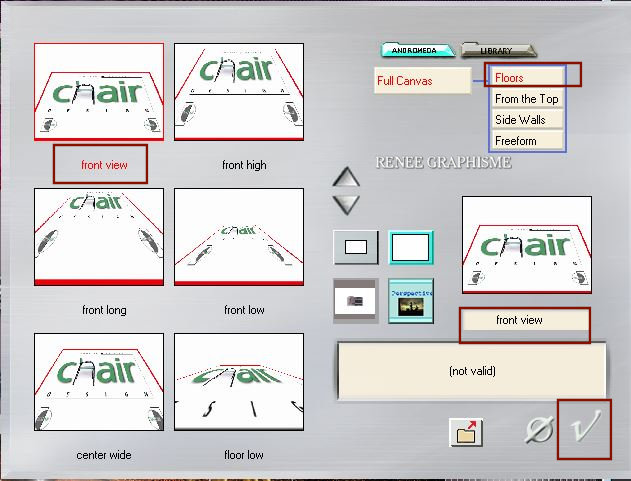
71. Effects – Plugins – Andromeda Perspective use the settings below
-Now move the book to the bottom right, or to taste
72. Effects- Plugins – Alien Skin Eyecandy 5 Impact- Perspective
Shadow- Preset : Drop shadow Blury
73. Image - Add borders-Symmetric checked: 1 Pixel Color #3b414a=2
74. Image - Add borders-Symmetric checked: 10 Pixels Color #ffffff=4
75. Image - Add borders-Symmetric checked: 1 Pixel Color #808599 =3
76. Selections -
Select All
77. Image - Add borders-Symmetric checked: 15 Pixels Color #be9aad=1
78. Selections -
Invert
79. Effects – Textureffects – Texture- select Brick Wall with the same settings
80. Effects- 3D-Effects – Drop shadow with the same settings
81. Image - Add borders-Symmetric checked: 2 Pixel Color #3b414a=2
82. Image - Add borders-Symmetric checked: 40 Pixels Color #ffffff=4
83. Image - Add borders-Symmetric checked: 1 Pixel Color #3b414a=2
84. Paste the author's watermark on your work and your own watermark
Layers- Merge- Merge All (flatten)
Layers- Resize 1005 Pixels width
Save as JPG
I hope you enjoyed this lesson
Renée
This lesson was written by Renée 03/05/2021
Edited and Update
2021
*
Any resemblance to an existing lesson is purely coincidental
Don't forget to thank the people who work with us and for us, the translators and the translators
I have appointed the tubeurs and translators
Thank you
*
|
 Translations