|
Let's start the lesson

- Preparation
-Material Properties:
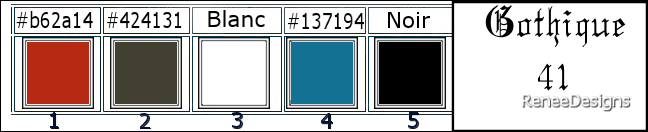
Set your Foreground color to color #b62a14=color 1 – Set your Background color to color #424231= 2
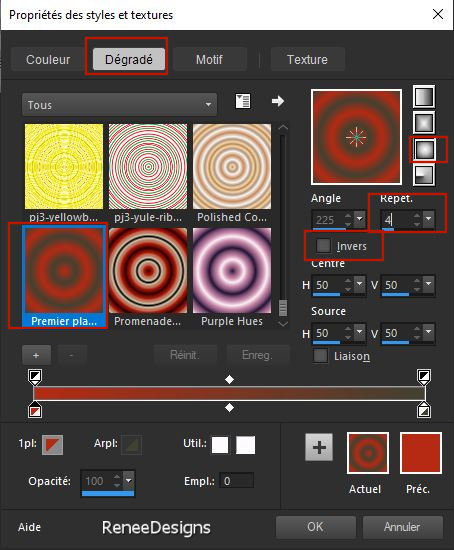
- Replace your Foreground color with a Foreground/Background Sunburst Gradient configured like this
1. File-Open a New Transparent Image in this size : 1050
x 700 Pixels
2. Activate Flood Fill Tool
 –
Fill the layer with the Gradient –
Fill the layer with the Gradient
3. Layers – Duplicate
4. Effects – Plugins – Medhi – Sorting Tiles use the settings below
5. Layers-Properties-Set the Blend Mode to " Overlay "
6. Layers- New Raster Layer
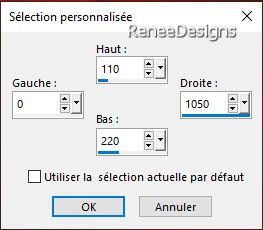
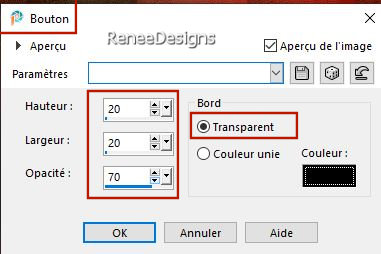
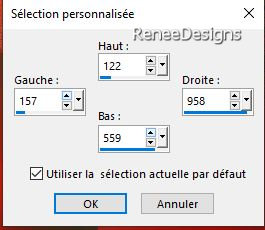
7. Activate Selection Tool -Custom Selection (S) -Rectangle with these settings

8. Activate Flood Fill Tool –
Opacity 40% – Fill the selection with the Gradient

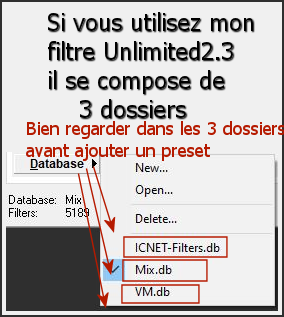
9. Effects- Plugins - Filters in Unlimited 2.0 -It@lian Editors Effect
- Effetto Fantasma: 19/19
10. Layers-Properties-Set the Blend Mode to " Screen"
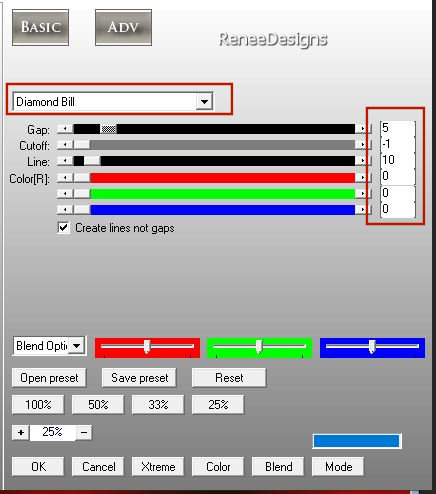
11. Effects- Plugins - AP[Lines] Lines – Silverlining use the settings below
12. Layers - Duplicate
13. Image - Mirror - Mirror vertical ( Image - Flip in older versions of PSP)
14.Layers- Merge- Merge Down
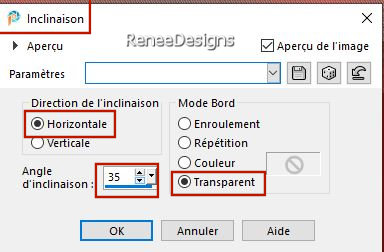
15. Effects – Geometric Effects - Skew use the settings below
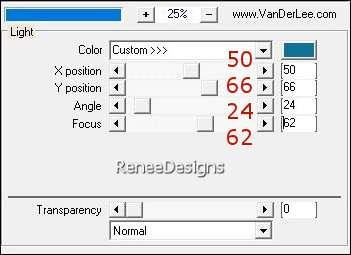
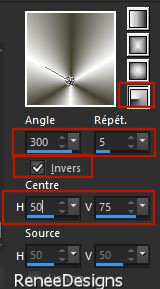
16. Effects –Plugins– Vanderlee – Unplugged X – Light use the settings below- Color
#137194=4
17.Image - Mirror - Mirror Horizontal (Image - Mirror in older versions of PSP)
- Repeat: Effects –Plugins– Vanderlee – Unplugged X – Light with the same settings
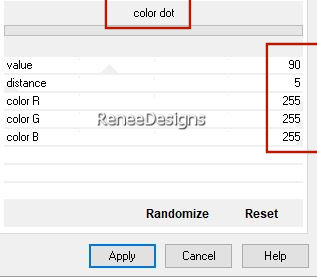
18. Effects- Plugins - Filters in Unlimited 2. – Penta Com – Color Dot use the settings below
19. Effects – Edge Effects– Enhance
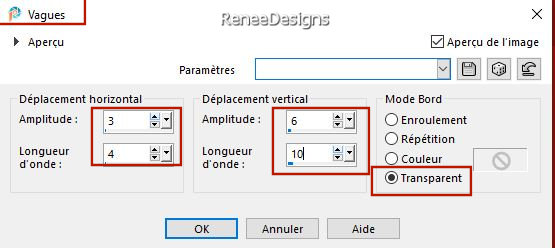
20. Effects– Distortion Effects– Wave us the settings below
21. Layers-Properties-Set the Blend Mode to " Soft Light "
- Material Properties: Set your Foreground color to color #ffffff=3
22. Layers- New Raster Layer
23. Selections –load/save selection –load selection from disc and select my selection: ‘’Gothique-41-1’’
24 Activate Flood Fill Tool
–
Opacity 40% – Fill the selection with the Foreground color #ffffff=3
25. Effects – Distortion Effects– Wind –Wind Strength 100 %– Wind Direction from Right
- Repeat: Effects – Distortion Effects– Wind – with the same settings
26. Effects- Plugins - Filters in Unlimited 2.0 Tramages - Cirquelate... 20
27. Layers-Properties-Set the Blend Mode to " Overlay "
28. Effects- Plugins - FM Tile Tools – Saturation Emboss using the default settings
- Material Properties:
Set your Foreground color to color #424131=color 2 – Set your Background color to color #ffffff=3
- Replace your Foreground color with a Foreground/Background Radial Gradient configured like this
29. Layers- New Raster Layer
30. Activate Flood Fill Tool
–
Opacity 100% –Fill the layer with the Gradient
31. Adjust- Blur- Gaussian Blur - Radius 20%
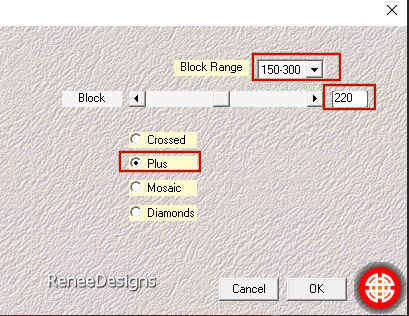
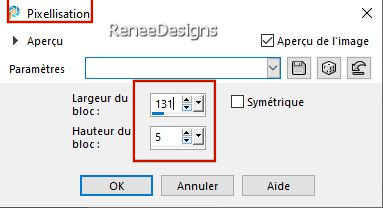
32. Effects– Distortion Effects– Pixelate use the settings below
33. Effects – Edge Effects – Enhance
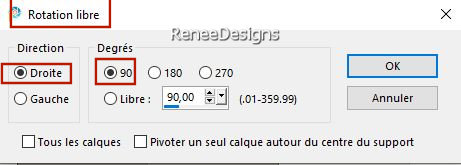
34. Image –Free Rotate -Degrees 90 -Right
- Activate Raster 1 in the layer palette
– Selections- Select All
35. Image -Crop to Selection
- Activate the top of the layer palette (Raster 4)
36. Effects- Plugins - Filters in Unlimited 2.0 – Scribe – Doughnutz :
20
37. Selections –load/save selection –load selection from disc and select my selection: ‘’Gothique-41-2’’

38. Effects- Plugins - Filters in Unlimited 2.0 – Scribe - 4way mirror
: 125/125
39. Selections –load/save selection –load selection from disc and select my selection: ‘’Gothique-41-3’’
40. Layers- New Raster Layer
41. Effects – 3D-Effects –
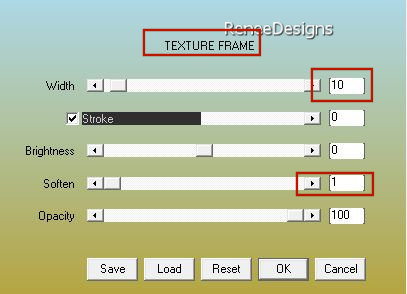
Buttonize use the settings below- Color Black
42. Selections – Invert
43. Effects- 3D- Effects- Drop Shadow with these settings: 10/10/48/12 Color Black
44. Layers-Properties-Set the Blend Mode to " Multiply "
- Activate the layer underneath (Raster 4)
- Activate Selection Tool -Custom Selection (S) -Rectangle with these settings
45. Layers-Properties-Set the Blend Mode to " Hard Light "
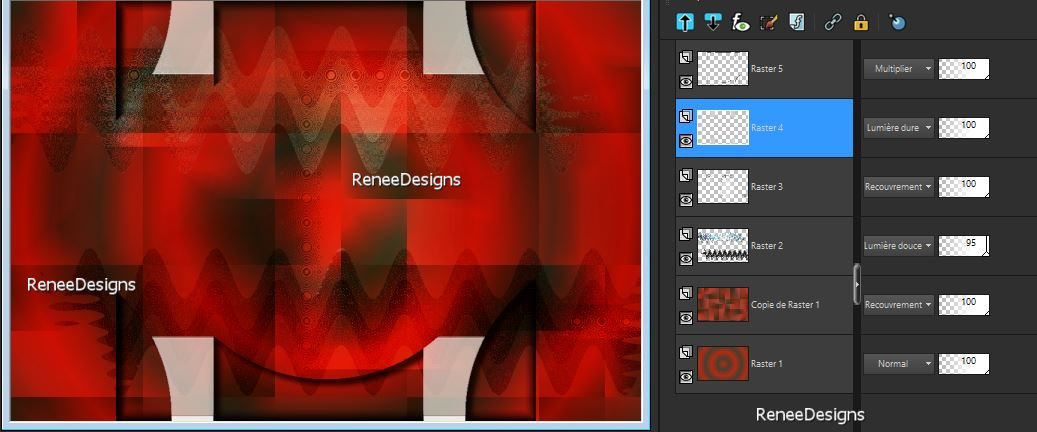
Your work and layer palette now look like this - You should have this result
- Activate the top layer in the layer palette
46. Open the Tube ‘’Renee-Tubes-
Gothique-41-Image1’’ - Edit - Copy- Activate your work -Edit - Paste as new layer
47. Pick Tool: (K) on your keyboard -Enter these parameters on the toolbar
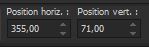 355
/71 355
/71
- Press ( M ) to close the tool
48. Layers-Properties-Set the Blend Mode to " Difference "
49. Effects – Plugins – FM Tile Tools – Metallic Emboss using the default settings
50. Layers- New Raster Layer
51. Selections –load/save selection –load selection from disc and select my selection: ‘’Gothique-41-4’’
52. Material Properties: Set your Foreground color to color #000000=5
Activate Flood Fill Tool
–
Opacity 100% –
Fill the Selection with the Foreground color #000000=5
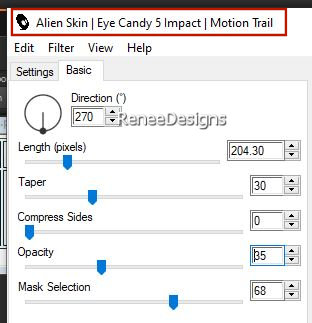
53. Effects- Plugins - Alien Skin EyeCandy 5 - Impact - Motion
Trail use the settings below
- Activate Raster 1 in the layer palette
54. Selections –load/save selection –load selection from disc and select my selection: ‘’Gothique-41-5’’
55. Selections –Promote Selection to Layer
56. Effects- Plugins - Filters in Unlimited 2.0 - [AFS IMPORT] -
sqborder2 : 255/34/215 remains a zero
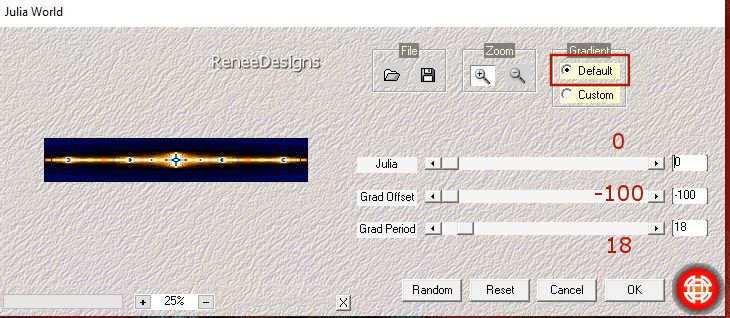
57. Effects –Plugins – Medhi- Julia Word use the settings below
58. Effects – Plugins – Transparency – Eliminate Black
- Replace at the top of the layers palette
59. Edit- Copy Special-Copy Merged
60. Paste as New Layer
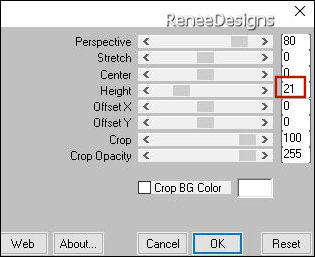
61. Effects – Plugins – Mura’s Meister – Perspective Tiling use the settings below
62. This layer will be above Raster 5 (top layer)
- Activate Promoted Selection Layer (second layer from bottom
)
63. Image - Mirror - Mirror vertical ( Image - Flip in older versions of PSP)
- Activate Raster 1 in the layer palette
64. Selections –load/save selection –load selection from disc and select my selection: ‘’Gothique-41-6’’
65. Selections –
Promote Selection to Layer
66.
Layers- Arrange- Bring to Top
67. Effects-Plugins -Filters in Unlimited 2.0 -[AFS IMPORT] -sqborder2 with these settings: 40/34/215 remains a zero
68. Selections – Modify –
Contract- 12 Pixels
69. Effects – Plugins- AAA Frame – Texture Frame use the settings below
70. Selections - Modify -
Contract- 12 Pixels
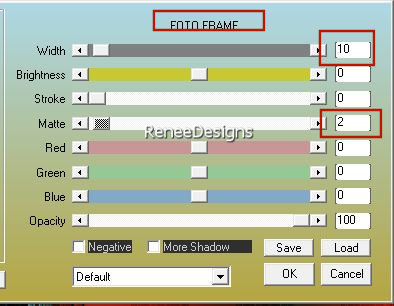
71. Effects – Plugins - AAA Frame – Foto Frame use the settings below
72.
Open the Tube ‘’Renee-TUBES- Decembre3-2023-47’’
- Activate layer
''Gohique-41'' of the Tube
-Edit - Copy- Activate your work -Edit - Paste as new layer
Insert into the small frame (see finished image)
- Material Properties:
Set your Foreground color to color #137194=color 4 – Set your Background color to color #ffffff=3
73. Layers- New Raster Layer
74. Selections –load/save selection –load selection from disc and select my selection: ‘’Gothique-41-7’’
75. Activate Flood Fill Tool
–
Fill the selection with the Foreground color #137194=color 4
76. Selections – Modify–
Contract-2 Pixels
77. Activate Flood Fill Tool –
Fill the selection with the Background color #ffffff=3
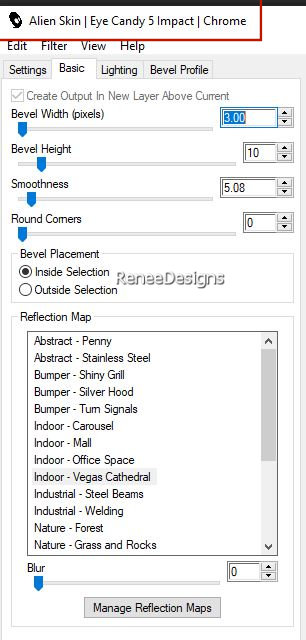
78. Effects- Plugins - Alien Skin EyeCandy 5 – Impact – Chrome use the settings below
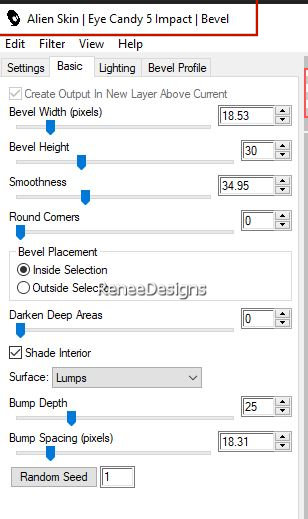
79. Effects- Plugins - Alien Skin EyeCandy 5 – Impact –Bevel-Tab- Settings- User Settings and select my file -Preset :’’
Renee-Gothique41- Bevel’’
80. Open the Tube Renee-Tubes-
Gothique-41-Image2.’’ -Edit - Copy- Activate your work -Edit - Paste as new layer
- Place on the right side (see finished image
)
81. Layers- Arrange- Move Down
- Activate the top of the layer palette
82. Layers- New Raster Layer
83. Selections –load/save selection –load selection from disc and select my selection: ‘’Gothique-41-8’’
84. Material Properties: Set your Background color to color #000000=5
Activate Flood Fill Tool
–
Fill the selection with the Foreground color #000000=5 ( 3 to 4 clicks)
85. Effects- 3D- Effects- Drop Shadow with these settings: 1/1/100/1 Color Black
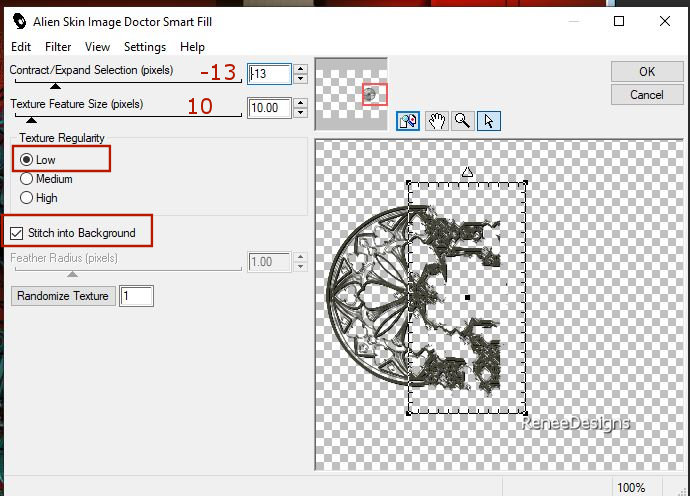
86. Selections –load/save selection –load selection from disc and select my selection: ‘’Gothique-41-9’’
87. Effects – Plugins - Alien Skin Image Doctor – Smart Fill
If you don't have this filter or if you have a problem with it
NO PANIC
this part where that selection runs
In this folder ''Effet- Skin Doctor'' contains the image of this part of the filter.
Copy image from folder '' Effet- Skin Doctor'' Paste as new layer on your work, fit it neatly to the existing part
( don't forget to merge down if you paste effect )
88. Repeat - Effects- 3 D-Effects- Drop Shadow with the same settings
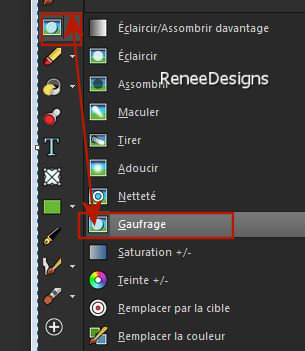
89. Activate Emboss Brush –
( default settings - clicking on the arrow ) )
use the settings below –
Blend mode =Dodge
AND WE APPLY SMALL CLICKS to obtain a similar result
( if you don't get a good result , delete yours and paste my image from the folder ‘’
Effet- Skin Doctor’')

90. Open the Tube ‘’ Renee-Tubes-
Gothique-41-Image3’’ - Edit - Copy- Activate your work -Edit - Paste as new layer
91. Pick Tool: (K) on your keyboard -Enter these parameters on the toolbar
 165/ 97
- Press ( M ) to close the tool
92. Open the two Tubes ‘’ Renee-Tubes- Gothique-41-montre’’ and ‘’ Renee-Tubes-
Gothique-41-clefs’
Edit - Copy- Activate your work -Edit - Paste as new layer and move
93. Image - Add Borders-Symmetric checked: 1 Pixel -Color # 424131=2
Image - Add Borders-Symmetric checked: 10 Pixels-Color #ffffff=3
Image - Add Borders-Symmetric checked: 1 Pixel -Color #b62a14=1
Image - Add Borders-Symmetric checked: 10 Pixels -Color #ffffff=3
Image - Add Borders-Symmetric checked: 2 Pixels -Color # 137194=4
Image - Add Borders-Symmetric checked: 40 Pixels -Color #ffffff=3
94. Activate the Tube –
‘’Novembre-2023-bis-11’’
- Image Resize- 76
%
- Edit - Copy- Activate your work -Edit - Paste as new layer
95. Objects – Align – Bottom
96. Layers-Properties-Set the Blend Mode to " Overlay "
97. Open the Tube ‘’ Deco-cadre’’ - Edit - Copy- Activate your work -Edit - Paste as new layer -Do not move
98. Write the text –
Font attached(Olde Englisch ttf) –Size 72 (or any other)
- Paste the author's watermark on your work and your own watermark
99. Layers- Merge- Merge All ( flatten)
100. Image - Resize - 1005 Px width- Resize all layers- Checked
Save as JPG
I hope you enjoyed this lesson
Renée
This lesson was written by Renée 29/01/2024
Edited and Update
in 2024
*
*
Any resemblance with an existing lesson is a coincidence
* Do not forget to thank the people who work with us and for us -
I have appointed the tubeurs and translators
Thanks
|
 Translations