|
Let's start the lesson.
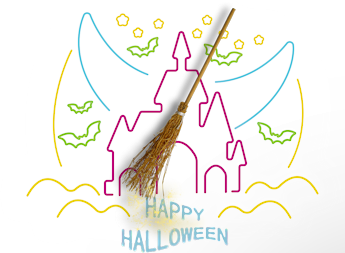
Happy Halloween 2020
- Preparation
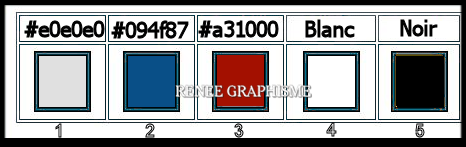
- Material Properties: Set your foreground color to color #e0e0e0= 1 – Set your background color to color #094f87= 2
1. File: Open a new transparent Image
1100 x 650 Pixels
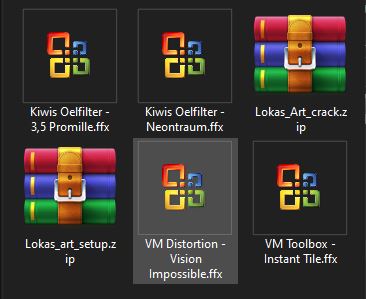
2. Effects – Plugins – Medhi- Wavy Lab 1.1 use the settings below
3. Effects –Plugins-
Unlimited 2.0- VM Distorsion – Vision Impossible using the default settings
4. Effects –Plugins-
Unlimited 2.0- VM Toolbox- Instant Tile: 77/31
-. Repeat this filter with the same settings
5. Effects -Plugins- Unlimited
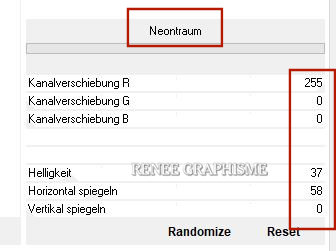
20. - Kiwis Oelfilter – Neontraum use the settings below
6. Open the tube ‘’ Halloween
2020-Image1 ‘’ -Edit - Copy -Activate your work- Edit - Paste as new layer
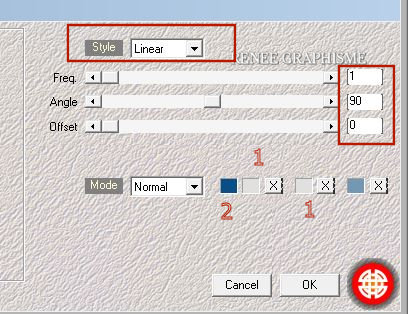
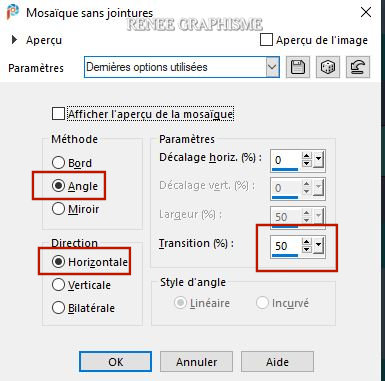
7. Effects- Image Effects- Seamless Tiling use the settings below
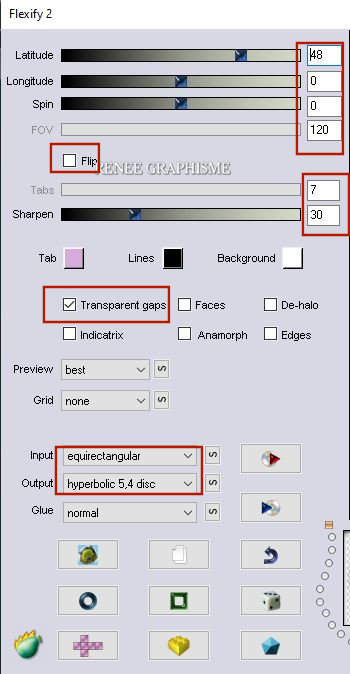
8. Effects – Plugins- Flaming Pear –Flexify 2 use the settings below
9. Layers- New Raster Layer
10. Set your Foreground color to color #ffffff=4
Activate Flood Fill Tool  - Fill the Layer with the Foreground color =4 - Fill the Layer with the Foreground color =4
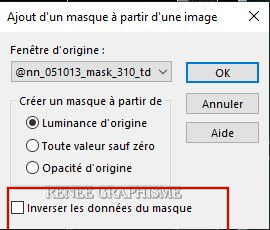
11. Layers- New Mask Layer- From Image and select Mask ‘’
@nn_051013_mask_310_tdstudio.jpg’’
- Layers- Merge- Merge Group
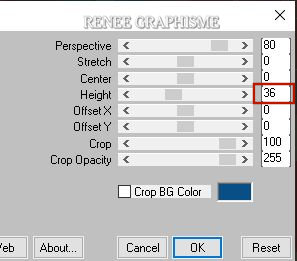
12. Effects – Plugins – Mura’s Meister – Perspective Tiling use the settings below
13. Layers- Duplicate
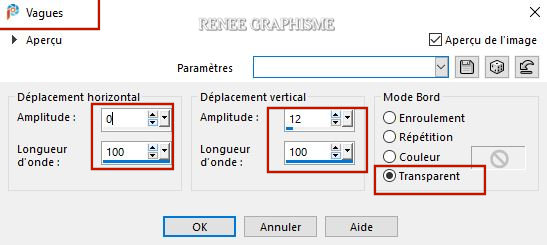
14. Effects – Distortion Effects- Wave use the settings below
15. Open the tube ‘’
Halloween2020-Image2’’ -Edit - Copy -Activate your work, Edit - Paste as new layer
16.Pick Tool: (K) on your keyboard -Enter these parameters for the X:-49 and Y: 80 positions on the Toolbar
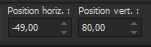 -49
/ 80 -49
/ 80
Press ( M) to close the Pick Tool
17. Effects – Plugins – Xero – Porcelain use the settings below

18. Layers- New Raster Layer
19.
Selections –load/save selection –load selection from disc and select my selection:
‘’Halloween-202-1’’
Set your Foreground color to color #a31000=3
- Activate Flood Fill Tool – Fill the Selection with the Foreground color =3
Selections- Deselect All
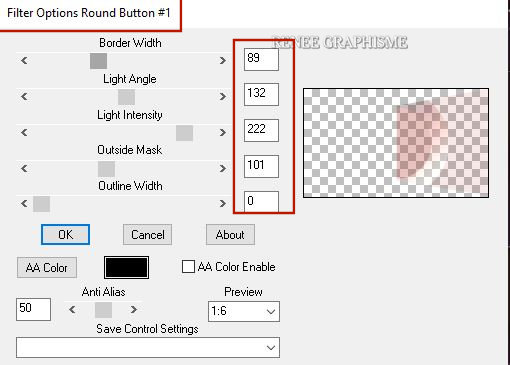
20. Effects – Plugins- Bordermania – Filter Options Round Button # 1 use the settings below
21. Effects – Plugins – FM Tile Tools – Saturation Emboss using the default settings
22. Layers-Properties-Lower the Opacity to 71%
23. Layers- New Raster Layer
24.
Selections –load/save selection –load selection from disc and select my selection:’’’Halloween-202-2’’
25.Set your Foreground color to color #ffffff=4
Activate Flood Fill Tool -Fill the Selection with the Foreground color=4
Selections- Deselect All
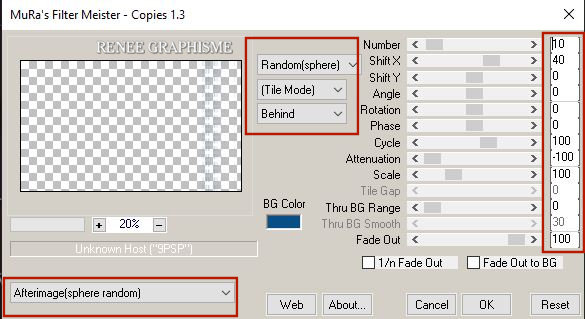
26. Effects – Plugins– Mura’s Meister – Copies use the settings below
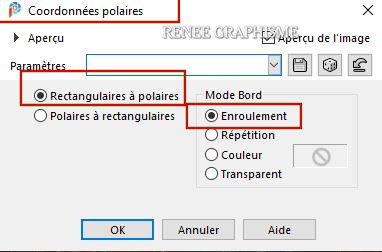
27. Effects - Distortion Effects– Polar Coordinates- Rectangular to Polar- Wrap
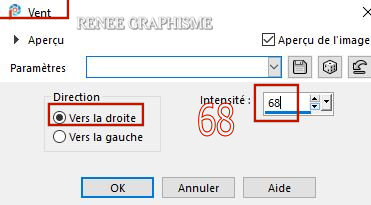
28. Effects – Distortion Effects– Wind- Wind direction from right-Wind strength 68
29. Effects- User Defined Filter – Emboss 3 - Using the default settings
30. Layers- New Raster Layer
31. Effects – Plugins – Axion – Lens Flare
- Attention -Click on Load Setttings and select >>>LW.LNS and OK
- Now use the settings below
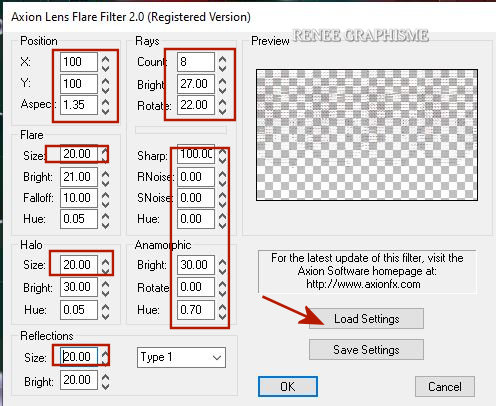 and
OK and
OK
32. Layers-Properties-Change the Blend Mode to "Screen "
- Put the image aside for now, we will need it later
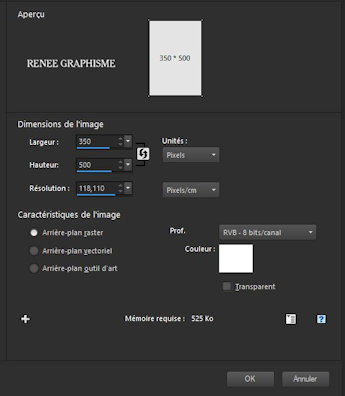
33. Open a new white image of 350 x 500 - Promote Background Layer
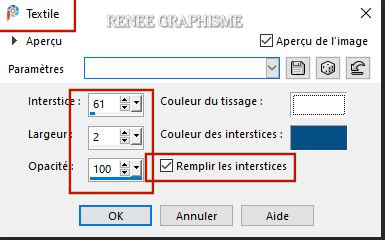
34. Effects- Texture Effects - Weave use the settings below Color White and #094f87=2
35. Activate the Magic Wand with these settings - select the grid like this (zoom in if necessary)
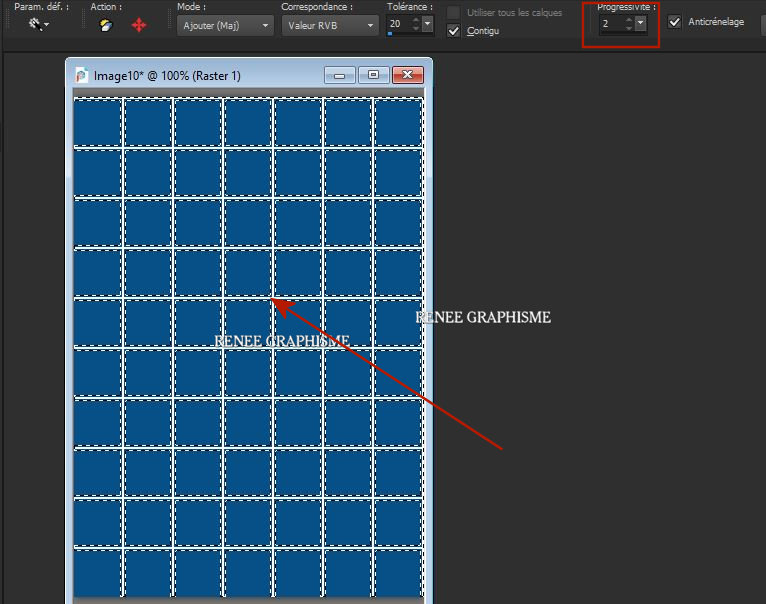
36. Selections –
Invert
DELETE

37. Selections -
Invert
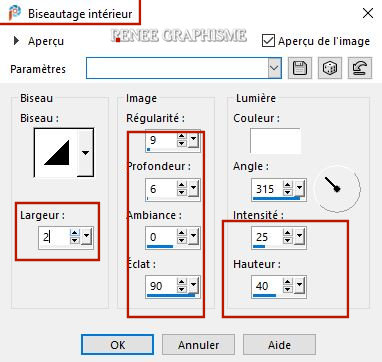
38. Effects-3D Effects -Inner Bevel use the settings below-Color White
39. Effects- Plugins – Lokas sofware – Metal
Attention for this filter
- Unzipp and Install the filter Lokas
- Open the filter -Click on A so that the code window opens
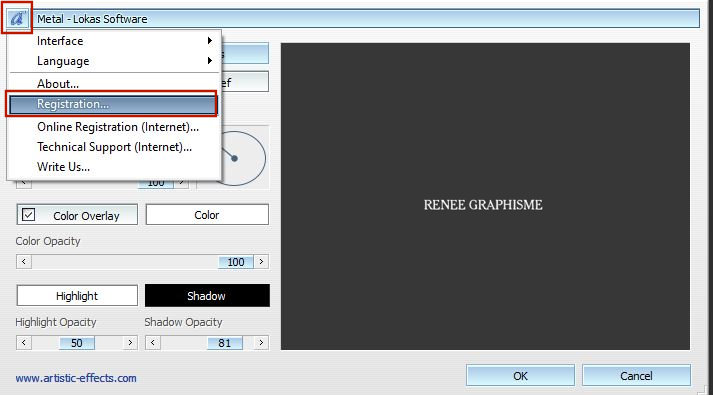
- Open the Keygen from the folder
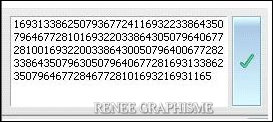
-Copy the number (looks like this)
-
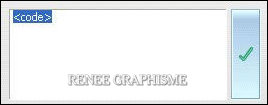
Ctrl + V to copy and paste the code in place
- Click OK
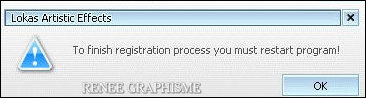
- Click Cancel

- Close PSP and reopen PSP/Now the filter is ready for use / Use the settings as shown in the example below
Click >>OK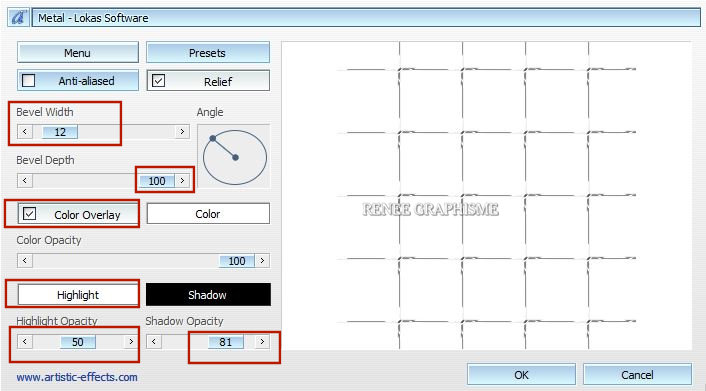
Selections- Deselect All
40. Edit- Copy !!!
(grid) (If the step above does not work, you will find an image in the folder ( grid reserve image)
-
Activate your minimized image of point 32
41. Edit - Paste as new layer
42. Objects - Align
– Right-Objects- Align –Bottom
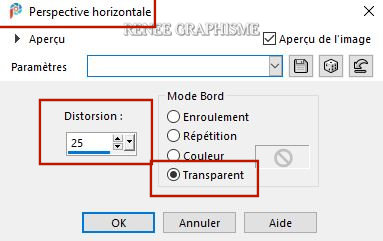
43. Effects- Geometric Effects-Perspective Horizontal use the settings below
44. The decoration
- Renee used these tubes ‘’Halloween2020- /Image3 /Image4 / Image 5 and Image
6’’-Edit-Copy-Edit- Paste as a new layer and place the decorative elements individually according to your taste
(I have different layers with decorations that you can use)
45. Open the tube ‘’
Renee_TUBES_Halloween-2020’’ -Edit - Copy -Activate your work, Edit - Paste as new layer
46. Image- Resize by 80% ( Resize all the layers NOT checked !) - Place it at the bottom right
47. Layers- Arrange -Move Down – (Place it under Raster 7 ( Grid
)
-
Activate the bottom of the Layer-Palette = Raster 1
48. Effects –Plugins-
Unlimited 2.0- Kiwis Oelfilter - 3,5 Promille using the default settings
49. Image - Add borders-Symmetric checked: 1 Pixel Color Black
50. Image - Add borders-Symmetric checked: 25 Pixels Color White
51. Image - Add borders-Symmetric checked: 2 Pixels Color Black
52. Image - Add borders-Symmetric checked: 50 Pixels Color White
53. Activate the tube "Titre/Text "- Edit-Copy-Edit- Paste as a new layer on your working area / Ore write your own text
54. Open the tube ‘’ deco renee
halloween cadre’’ -Edit - Copy -Activate your work, Edit - Paste as new layer
55. Objects – Align
- Bottom
56. Layers- Merge- Merge All
57. Image -Resize to 1005 Pixels width.
Save as JPG file and you're done!
I hope you enjoyed this lesson
Renée
This lesson was written by Renée
08-07-2020
Edited and Update
in 2020
*
Any resemblance with an existing lesson is a coincidence
* Do not forget to thank the people who work with us and for us I have appointed the tubeurs and translators
Thanks *
*
|


 Translations