|
Let's start the lesson
Halloween 2025
- Material Properties: Set the foreground color to color number 1 - Set the background color to color number 2

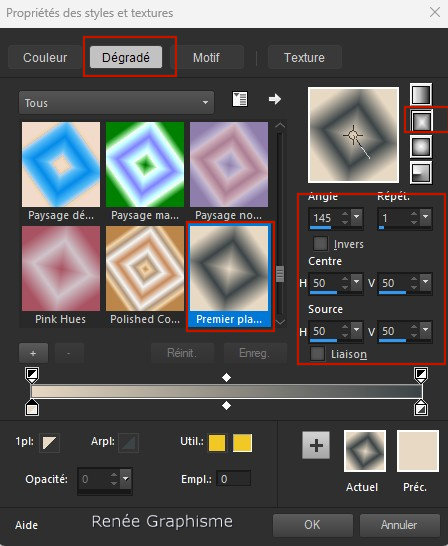
1. Replace your foreground with a rectangular gradient configured like this:
2. File - Open a new transparent image in this size : 1050 x 700 Pixels
3. Activate the Flood Fill Tool
 -
Flood fill the layer with the gradient -
Flood fill the layer with the gradient
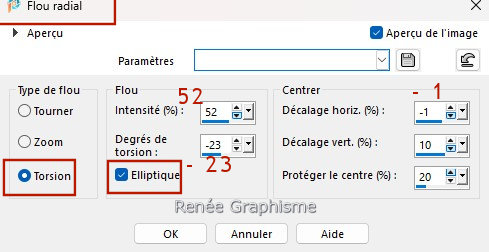
4. Adjust - Blur - Radial Blur use the settings below
5. Effects - Plugins – Simple – Diamonds
6. Effects - Plugins – Simple – Left Right Wrap
7. Selections – load/save selection – load selection from disc and select my selection: ‘’Halloween-2025-1’’
8. Selections - Promote Selection to Layer

9. Effects – 3D Effects - Drop Shadow with these settings : 0 / 0 / 70 2/ Color - Black
10. Effects - Plugins – Toadies – What are you 82 /82
11. Effects – 3D Effects - Drop Shadow with these settings : 0 / 0 / 70 2/ Color - Black
12. Layers - Merge - Merge Visible
13. Layers - Duplicate
14. Adjust - Blur - Gaussian Blur - Radius 25%.
15. Adjust - One Step Photo Fix
16. Effects - Plugins - Filters in Unlimited 2.0 - ICNET-Filters - Tile
& Mirror - XY Offset 50% (negative)
17. Effects - Edge Effects - Enhance
18. Open the tube ‘’Renee-TUBES-Halloween-2025-2’’ - Edit - Copy - Activate your work - Edit - Paste as new layer
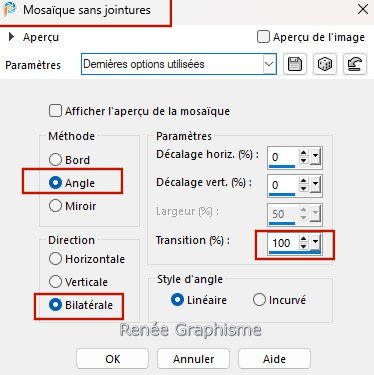
19. Effects- Image Effects- Seamless Tiling use the settings below
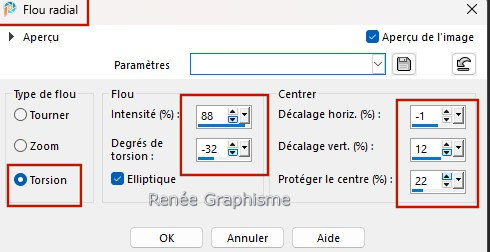
20. Adjust - Blur - Radial Blur use the settings below
21. Effects - User Defined Filter - Emboss 3
22. Layers - Merge - Merge Down
23. Effects - Plugins - Filters in Unlimited 2.0 - ICNET-Filters - Tile
& Mirror - Seamless Blend (vertical)
24. Effects - Reflection Effects - Rotating Mirror using the default settings
25. Effects - Plugins – Simple – Left Right Wrap
26. Layers - Properties - Set the blend mode to ' Hard Light "
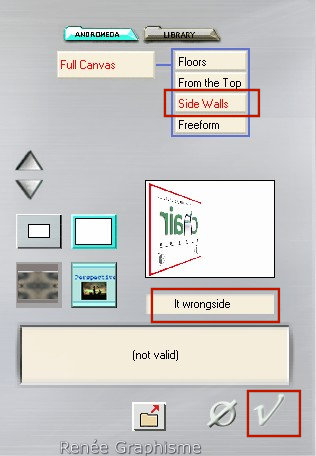
27. Effects - Plugins – Andromeda - Perspective use the settings below
28. Effects - Image Effects - Offset with these settings : - Horizontal – 32
and Vertical 0 / Transparent
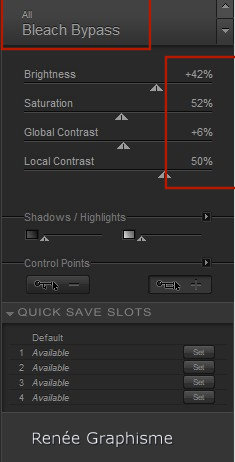
29. Effects - Plugins- Nick Softwar Color Effex Pro.3 0 - Bleach
Bypass use the settings below
30. Activate the tube ‘’
Renee-TUBES-Halloween-2025-3’’
- Image - Resize 60%
- Edit - Copy - Activate your work - Edit - Paste as new layer
-Place on the frame (see finished image )
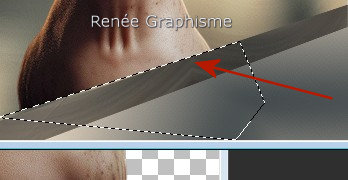
31. Activate Freehand Selection Tool - Point to point
- Select as follows


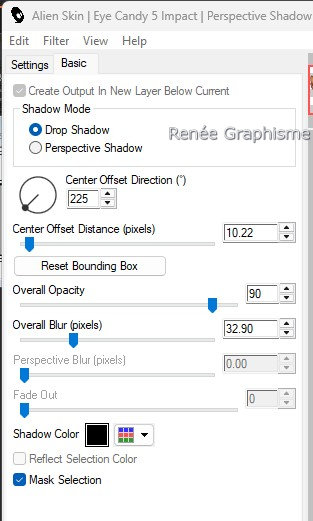
32. Effects - Plugins - Alien Skin EyeCandy 5 – Impact – Perspective
shadow use the settings below
- Activate the layer underneath (Copy Merged )
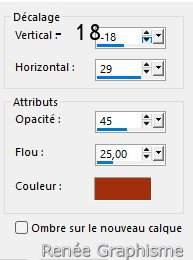
33. Effects – 3D Effects - Drop Shadow with these settings : Color number 3
- Activate the top of the layer palette
34. Layers - New Raster layer
35. Selections – load/save selection – load selection from disc and select my selection: ‘’Halloween-2025-2’’
36. Activate the Flood Fill Tool
 –
Flood fill the selection with color number 3 –
Flood fill the selection with color number 3
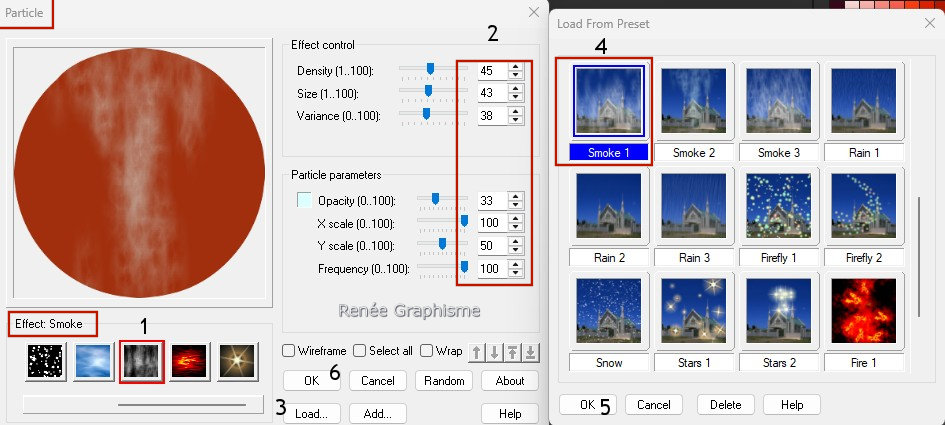
37. Effects - Plugins – Ulead Effects - Particle use the settings below
Effect : Smoke
Click Load : Smoke 1
Ok
Ok
38. Effects - Plugins - Filters in Unlimited 2.0 - &<Background
Designers IV> - @Night Shadow Pool using the default settings

39. Layers - Arrange - Move Down
40. Reduce the opacity of this layer to 67%
- Activate the top of the layer palette
41. Activate the tube ‘’Halloween-petit-titre’’ - Edit - Copy - Activate your work - Edit - Paste as new layer
- Place on the red moon
42. Layers - New Raster layer
43. Selections – load/save selection – load selection from disc and select my selection: ‘’Halloween-2025-3’’
44. Effects - Plugins - Alien Skin EyeCandy 5 - Impact – Textures -Texture
brick wall :Tab Settings/ User Settings and select my file Preset :’’Halloween-renee-2025-Brick-Wall’’

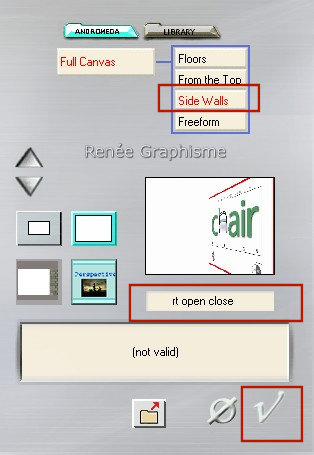
44a. Effects - Plugins – Andromeda - Perspective use the settings below
45. Activate the tube -‘’ Renee-TUBES-Halloween-2025-4’’ - Edit - Copy - Activate your work - Edit - Paste as new layer
46. Pick Tool: (K) on your keyboard -Enter these parameters on the toolbar
 127 /131
Press the ( M ) button to close the tool.
47. Layers - New Raster layer
48. Selections – load/save selection – load selection from disc and select my selection: ‘’Halloween-2025-4’’
49. Activate the Flood Fill Tool  - Flood fill the selection with color white (click 5 times in the selection)
50. Effects - Plugins - L & K's - Pia : 21
51. Effects – 3D Effects - Drop Shadow with these settings : 2/ -12
/ 65/ 6 Color - Black

52. Effects – 3D Effects - Drop Shadow with these settings : 2/ -12
/ 65/ 6 - Color #3c4447 (Color number 2)
53. Layers - New Raster layer
54. Selections – load/save selection – load selection from disc and select my selection: ‘’Halloween-2025-5’’
55. Activate the Flood Fill Tool
– Flood fill the selection with color number 4
56. Effects - Edge Effects - Enhance More
- Repeat a second time.
57. Effects - Plugins - Filters in Unlimited 2.0 - Toadies - Living
Sine (circular) using the default settings

58. Layers - Properties - Set the blend mode to ' Hard Light "
59. Activate the tube ‘’Renee-TUBES-Halloween-2025-5’’ - Edit - Copy - Activate your work - Edit - Paste as new layer
- Place to your liking.
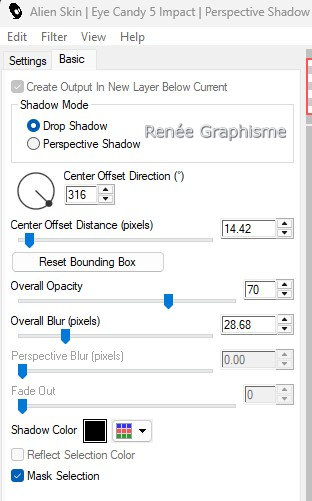
60. Effects - Plugins- Alien Skin EyeCandy 5 – Impact – Perspective
Shadow use the settings below
61. Layers - Arrange - Move Down
- Activate the top of the layer palette
62. Activate the tube ‘’Renee-TUBES-Halloween-2025-1’’ - Edit - Copy - Activate your work - Edit - Paste as new layer
Placer
63. Effects - Plugins - Alien Skin Eye Candy 5 – Impact – Perspective
Shadow same settings
64. Image - Add Borders - Symmetric checked: 1 Pixel – Color number 2
Image - Add Borders - Symmetric checked: 15 Pixels – Color - White
Image - Add Borders - Symmetric checked: 4 Pixels – Color number 3
Image - Add Borders - Symmetric checked: 35 Pixels – Color - White
65. Selections - Select All
66. Selections – Modify – Contract by 15 pixels
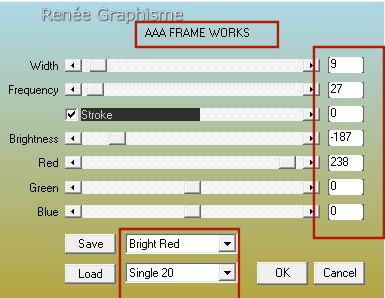
67. Effects - Plugins - AAA Frame Works use the settings below
68. Effects – 3D Effects - Drop Shadow with these settings : 0 / 0 / 100 / 75 Color - Black

- Add the author's watermark and your own watermark.
69. Layers - Merge - Merge All (flatten)
70. Image - Resize to 1005 pixels Width - Resize all layers checked !
Save as JPG
I hope you enjoyed this lesson
Renée
This lesson was written by Renée 17/08/2025
Edited and Update
2025
***
*
Any resemblance with an existing lesson is a coincidence
*
Do not forget to thank the people who work with us and for us .
I have appointed the tubeurs and translators
Thanks
|


