|
Let's get started with the lesson.
Hiver 2024
Winter 2024
- Preparation
-Material Properties: Set your Foreground color to color 1 – Set your Background color to color 2

1. Open the background image
‘’fond’’Hiver-2024’’ –Promote Background Layer = Raster 1
2. Adjust-One Step Photo Fix
3. Layers-New Raster layer
4. Selections –load/save selection –load selection from disc and select my selection:‘’Hiver-2024-1’’
5. Flood Fill Tool
 –
Opacity 50% –
Fill the selection with foreground color 1 –
Opacity 50% –
Fill the selection with foreground color 1

6. Effects – Plugins – Mura’s Meister - Copies use the settings below
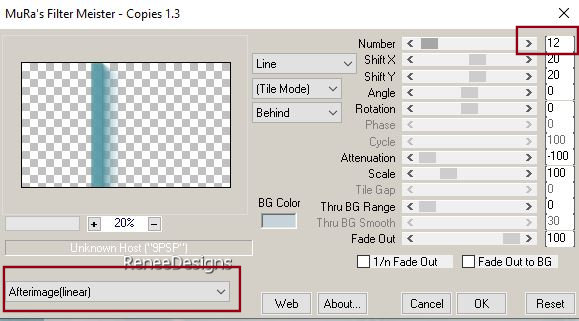
7. Layers-Duplicate
8.Image - Mirror - Mirror Horizontal (Image - Mirror in older versions of PSP)
9. Effects – Image Effects – Offset use the settings below
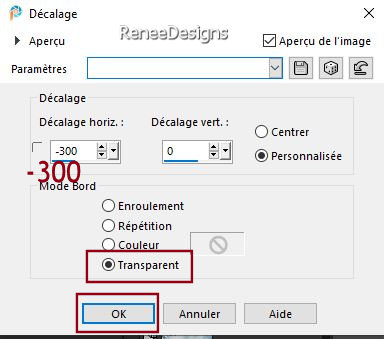
10. Reduce the opacity of this layer to 63%
11. Layers- Merge- Merge Down
12. Effects-Distortion Effects-Wave use the setting below
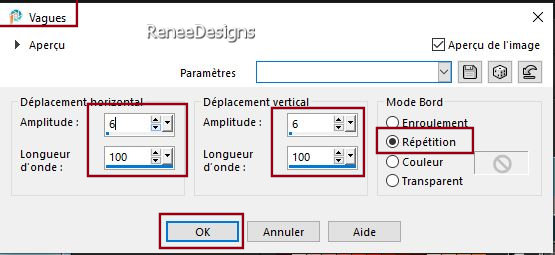
13. Effects – Image Effects – Offset use the settings below
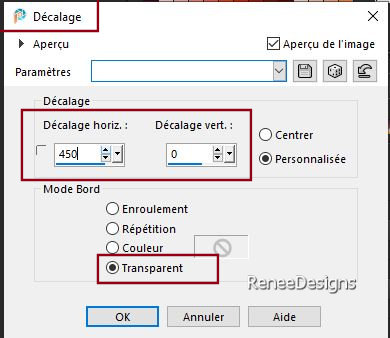
14. Effects-User Defined Filter –
Emboss 3 -default settings
15. Effects- 3D- Effects- Drop Shadow with these settings: 0/0/75/5 Color number 1
16.Layers-Properties-Set the Blend Mode to " Multiply"
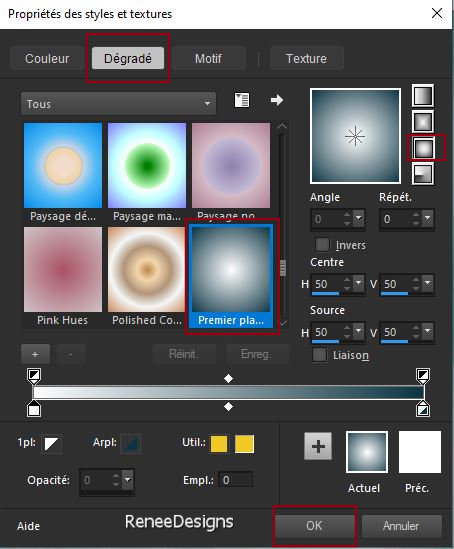
- Material Properties: Set your Foreground color to color 4 – Set your Background color to color 3
- Replace your foreground color with a Foreground/Background Sunburst gradient configured like this
- Activate Raster 1 in the layers palette
17. Layers-New Raster layer
18. Flood Fill Tool –
Opacity 100 %–
Fill the layer with the gradient
19. Effects-Plugins - Filters/ Unlimited 2.0 - VM Extravaganza
-Plastic Surgery with these settings: 255 / 255/ 255
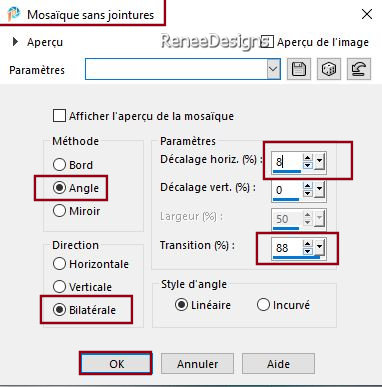
20. Effects- Image Effects- Seamless Tiling use the settings below
21. Effects-Plugins - Filters/ Unlimited 2.0 - &<Bkg Designer sf10
III> - Whirl : 56
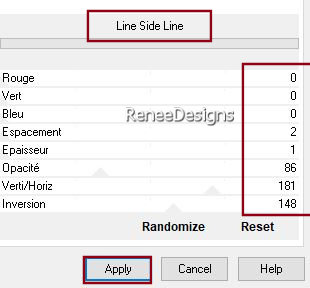
22. Effects-Plugins - Filters/ Unlimited 2.0 - &<BKg Designer sf10
II> - Line Side Line with these settings
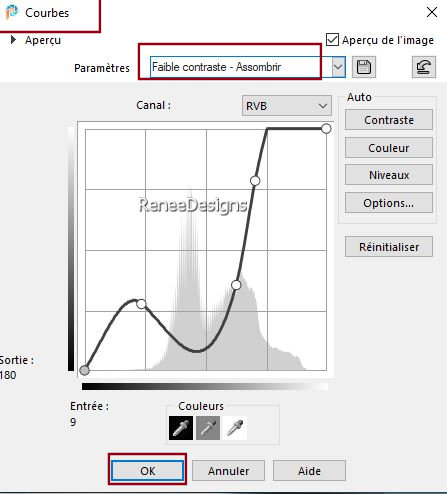
23. Adjust-Brightness and Contrast-Kurves– Settings : Low Contrast Darken
24. Layers-Properties-Set the Blend Mode to " Hard Light " -Reduce the opacity of this layer to 60%
- Activate the top of the layer palette
25. Layers-New Raster layer
26. Selections –load/save selection –load selection from disc and select my selection:‘’Hiver-2024-2’’
27.Set the foreground color to color #ffffff
Flood Fill Tool
 -Fill the selection with #ffffff
(2 clicks) -Fill the selection with #ffffff
(2 clicks)

28. Activate tube ‘’Hiver-2024-Etoiles’’ -Edit - Copy- Activate your work -Edit - Paste as new layer
29. Objects – Align -
Top
30. Layers-Properties-Set the Blend Mode to " Dodge "
31. Layers-New Raster layer
32. Flood Fill Tool –Fill the layer with color #ffffff
33. Layers - New mask layer - From image and choose mask
‘’Narah_Mask_0911.jpg’’
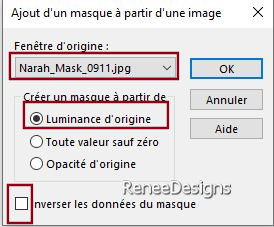
- Layers- Merge- Merge Group
-On the same layer
34. Selections –load/save selection –load selection from disc and select my selection:‘’Hiver-2024-3’’
35. Effects-Distortion Effects-Wave use the setting below
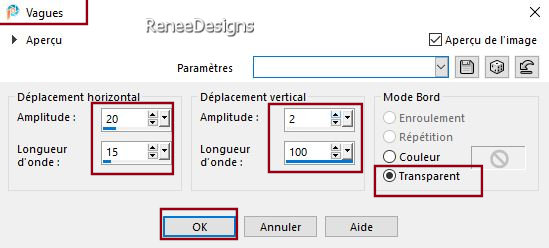
36. Effects –Edge Effects– Enhance

37. Selections –load/save selection –load selection from disc and select my selection:‘’Hiver-2024-3’’ a nouveau
38. Selections – Invert

 -
Activate raster 1 in the layers palette -
Activate raster 1 in the layers palette
39. Effects –Plugins – Flaming Pear – Flood –Click on the red triangle and select my file- Preset :
Hiver-2024-Flood’’
Or put the settings in manually
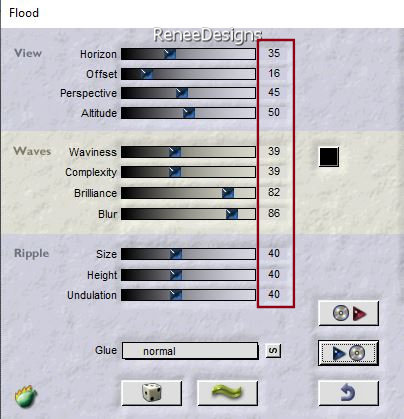
- Activate Raster 3 in the layers palette
40. Layers-New Raster layer
41. Flood Fill Tool
 -
Fill the layer with color white (#ffffff ) -
Fill the layer with color white (#ffffff )
42. Layers - New mask layer - From image and choose mask
‘’Narah_Mask_0910.jpg’’
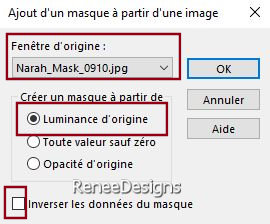
- Layers- Merge- Merge Group
43. Adjust- Blur-Gaussian Blur-Radius 5
44. Layers-Properties-Set the Blend Mode to " Screen"
- Activate raster 3 in the layers palette
45. Activate tube ‘’Renee-TUBES-Hiver-2024-Paysage’’ -Edit - Copy- Activate your work -Edit - Paste as new layer
46. Pick Tool: (K) on your keyboard - Enter the following parameters on the toolbar
 121
/ - 111 121
/ - 111
- Press the ( M ) button to close the tool
47. Selections –load/save selection –load selection from disc and select my selection:‘’Hiver-2024-4’’
48. Selections-Promote selection to layer

49. Layers-Properties-Set the Blend Mode to " Multiply "
50. Effects-Plugins - Alien Skin EyeCandy 5 – Impact – Perspective
Shadow use the settings below
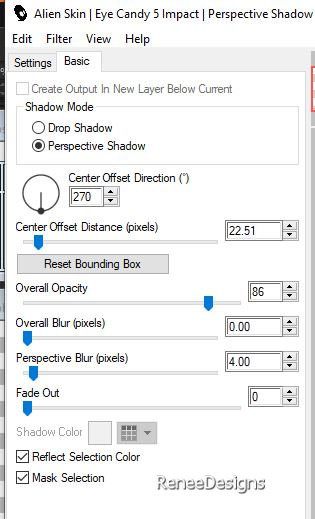
- Activate Raster 3 in the layers palette
51. Layers-New Raster layer
52. Selections –load/save selection –load selection from disc and select my selection:‘’Hiver-2024-5’’
53. Flood Fill Tool
 –
Fill the selection with color white ( #ffffff) –
Fill the selection with color white ( #ffffff)

54.
Effects-Distortion Effects-Spiky Halo use the settings below
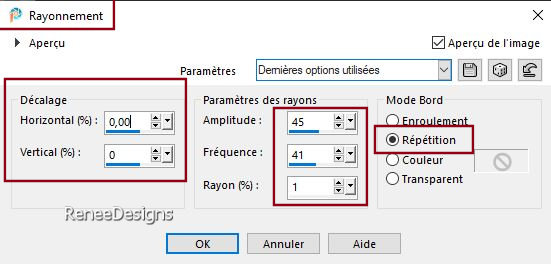
55. Selections –load/save selection –load selection from disc and select my selection:‘’Hiver-2024-6’’


-On this layer - Repeat:
56. Effects-Distortion Effects-Spiky Halo with the same settings
57. Layers-Properties-Set the Blend Mode to " Dissolve " -Reduce the opacity of this layer to 42%
- Activate the top of the layer palette
58. Layers-New Raster layer
59. Selections –load/save selection –load selection from disc and select my selection:‘’Hiver-2024-7’’
60. Flood Fill Tool –
Fill the selection with color white ( #ffffff)
61. Select - Modify - Contract by 3 Pixels
62.Set the foreground color to color 3
Flood Fill Tool
–
Fill the selection with color 3
63. Effects-Plugins - Alien Skin EyeCandy 5 – Nature-Snow-Drift use the settings below
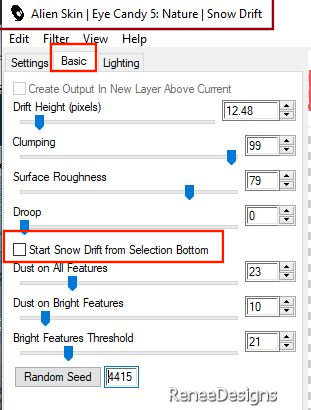
64. Effects –Plugins- EyeCandy 4000 - Motion Trail use the settings below
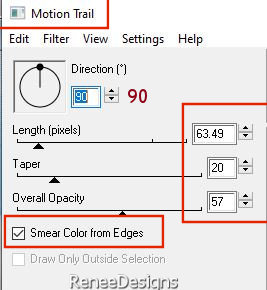

65. Effects-Plugins - Alien Skin EyeCandy 5 – Nature - Snow Drift use the settings below
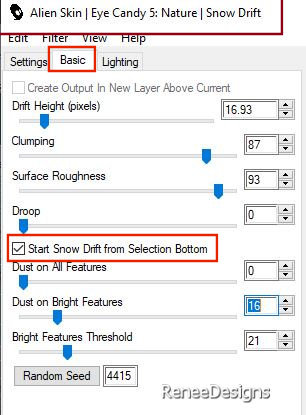
66. Objects – Align - Bottom
67. Activate tube ‘’Hiver-2024-
Image1’’ -Edit - Copy- Activate your work -Edit - Paste as new layer
- Place at the bottom of the blocks - see finished image
68. Layers-New Raster layer
69. Selections –load/save selection –load selection from disc and select my selection:‘’Hiver-2024-8’’
70.Activate tube‘’ ’Hiver-2024- Image2’’ - Edit - Copy- Activate your work -Edit - Paste into selection

71. Layers– Duplicate
72. Layers-Merge-Merge Down
73. Effects-Plugins - Alien Skin EyeCandy 5 – Nature – Snow Drift use the settings below
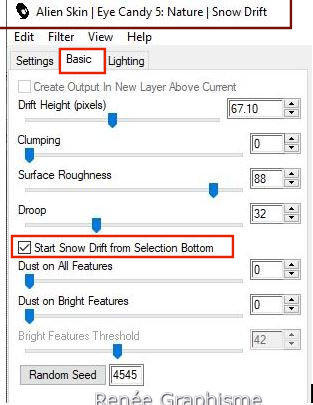
74. Activate tube ‘’Renee-TUBES-Hiver-2024-13.’’
–Image-Resize 35%
- Edit - Copy- Activate your work -Edit - Paste as new layer
- Place as shown in the screenshot below
75. Select tool (k) Slightly crop the tube to position it correctly

76. Layers-New Raster layer
77. Selections –load/save selection –load selection from disc and select my selection:‘’Hiver-2024-9’’
78.Set the foreground color to color 1
Flood Fill Tool
 –
Fill the selection with color 1 –
Fill the selection with color 1

79. Effects-Plugins - Alien Skin EyeCandy 5 - Impact – Extrude use the settings below- Color #4cccd2
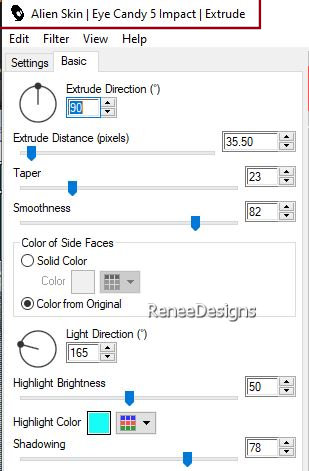
80. Activate a tube of your choice
Renée has chosen this Tube
Activate tube ‘’Renee-TUBES-Hiver-2024-5.’’
– Image Resize 62 %
Edit - Copy- Activate your work -Edit - Paste as new layer
81. Open several tubes to your liking and paste as a new layer
82. Image - Add Borders-Symmetric checked: 2 Pixels -Color 3
83. Selections -
Select All
Image - Add Borders-Symmetric checked: 40 Pixels -Color white
Image - Add Borders-Symmetric checked: 1 Pixels -Color 1
Image - Add Borders-Symmetric checked: 20 Pixels-Color white
84. Effects –3D-Effects-Drop Shadow with these settings: 0/0/75/75 Black

85. Effects –Plugins – AAA Frame - Foto Frame use the settings below
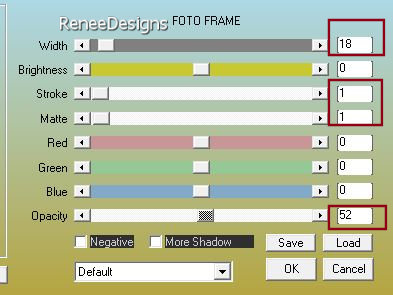
86. Write your title with the fonts of your choice or paste mine
(fonts attached to the folder
)
87.Add the author's watermark to your work and your own watermark.
88. Layers-Merge-Merge All (flatten)
89. Image -Resize by 90 % Resize all layers checked .
Save as JPG
I appreciate your attention and engagement with this lesson.
Renée
Renée has written this lesson. 18/08/2024
I have edited and updated it
in 2024
*
Any resemblance to an existing lesson is purely coincidental.
Do not forget to thank the people who work with us and for us.
I have appointed the tubeurs and translators.
Thank you
*
*
|


