|
Homage to Cameron
Let's start the lesson.
1. File - New - New Image 900 x 650 pixels transparent
2.-Activate Flood fill tool and fill the layer with color: #ffffff
3. Layers - New Raster layer / Activate Flood fill tool and fill the layer with color:#2b44b9
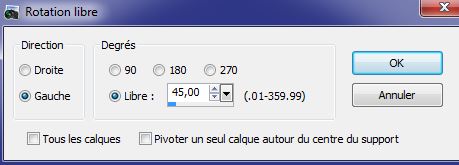
4. Image
Free Rotate 45° Left
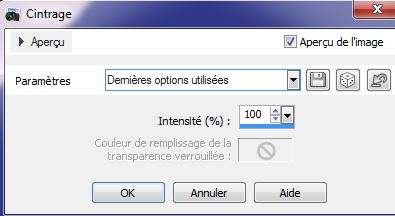
5. Effects-Distortion Effects- Pinch use settings below
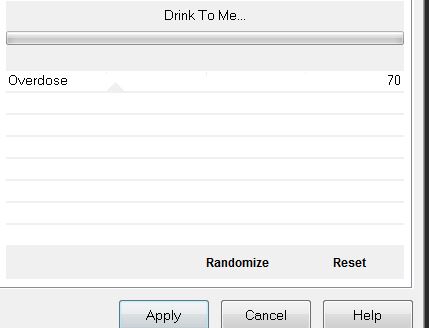
6.Effects- Plugins Unlimited2.0 -Fiter
Gallery J/drink to me
7. Layers - New Raster layer /Activate Flood fill tool and fill the layer with color:
#cea8a9
8. Effects- Geometric Effects- Circle use settings below/ transparent

9. Image
-Resize 60% (Resize all the layers not checked).
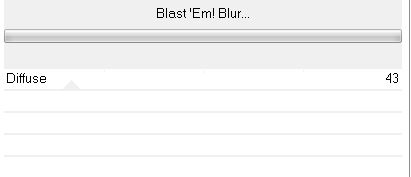
10. Effects-Plugins Unlimited2.0 - Filter Gallery J/ Blast 'Em Blur
(Attention: Material of the background: BG-Color = Black)
11.
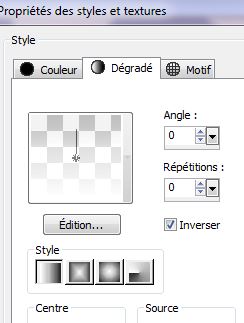
Layers - New Raster layer / Material of the foreground:Prepare a linear "Fading White" gradient configured as shown below. Activate Flood fill tool and fill the layer with the gradient
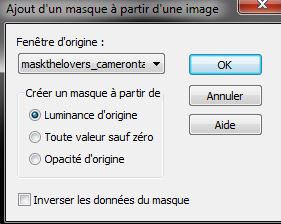
12.
Layers-New Mask Layer From Image and choose Mask: ''maskthelovers_cameron''
13.
Layers- Merge -Merge Group
14. Image
-Free Rotate 45° Right
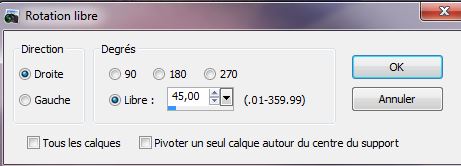
15. Effects-Distortion Effects- Pinch use settings below
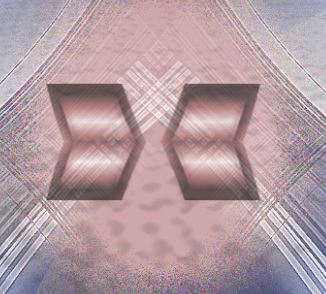
16.Effects- Plugins - EyeCandy5 Impact
– perspective shadow-Preset / Preset = Drop shadow blury
*Attention :Material of the background: BG-Color to color: #2b44b9 *
17.Effects- Plugins -ICNET-Filters- Tile & Mirror/Mirror(vertical)
18.
Layers- Duplicate-Image Mirror
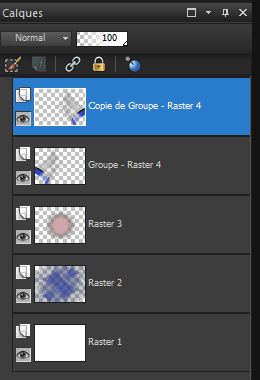
19. Your work and Layer Palette look like this now:
20.Layers- Merge- Merge Down/Double click on this Layer and set the Blend Mode to "Screen "
21. Material of the foreground: foreground color to color white
22.
Layers - New Raster layer
23.
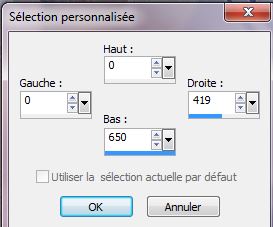
Activate Selection Tool - Custom selection with these settings
24.
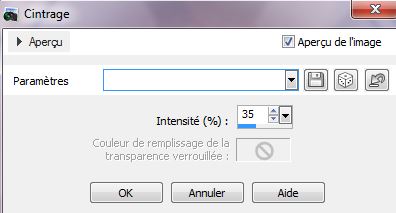
Flood fill tool opacity 35%

Don t forget !! Flood fill tool opacity back to 100
25.
Activate Flood fill tool and fill the selection with the foreground color
26.
Selections- Deselect All
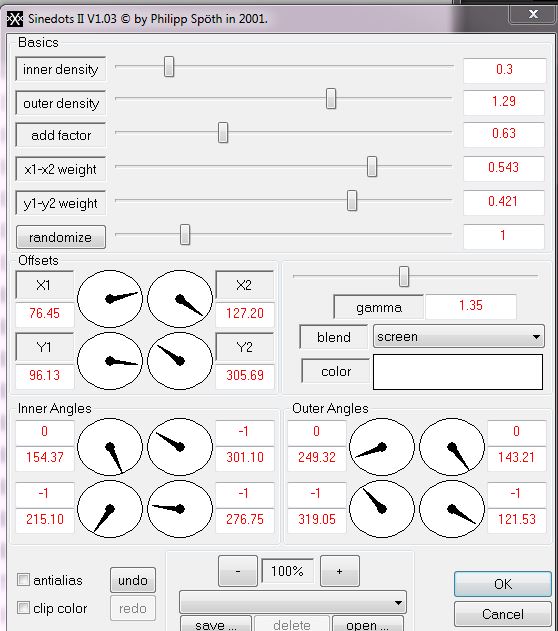
27.Effects- Plugins -Simple - Diamonds
28. Effects-Distortion Effects- Pinch use settings below
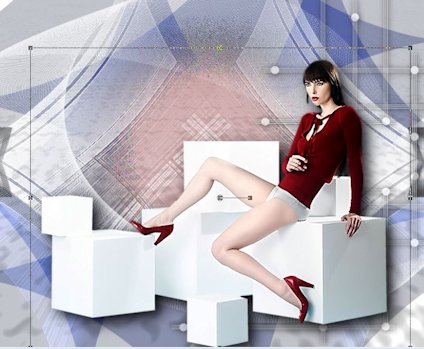
29. Image
Resize 60% (Resize all the layers not checked).
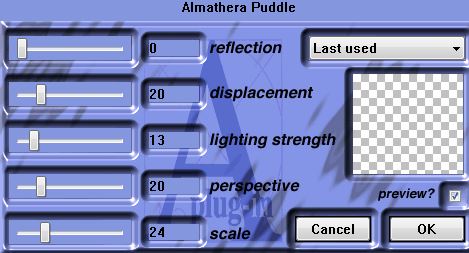
30.Effects- Plugins Almathera- Puddle with these settings
31.
Layer Palette -Double click on this Layer and set the Blend Mode to "Hard Light "
32.
Layers - New Raster layer
33.Selections - load/save selection - load selection from disk and choose my selection: ''hommage_cameron_1''
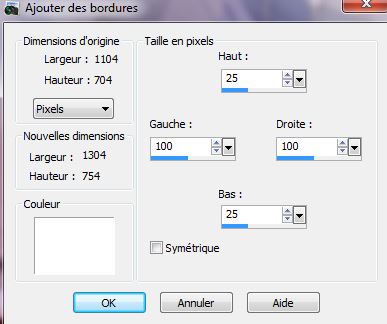
34. Material of the foreground :change your gradient into a Black-White linear gradient with these settings
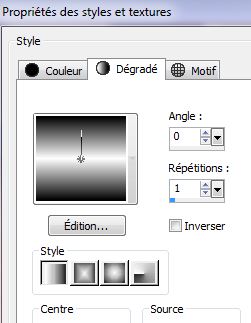
35.
Activate Flood fill tool and fill the selection with the gradient
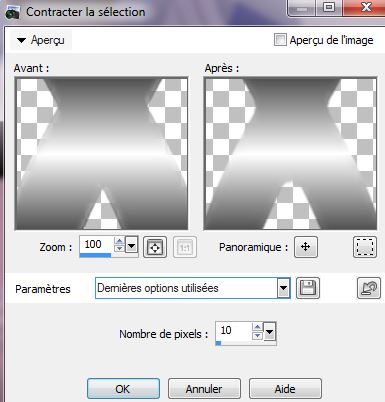
36.
Selections- Modify-Contract-10 pixels
37.Material of the foreground: change your linear gradient with these settings
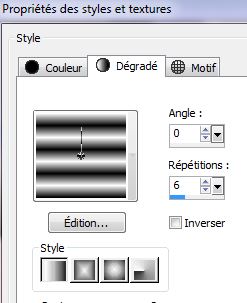
38.
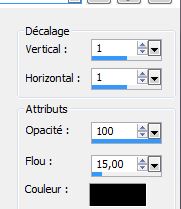
Activate Flood fill tool and fill the selection with the gradient /Effects - 3D Effects - Drop shadow use settings below
39.Selections- Deselect All
40.Layer Palette -Double click on this Layer and set the Blend Mode to "Luminance"
41. Effects- Plugins -Simple- Centre Tile
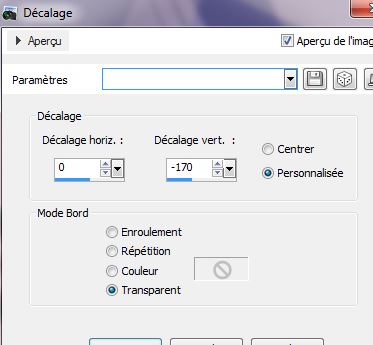
42. Effects-Image effects-Offset use settings below
43.
-Layer Palette -Double click on this Layer and set the Blend Mode to "Luminance " and lower the opacity down to 55%
44.
Activate Selection Tool-Rectangle -Select these 2 parts/Hit the Delete Key of your Keyboard
45.
Selections- Deselect All
46. Layers - New Raster layer
47.Effects- Plugins -DragonFly – Sinedots 2 use settings below
48.
Opacity of the layer down to 71%
49.
Activate the tube ''Cameron_barres '' .Edit - Copy -Edit - Paste as new layer on your working area /With your move tool place it on the right side/Lower the opacity down to 61%
50.Activate the tube ''beauty_woman_276_by_thafs'' .Edit - Copy -Edit - Paste as new layer on your working area .With your move tool place it to the right place as shown below
51.Effects- Plugins EyeCandy 5 Impact
– Perspective shadow-Preset/Drop shadow blury
52.
Activate the tube ''cameron_billes''
Edit - Copy -Edit - Paste as new layer on your working area .With your move tool place it to the right place -Layer Palette -Double click on this Layer and set the Blend Mode to "Luminance Legacy "
53. Activate the tube ''image-CAMERON-moulin''
Edit - Copy -Edit - Paste as new layer on your working area .With your move tool place it to the right place
54.
Activate the tube''image_cameron_3''
Edit - Copy -Edit - Paste as new layer on your working area .With your move tool place it to the right place
55. Layers- Merge-Merge Visible
56.Image - add borders-Symmetric checked 3 pixels background color: #
2b44b9
57.Image -add borders -Asymmetric use settings below
58.
Activate the tube "Text" Edit - Copy - Edit - Paste as new layer and move.
Or write your own text.
Layers - Merge -Merge all layers
I hope you enjoyed this lesson
This lesson was written by Renée 19/05/2013

|
 Homage to Cameron
 Translations