|
Let's begin
1.
Open your Image ''fond_i_love_vintage'' Background layer
2.
Material Properties: Foregroundcolor - #a6a68c
and your Backgroundcolor to color #f6f4f5
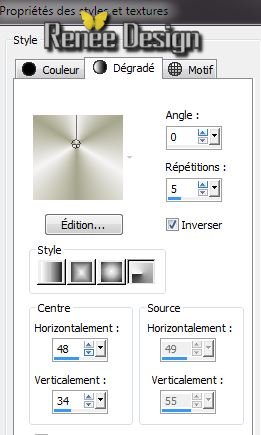
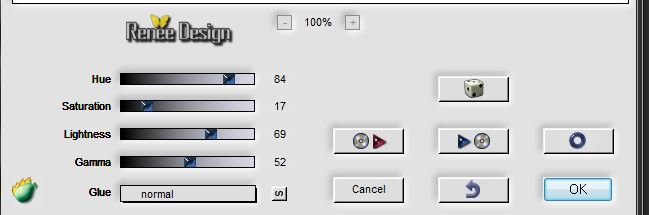
3.
Prepare a Radial Gradient as configured
4.
Layer - New raster layer. Flood Fill Tool: Fill it with the radial gradient
5.
Adjust - Blur - Gaussian Blur : Radius 42
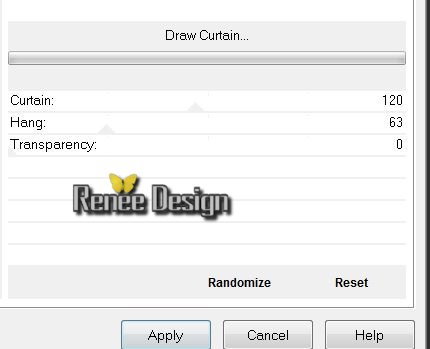
6.
Effects -Plugins Unlimited - Willy / Draw
Curtain
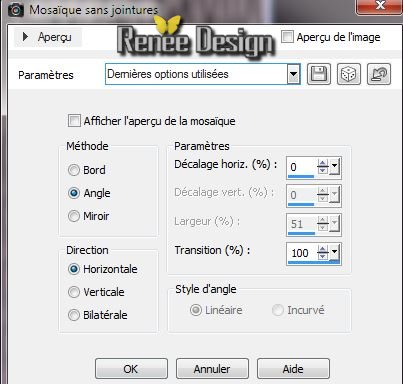
7
Effects- Image Effects- Seamless Tilling
8.
Effects - Plugins Vanderlee- Unplugged X- Wavemaker

9.
Blend Mode on this layer: "Soft Light"
10.
Layers – Duplicate
11.
Effects - Plugins Simple - Pizza slice Mirror (Repeat 2 times )
12.
Effects - Plugins Unlimited - VM1- Web weaver 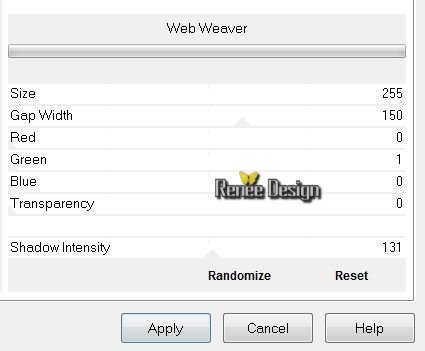
13.
Activate the bottom layer in your layer palette - (arrière plan )
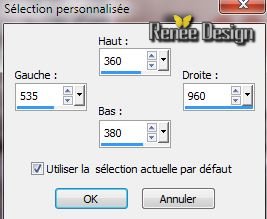
14.
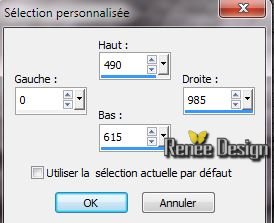
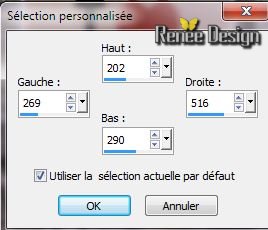
Selections-Custom selection with these settings
15.
Selections- Promote selection to layer
16.
Effects - Plugins Unlimited -Toadies- Sucking Toad *bevel
II.2

17.
Selections - Deselect all/ Layers-Arrange-Bring on Top
18. Activate the bottom layer in your layer palette (Arrière plan
)
19.
Selections - load/save selection - load selection from disk and choose ''live_vintage_1''
20.
Selections- Promote selection to layer
Layers-Arrange-Bring on Top
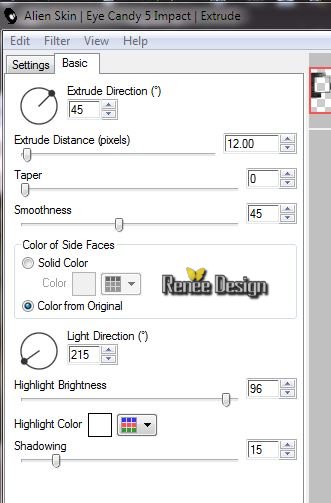
21. Effects
- Plugins EyeCandy 5- Impact / Extrude /Preset
''love_vintage_extrude'' ( Should there be be a problem with the preset/ Here are the settings of the preset )
22.
Selections - Deselect all
23. Effects
-3D Effects-Drop Shadow: Default
Blend Mode on this layer:"Luminance (Legacy)
Stay on the top layer in your layer palette
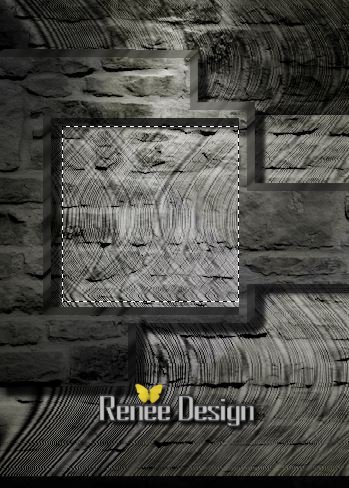
24. Aktivate your Selection Tool: (S) - Selection type: Rectangle-Select a rectangle as shown on the screen
25. Layers - New Raster Layer
Selections - load/save selection - load selection from disk and choose
''I_love_vintage_photo1''
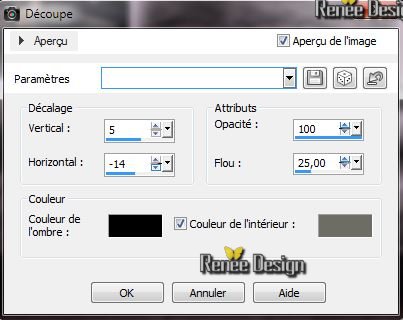
26. Effects
- 3D Effects-Drop Shadow 10/10/65/18 color white
27.
Selections - Deselect all
28.Select the second frame on the right same way
29. Layers - New Raster Layer
Selections - load/save selection - load selection from disk and choose
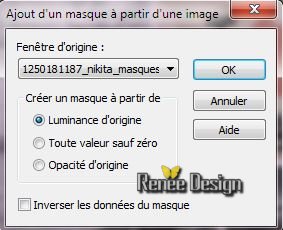
''I_love_vintage_photo2''
. Effects-
3D Effects-Drop Shadow -10/-10/65/18 color white
30.
Selections - Deselect all
31.
Layers - New Raster Layer
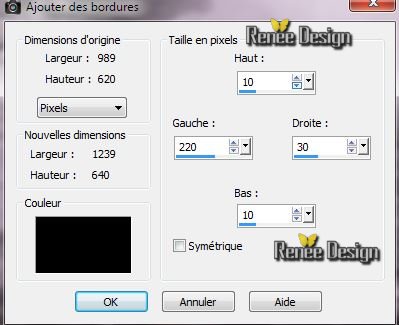
32.
Selections-Custom selection with these settings
Flood Fill tool: Fill the selection with color: #6d6d64
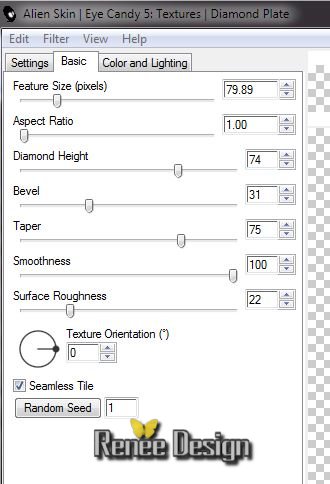
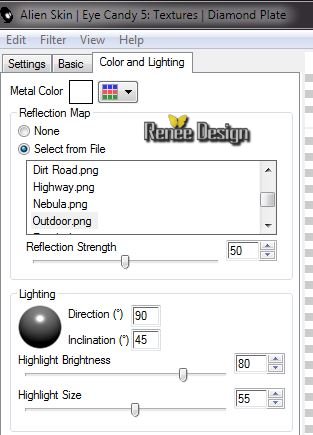
33. Effet
- Eyecandy5 Textures / Diamonds plate /Preset
''love_vintage_daimondsPlate'' ( if problems with preset /Here are the settings of the preset )
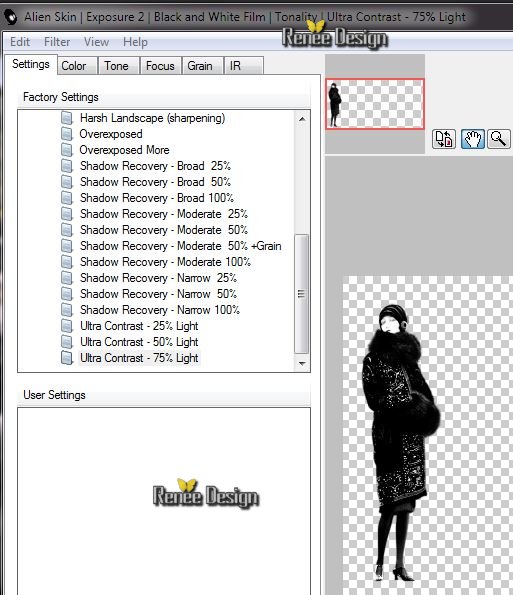
34.
Selections - Deselect all
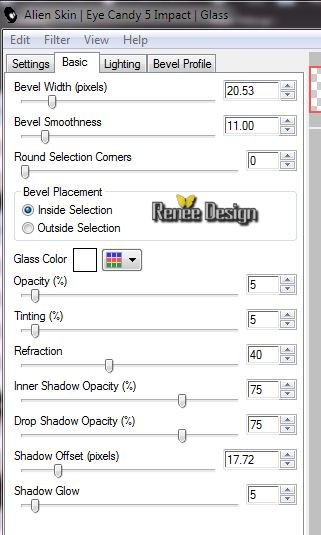
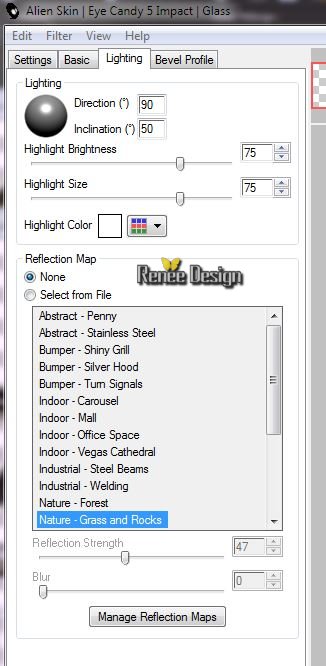
35. Effects
- Plugins EyeCandy 5 Impact -Glass /Preset ''@renee_coulor 1'' ( See example.)
36. Effects
- 3D Effects-Drop Shadow
-10/-10/65/18 color white
37. Layers – Duplicate/Moving slightly down (See example.)
38.
Layers-Duplicate/Layers-Merge-Merge Down
39. Open the tube ''love_vintage_ecrou'' Edith/copy- Edith/ paste as new layer. Placed as shown
Layers-Duplicate /Placed as shown. Layers-Merge-Merge Down
40 .
Open the tube ''love_vintage_nuage'' /Edith/copy- Edith/ paste as new layer and place to the right
41. Activate raster 1
42
Selections - load/save selection - load selection from disk and choose
''love_vintage_2''/ Selections- Promote selection to layer
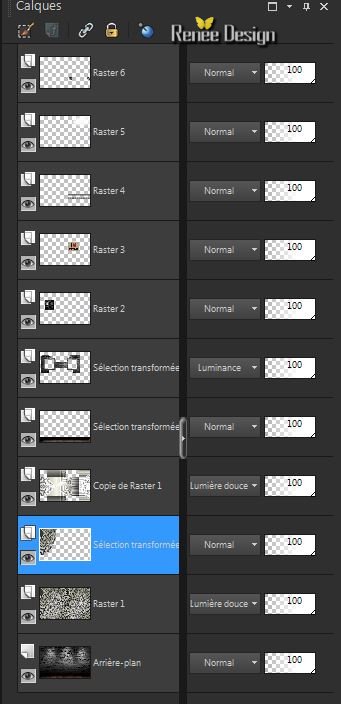
You have this in your layers palettes
43.
Adjust-Blur-Gaussian Blur: Radius 64
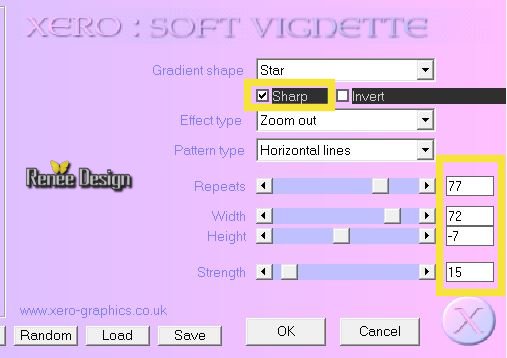
44. Effects
-Plugins Xero - Soft Vignette
45.
Selections - Deselect all
Blend Mode on this layer "Dodge"
46.
Layers-Merge- Merge- Visible
47. Open the tube ''love_vintage_grilleegout '' Edit/ copy- Edit/ paste as new layer and place
48. Open the tube ''love_vintage_lampadaire'' /Edit/ copy- Edit/ paste as new layer
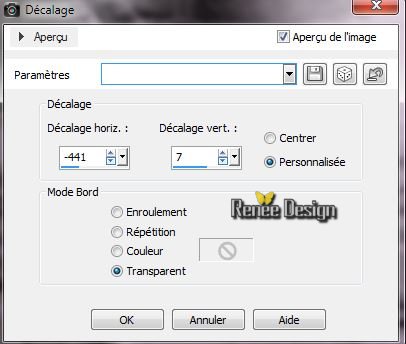
49. Effects
- Image Effects -Offset
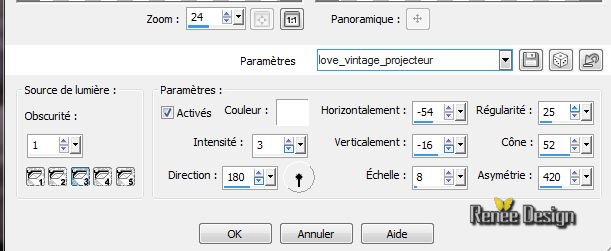
50. Effects- Illumination Effects- Lights /Preset ''love_vintage_projecteur
''(or adjust the settings manually )
51. Layers - New Raster Layer
52. Selection -Tool (S) Selection Type Ellipse -Draw a small circle around the base of the lamp
Layers -Arrange-Move Down
53. Effects- 3D Effects- Cutout - the interior color
#6d6d64
54. Effects
-Plugins Xero - Soft Vignette (still in memory)
Selections - select none
Place the oval nicely in the middle of the base of the lamp, see the great example above)
55. Open the tube ''vintage_bike_png_asbsurdwork''/ Editer copier
/Edit/ copy- Edit/ paste as new layer and place
56. Image
-Resize 90%. Resize all layers not checked
(the bicycle stand in the manhole locations)
57. Activate the bottom layer in your layer palette (Fusionné )
58.
Selections-Custom selection with these settings
Selections- Promote selection to layer
59. Effects
-Plugins Flaming Pear - kyoto color
60.
Selections - Deselect all
61. Effects
- 3D Effects-Drop Shadow 0/0/100/5 color black
62. Aktivate your top layer in your layer palette
63. Layers - New Raster Layer
64.
Selections - load/save selection - load selection from disk and choose "love_vintage_3''
65. Flood Fill Tool: Paint settings Normal mode but the Opacity down to 65. Fill the selection with color #ffffff and then set the Opacity back to 100/ Flood Fill tool: Fill the selection with color: #ffffff
66. Layers-New mask layer from image and open mask ''1250181187_nikita_masque''
67. Effects
- Edge effects- Enhance
Layers-Merge-Merge Group
68.
Selections - select none
69. Open the tube ''JHanna_543-3 tube"" Image resize 60% -
Edit/ copy- Edit/ paste as new layer and place
70.
Open the tube ''JHanna_544Art_Johanna''/ Image resize 35 % - Edit/ copy- Edit/ paste as new layer and place
71.
Effects -Plugins Eyecandy 5 Impact - Perspective shadow-
Preset ''love_vintage-perspective_shadow''
72.
Layers-Merge- Merge- Visible
73.
Image - add borders symmetric 2 pixels white
74.
Image Add Borders asymmetrical black
75.
Layers - New Raster Layer
76.
Selections - load/save selection - load selection from disk and choose ''love_vintage_4'' Flood Fill Tool: Fill the selection with color: #7d2321 (click 3 to 4 times with your flood fill tool
)
77.
Selections - Deselect all
78.
Open the tube ''fashion_from_the_oldies'' - Editer copier -
Edit/ copy- Edit/ paste as new layer-and place
79.
Effects -Plugins Alien Slin Exposure 2 Black and White: First, click Tonality and then you look for the Ultra Contrast 75% Light and then okay
80. Image - add borders symmetric 5 pixels white
81. Image
resize 995 pixels width
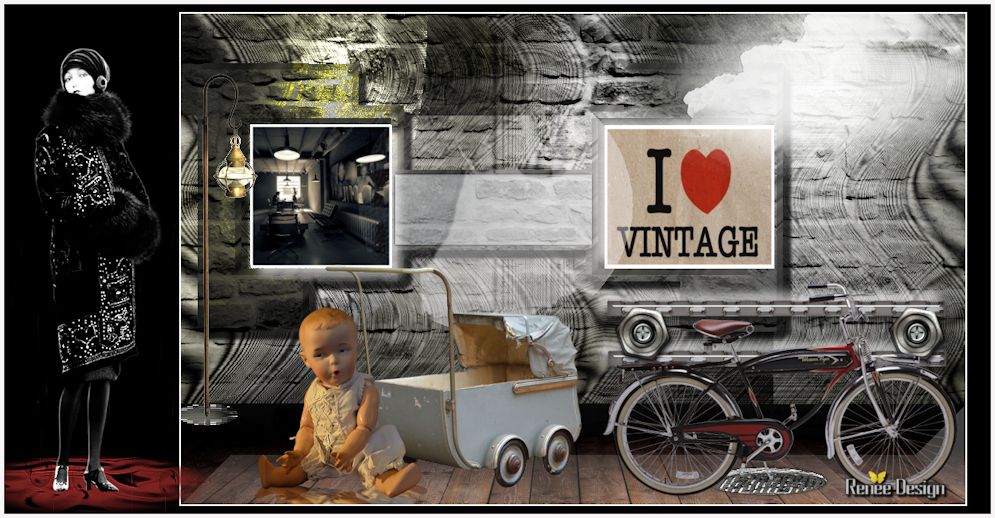
That's it !! You've done it !
Renée
This lesson was written by Renée the 5/01/2014
Created the
15/01/2014
*
Any resemblance with an existing lesson is merely a coincidence
*
Don't forget to thank the people who work for us and with us. I named the tubeurs - Testers and the translators
Thank you

| 

 Translation