|
Let's start the lesson
It's time to relax - Il est
temps de se détendre
- Preparation
-Material Properties: Set your Foreground color to color
1 – Set your Background color to color 2

1. File-Open a New
Transparent Image in this size 1050 x 700
Pixels =Raster 1
2. Activate Flood Fill Tool
 –
Fill the layer with the Foreground color=1 –
Fill the layer with the Foreground color=1
3. Layers-New Raster Layer
4. Selections –load/save
selection –load selection from disc and select my
selection: ‘’Time-to-relax-1’’
5. Activate Flood Fill Tool
 –
Fill the selection with the Background color 2 –
Fill the selection with the Background color 2

6. Effects- Image Effects-
Seamless Tiling – Side by side
7. Effects- Reflection
Effects-Rotating Mirror using the default settings
8. Effects- Plugins – Toadies – What are you : 5/0
9. Effects-Plugins - Filters
in Unlimited 2.0 - &<Background
Designers IV> - @Frame Gradient Switcher use the
settings below- Take number 46 from the menu and then
click on "Select"
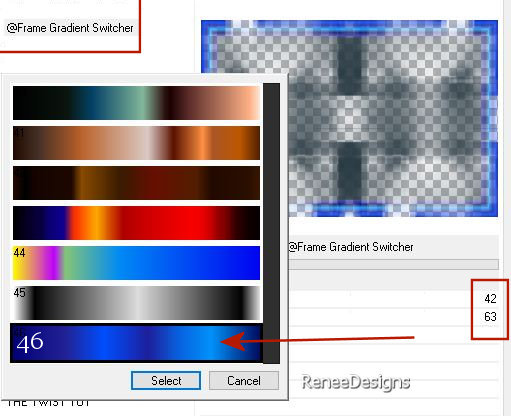
- Sur le même calque
10. Selections –load/save
selection –load selection from disc and select my
selection: ‘’Time-to-relax-2’’
11. Effects-Plugins - Filters
in Unlimited 2.0 - &<Sandflower Specials°v°
> - Color Book... using the default settings
12. Effects – Edge Effects–
Enhance More
13. Effects – Artistic
Effects – Enamel use the settings below
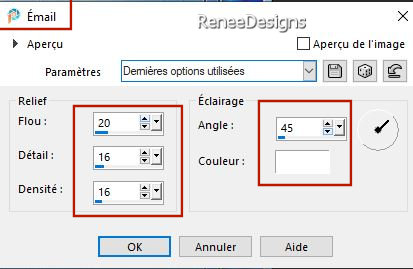
14. Effects- 3D- Effects-
Drop Shadow with these settings: 0 /0 /45 / 45
Color Black

15. Layers-Properties-Set
the Blend Mode to "Darken"
16. Selections –load/save
selection –load selection from disc and select my
selection: ‘’Time-to-relax-3’’
17. Selections- Promote
Selection to Layer
18. Effects- Plugins - Filters
in Unlimited 2.0 – Toadies – Weaver using the default
settings
19. Effects- Plugins – Carolaine and Sensibility- CS-LDots : 215/3/2
20. Effects-3D-Effects – Buttonize
use the settings below
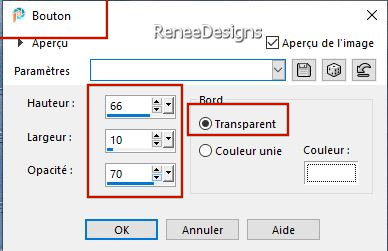

21. Effects- Pluigns – Simple- Top Left Mirror
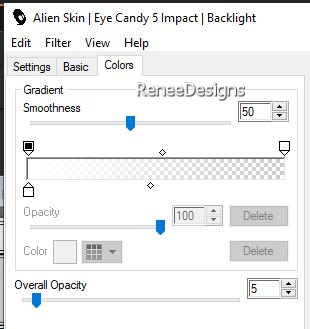
22. Effects-Plugins - Alien Skin Eye Candy 5 - Impact - Backlight
–Tab-Settings-User Settings and select my file- Preset : It's time to relax Backlight
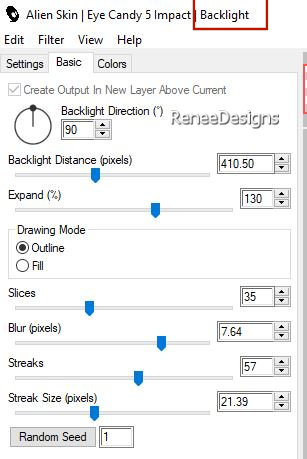 
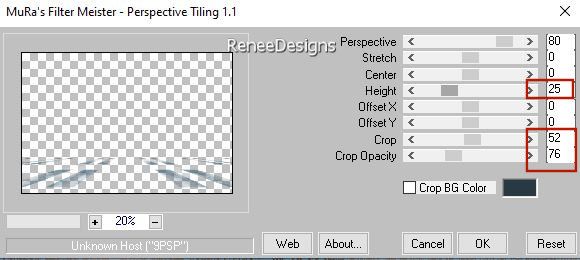
23. Effects- Plugins – Mura’s Meister – Perspective Tiling
use the settings below
24. Layers- Duplicate
25. Layers-Properties-Set
the Blend Mode to " Multiply "
26. Layers- New Raster
Layer
27. Selections –load/save
selection –load selection from disc and select my
selection: ‘’Time-to-relax-4’’
28. Activate Flood Fill
Tool –
Fill the selection with color 3
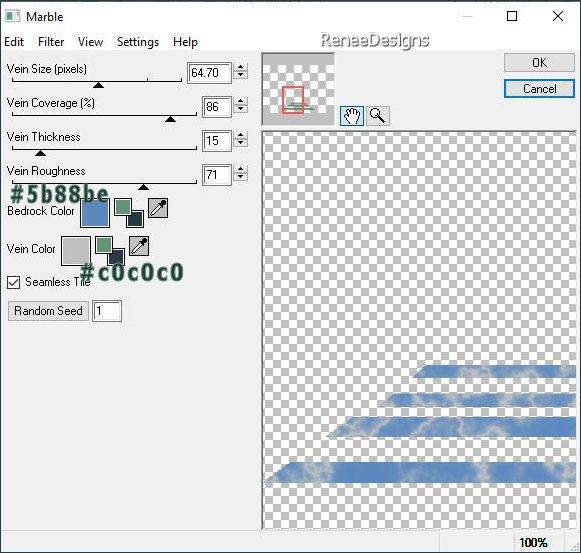
29. Effects - Plugins
– EyeCandy 4000 – Marble –use the settings below- Colors #5b88be and #c0c0c0

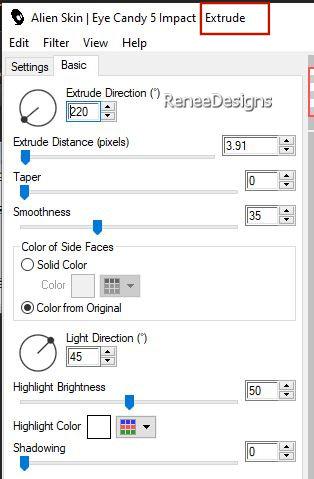
30. Effects-Plugins - Alien Skin EyeCandy 5 – Impact – Extrude
use the settings below
31. Effects – Edge Effects-
Enhance
32. Open the Tube: ‘’Time
to relax-Image 1’’ - Edit - Copy- Activate your
work -Edit - Paste as new layer
32. Pick Tool: (K) on your
keyboard -Enter these parameters on the Toolbar
 141 / 99
Press ( M ) to close the
Tool
33. Effects- Plugins - Alien Skin EyeCandy 5 – Impact – Extrude
with the
same settings
34. Effects- 3D- Effects-
Drop Shadow with these settings: – 2
/
-3 / 65 / 28 Color Black
35. Layers- New Raster
Layer
36. Selections –load/save
selection –load selection from disc and select my
selection: ‘’Time-to-relax-5’’
37. Activate Flood Fill
Tool
 –
Fill the selection with color 4 –
Fill the selection with color 4
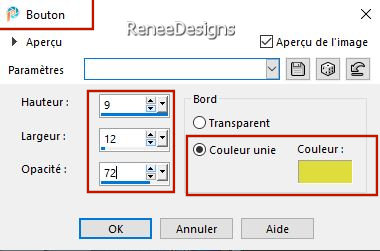
38. Effects-3D-Effects –
Buttonize use the settings below – Color #dfdd3f
39. Layers- New Raster
Layer
40. Selections –load/save
selection –load selection from disc and select my
selection: ‘’Time-to-relax-6’’
41. Activate Flood Fill
Tool
 –
Fill the selection with color 5 –
Fill the selection with color 5
42. Layers- New Raster
Layer
43. Selections –load/save
selection –load selection from disc and select my
selection: ‘’Time-to-relax-7’’
44. Activate Flood Fill
Tool
 –
Fill the selection with color 6 –
Fill the selection with color 6
45. Layers- New Raster
Layer
46. Selections –load/save
selection –load selection from disc and select my
selection: ‘’Time-to-relax-8’’
47. Activate Flood Fill
Tool
 –
Fill the selection with color 7 –
Fill the selection with color 7
48. Layers-Arrange -Move
Down

- Replace at the top
of the layers palette
49. Layers- Merge Merge
Down- 3 times (the 2 so-called towels you just made and
the rod in one layer)
50. Effects- 3D- Effects-
Drop Shadow with these settings: 2 / -3
/ 65 /28 Color Black
51. Layers- New Raster
Layer
52. Selections –load/save
selection –load selection from disc and select my
selection: ‘’Time-to-relax-9’’
53. Material Properties:
Set your Background color to color #00000
Activate Flood Fill
Tool
 –
Fill the selection with the Foreground color #000000 (3
to 4 clicks) –
Fill the selection with the Foreground color #000000 (3
to 4 clicks)
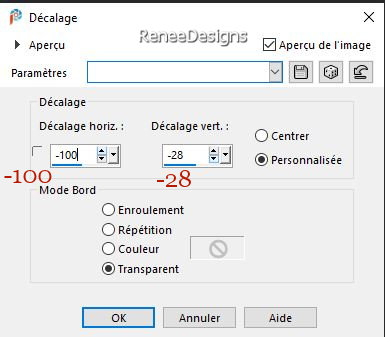
54. Effects – Image Effects
– Offset use the settings below

55. Open the Tube : ‘’Renee-TUBES-Time-to relax-
Meubles SDB’’ -Edit - Copy- Activate your work -Edit
- Paste as new layer
56. Pick Tool: (K) on your
keyboard -Enter these parameters on the Toolbar
 -22 / 98
Press ( M ) to close the
Tool
57. Activate the Tube
‘’Textes - bridal- shower’’
- Select one of the texts
--Edit - Copy- Activate your work -Edit - Paste as new
layer
- Place to your liking (see
finished image)
58. Layers- New Raster
Layer
59. Selections –load/save
selection –load selection from disc and select my
selection: ‘’Time-to-relax-10’’
60.
Activate Flood Fill Tool
 –
Fill with color of your choice (Renée chose this
color #b3ecf5) –
Fill with color of your choice (Renée chose this
color #b3ecf5)

61. Image – Rotate Left
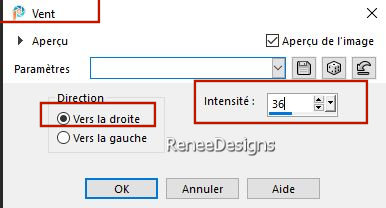
62. Effects – Distortion
Effects– Wind- Wind direction -From right -Wind Strength
36
63. Image - Rotate Right
64. Activate the Tube ‘’ Renee-TUBES-It's time to relax’’
- Activate raster 1
from this tube
- Image - Resize 60 %
-Edit - Copy- Activate your
work -Edit - Paste as new layer and move (see finished
image)
65. On the same tube -
activate layer ‘’Spot ‘’
- Edit - Copy- Activate
your work -Edit - Paste as new layer and move it in the
right place (see finished image)
66. Layers- Duplicate
67. Image - Mirror - Mirror Horizontal (Image - Mirror
in older versions of PSP) – move it in the right place(see
finished image)
68. Open the Tube:‘’Time to relax-Bulles’’
-
-Edit - Copy- Activate your
work -Edit - Paste as new layer and move (see finished
image)
69. Decorate to your taste
with your own tubes or with the tubes provided
( ''towels and soap'' ) (Not required)
70. Image - Add
Borders-Symmetric checked: 1 Pixel -Color 2
71. Image - Add
Borders-Symmetric checked: 50 Pixels -Color white
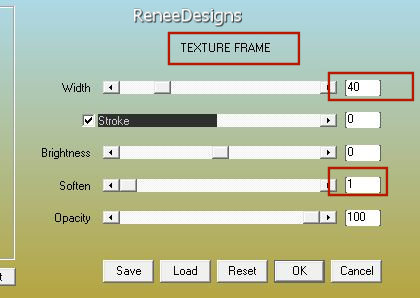
72. Effects- Plugins – AAA Frame – Texture Frame
use the settings below
73. Repeat:
Effects-Plugins- AAA Frame -Texture Frame with the same
settings
74. Paste the author's
watermark on your work and your own watermark
75. Layers- Merge Merge All
(flatten)
76.
Image -
Resize - to 90% - Resize all layers- Checked
77. Paste the text or write
your own - Optional
Save as JPG
I hope you enjoyed this
lesson
Renée
This lesson was written by
Renée 19 /04/ 2024
Edited and Update
in 2024
*
*
Any resemblance with an existing lesson is a coincidence
* Do not forget to thank the people who work with us and
for us - I have appointed the tubeurs and translators
Thanks
|


 Translations


