|
Let's start the lesson.
La fille de l’eau/The water girl

- Preparation
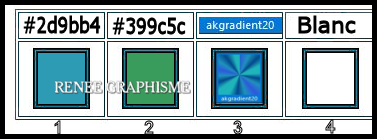
- Material Properties: Set your foreground color to color #2d9bb4= 1 – Set your background color to color # 399c5c=2
1. Open the BG-Image
‘’Fond-Fille-de eau’’-Promote Background Layer = Raster 1
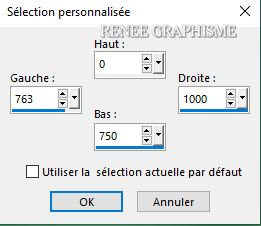
2. Activate Selection Tool -Custom Selection (S) -Rectangle with these settings

3.Selections- Promote Selection to Layer
Selections -Deselect All
4. Effects –Plugins-
Unlimited 2.0 - Filter Factory Gallery H - Edge Saturate...
217/54/194
5. Layers-Properties-Change the Blend Mode to "Overlay "
6. Effects – Edge Effects– Enhance
7. Effects –Plugins-
Unlimited 2.0 - Filter Factory Gallery B – Button Deluxe
using the default settings
8. Effects –Plugins-
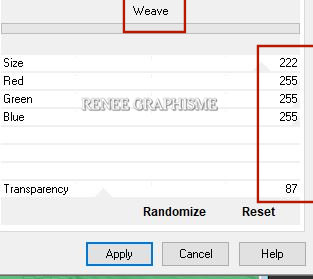
Unlimited 2.0 - Filter Factory Gallery A – Weave use the settings below
9. Layers- Duplicate
10. Image - Mirror - Mirror Horizontal (Image - Mirror in older versions of PSP)
11. Layers- Merge- Merge Down
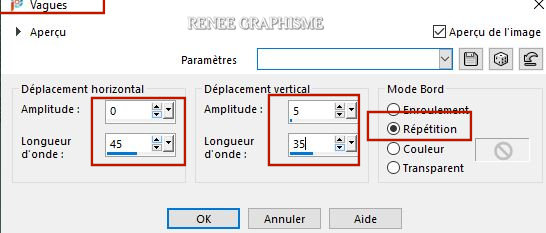
12. Effects – Distortion Effects – Weave use the settings below
11. Effects-3 D Effects- Drop Shadow with these settings : 0/0/65/18 Color Black
14. Effects – Plugins – Mura’s Meister – Perpective Tiling using the default settings
15. Layers-Properties- Lower the Opacity to 59%
16. Layers- New Raster Layer
17.
Selections –load/save selection –load selection from disc and select my selection:
‘’Fille-eau-selection 1’’
- Material Properties: Set your Foregroundcolor to foreground-background "Sunburst" gradient configured like this
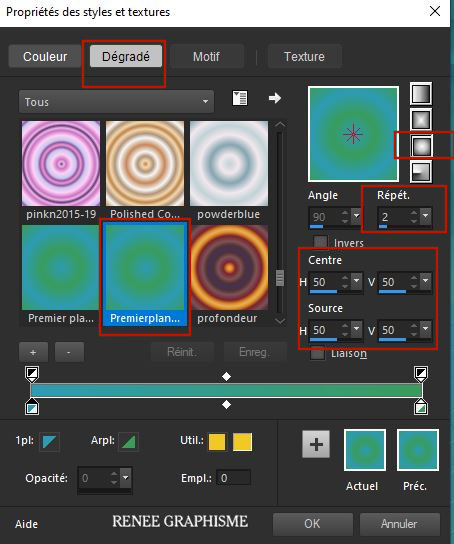
18. Flood Fill Tool
 -
Fill the Selection with the gradient -
Fill the Selection with the gradient
Selections -Deselect All
19. Effects –Plugins – L & K’s – Paris use the settings below
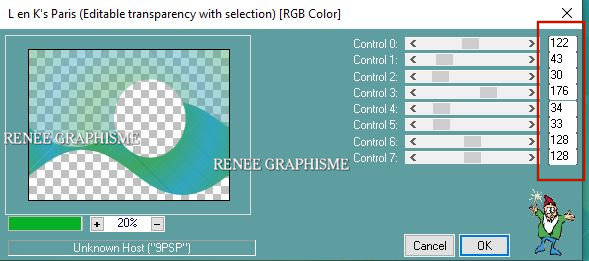
20. Effects– 3d Effects - Drop Shadow same settings
21. Open the tube ‘’ Fille-eau- Image
1’’ -Edit - Copy- Activate your work -Edit - Paste as a new layer
22. Effects – Plugins – Aim – Gamma use the settings below
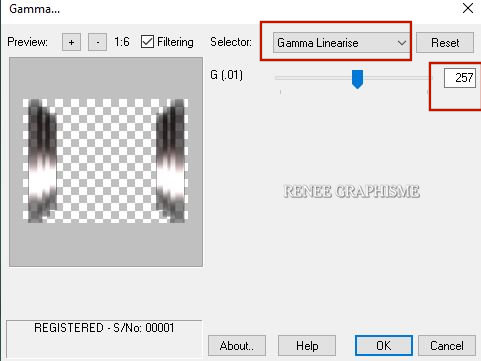
23. Activate Selection Tool -Custom Selection (S) -Rectangle with these settings
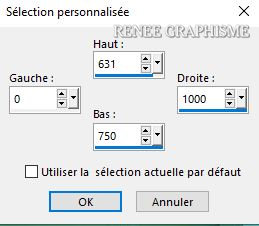
24. Adjust- Blur -Motion Blur use the settings below
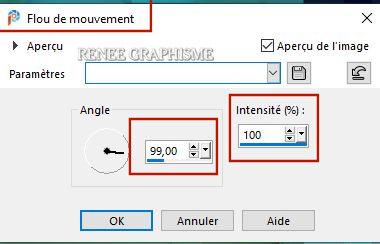
Selections -Deselect All
- Material Properties-Set your Foreground Color to Gradient and select ‘’akagradient20’’ –
Style: Radial , configured like this
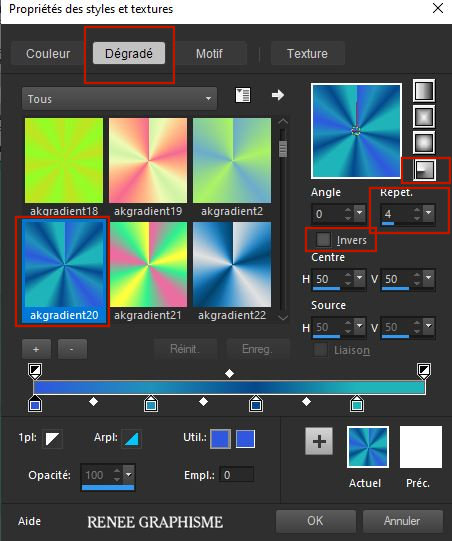
25. Layers- New Raster Layer
26. Flood Fill Tool
 -
Fill the Layer with the gradient -
Fill the Layer with the gradient
27. Adjust- Blur- Gaussian Blur : Radius 22%
28. Effects –Distortion Effects– Warp use the settings below
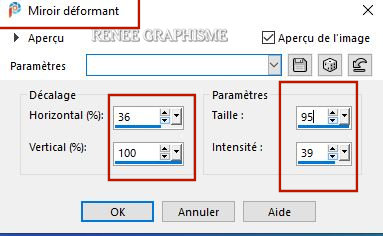
29. Effects – Plugins – dsb flux- Radial Warp…use the settings below
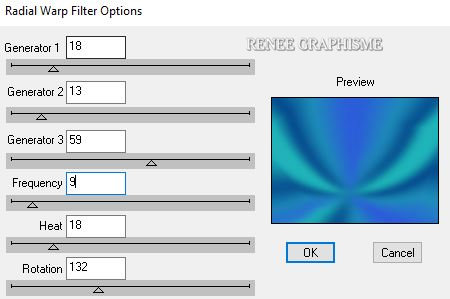
30. Effects – Plugins – Artistic – Plastic Warp use the settings below /(or Effects Plugins Artistiques -and select
Emballage plastique)
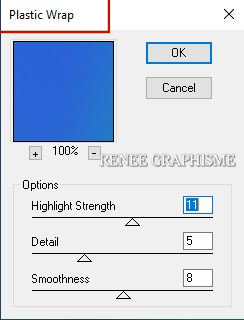
31.
Layers-Load/Save Mask-Load Mask From Disk and select Mask’’ 20-21’’
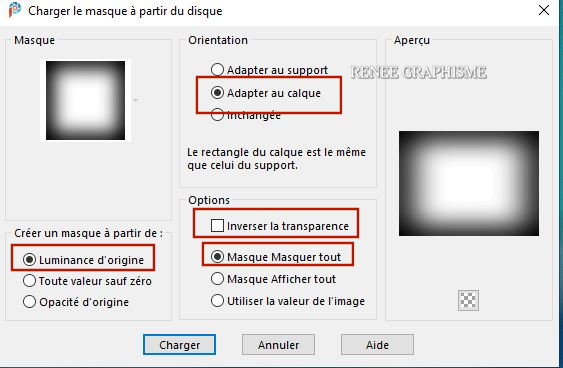
32.Layers- Duplicate
- Layers- Merge- Merge Group
33. Image- Resize 76 % -All layers not checked
34.Pick Tool: (K) on your keyboard -Enter these parameters for the X:142,00 and Y: 301 positions on the Toolbar
 142 / 301
- Press ( M ) to close the Pick Tool
35. Effects – Plugins- Vanderlee- Halftone -
Preset "Renee-Fill-eau.ht2 "can be used in any folder of your choice by clicking it and OK.
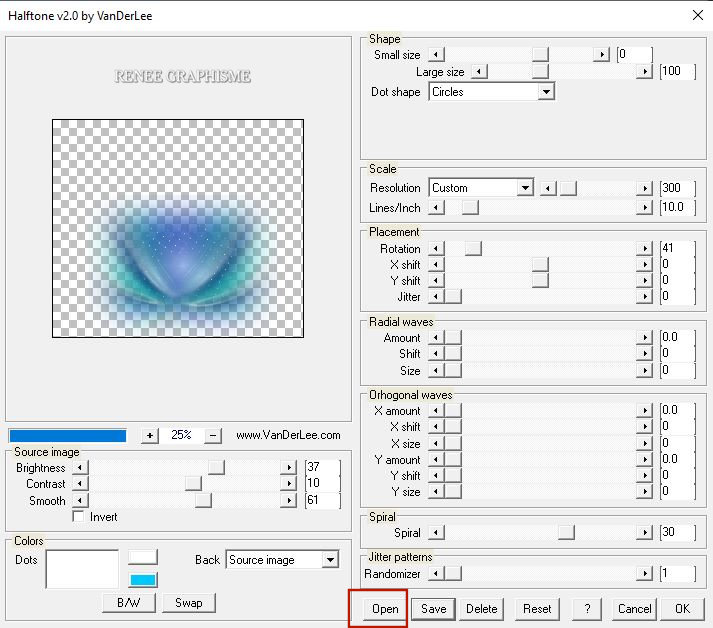 
36. Layers-Properties-Change the Blend Mode to "Overlay" – Lower the Opacity to
83%
37. Layers- Duplicate
38. Layers- Merge- Merge Down - Layers-Properties-Lower the Opacity to
83%
- Your work and Layer Palette look like this now-You should have this result
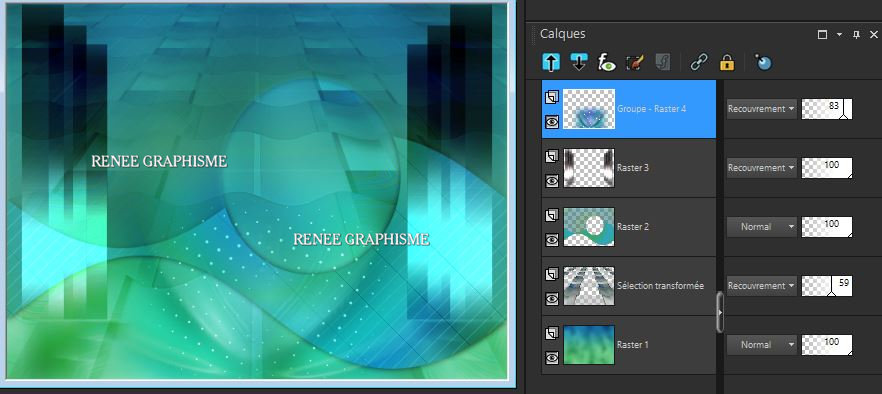
- Activate the bottom layer in the layer palette = Raster 1
39. Activate Selection Tool -Custom Selection (S) -Rectangle with these settings
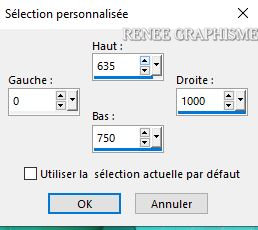
40. Selections- Promote Selection to Layer
Selections -Deselect All
41.Adjust Blur- Gaussian Blur: Radius 65%
42. Effects – Plugins L& K’s – Jeffrey 8
43. Effects – Edge Effects – Enhance
44. Effects-3 D Effects- Drop Shadow with these settings : 15 /0 /100 /1 Color WHITE
- Repeat: Effects-3 D Effects- Drop Shadow with the same settings
- To replace the top of the Layer-Palette
45. Layers- New Raster Layer
46.
Selections –load/save selection –load selection from disc and select my selection:
‘’Fille-eau-selection 2’’
47. Flood Fill Tool
 –
Fill the Selection with the gradient –
Fill the Selection with the gradient
Selections -Deselect All
48. Effects – Plugins – Alien skin eyeCandy 5 Impact – Motion Trail ––Tab-Settings-User Settings and select my file –
Preset : ‘’Renee-fille-eau-motion Trail ‘’
49. Layers- New Raster Layer
50.
Selections –load/save selection –load selection from disc and select my selection:
‘’Fille-eau-selection 3’’
51. Flood Fill Tool
 –
Fill the Selection with the gradient –
Fill the Selection with the gradient
Selections -Deselect All
52. Effects – Plugins – Alien Skin EyeCandy 5 – Glass ––Tab-Settings-User Settings and select my file – Preset : ‘’
Renee_Fille_Eau_Glass’’
53. Effects – Plugins – Alien skin Eye Candy 5 Impact – Motion Trail ––Tab-Settings-User Settings and select my file –
Preset : ‘’Renee-fille-eau-motion Trail’’
54. Layers New Raster Layer
55.
Selections –load/save selection –load selection from disc and select my selection:
‘’Fille-eau-selection 4’’
56. Open the tube
‘’Fille-eau- Image 3’’
- -Edit - Copy- Activate your work -Edit - Paste as a new layer
57. Layers- Duplicate -Select a part of this image as shown in the example below
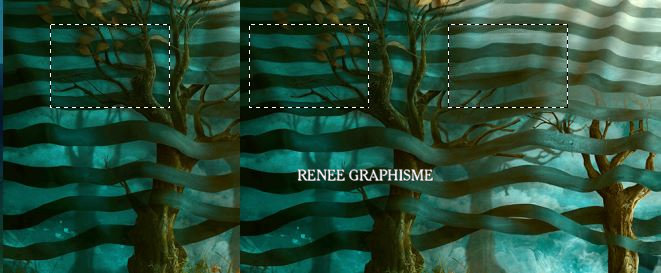
58.Layers- Merge- Merge Down
59. Selections -
Invert
DELETE

Selections -Deselect All
60. Effects – Plugins- Alien Skin Eye Candy 5 - Impact – Glass ––Tab-Settings-User Settings and select my file – Preset :
''Renee_Fille_Eau_Glass 2’’
61. Layers- New Raster Layer
62.
Selections –load/save selection –load selection from disc and select my selection:
‘’Fille-eau-selection 5’’
63. Materials Properties: Change the radial gradient in linear gradient configured like this
Flood Fill Tool: Fill the Selection with the gradient Change the Gradient into a linear gradient
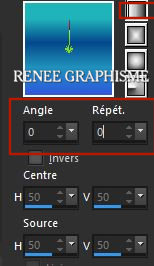
Selections -Deselect All
64. Effects-3 D Effects- Drop Shadow using the default settings
65. Open the tube ‘’ Fille-eau-texte’’ -Edit - Copy- Activate your work -Edit - Paste as a new layer
- With your move tool place it to the right side ( see finished image )
66. Layers-Properties-Change the Blend Mode to "Overlay " – Lower the Opacity to 63%
67. Open the tube ‘’ Fille-eau- Image
2’’ -Edit - Copy- Activate your work -Edit - Paste as a new layer
- With your move tool place it to the bottom right side (Original tube by JCW)
68. Open the tube ‘’ Fille-eau- Image
4.pspimage’’ -Edit - Copy- Activate your work -Edit - Paste as a new layer
69. Pick Tool: (K) on your keyboard -Enter these parameters for the X:279 and Y: 270 positions on the Toolbar  279 / 270
70. Open the tube " Personnage" -Edit - Copy- Activate your work -Edit - Paste as a new layer /
Or use the tubes from the folder (reserves tubes) Or other tubes to your liking (Resize the tube if necessary)
-With your move tool place it to the bottom left side ( see finished image )
- On this tube
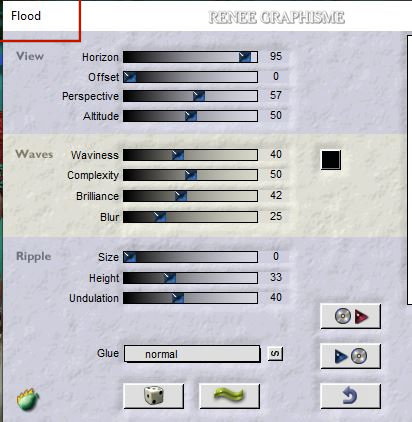
71. Effects – plugins – Flaming Pear – Flood use the settings below (The setting of Horizon depends on where the tube is)
72. Activate your Text Tool-Font ‘Very_Damaged’’
(into the zipfile) and write the text - La fille de l’eau
Confirm and Convert to Raster Layer
73. Effects- 3 D Effects -Drop shadow to your own taste
74. Image - Add borders-Symmetric checked: 1 Pixel Color #2d9bb4 =1
75. Image - Add borders-Symmetric checked:15 Pixels Color #ffffff=4
76. Selections -
Select All
77. Image - Add borders-Symmetric checked: 1 Pixel Color #399c5c= 2
78. Image - Add borders-Symmetric checked: 45 Pixels Color #ffffff=4
79. Effects-3 D Effects- Drop Shadowwith these settings: 0 / 0/65/ 42 Color Black
Selections -Deselect All
80.Open the tube ‘’Deco-Fille-eau-cadre’’ -Edit - Copy- Activate your work -Edit - Paste as a new layer
81.Layers- Merge- Merge All
82.
Image -Resize to 1000 Pixels width.
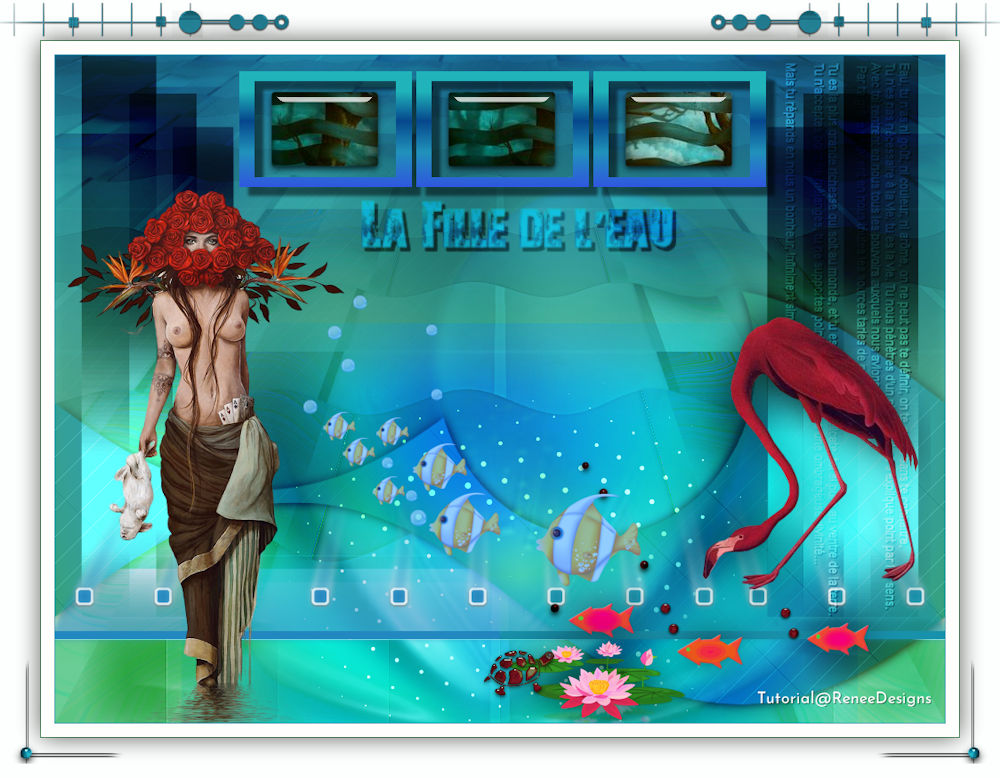
Save as JPG file and you're done!
I hope you enjoyed this lesson
Renée
This lesson was written by Renée
11-08-2020
Edited and Update
in 2020
*
Any resemblance with an existing lesson is a coincidence
*
Do not forget to thank the people who work with us and for us I have appointed the tubeurs and translators
Thanks
*
|

 Translations


