|
Let's start
1.
Open a New Transparent Image of 985 x 665 pixels
Material Properties: Foregroundcolor to color : #e1dad5 and your Backgroundcolor to color
#121312
2.
Flood Fill tool : Fill the layer with your foregroundcolor
#e1dad5
3.
Open the tube ''KRYSFANTASTIQUE14-12-13-002- Edit/copy-Edit paste as a new layer
4.
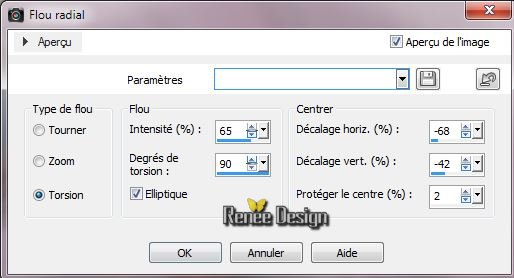
Adjust-Blur-Radial Blur with these settings
5.
Layers-Duplicate- Image Mirror/ Layers-Merge-Merge Down
6.
Effects - Edge Effects- Enhance More
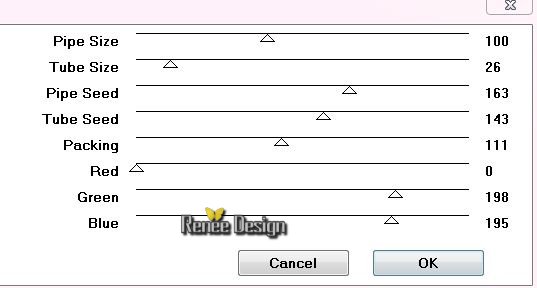
7. Effects - Distortion Effects
- Polar Coordinates

8.
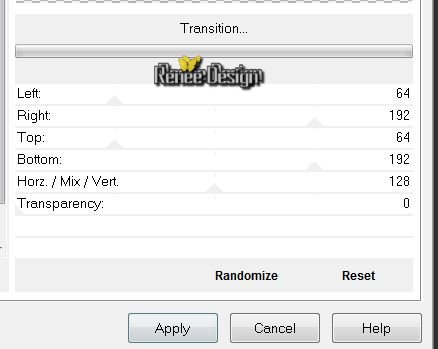
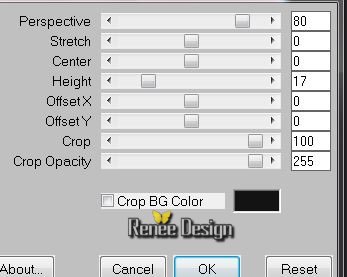
Effects-Plugins Unlimited -UnPlugged Tools -Transition
9.
Effects- Edge Effects-Enhance More
10.
Layers-New raster layer/Flood Fill Tool: fill the layer with black
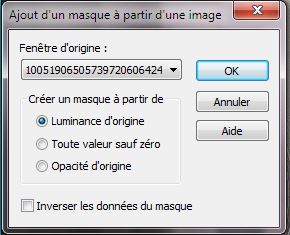
11. Layers-New Mask Layer from Image choose Maske : "100519065057397206064247.jpg"
Layers-Merge-Merge Group
12.
Effects-Plugins Unlimited - Unplugged Shapes/ 45° degrees Rectangle
default
13.
Selections - load/save selection - load selection from disk and choose ''lady_symphonie''
14.
Adjust-Blur-Gaussian Blur Radius 45
15.
Effects - 3D Effects - Drop Shadow 0/0/40/23 black
16.
Selections-Promote Selection To Layer
-
Selections-Select none
17.
Effects -Plugins Unlimited - Unplugged Tools - vertical Tile
Selections - load/save selection - load selection from disk and choose ''lady_symphonie''
18.
Effects - Plugins Unlimted - Visual Manipulation -
Transmission
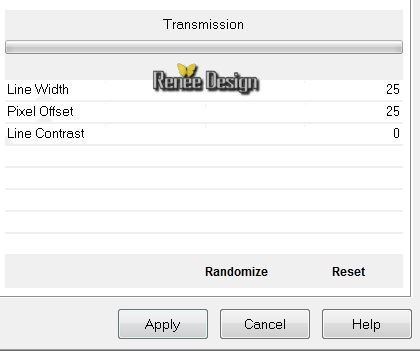
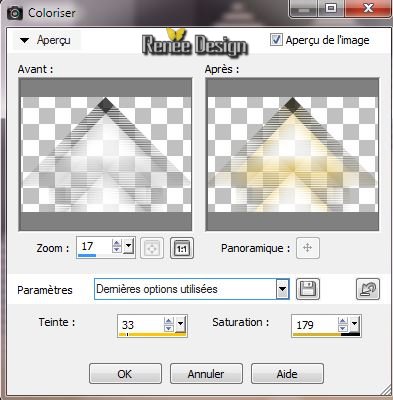
19.
Adjust-Hue and Saturation-Colorize
20.Selections-Select none
21.Selections - load/save selection - load selection from disk and choose
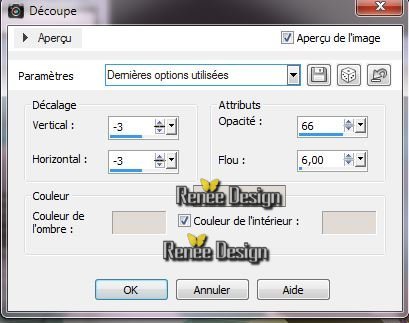
''lady_symphonie_1''
21. Effects
- Plugins EyeCandy 5 Impact -Texture/ Texture Noise /Preset
''Lady_symphonie_texture noise''
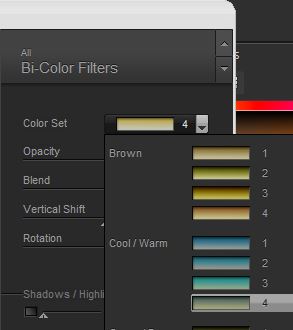
22.
Effects -Plugins Nick Color effex .Pro3/ Bicolor Filters -Color
set -Cool warm /4
23. Layers-Duplicate - Layers-Merge-Merge Down
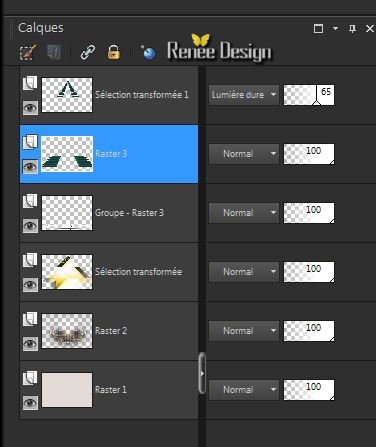
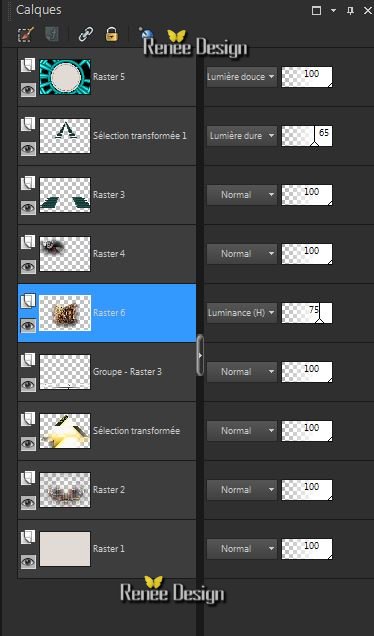
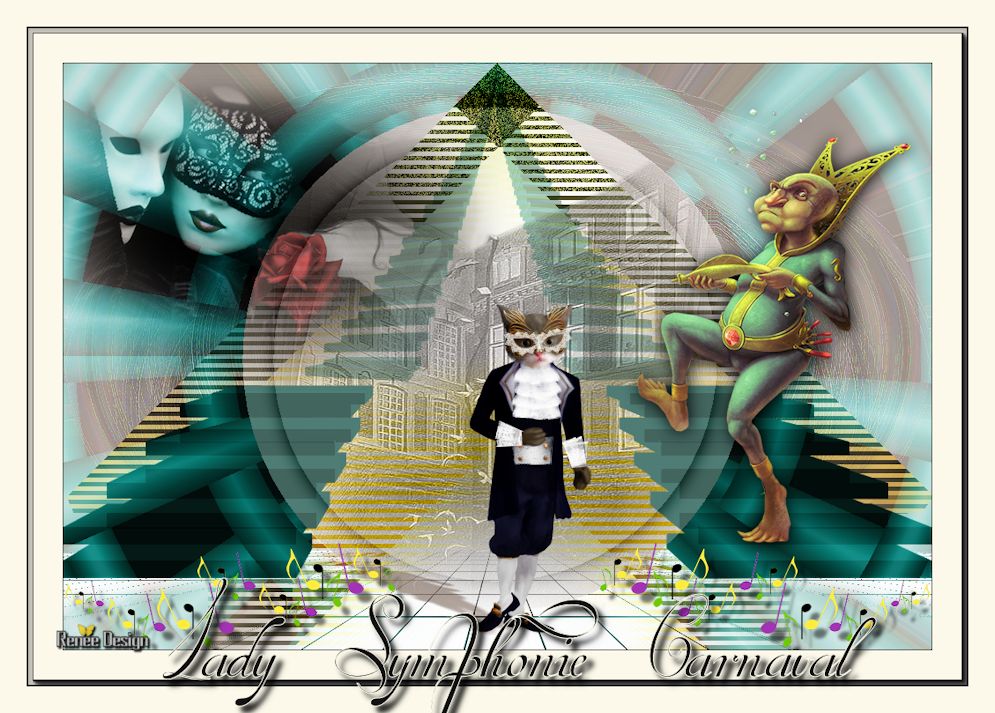
Your work is like this right now
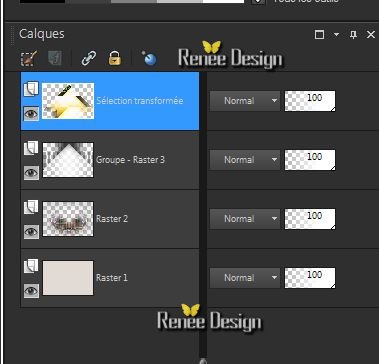
24. Aktivate the layer (Groupe -Raster 3)
25. Effet
-Unlimited -Toadies -3 DGrid - settings
24/7/18
26. Aktivate the top of the Layers palette
27.
Effects-Plugins Mura's Meister - Perspective Tilling
28. Layers-Duplicate-Layers-Merge-Merge Down
29.Layers-New Raster Layer
30.
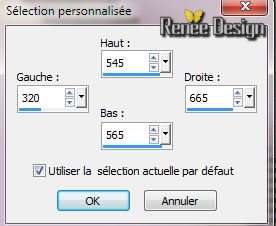
Selections-Gustom Selection with these settings
31.
Flood Fill Tool: fill the selection with color :#1f776e
32.
Effects - Artistic Effects- Hot Wax Coating
33.
Selections-Select none
34.
Effects - PluginsToadies - What are you /with these settings
208/15 /0/0/0/0
35. Layers-Duplicate-Layers-Merge-Merge Down
36. Effects
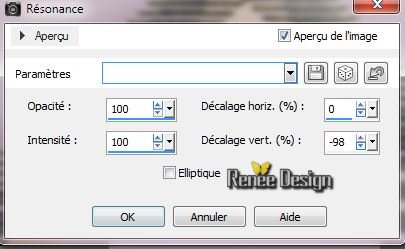
- Reflections Effects - Feedback
37. Effects
-Plugins Eyecandy 5 Extrude -Preset''
lady_symphonie_extrude''
38.
Selections - load/save selection - load selection from disk and choose ''lady_symphonie_2''
39.
Selections-Promote Selection To Layer
40. Selections-Select none
41. Effects
- Geometric effects- Circle
Set the Blend Mode to "Hard Light - and lower the Opacity to 65%
42. Aktivate this layer ( Raster 3) / Selections - load/save selection - load selection from disk and choose ''lady_symphonie_2'' /Delete
Your work is like this right now
43. Open the tube ''TriziaTubed-Lady_Symphone'' /Image Resize to
70%
- Edit/ copy - Edit/paste as a new layer
Well placed at the top left
44. Arrange layer below Raster 3
Aktivate the top of the Layers palette
45. Layer - New raster layer. / Flood Fill Tool: Fill the layer with white
46.
Effects -Plugins VM Instant ART - Pipeline to Siberia
47.
Selections - load/save selection - load selection from disk and choose
''lady_symphonie_3''/ Delete
48. Effects
- 3D Effects - Cutout- With this color : #e1dad5
49.Selections- Modify - Contract- 35 pixels
50. Effects - 3D Effects-Drop Shadow
1/1/100/28 back
52.
Selections-Select none/Set Blend Mode to Soft light
- Activate this layer (Groupe Raster3)
53. Layers-New Raster Layer
54.Selections - load/save selection - load selection from disk and choose
''lady_symphonie_3''
55. Open the tube ''Verlaine C83''/ Edit/copy-Edit paste into the selection
56.
Selections-Select none
57. Set Blend Mode to Luminance Legacy/ Opacity to 75
58. Effects
- Edge Effects - Enhance
Your work is like this right now
59. Open the tube''personnage_etrange_des fonds marins_art-Aleksey
-Baydakov''/ Image mirror -/Image-Resize
80%
Edit/copy - Edit/paste as a new layer /-Place on the right
60. Effects
- 3D Effects -Drop Shadow with the same settings
61. Open the tube ''ladysymphonie_chat_carnaval''/ Edit/copy - Edit/paste as a new layer
62. Open the tube ''lady_symphonie_note/ Edit/copy - Edit/paste as a new layer Place on the right
63. Layers-Duplicate-Image Mirror/ Layers-Merge-Merge Down
64. Effects
- 3D Effects -Drop Shadow default
65. Layers-Merge-Merge Visible
66. Image-add borders symmetric 1 pixel black
67.Image-add borders symmetric 40 pixels white
68. Image-add borders symmetric 1 pixel black
69. Image-add borders symmetric 30 pixels white
70. With your magic wand select the border with the 40 pixels
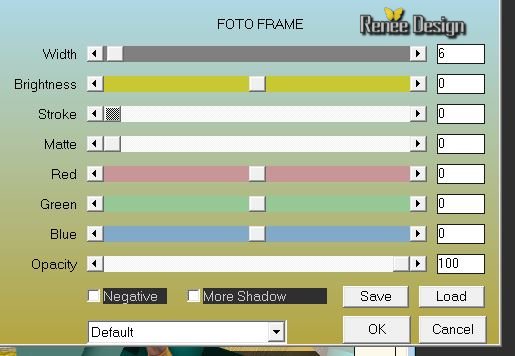
71. Effects
-Plugins AAA Frame - Foto frame
72.Text-Tool : Write your title I used the font "Van den velde ''
Download here
http://www.dafont.com/fr/search.php?q=van+den+velde
Material-Properties:
foregroundcolor to color white Backgroundcolor to color black
Size 48 Points
Write: Lady Symphonie Carnaval
73. Image Resize to 995 pixels
width
I hope you enjoyed this lesson
Renée
Write the 18/01/2014
introduction
the../ 02/2014
*
Any resemblance with an existing lesson is merely a coincidence.
*
Don't forget to thank the people who work for us and with us. I named the tubeurs - Testers and the translators
Thank you Renée

| 
 Translations