|
Let's start the lesson
-
Color palette
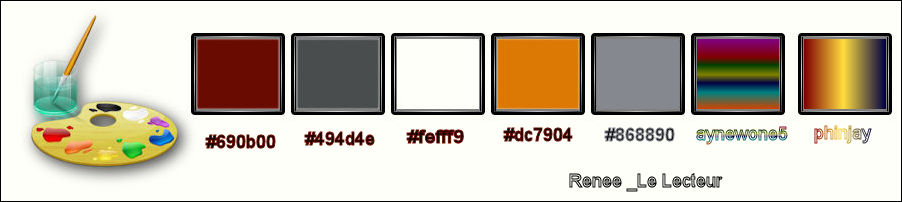
- Color Palette- Set your foreground color to #690b00 - Set your background color to #000000 (We will start with these colors (required) )
1.
Open Image ‘’Fond_le_lecteur’’- Window - Duplicate (or shift+D) - Close the original and proceed on the copy -Promote Background Layer =Raster 1
2.
Effects-Plugins -Unlimited - &<Bkg Designer sf10
III>-Whirl 69
3.
Layers- Duplicate
4.
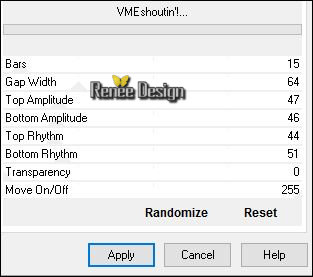
Effects –Plugins- Unlimited -&<Bkg Designer sf10 III>-
VMEshoutin'!..use settings below.
5.
Effects- 3 D Effects- Drop Shadow with these settings:

6.
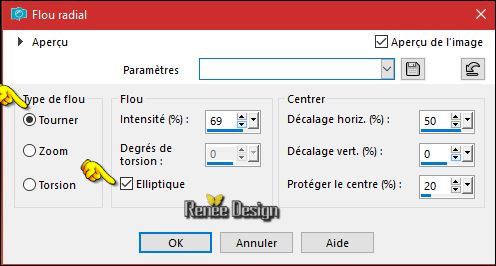
Adjust- Blur- Radial Blur with these settings
7. Effects- Edge Effects- Enhance
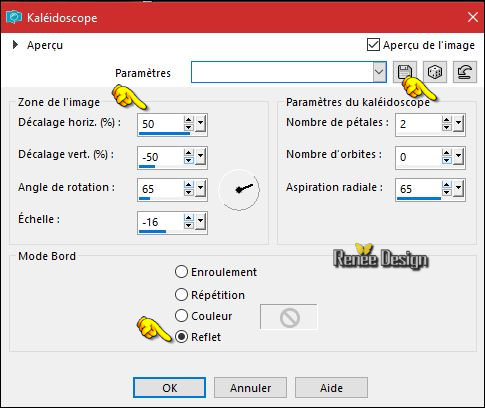
8. Effects –
Reflection Effects-Kaleidoscope with these settings
9. Image –
Resize to 85% - Resize all layers not checked
10. Layers- Duplicate
11. Image
- Resize to 70%- Resize all layers not checked
12. Layers- Duplicate
-
Properties of your layers –Blend Mode to
"Normal" –
"Screen" -"Hard Light" – "Hard Light" (see screenshot below)
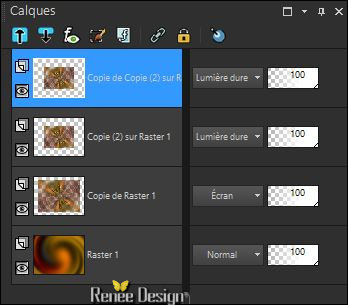
13. Close the bottom layer in the layer palette =Raster 1
- Activate an open layer in the layer palette – Layers- Merge- Merge Visible
14. Effects
– Image Effects- Offset with these settings H = - 133 and V =
0
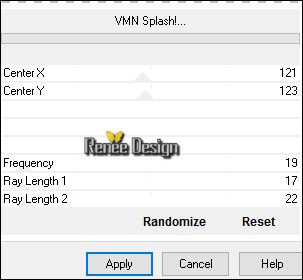
15.
Effects –Plugins- Unlimited - &<Bkg Designer sf10 III>-VMN
Splash!..use settings below .
16. Effects
–Reflection Effects -Rotating Mirror
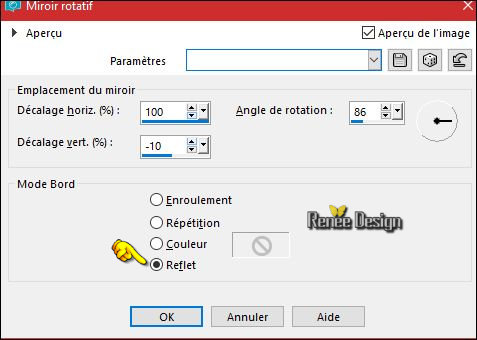
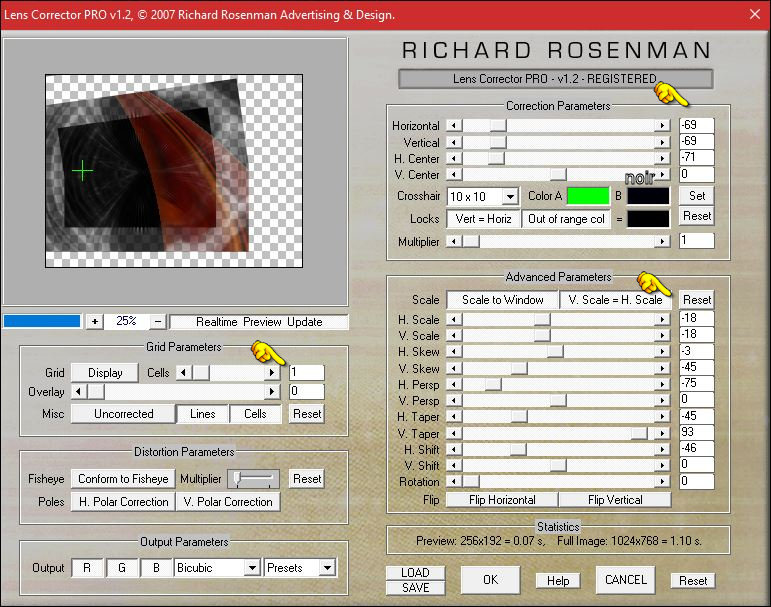
17.
Effects –Plugins –Richard Rosenman – Lens Corrector
Pro use settings below
18. Effects
–Plugins - Mura’s Filter Meister –Pole
Transformation
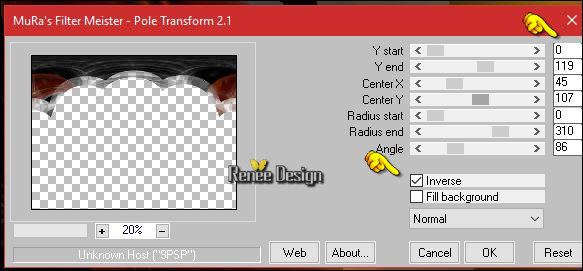
19. Effects- Edge Effects- Enhance More
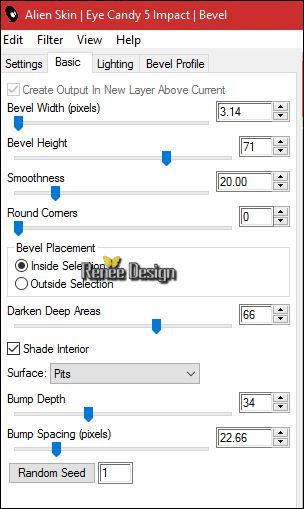
20. Effects
-Plugins –Eye Candy 5 – Bevel -tab Settings/User settings choose my Preset
‘’Le_lecteur_Bevel’’
If there are still small image areas in the background area, you can remove them with the "Eraser Tool". ( triangles that remain after the filter)

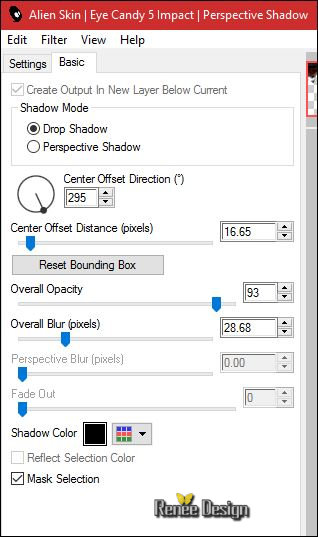
21. Effects
–Plugins – Eye Candy 5 - Perspective
Shadow use settings below
- Color Palette- Set your foreground color to #868890 - Set your background color to #fefff9
- Layers- New Raster Layer
22.
Selections –load/save selection –load selection from disc and select my selection: ‘’ Le _Lecteur’’
23. Activate Flood Fill Tool and fill the selection with the foreground color#868890
Selections- Deselect All
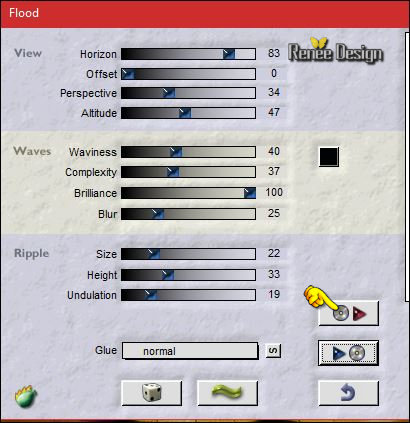
24. Adjust- Blur- Gaussian Blur : Radius 13
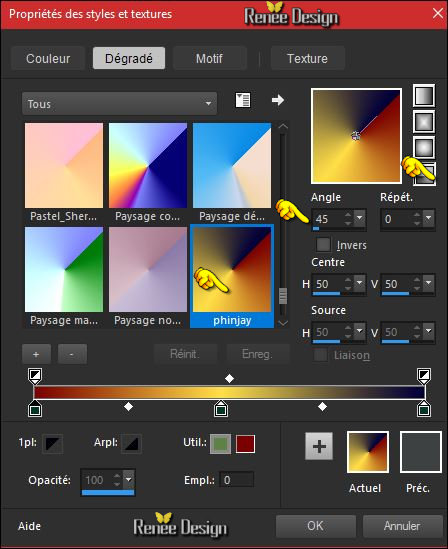
25.
Layers-Properties-Set the Blend Mode to "Screen"- Set the layer opacity of this layer to 65%
- Color Palette- Set your foreground color to
#dc7904
26. Layers- New Raster Layer
27.
Selections –load/save selection –load selection from disc and select my selection: ‘’ Le _Lecteur_5’’
28. Activate Flood Fill Tool and fill the selection with the foreground color(4 clicks )
Selections- Deselect All
29.
Layers-Properties-Set the Blend Mode to "Screen"- Set the layer opacity of this layer to 81%
- Layer- Palette-Open the bottom layer=Raster 1
30. Open the tube ‘’Renee_tube_2121.pspimage’’
- Edit - Copy- Activate your work -Edit - Paste as a new layer (do not move !!)
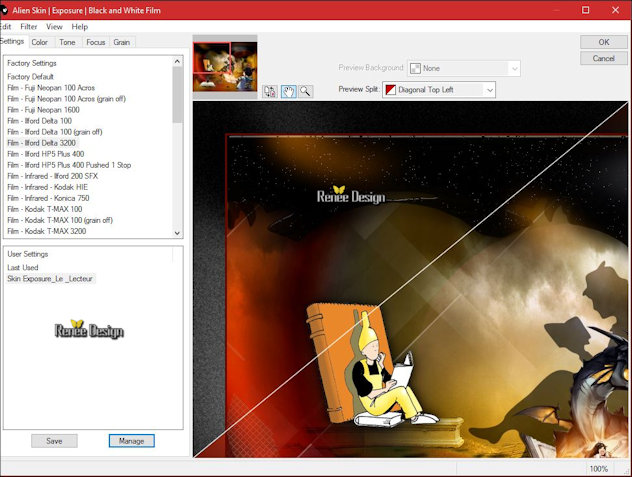
31.
Layers- Duplicate
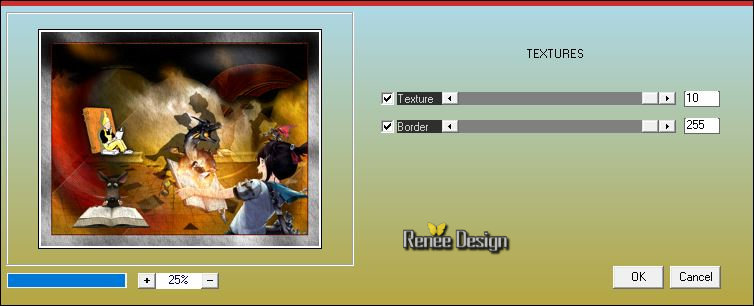
32.
Effects –Plugins- Unlimited - MuRa's Seamless – Shift 128
/0
33. Layers-Properties-Set the Blend Mode to " Overlay " -Set the Layer Opacity of this layer to 73%
34. Open the tube ‘’ Renee_Lecteur-Silhouette.pspimage’’
- Image
Resize to 70 %
-
Edit - Copy- Activate your work -Edit - Paste as a new layer
- Effects –
Image Effects- Offset with these settings H = 25 and V = 13 /Transparent
35.
Layers-Properties-Set the layer opacity of this layer to 55%
36. Layers- Duplicate - Layers-Properties-Set the layer opacity of this layer to 100%
- Image -Negative Image
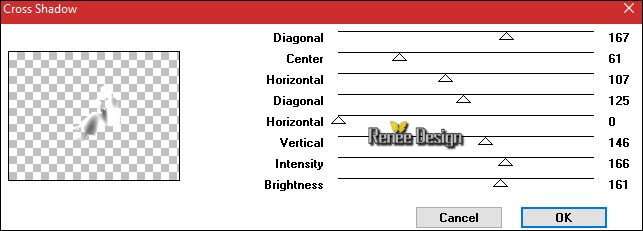
37. Effects
–Plugins – Graphic plus – Cross Shadow use settings below
38. Image
- Mirror - Mirror Horizontal CTRL+B)( Image - Mirror in previous PSP Versions)
39. Effects- Image Effects- Offset with these settings: H = 365 and V = - 29
/Transparent
40. Layers-Properties-Set the Blend Mode to "Soft Light "
Layer palette –Make Copy of Raster 4 active
41. Layers- New Raster Layer
42. Flood Fill Tool - Set the Opacity to 50% – Fill the layer with the background color#fefff9
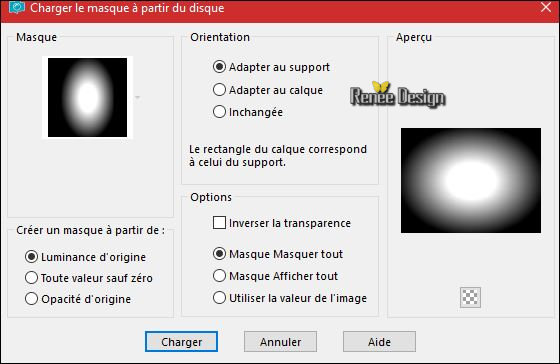
-Open the Mask ‘’ masquesRENEE26’’ in your PSP and minimize it
43. Layers - New Mask Layer - From Image and choose Mask :
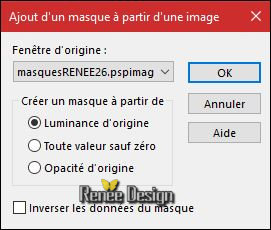
- Layers- Merge- Merge Group
44. Effects
–Plugins – Simple – Diamonds
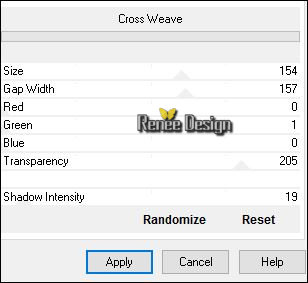
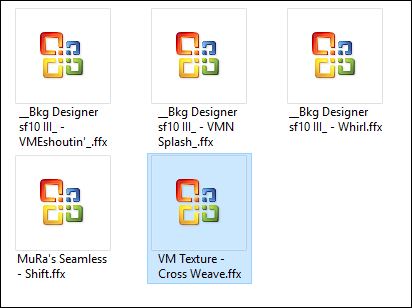
45.
Effects –Plugins - Unlimited – VM Texture – Cross
Weave use settings below
46.
Activate the Magic Wand use settings below

-
With the Magic Wand select all the black parts
47. Edit- Cut !!! -Edit -Paste as a new layer
Selections- Deselect All
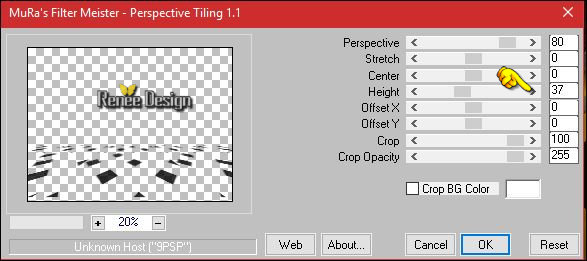
48. Effects
–Plugins – Mura’s Meister – Perspective
Tilling
49.
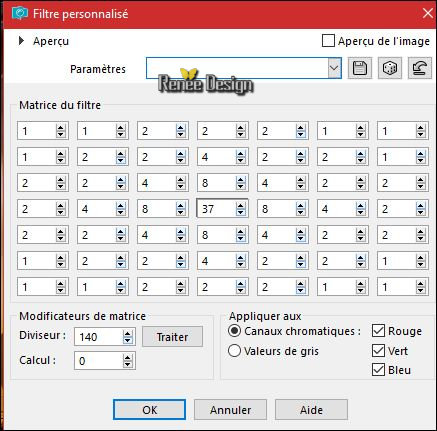
Effects- User Defined Filter - Gaussian with these settings (in your preset folder )
-
Layers-Properties-Set the layer opacity of this layer to 77%
50.
Selections –load/save selection –load selection from disc and select my selection:‘’ Le _Lecteur_1’’
Hit the DELETE Key of your keybord 
Selections- Deselect All
51. Layers- New Raster Layer
52.
Selections –load/save selection –load selection from disc and select my selection: ‘’ Le _Lecteur_2’’
53. Flood Fill Tool - Set the Opacity to 100% -Fill the selection with the background color (2 or 3 clicks)
Selections- Deselect All
-
Layers-Properties-Set the Blend Mode to " Dodge"
54. Open the tube ‘’Lecteur_image1’’
-
Edit - Copy- Activate your work- Edit - Paste as a new layer
55. Effects
– Image Effects- Offset with these settings H = 29 and V =
100
56. Layers-Properties-Set the layer opacity of this layer to 58%
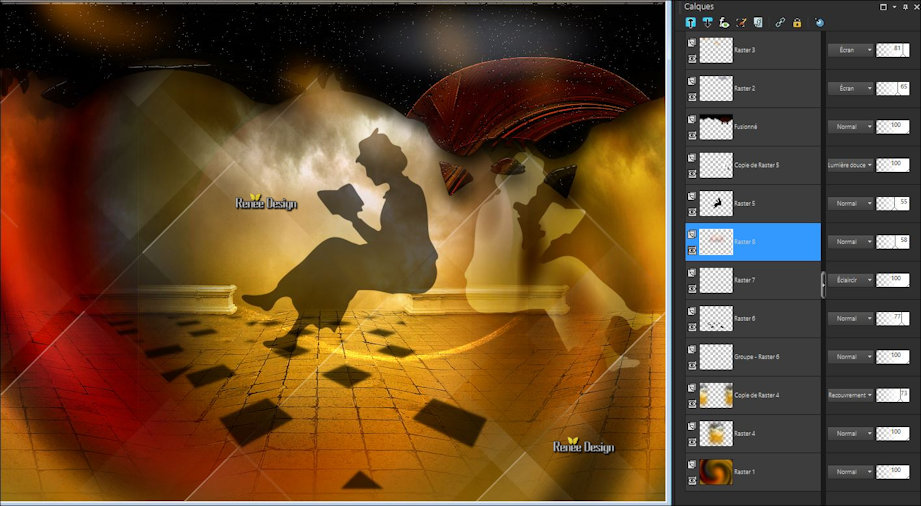
- Your Layer palette look like this now-You should have this result
- To replace the top of the layers palette
57. Open the tube ‘’ Lecteur_image2 »
-
Edit - Copy- Activate your work - Edit - Paste as a new layer
- With the Move Tool/ move it in the right place (see finished image)
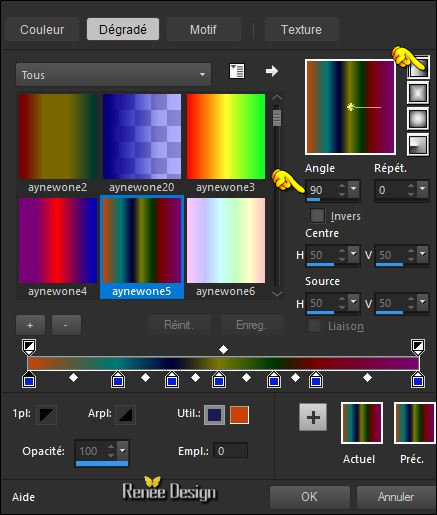
-Color-Palette- Set your Foregroundcolor to gradient and select
–‘’anywone5’’-Prepare a linear gradient configured like this
58. Layers- New Raster Layer
59.
Selections –load/save selection –load selection from disc and select my selection: ‘’ Le _Lecteur_4’’
60.Flood Fill Tool - Opacity to 100%– Fill the selection with the gradient
-
Layers-Properties-Set the Blend Mode to " Hard Light"
Selections- Deselect All
61. Layers-Load/Save Mask-Load mask from Disk and select ‘’20/20’’
- Layers- Merge- Merge- Group
62.
Effects – Plugins – Flaming Pear Flood/ Preset "Lecture Flood Setting q8r ‘’>> click on the red arrow>>  and select my file-preset "Lecture Flood Setting q8r ‘’ can be used in any folder of your choice by clicking it. Open it will be ok in your filter and select my file-preset "Lecture Flood Setting q8r ‘’ can be used in any folder of your choice by clicking it. Open it will be ok in your filter
63. Effects- Edge Effects- Enhance More
-
Color-Palette- Set your Foregroundcolor to gradient and select ‘’phinjay’ ‘-
’Prepare a radial gradient configured like this
64. Layers- New Raster Layer
65.
Selections –load/save selection –load selection from disc and select my selection: ‘’ Le _Lecteur_3’’
66. Activate Flood Fill Tool and fill the selection with the gradient
Selections- Deselect All
67. Effects- 3 D Effects- Drop Shadow with these settings: 2/1/22/1 black
68. Effects
–Plugins- AP[-Lines] Silverling (Older version AP01)
69. Open the tube ‘’
Fille_Livre_Invocation_Dragon_Princesse_Chevaliers_Flam »
-Image
Resize to 70 %
-
Edit - Copy- Activate your work- Edit - Paste as a new layer
- Move Tool / move to the bottom right corner
70. Open the tube ‘’ Renee_tube_Le lecteur_dog »
-
Edit - Copy- Activate your work- Edit - Paste as a new layer
- Move Tool / move to the left
71. Open the tube ‘’ Renee_tube_Le Lecteur_Livres’’
-
Edit - Copy- Activate your work- Edit - Paste as a new layer
-
Move tool / put the tube in place( to your taste)
72. Image - Add borders-Symmetric checked: 3 pixels #690b00
73. Edit
- Copy !!!
74.
Selections- Select All
75. Image - Add borders-Symmetric checked: 50 pixels #ffffff
Selections- Invert
- Edit - Paste into Selection (Image is still in your PSP memory)
76. Adjust- Blur- Gaussian Blur : Radius 32
77. Effects
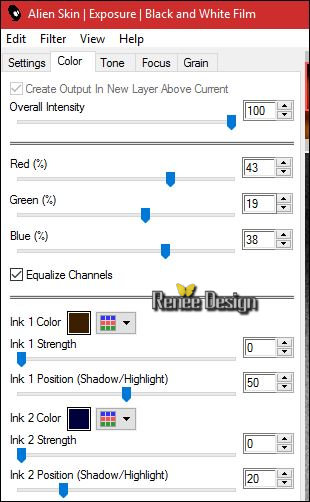
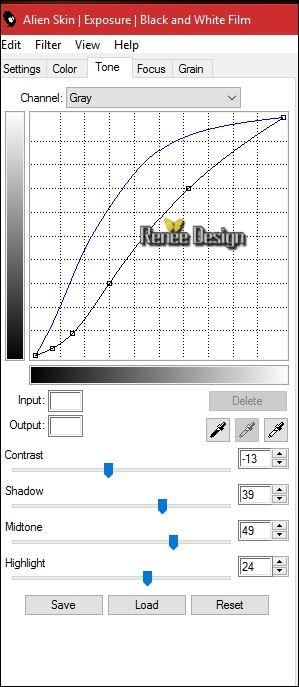
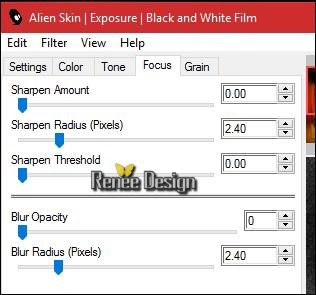
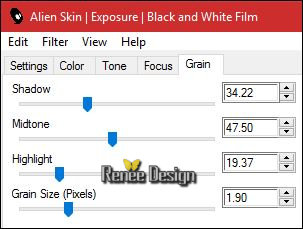
–Plugins – Alien skin – Exposure
- Black and
white Film-tab Settings/User settings choose my Preset ''Skin_Exposure_Le_Lecteur''
Or manual settings as shown in the example below
Keep Selected
78. Image - Add borders-Symmetric checked: 10 pixels #690b00
79. Effects
–Plugins – AAA Filters – Textures use settings below
Selections- Deselect All
80.Image - Add borders-Symmetric checked: 2 pixels #494d4e
81.Image - Add borders-Symmetric checked: 50 #ffffff
82. Open the tube « Renee_tube_Le
Lecteur_Texte.pspimage »
- Edit - Copy- Activate your work - Edit - Paste as a new layer-With the Move tool, move it in the right place( see finished image)
83. Layers- Merge- Merge All (flatten)
-Image Resize to
999 pixels Width.
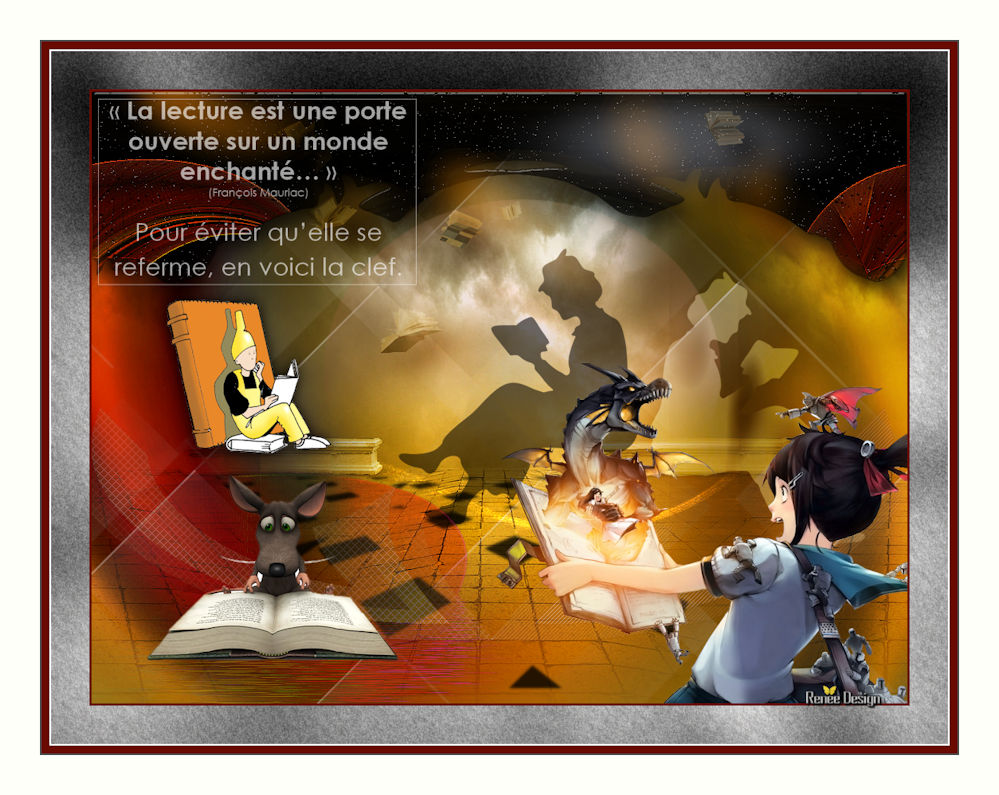
Save as JPG
I hope you enjoyed this lesson
Renée
This lesson was written by 10/11/2016
Edited and Update
2016
*
Any resemblance with an existing lesson is a coincidence
* Do not forget to thank the people who work with us and for us I have appointed the tubeurs and translators.
Thanks Renée *
*
| 
 Translations


 If a plugin supplied appears with this icon it must necessarily be imported into Unlimited *

 All rights reserved