|
Let's start the lesson
Le temps est une illusion -
Time is an illusion


-Material Properties: Set
your Foreground color to color 1 – Set your Background
color to color 2
1. Open the Background Image
‘’Fond-Temps-est-illusion – Promote Background Layer = Raster 1
2. Effects - Plugins – Simple – Blintz
3. Effects - Plugins – Simple – Half Wrap
4. Effects - Plugins - Filters in Unlimited 2.0 - Filter Factory
Gallery A – Zoom Out with these settings: 80/88/226/214
5. Effects – Edge Effects
–Enhance
6. Adjust – Brightness and
Contrast –Highlight/Midtone/Shadow use the settings below
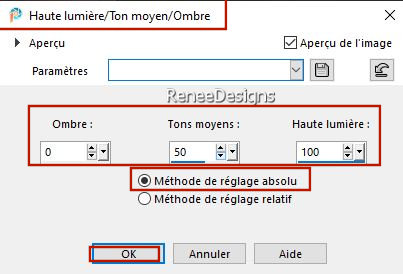
7. Layers – Duplicate
8. Effects - Plugins - Filters in Unlimited 2.0 - Filter Factory
Gallery T – Tripolis with these settings: 122/38/48/92/244
9. Layers-Properties-Reduce the Opacity of this layer to 40%
10. Effects - Plugins - Filters in Unlimited 2.0 - Filter Factory
Gallery M – Loom using the default settings: 0/255
11. Adjust – Sharpness –
Sharpen More
12. Edit– Copy Special
– Copy Merged –Edit -Paste as new layer
13. Effects – Plugins – Mura’s Meister – Perspective Tiling use the settings below
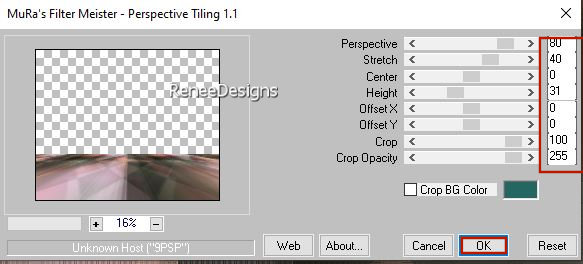
14. Layers - Duplicate
15. Effects - Artistic Effects – Topography use the settings below
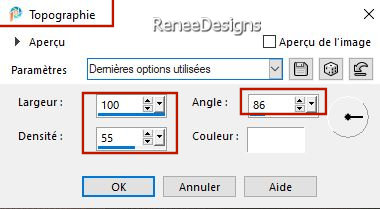
16. Layers-Properties-Set the Blend Mode to "Multiply"
17. Effects – Edge Effects – Enhance More
18. Effects–3D- Effects- Drop Shadow with these settings: -36 / 0
/ 85 / 45 Color #5e403c
- Activate the layer underneath =Raster 2
19. Effects–3D- Effects- Drop Shadow with these settings: -23 /2
/ 85 /45 Color white
- Stay on this layer
-
Material Properties: Set your Foreground color to Gradient and select ’’Profondeur ‘’- Style " Sunburst "configured like this
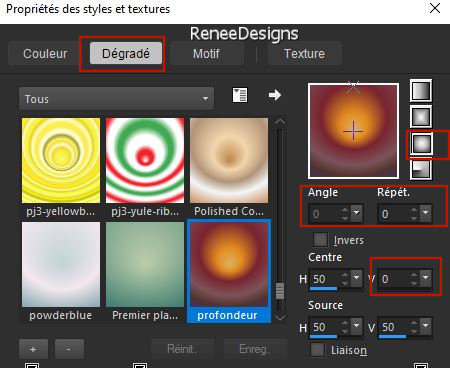
20.
Layers- New Raster Layer
21. Flood Fill Tool
 –
Fill the layer with the Gradient –
Fill the layer with the Gradient
22.Layers- New Mask Layer -From Image and select Mask : ‘’Demi-lune-mask''
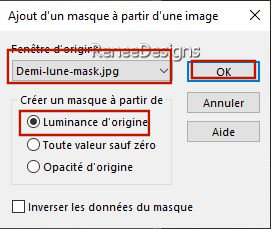
- Layers- Merge- Merge Group
23. Activate Selection Tool -Custom Selection (S) -Rectangle use the settings below 
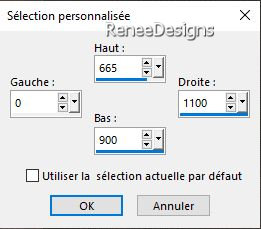


24. Layers-Properties-Set the Blend Mode to "Overlay " -Reduce the Opacity of this layer to 73%
25. Effects –Distortion Effects- Wave use the settings below
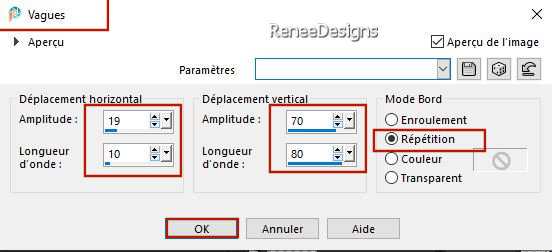
26. Effects – Image Effects
– Seamless Tiling-Side by Side
- Activate Copy of Raster 1 in the Layer Plaette
-
Material Properties: Set your Foreground color to Gradient and select ‘’ Autumn Foliage’’- Style" Linear "configured like this
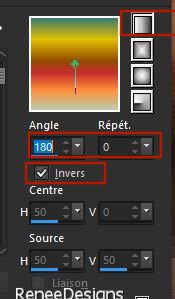
27. Layers- New Raster Layer
28. Flood Fill Tool
 –
Fill the layer with the gradient –
Fill the layer with the gradient
29. Effects - Plugins - Filters in Unlimited 2.0 - Sapphire Filters 07 -
SapphirePlugin_0611..use the settings below.
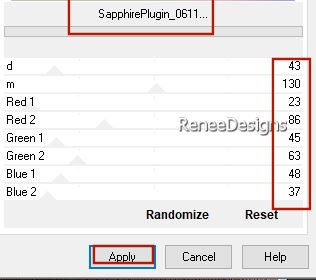
30.
Effects - Plugins - Filters in Unlimited 2. -
UnPlugged Tools – Lomo with these settings: 82/ 170
31. Effects - Plugins - Filters in Unlimited 2.- Tramage – Pool Shadow use the settings below
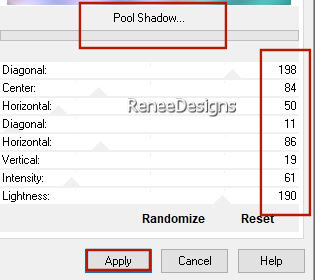
32. Layers-Properties-Set the Blend Mode to "Color Legacy"
-
Activate the Top of the Layer Palette
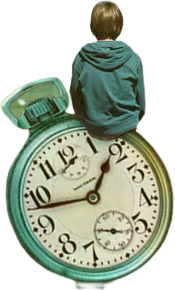
33. Open the Tube ’’Renee-TUBES-Temps-Illusion-3’’ -Edit - Copy- Activate your work -Edit - Paste as a new layer
34. Objects – Align - Top
35. Selections –load/save selection –load selection from disc and select my selection: ‘’ Temps-Illusion-1’’
36. Effects - Plugins –Nick Color Efex Pro ! 1.0 – Graduated 201h(
Sky Blue)use the settings below
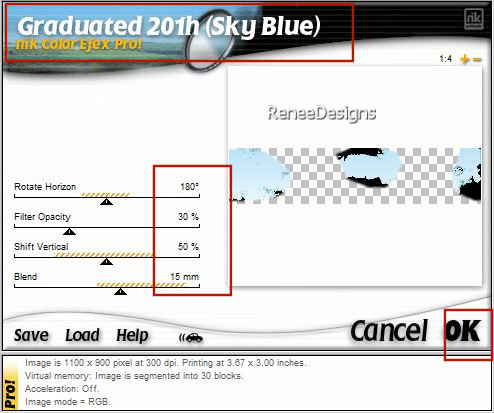

37. Adjust- Blur- Gaussian Blur- Radius 2%
- In the Layer Palette- activate Raster 2
38. Layers- New Raster Layer
39. Selections –load/save selection –load selection from disc and select my selection: ‘’ Temps-Illusion-2’’
40. Effects - Plugins - Alien Skin EyeCandy 5 – Textures – Stone Wall
–-Tab- Settings- User Settings and select my file - Preset ‘’ Temps-Illusion-Stone-Wall’’
41.
Effects – Plugins– Mura’s Meister – Perspective
Tiling use the settings below
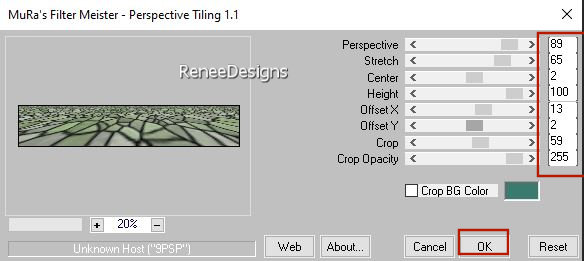
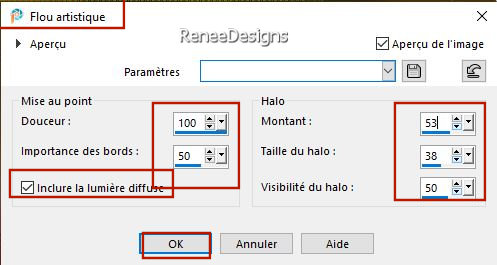
42. Adjust – Softness–
Soft Fokus use the settings below
43. Effects–3D- Effects- Drop Shadow with these settings: - 58 /0
/ 55 /82 Color #202926=3

44. Mesh Warp Tool–select my file - Preset ‘’Temps-Illusion-Deformation ‘’(place in the presets folder of your psp
 
-and Apply
- Press ( M ) to close the tool
45. Selections –load/save selection –load selection from disc and select my selection: ‘’ Temps-Illusion-3’’
46. Effects - Plugins - Alien Skin EyeCandy 5 – Nature – Smoke –-Tab- Settings- User Settings and select my file -
Preset – ‘’Temps- Illusion- Smoke ‘’

- Activate the Top of the Layer Palette
47. Open the Tube ‘’ Renee-TUBES-Temps-Illusion-2’’ -Edit - Copy- Activate your work -Edit - Paste as new layer
48.
Objects – Align–Top and Objects – Align -Right
49. Open the Tube ’’ Renee-TUBES-Temps-Illusion-4 --Edit - Copy- Activate your work -Edit - Paste as new layer
50.
Pick Tool: (K) on your keyboard -Enter these parameters on the toolbar
 453/63
-
Press ( M ) to close the Pick Tool
51. Calques – Nouveau
calque raster
52. Selections –load/save selection –load selection from disc and select my selection: ‘’ Temps-Illusion-4’’
53. Open the Tube ‘’Renee-TUBES-Temps-Illusion-5’’ -Edit - Copy- Activate your work -Edit - Paste into Selection

54.Open the Tube ‘’ ’Renee-TUBES-Temps-Illusion-6’’ --Edit - Copy- Activate your work -Edit - Paste as new layer
- Pick Tool: (K) on your keyboard -Enter these parameters on the toolbar- Position X 61 and Position Y 165
55. Layers- Merge- Merge Down
56. Image - Resize - to 88% - Resize all layers-NOT Checked
57. Pick Tool: (K) on your keyboard -Enter these parameters on the toolbar
 28/262 28/262
58. Effects–3D- Effects- Drop Shadow with these settings: -26 / 21
/25 /3 Color Black
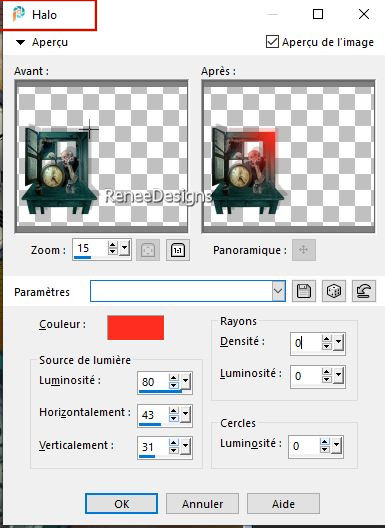
59. Effects – Illumination Effects -Sunburst use the settings below-Color #ff2e1f
60.Open the Tube
‘’ ’Renee-TUBES-Temps-Illusion-7’’ -Edit - Copy- Activate your work -Edit - Paste as new layer
- Place the tube on the table ( see finished)
61. Effects – 3D-Effects – Drop Shadow with these settings: 1/1/100/3 Color black
62.
Layers New Raster Layer
63. Selections –load/save selection –load selection from disc and select my selection: ‘’ Temps-Illusion-5’’
64. Color Palette-Set your foreground color to color #ffffff=4
Flood Fill Tool  –
Opacity 50 %–Fill the selection with #ffffff=4 –
Opacity 50 %–Fill the selection with #ffffff=4

65.
Effects - Plugins - Filters in Unlimited 2.0 -
It@lian Editors
Effect- Effetto Fantasma: 15/0
66. Effects – 3D-Effects – Drop Shadow with these settings: 38/ -30
/25 /5 Color black
67. Effects - Plugins - Filters in Unlimited 2.0 - Italian Editors
Generatore - Pattern Tovaglia using the default settings
68. Adjust- Blur- Gaussian Blur- Radius 25%
69. Layers-Properties-Set the Blend Mode to "Hard Light "
70. Open the Tube " texte '‘Renee-TUBES-Temps-Illusion-8’’’
-Edit - Copy- Activate your work -Edit - Paste as new layer and move
71.
Image - Add Borders-Symmetric checked: 1 Pixel – Color #202926= 3
72.
Image - Add Borders-Symmetric checked: 40 Pixels –Color #ffffff=4
Image - Add Borders-Symmetric checked: 1 Pixel – Color #246662= 2
Image - Add Borders-Symmetric checked: 3 Pixels –Color #202926= 3
Image - Add Borders-Symmetric checked: 20 Pixels–Color #ffffff=4
Image - Resize - to 82% - Resize all layers- Checked
73.Open the Tube "Titre"-Paste as new layer and move
74. Paste the author's watermark on your work and your own watermark
75.
Layers- Merge- Merge All ( flatten)
Save as JPG
I hope you enjoyed this lesson
Renée
This lesson was written by Renée
16/09/2023
Edited and Update
in 2023
*
*
Any resemblance with an existing lesson is a coincidence
*
Do not forget to thank the people who work with us and for us
-I have appointed the tubeurs and translators
Thanks
|


 Translations


