|
Let's start the lesson./Open the Color-Palette
-
Material Properties:Put the foreground color on #e7e7e7 and the background color on #9a9a9b
-
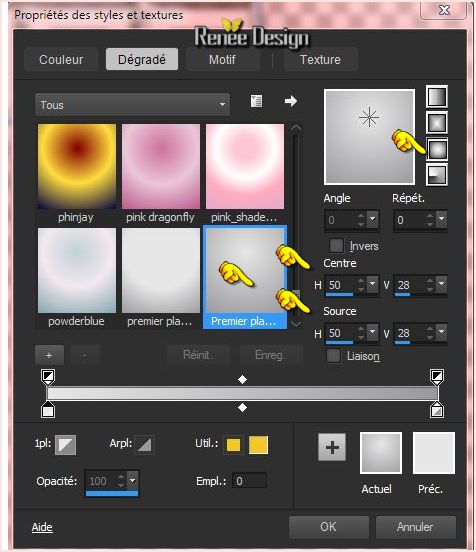
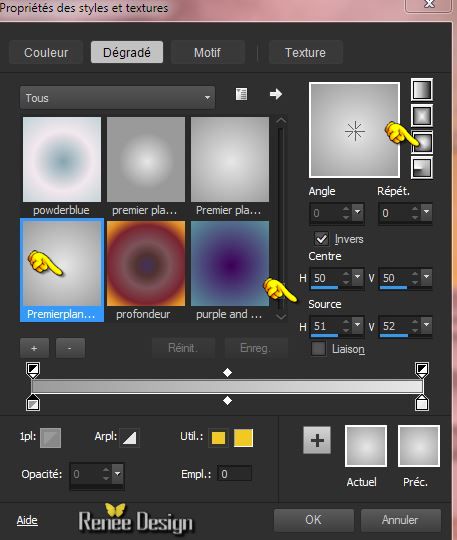
Material Properties: Make a foreground/background sunburst gradient with these settings
-
We'll start with the basics of the labyrinth
1.
File - New - Transparent - New Image 1250 x 722
-Activate Flood Fill Tool and fill the layer with the gradient
2.
Layers - New raster layer
3.
Selections - load/save selection - load selection from disk and select my file: ‘’labyrinthe_1 »
-
Activate Flood Fill Tool and fill the selection with the gradient
Do not add layer
Selections- Deselect All
4.
Selections - load/save selection - load selection from disk and select my file: ‘’
‘’labyrinthe_2’’
-
Activate Flood Fill Tool and fill the selection with the backgroundcolor
Selections- Deselect All
5.
Selections - load/save selection - load selection from disk and select my file: ’’Labyrinthe_3’’
-Activate Flood Fill Tool and fill the selection with the backgroundcolor
Selections- Deselect All
6.
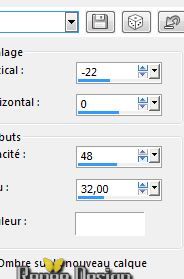
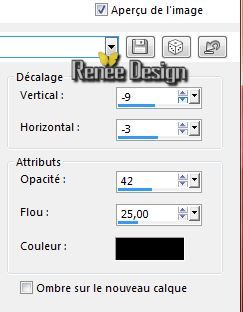
Effects - 3D Effects - Drop shadow with these settings
-Rename this layer : ‘’ Bloc_avant_droit’’
7.
Layers-New raster layer
8.
Selections - load/save selection - load selection from disk and select my file: ’’Labyrinthe_4’’
-
Activate Flood Fill Tool and fill the selection with the gradient
Do not add layer
Selections- Deselect All
9.
Selections - load/save selection - load selection from disk and select my file:
’’Labyrinthe_5’’
-
Activate Flood Fill Tool and fill the selection with the backgroundcolor
Selections- Deselect All
10.
Selections - load/save selection - load selection from disk and select my file: ’’Labyrinthe_6’’
11.
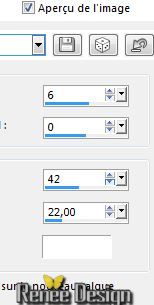
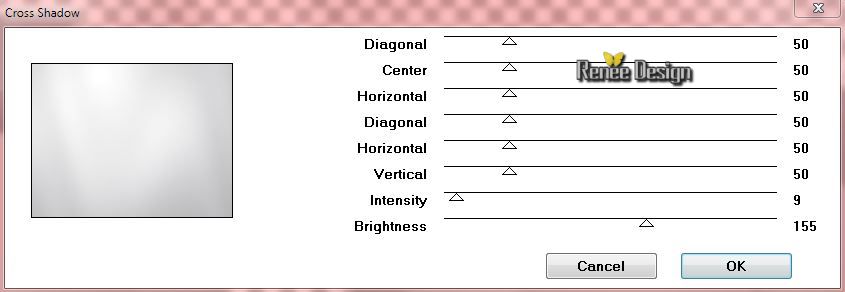
Effects- Plugins –Graphic plus - Cross
shadow with these settings
Selections- Deselect All
12.Activate Pen Tool (V) with these settings- Properties Foreground: FG-Color on gradient

13.
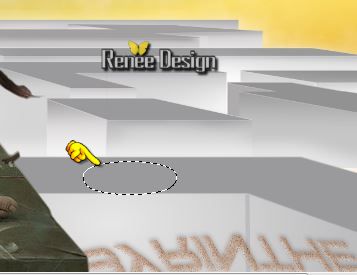
Draw a straight line as shown in the example below
-
Convert to raster layer
14.
Layers- Merge-Merge Down
15.
Effects - 3D Effects - Drop shadow with these settings
-
Rename this layer
« Bloc_devant_gauche »
16. Layers- New raster layer
-
Set your Backgroundcolor to color white
17.
Selections - load/save selection - load selection from disk and select my file: _7 ‘’
-
Activate Flood Fill Tool and fill the selection with the backgroundcolor white
Selections- Deselect All
-
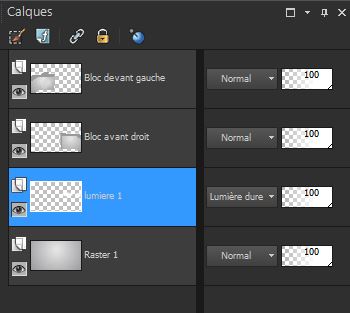
Rename this layer: Lumière 1
18.Layers- Arrange- Move 2x Down
-
Double click on this layer and set the Blendmode to Hard Light
You should have this result
19.
Activate the layer above= (Bloc_avant_droit)
- Layers- New raster layer
20.
Selections - load/save selection - load selection from disk and select my file: ‘’
Labyrinthe_8’’
-
Activate Flood Fill Tool and fill the selection with the backgroundcolor white
-
Rename this layer: Lumière 2
Selections- Deselect All
-
Activate the layer: Lumiere_ 1
- Layers- New raster layer
21.
Properties Background: BG-Color = #9a9a9b
22.
Selections - load/save selection - load selection from disk and select my file:
« labyrinthe_9’'
-
Activate Flood Fill Tool and fill the selection with the gradient
Selections- Deselect All
23.
Selections - load/save selection - load selection from disk and select my file:
« labyrinthe_10’'
-
Activate Flood Fill Tool and fill the selection with the backgroundcolor #9a9a9b
Selections- Deselect All
24.
Effects - 3D Effects - Drop shadow with these settings
-
close bottom layer =(Raster 1)
-
but keep top layer active
25.Layers- Merge- Merge- Visible
26.
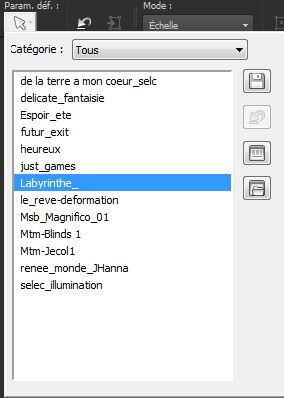
Activate your Pick Tool (K) Mode Scale -select my file- Preset_Pick_Labyrinthe_.Psp.Script
 ) )
-Or manual:
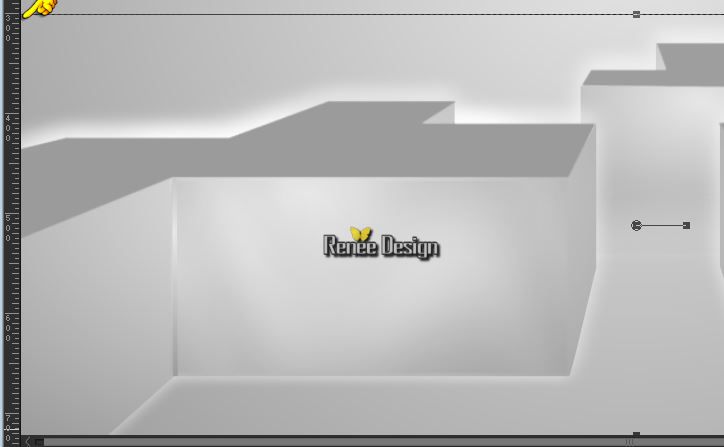
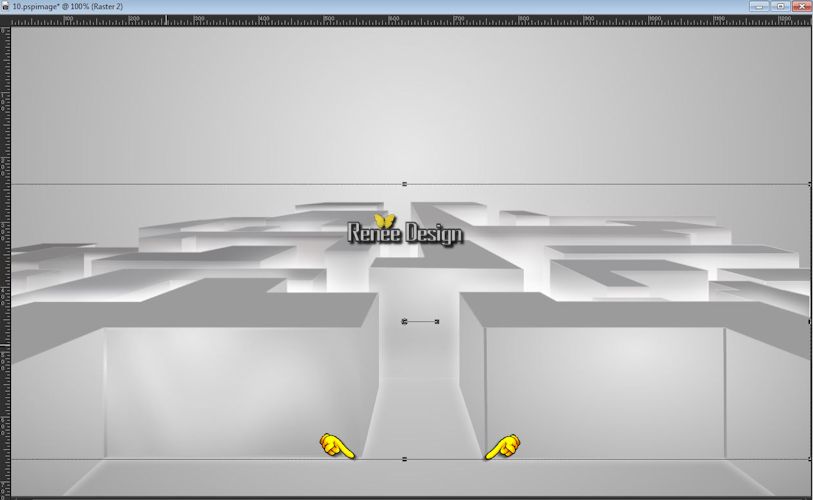
With your Move Tool place it in the right place like this
27.
Activate the bottom of the layer-Palette Raster 1 (open bottom layer again )
28.
Activate the tube
« Blocs_haut_travail_Labyrinthe’’
-
Edit - Copy -Edit - Paste as new layer on your working area.
29.
Activate your Pick Tool (K) Mode Scale -With arrow keys on the keyboard to move the layer down 
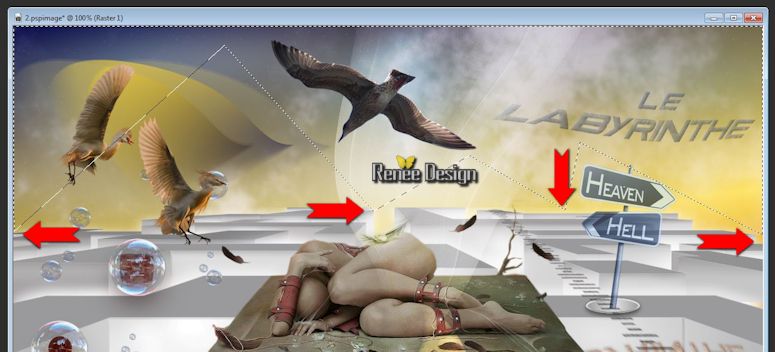
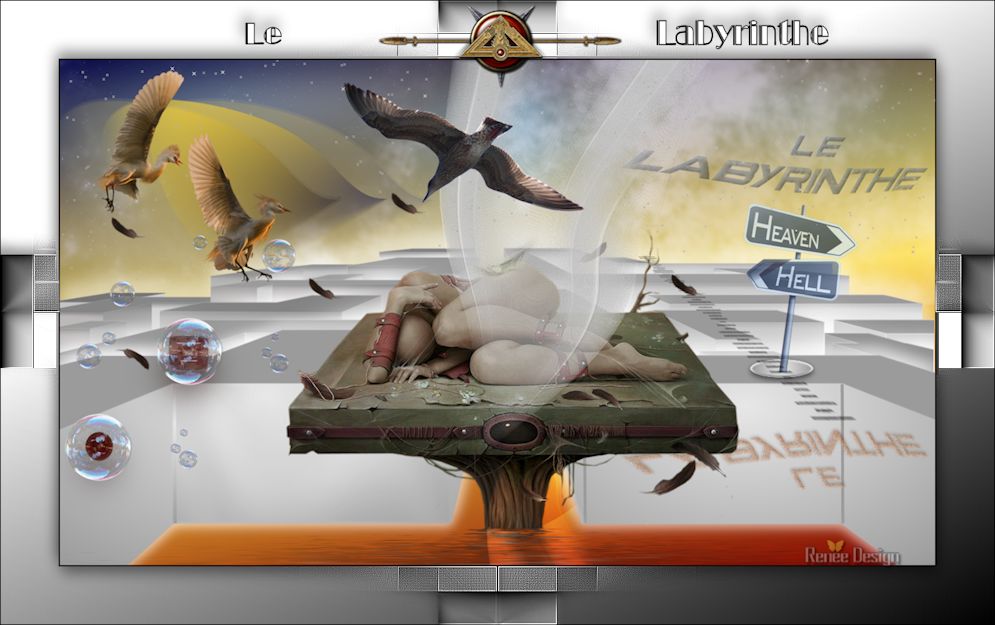
You should have this result
30.
Activate the top of the layer-Palette - Layers- Merge- Merge- Down ( 2 formes of the labyrinthe)
31.
Effects - 3D Effects - Drop shadow with these settings
-Layer Palette look like this now-You should have this result
-
Activate the bottom of the layer-Palette =Raster1
32.
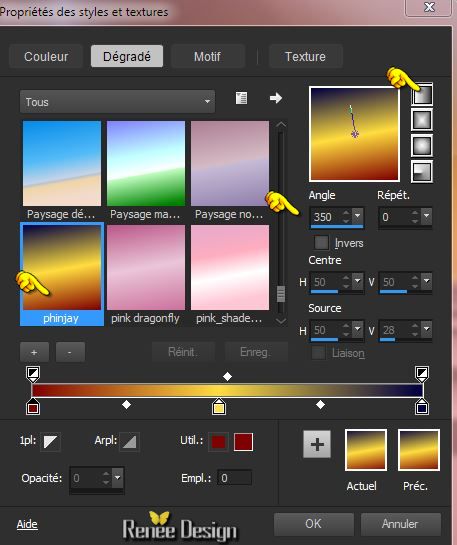
Material of the foreground - select my file in the list’’
phinjay’’ Make a linear gradient with these settings
33.
Activate the bottom of the layer-palette. Activate Flood Fill Tool and fill the layer with the gradient on this layer !!!! /do not add layer !!!
34.
Activate the tube ‘’ labyrinthe_nuages1’’
-
Edit - Copy -Edit - Paste as new layer on your working area.
-
Activate your Move Tool (M) place on top
35.
Layers - New raster layer
36.
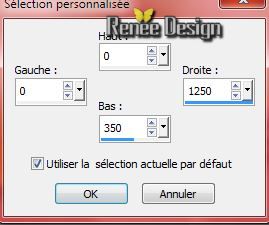
Selection Tool(S)-Custom Selections with these settings
37.
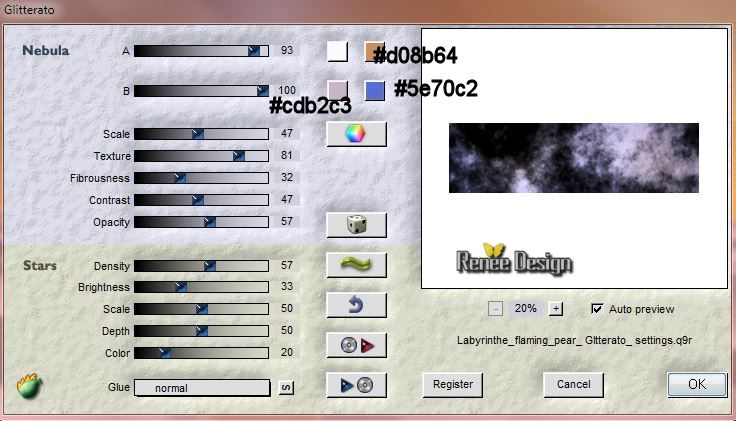
Effects- Plugins Flaming Pear-Glitterato Click on the Red Arrow and load - Preset
‘’Labyrinthe_flaming_pear_
Glitterato_ settings’’ Or if this is not working for you with these settings:
38.
Effects- Plugins – Transparency Eliminate
black
39.
Selection Invert
–Hit the Delete Key of your Keyboard
Selections- Deselect All
40. Double click on this layer and set the Blendmode to Screen and set the layer opacity of this layer to 63%
- Activate the top of the layer-Palette
41. Activate the tube ‘’labyrinthe_titre « «
(Activate layer 2 of the tube)
- Edit - Copy -Edit - Paste as new layer on your working area.
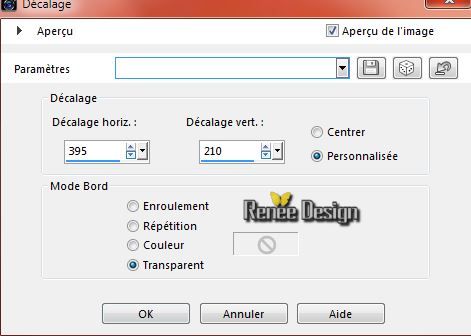
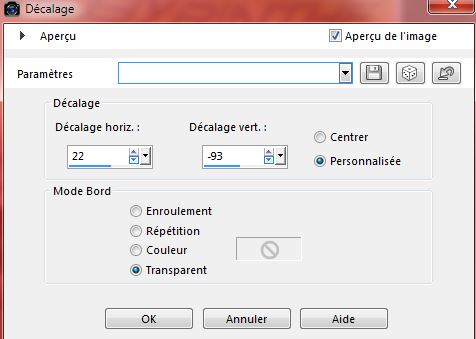
43. Effects- Image Effects- Offset with these settings
44. Layers- Duplicate
45. Image
Flip
- Stay on the copy layer
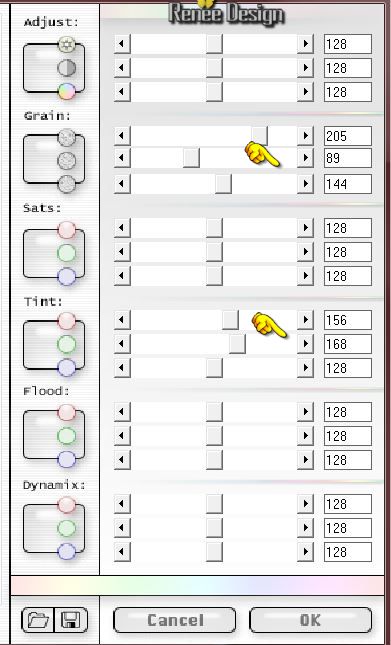
46. Effects- Plugins - Final Impact - Hot shot with these settings
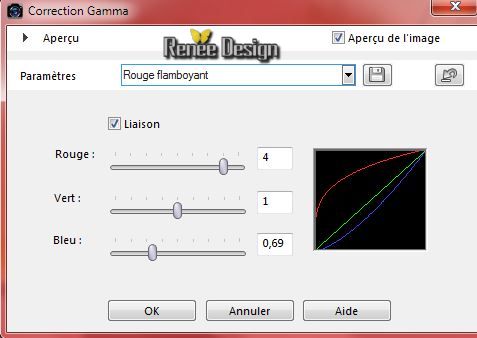
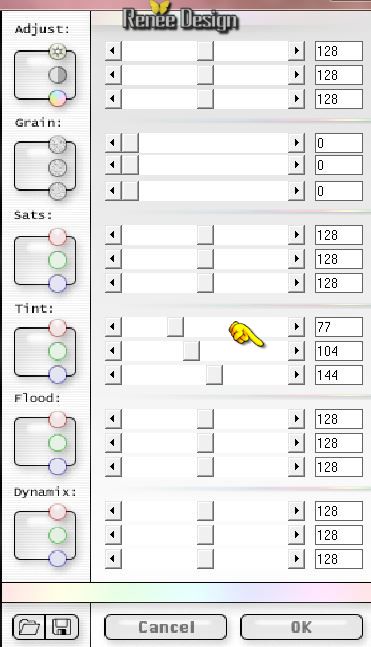
47. Activate Gamma Correction Shift+G- (link not checked ) use settings below
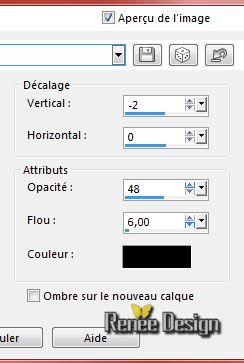
48. Effects - 3D Effects - Drop shadow with these settings
- Activate the bottom of the layer palette=Raster 1
49.
Selections - load/save selection - load selection from disk and select my file: ’’Labyrinthe_11 »
50.
Selections- Promote selection to layer
Selections- Deselect All
51. Layers- Arrange-Bring to Top
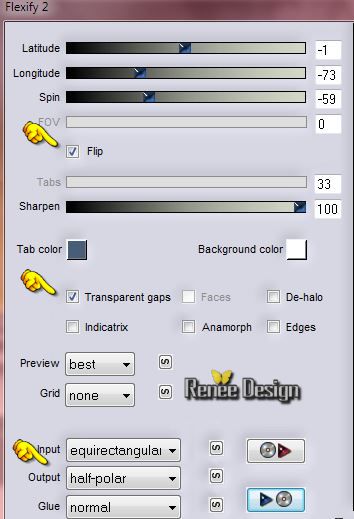
52. Effects- Plugins – Flaming Pear - Flexify 2-Click on the Red Arrow and load - Preset ''
Renee_labyrinthe.q2q” Or if this is not working for you with these settings:
53. Layers- Duplicate
54. Effects- Plugins –
Unlimited 2.0 – It@lian Editors Effects – Effeto
Fantasma with these settings 28/2
55. Layers- Merge- Merge- Down
56. Activate the tube ‘’ labyrinthe_effet_1’’- Edit - Copy -Edit - Paste as new layer on your working area.
57. Effects- Distortion Effects -Twirl: -25
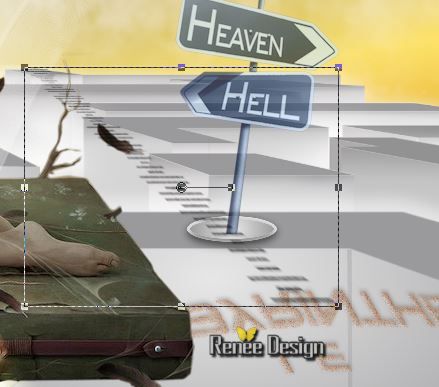
- With your move tool move as shown in the example below
58. Activate the tube ‘’ Renee_tube_The_bird_AnnMei.pspimage’’- Image
Resize with 68%
- Edit - Copy -Edit - Paste as new layer on your working area.
59. Effects- Image Effects- Offset with these settings
60. Layers-Arrange- Move Down
61.
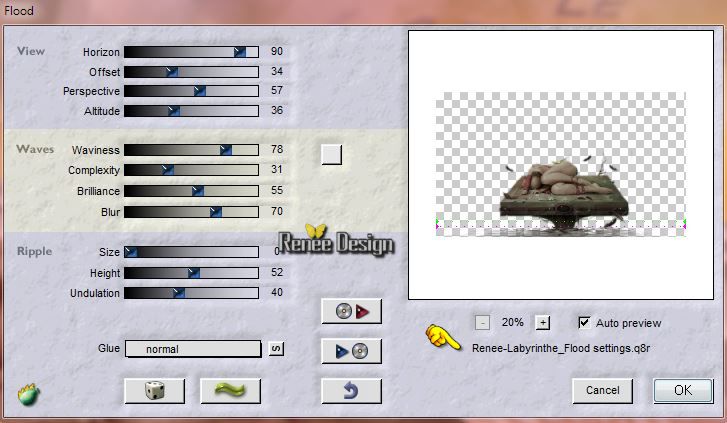
Effects-Plugins - Flaming Pear - Flood
-
Color: #e7e7e7
-Click on the Red Arrow and load - Preset ‘’ Renee-Labyrinthe_Flood settings’’ Or if this is not working for you with these settings:
- Activate the top of the layer palette
62. Layers- Duplicate
63.
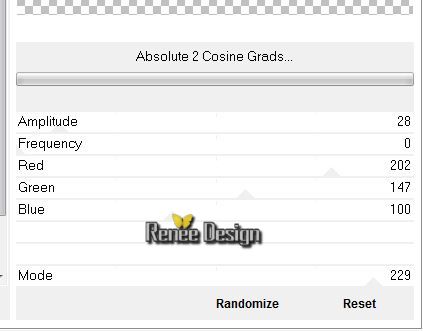
Effects- Plugins – Unlimited 2.0 - Alf's Power Sines - Absolute 2
Cosine Grads...
64. Image
Resize with 45 % Resize all Layers not checked
65. Image –
Flip
-Move Tool: move at the bottom of your work
(
see the finished image)
66. Double click on this layer and set the Blendmode to Overlay
- Activate the layer underneath=Raster 6
67. Double click on this layer and set the Blendmode to Overlay and set the layer opacity of this layer to 75%
-Layer Palette look like this now-You should have this result

- Activate the top of the layer-Palette
68. Activate the tube ‘’ labyrinthe_effet_2.pspimage’’
69. Edit -Copy -Edit - Paste as new layer on your working area.
70. With your move tool move to the upper left side
71 .
Activate the tube ‘’
@nn_170109_005_birds_JAG_tdstudio’’
72. Image
Resize with 60 %
- Edit -Copy -Edit - Paste as new layer on your working area.
place it in the right place
73. Activate Freehand Selection-Lasso– Mode Point to point
- Activate this tube’’ Renee_tube_The_bird_AnnMei’’ select different feathers
– Edit -Copy -Edit - Paste as new layer on your working area.
- place of your choice
(Add feathers merge visible to one layer)
74. Activate the tube ‘’ KaraT7344.psp’’
Edit/copy-Edit paste as a new layer.With your move tool place it in the right place
75. Layers - New raster layer
76.
Material Properties:Put the foreground color on #e7e7e7
and the background color on #9a9a9b
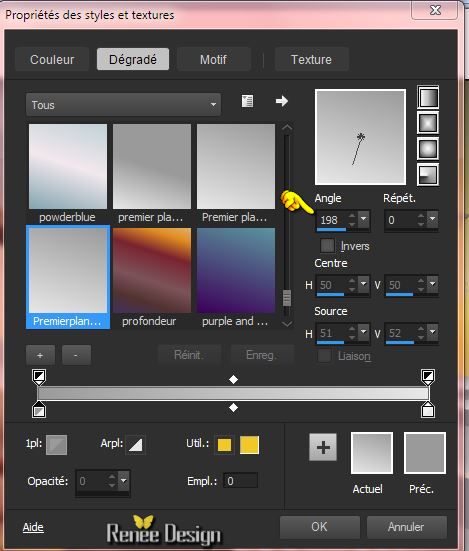
- Material Properties: Make a foreground/background sunburst gradient with these settings
77. Activate Selection Tool (S) - Ellipse –Draw a form like this
78. Activate Flood Fill Tool and fill the selection with the BG-Color
79.
Selections- Modify-Contract 3 pixels
80. -Activate Flood Fill Tool and fill the selection with the gradient
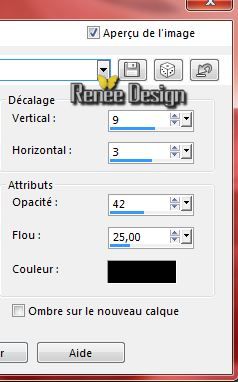
81. Effects - 3D Effects - Drop shadow: 3/0/48/12 black
Selections- Deselect All
81. Repeat:
Effects - 3D Effects - Drop shadow: 3/0/48/12 black
You should have this result

82.
Activate the tube ‘’ Now you know where to go - tubed by A PSP
Devil PSP12.pspimage’’
- Acitvate ‘’direction’’ of the tube
- Edit - Copy -Edit - Paste as new layer on your working area.
- Activate Move Tool (M) place at the form
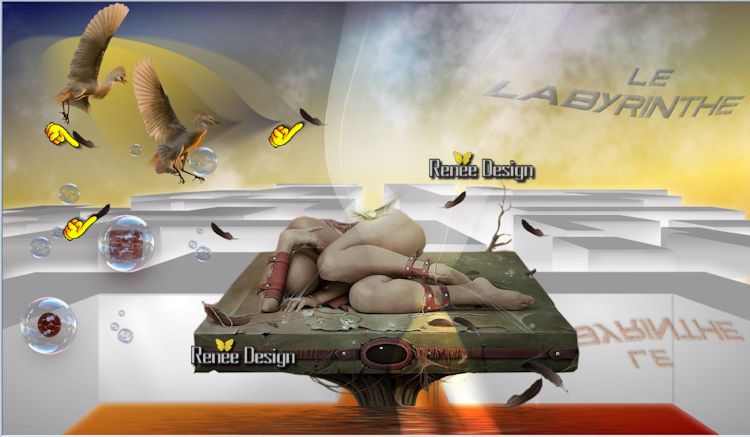
- (
see the finished image)
83. Effects-Plugins – Final Impact – Hotshot use settings below
(If you are using tubes and colors of your own-You can colorize it to match your work)
84.
Double click on this layer and set the Blendmode to Normal and set the layer opacity of this layer to
61%
85. Activate the tube ‘’ labyrinthe_effet_texte’’
-Edit - Copy -Edit - Paste as new layer on your working area.
- With your move tool move as shown in the example below
86. Layers- Merge- Merge- Visible
87.
Freehand Selection Tool-Lasso- Point to point with these settings

88. Draw an selection as shown in the example below
89. Layers- New raster layer
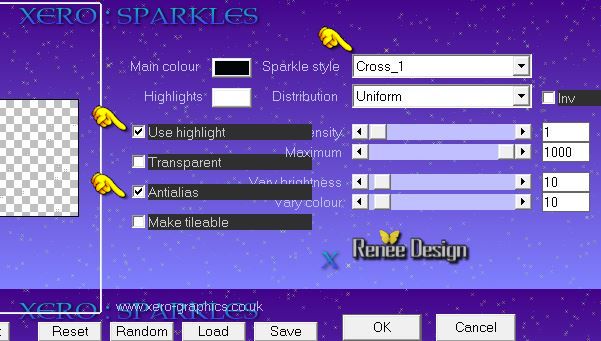
90. Effects- Plugins – Xero – Sparkles with these settings
Selections- Deselect All
91. Activate your Eraser Tool-erase the many stars who sit on the birds
92. Image - Add borders-Symmetric checked: 2 pixels black
93. Image
Resize with 85% Resize all Layers checked!!
94. Material Properties:Put the foreground color on #e7e7e7 and the background color on #9a9a9b
- Material Properties: Make a foreground/background linear gradient with these settings
95. Image - Add borders-Symmetric checked: 70 pixels white
96. Activate Magic Wand and click in the white border of 70 pixels
97. Flood Fill Tool: Opacity 100%/ Activate Flood Fill Tool and fill the selection with the gradient
98.
Effects- Plugins –Mock- Bevel 73
99.
Selections- Invert
100. Effects - 3D Effects - Drop shadow with these settings
Selections- Deselect All
100.
Activate the tube ‘’labyrinthe_cadre’’
Edit - Copy -Edit - Paste as new layer on your working area. Do not move!!
101. Image - Add borders-Symmetric checked: 1 pixel black
102.
Activate the tube ‘’
Labyrinthe_Talisman_logo01 »
Edit - Copy -Edit - Paste as new layer on your working area and move .
103.To write the title- I used the font BroadwayEngraved or take mine title and past as a new layer
104.
Layers- Merge- Merge All
105. Image
Resize with 995 pixels Width
Save as JPG
29/01/2015
| 
 Translations


 When you see this logo the filter is imported in Unlimited *

 All rights reserved