|
Let's start the lesson.
- Material Properties: Foreground color:white Background color: #044d50
1. File - New - Transparent - New Image 995 x
585 pixels
/Flood Fill Tool: fill the layer with the foreground color
2. Layers - New Raster layer //Flood Fill Tool: fill the layer with the background color
3. Layers-New Mask Layer From Image and choose Mask:''PsPMaSK2010''

- Layers- Merge-Merge - Group
4.Effects-Plugins- Simple- Center Tiles
5.Effects-Plugins- Simple- Zoom out and Flip
6.Effects-Plugins-Toadies -What are you / 16/151
7.Effects-Plugins- VM Extravanga -
Transmission 221/ 188/40
8.
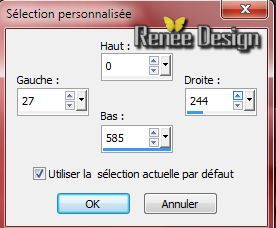
Activate Selection Tool - Custom Selection with these settings:

9.
Selections - Promote selection to layer
10.Effects-Plugins- Mura's Meister /Clouds
With the foreground/background color

11.Effects-Plugins-Eye Candy 5 Textures- Texture
noise in tab Settings-User Settings and choose my Preset ''poids_reves_texture_noise''
Keep selected
12.
Layers - New Raster layer /Flood Fill Tool: fill the selection with color white
13.
Selections-Modify-Contract 2 pixels / Push the delete button

Selections- Deselect All
14.
Layers- Duplicate
15.
Effects- Plugins - Simple - Blintz
16.
Layers- Duplicate -Image Mirror
-
Layers- Merge-Merge Down
Your Layer Palette look like this now:

17. With the magic wand select the white triangle left

18. Layers - New Raster layer
- Flood Fill Tool: fill the selection with color black
19.
Layers-New Mask Layer From Image and choose Mask:''Narah_mask_0477.jpg''

-
Layers- Merge-Merge - Group
Selections- Deselect All
20.
Layers- Duplicate /Image Mirror
-Layers- Merge-Merge Down (2 triangles with mask effect)
21.
Effects-Edge Effects-Enhance
Layer Palette -activate the layer underneath (Copy Raster 2)
22.
Effects- Image Effects-Offset use settings below

23. Effects- Plugins - Toadies - What are you 20/20
-Activate the top of the layer-Palette/ Group-raster3
24.
Layers- Merge-Merge-Down
25.Effects-Plugins- Eye Candy 5 Impact -
Perspective shadow / Preset ''Drop shadow blury''
26.
Layers - New Raster layer
27.
Activate Selection Tool - Custom Selection with these settings:

-
Flood Fill Tool: fill the selection with color black
28.
Layers-New Mask Layer From Image and choose Mask:''Narah_mask_0477.jpg''

-
Layers- Merge-Merge - Group
29.
Layers - New Raster layer
30.
Effects-3D Effects-Cutout use settings below

Selections- Deselect All
-
Layers- Merge-Merge-Down
31.
Layers - New Raster layer
32.
Selections - load/save selection - load selection from disk and choose my selection: '' poids_reves_1''/Flood Fill Tool: fill the selection with color black
33.
Layers-New Mask Layer From Image and choose Mask:
''masque-poids_reves.jpg''

Layers- Merge-Merge - Group
Selections- Deselect All
34.Effects-Plugins- Neology /Mountain Lines

35.
Activate the tube ''poids_reves_loupe'' /Edit/copy- Edit/ paste as new layer (do not move it is in the right place)
36.
Layer Palette-Activate this layer (Group-Raster 2)
37.
Activate Selection Tool - Custom Selection with these settings:

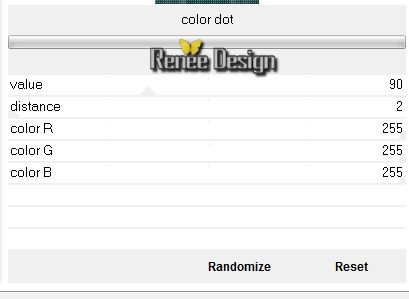
38. Effects-Plugins Unlimited 2.0
- Penta.com / Color Dot

-
Selections- Deselect All
- Activate the top of the layer-Palette
39.
Activate the tube ''poids_reves_de_ Christian Schloe''/
Edit/copy- Edit/ paste as new layer (do not move it is in the right place)
40.
Activate the tube '' porte_reves_cubes.pspimage''/Edit/copy- Edit/ paste as new layer.
41.
Effects- Image Effects-Offset with these settings H= 0 and V = 165
/ transparent
42. Effects-Plugins Unlimited 2.0
- Factory Gallery B/Button de luxe

43.
Effects-Edge Effects -Find All
On your working area
Choose a theme 2 images do not exceed 190 pixels high or take mine
44.
Activate the 2 images (image_reve1 and reve2)
This effect on both images:
-
Image - add borders-Symmetric checked 1 pixel color white
-
Image - add borders-Symmetric checked 10 pixels choose color or take mine: #329eaa
-Effects-Plugins- AAA Frame - Foto Frame

-
Are the 2 images ready?
45.
Edit - Copy- Edit - Paste as new layer
With your move tool place it in the right place
46.
Activate the tube ''poids_reves_attaches'' / Edit/copy-Edit paste as a new layer. With your move tool place it in the right place
47.
Layers- Merge-Merge- Visible
48.
Layers - New Raster layer
49.
Activate Selection Tool - Custom Selection with these settings:

50.
Activate the tube ''poids_reves_image1''/ Edit/copy-Edit paste into selection
Selections- Deselect All
51.
Effects-Edge Effects-Enhance
52.
Selections - load/save selection - load selection from disk and choose my selection: ''poids_reves_2'' /
Flood Fill Tool: fill the selection with color white
Selections- Deselect All
53.
Layers- Merge-Merge- Visible
54.
Selections-Select All
55.
Image - add borders-Symmetric checked 1 pixel color: #284244
56.Image - add borders-Symmetric checked 60 pixels color white
57.Effects-Plugins-EyeCandy 5 Impact Perspective shadow in tab Settings/User Settings and choose my Preset ''shadow_poids_reves''
Selections- Deselect All
58.
Activate the tube ''coin'' /Layers- Duplicate -Image Mirror -Image Flip.Edit/copy-Edit/Paste as a new layer. With your move tool place it in the right place
59.Activate the tube ''corde'' /Layers- Duplicate -Image
Mirror -Image Flip- Edit/copy-Edit/Paste as a new layer.
With your move tool place it in the right place .
Layer Palette -Double click on this Layer and set the Blend Mode to "Luminance"
60.
Image - add borders-Symmetric checked 1 pixel color #284244
61.
Image - add borders-Symmetric checked 30 pixels color white
62.
Image - add borders-Symmetric checked 1 pixel color #284244
Activate the tube "titre ''Le poids des rêves ''Edit - Copy - Edit - Paste as new layer and move.
Or write your own text -I used font" Vivaldi"
63.Layers - Merge -Merge all layers
I hope you enjoyed this lesson
Renée
This lesson was written by Renée the 13/07/2014
Created the
07/2014
*
Any resemblance with an existing lesson is merely a coincidence *
* Don't forget to thank the people who work for us and with us. I named the tubeurs - Testers and the translators.
Thanks Renée.
|