|
Let's start the lesson.
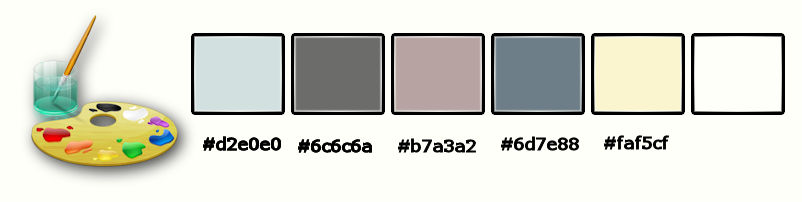
- Color-Palette : Set your foreground color to color #d2e0e0 -Set your background color to color#6c6c6a
1.
File: Open a new transparent image of 1005 x 645 Pixels
2.
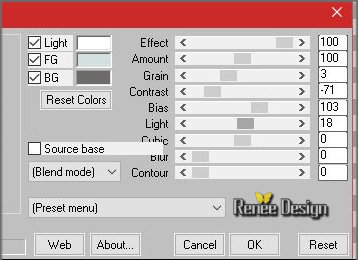
Effects-Plugins – Mura’s Meister –
Clouds
Colors: #ffffff -#d2e0e0 and # 6c6c6a use settings below
3.
Adjust- Blur- Gaussian Blur : Radius: 15
-
Repeat:Adjust- Blur- Gaussian Blur : Radius:
15
- Color-Palette : Set your foreground color to color
#ffffff
4.
Layers-New Raster Layer
- Activate Flood Fill Tool and fill the layer with the foreground color white
-
Open the Mask ‘’ Renee_Masque_Le reve ILah.jpg’’ in your Psp
5.
Layers - New Mask Layer - From Image and select :
« Renee_Masque_Le reve ILah.jpg »

-
Effects-Edge Effects-Enhance
-
Layers-Merge- Merge Group.
6.
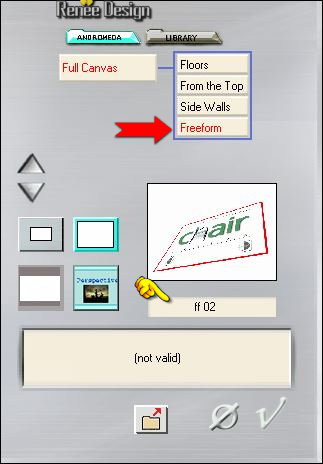
Effects-Plugins – Andromeda Perspective – Freeform
– ff 02
7.
Effects- Plugins – AV Bros page curl Pro 2.2 /Preset
« ILah.avcps »
I will now show you how to proceed
- Click on
Main

-
Click on Load
Settings(relative)
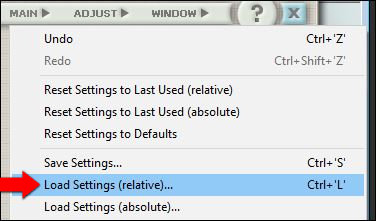
-
look for your preset « ILah.avcps »(can be used in any folder of your choice by clicking it.) 
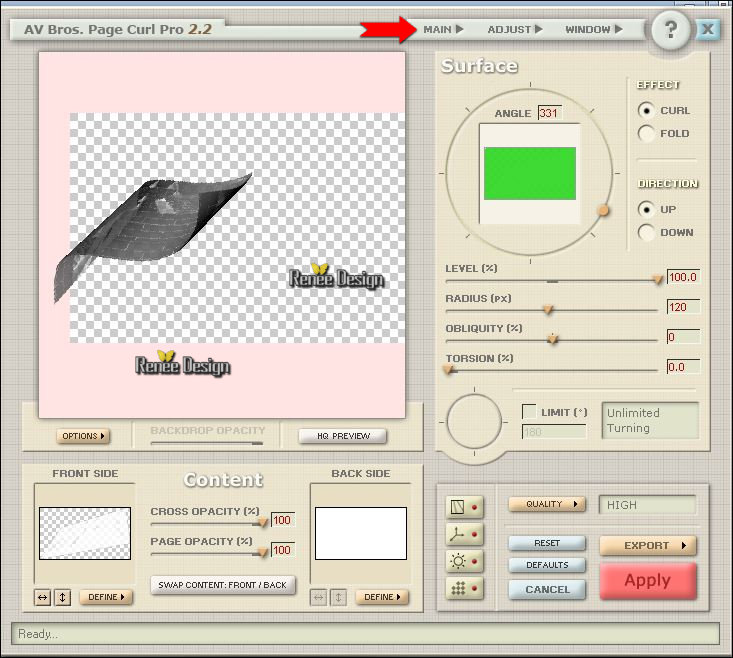
-
Click APPLY ( Do you have problems with this
? Using Manual Settings)
8.
Image - Flip (CTRL+I)
-
Layers- Duplicate
-
Image Mirror(CTRL+B)
9.
Layers- Merge- Merge Down
10.
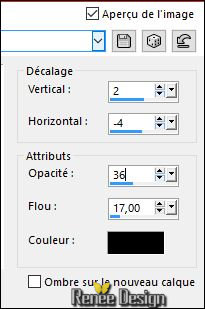
Effects- Image Effects- Offset with these settings
11.
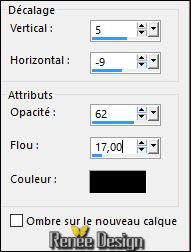
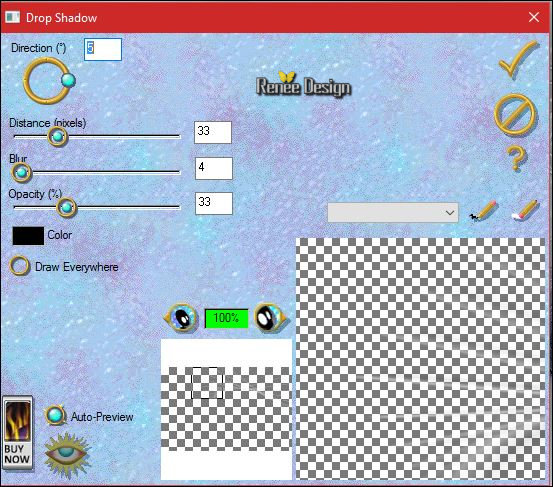
Effects- 3 D Effects- Drop Shadow use settings below
12.
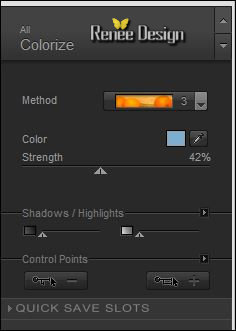
Effects-Plugins – Nick Color Effex Pro 3 /Colorize
–Color: #7daed1
13.Effects-Edge Effects-Enhance
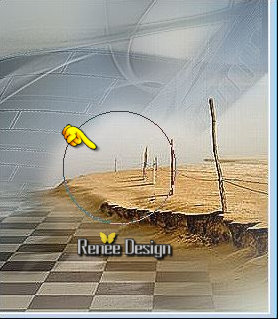
- Open the tube
‘’ Tubes_pour le tuto_Le reve ILah’’
Do not close we need it later for the rest of the work (some are hidden layers to lighten the weight of the tube simply open)
14. Activate "Raster 1 "of the tube
- Edit/ Copy-Edit - Paste as new layer on your working image
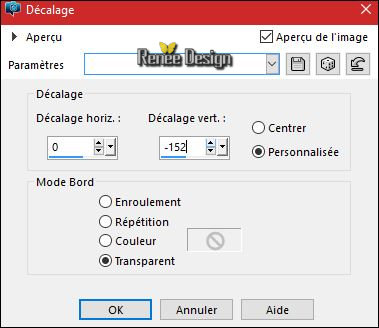
15. Effects- Image Effects- Offset with these settings H = 0 and V = -152
- Layers- Duplicate
- Layers- Merge- Merge Down
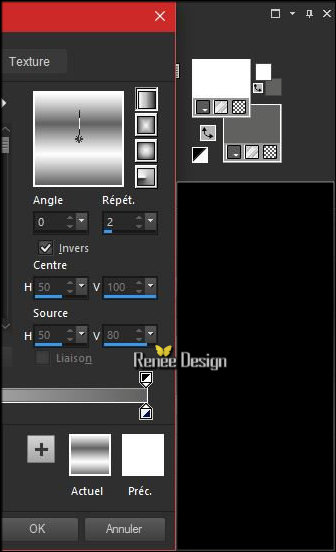
- Color Palette: Set your foreground to gradient 'Foreground-background' -Prepare a linear gradient configured like this.
16. Layers-New Raster Layer
17. Selections –load/save selection –load selection from disc and select my selection: ‘’ Ilah_1’’
18.Activate Flood Fill Tool and fill the selection with the gradient
Selections- Deselect All
19. Effects- Edge Effects- Enhance
- Layer Palette -double click on this layer and set the Blendmode to "Luminance " and set the layer opacity of this layer to 75%
- Color- Palette: Change the settings of the gradient-Repeats 1

20. Layers- New Raster Layer
21. Selections –load/save selection –load selection from disc and select my selection: ‘’Ilah_2’’
22.Activate Flood Fill Tool and fill the selection with the gradient
Selections- Deselect All
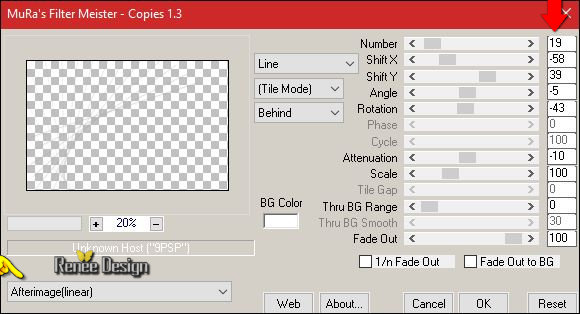
23. Effects-Plugins – Mura’s Meister – Copies use settings below
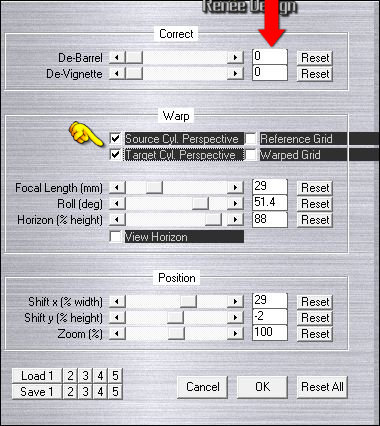
24. Effects-Plugins – MV’s Plugins – Panowarp with these settings
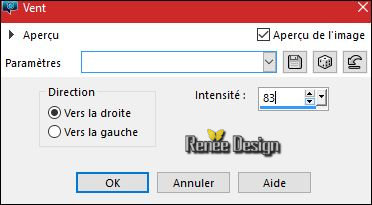
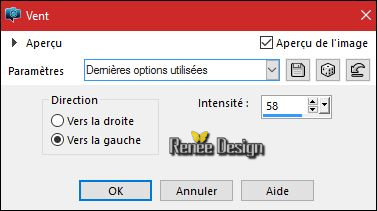
25.Effects - Distortion Effects - Wind - From Right checked - Wind Strength:83
Layers- Arrange- Move Down "above" Raster 1
26. Effects- Plugins – EyeCandy 3 – Drop shadow
you get this message >>Click Ok .jpg) and the window opens and you can use the filter with these settings (Example of the two versions of this filter ) and the window opens and you can use the filter with these settings (Example of the two versions of this filter )
-Activate the top of the Layer Palette
Back on the tube
DECO
27. Activate
"Raster 2" of the tube
- Edit/ Copy-Edit - Paste as new layer on your working image
- Activate your Pick Tool /-Deformation tool (K) Mode Scale -place it in the right place as shown in the example below
28. Activate Paint Brush (B)
-Click on arrow to reset the default 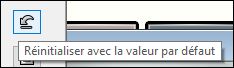
- you will have automatically the round brush
- Use settings below

- Activate the brush with the foreground gradient put a few clicks on this part like this (the selected parts of the image will be blurred. )
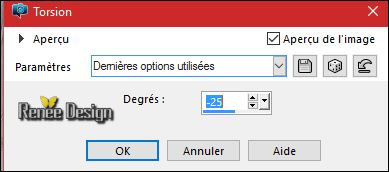
29. Effects- Distortion Effects- Twirl use settings below
- Back on the tube Deco
30. Activate Raster 3 of the tube (Frame )
-
Edit/ Copy-Edit - Paste as new layer on your working image
31. Effects- Image Effects- Offset with these settings H = 215 and V = 83
- Layers-Arrange- Move Down "above" Raster 2
-Activate the top of the Layer Palette
- Back on the tube
Deco
32. Activate
Raster 5 of the tube ( Licorn )
- Edit/ Copy-Edit - Paste as new layer on your working image
- Move Tool (M) place it in the right place
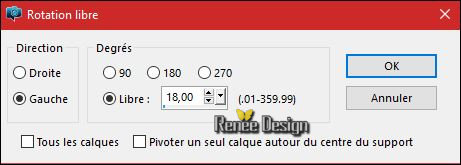
33. Image Free Rotate with these settings
- Back on the tube
DECO
34. Activate "Raster 4 "of the tube
- Edit/ Copy-Edit - Paste as new layer on your working image
- Move Tool (M) place it in the right place
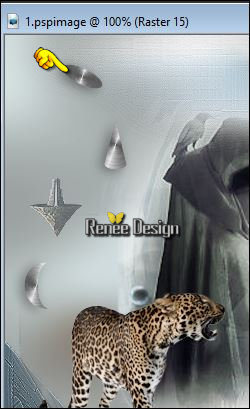
Your work and Layer Palette look like this now-You should have this result

- Layer- Palette- Make Raster 3 active
35. Layers- Duplicate
36. Layers- Arrange- Bring to Top
- Layer Palette -double click on this layer and set the Blendmode to "Screen " and set the layer opacity of this layer to 44%
- Back on the tube
DECO
37. Activate "Raster 6" of the tube (Clock )
-
Edit/ Copy-Edit - Paste as new layer on your working image
- Move tool / place your tube on the bottom right side of your image
38. Image-
Free Rotate - 90° right
39. Effects - Distortion Effects - Wind - From Left checked - Wind Strength: 58
40. Layers- Duplicate –Image Resize to 30% all Layers not checked
- Do not move, it is in the right place
- Activate the bottom of the Layer Palette = Raster 1
41. Selections –load/save selection –load selection from disc and select my selection: ‘’Ilah_3’’
- Selections- Promote Selection to Layer
42.
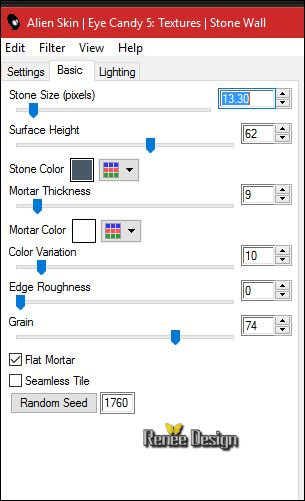
Effects-Plugins – EyeCandy 5 Textures Stone Wall-tab Settings/User settings choose my Preset ‘’ Ilah_Renee_stone Wall’’(
Instead you can change the settings (and the color if you want to) under Settings and Basic. I chose this colors #6c6c6a and #ffffff
)
Selections- Deselect All
-Activate the top of the Layer Palette
43. Layers-New Raster Layer
44.
Selections –load/save selection –load selection from disc and select my selection: ‘’Ilah_4’’
- Color-Palette: Set the background color to #ffffff
45. Activate Flood Fill Tool and fill the selection with the background color white (2
clicks)
Selections- Deselect All
46. Layers-New Raster Layer
47.
Selections –load/save selection –load selection from disc and select my selection: ‘’Ilah_5’’
- Activate the tube
‘’Renee_Ilah_nuages’’
- Edit/ Copy-Edit - Paste into selection
Keep Selected
48.
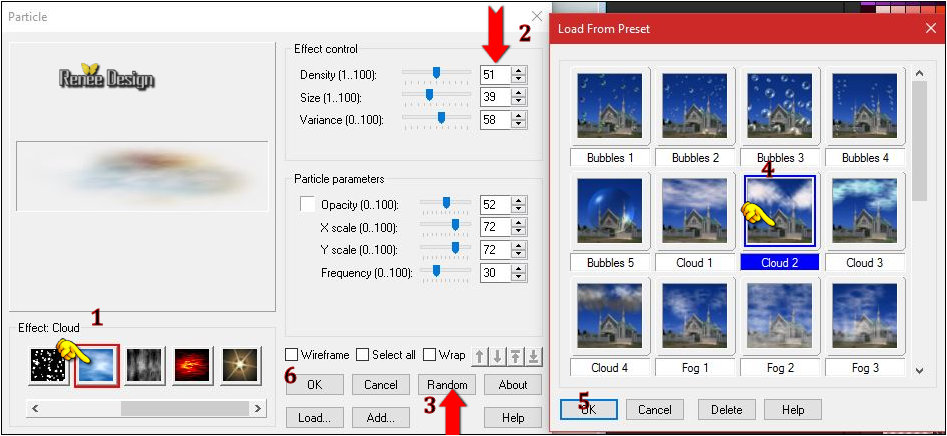
Effects- Plugins – Ulead particle
1. Click effect
Cloud
2. Put the settings
3. Click 1x Random
4. Click Load
and Choose Cloud 2
Ok and OK
Selections- Deselect All
- Back on the tube
DECO
49. Activate "Raster 8" of the tube
- Edit/ Copy-Edit - Paste as new layer on your working image
- Move the tube with the move tool in its place
- Set the layer opacity of this layer between 75 and 80 your choise
50. Back on the tube DECO -Activate Raster 7 of the tube
- Edit/ Copy-Edit - Paste as new layer on your working image
- Move tool / place your tube on the left side of your image
51. Layers-New Raster Layer
52. Selections –load/save selection –load selection from disc and select my selection: ‘’Ilah_6’’
53. Pot of Paint: Change the opacity of the color at 65%
-Color-Palette : Set your foreground color to color black -Activate Flood Fill Tool and fill the selection with the foreground color black
Selections- Deselect All
54. Activate Preset Shape Tool (P)
- Choose 3 different forms -Draw 3 Shapes as shown in the example below (not too large )
- Convert to Raster Layer
55. Layers - Merge -Merge Down-and Repeat-Three layers are merged
56.
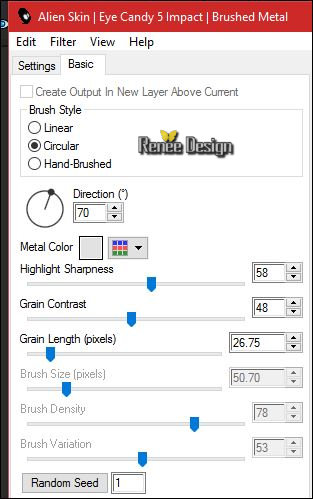
Effects- Plugins - Eyecandy 5 - Impact -
Brushed Metal use settings below
57.
Effects- 3 D Effects- Drop Shadow use settings below
- Layer- Palette- Make Raster 2 active
58. Layers- New Raster Layer
- Color-Palette : Set your foreground color to color #faf5cf
59.
Selections –load/save selection –load selection from disc and select my selection: ‘’Ilah_7 »
60. Pot of Paint: Change the opacity of the color at 100% -Activate Flood Fill Tool and fill the selection with the foreground color
Selections- Deselect All
61. Image - Add borders-Symmetric checked: 2 pixels #6c6c6a
62. Image - Add borders-Symmetric checked: 10 pixels #faf5cf
63. Image - Add borders-Symmetric checked: 45 pixels #ffffff
64. Open the
tube Renee_titre_Ilah Edit -Copy- Edit Paste as a new Layer
-Move Tool (M)place your tube on the bottom left side of your image
65. Image - Add borders-Symmetric checked: 2 pixels #cccdc9
66. Image - Add borders-Symmetric checked: 20 pixels #ffffff
Save as JPG
I hope you enjoyed this lesson
Renée
This lesson was written by Renée
28/06/2016
Edited and Update
2016
*
Any resemblance with an existing lesson is a coincidence
* Do not forget to thank the people who work with us and for us I have appointed the tubeurs and translators
Thanks Renée
| 
 Translations


 When you see this logo the filter is imported in Unlimited

 _All rights reserved