|
Let's start the lesson
Les Muses/The Muses
-Preparation
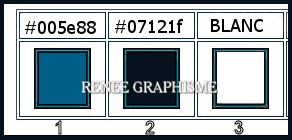
-Material Properties: Set your foreground color to color #005e88 = 1 – Set your background color to color #07121f= 2
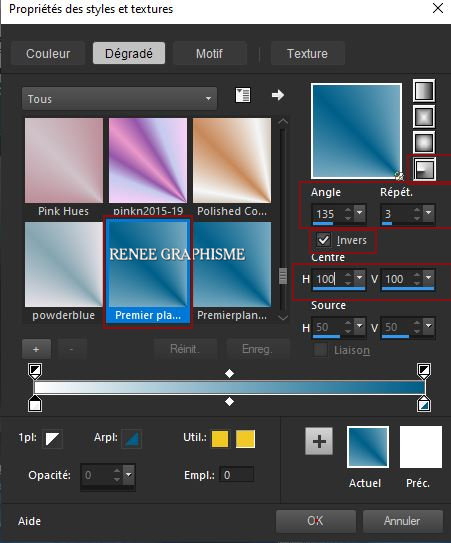
- Set your foreground color to a Foreground/Background Gradient, style Radial configured like this

1. Open the background image ‘’Fond-les-muses’’-
Promote Background Layer =Raster 1
2. Layers- New Raster Layer
3. Flood Fill Tool
 -
Fill the layer with the gradient -
Fill the layer with the gradient
4. Effects – Edge Effects– Enhance
5. Effects- Image Effects-Seamless Tiling – Settings : Side by side
6. Effects – Edge Effects– Enhance More
7. Effects –
Plugins-Unlimited 2.0 - Filter Factory Gallery H – Alias Blur:
105/28
8. Effects –
Plugins-Unlimited 2.0- Déformation - Mirror, Mirror using the default settings
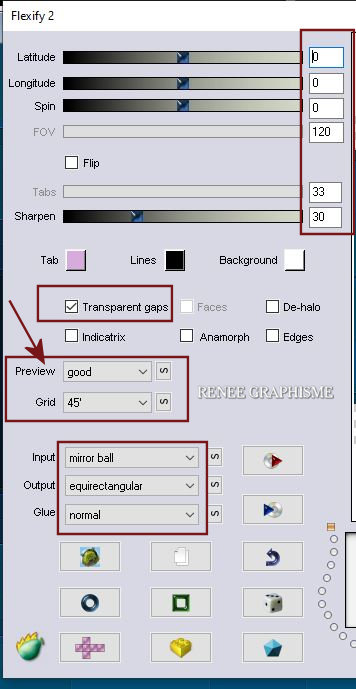
9. Effects – Plugins– Flaming Pear – Flexify 2 use the settings below
10. Effects-
3D-Effects - Drop Shadow with these settings: 0/0/63/32 / Color #07121f= 2
11. Layers- New Raster Layer
- Color Palette- Set your Foreground color to color #ffffff=3
12. Flood Fill Tool
-
Fill the layer with the foreground color =3
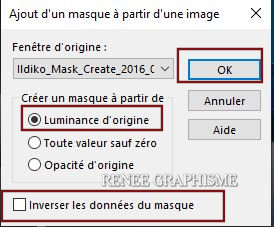
13. Layers- New Mask Layer-From Image and select Mask-
‘’Ildiko_Mask_Create_2016_05_21_020.’’
- Layers- Merge -Merge Group
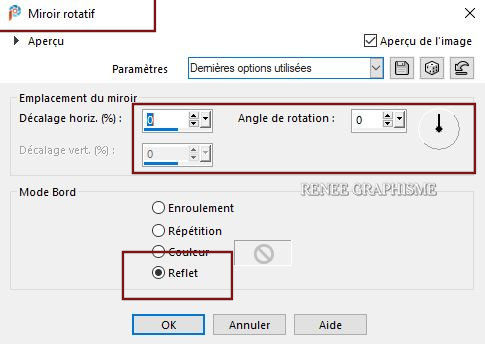
14. Effects- Reflection- Effects- Rotating Mirror-default settings
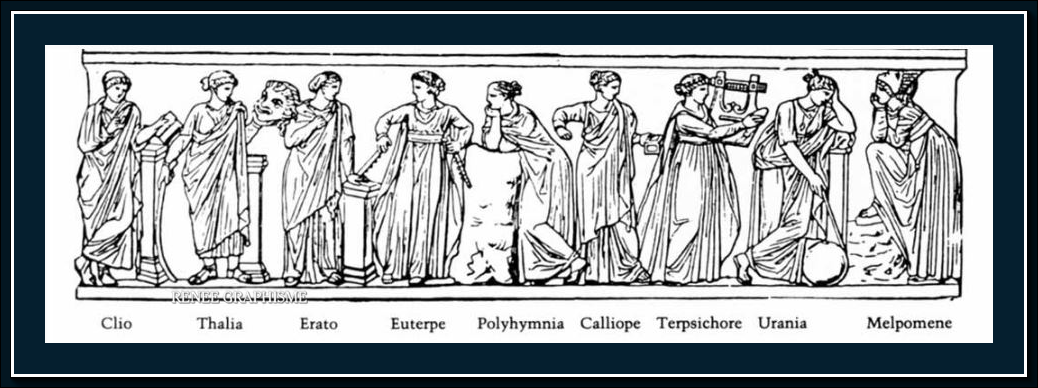
15. Open the tube ’’ Les-Muses-Image
1’’ -Edit - Copy- Activate your work -Edit - Paste as a new layer - Do not move !
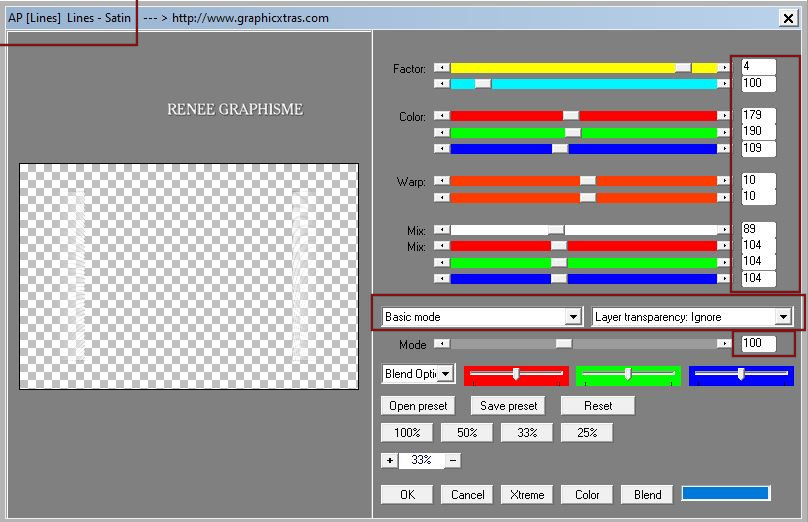
16. Effects – Plugins - AP[Lines] – Lines Satin use the settings below
17. Effects – Edge Effects- Enhance
18. Effects –3D- Effects – Drop Shadow with the same settings
- Layer palette – Make Raster 2 active
19. Selections –load/save selection –load selection from disc and select my selection:’’ Les-Muses 1’’
20. Selections-Promote selection to layer
21. Effects -Plugins -
Unlimited 2.0- [AFS IMPORT]- MIRROFF using the default settings
22. Layers- Duplicate
23. Effects-Plugins-
Unlimited 2.0- It@lian Editors Effect- Mosaico with these settings: 84/94/38
24. Layers-Properties-Set the Blend Mode to " Dodge "
25. Effects –Edge Effects- Enhance
26. Layers- Merge- Merge Down
27. Effects – Plugins – Mura’s Meister – Perspective Tiling using the default settings

28. Objects- Align
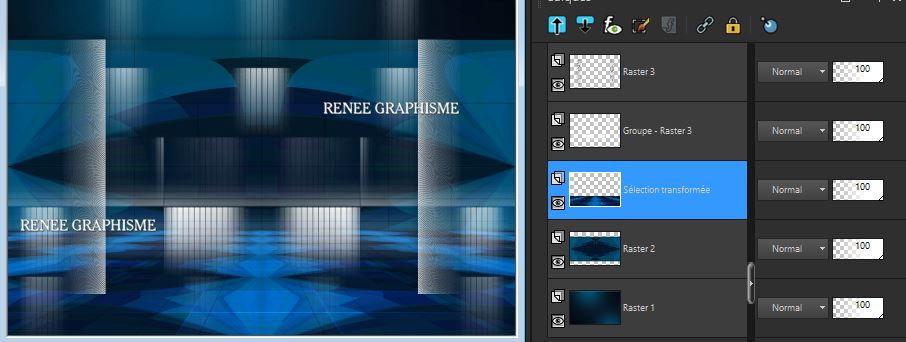
– Bottom
-Your work and Layer Palette look like this now-You should have this result
- Activate the Brush Tool- search for the brush "Muses" (
Place the brush in the brush folder of your Psp)
If it doesn't work
Open the brush "Les Muses Pinceau jpg " in your PSP
File- Export Custom Brush (Give it a name) ’Muses’’
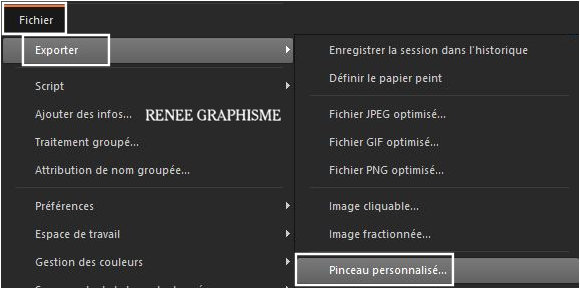 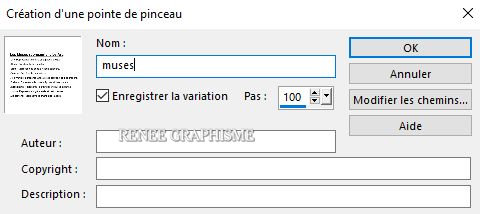
And you will find it in the list of your brush tool
29. To replace the top of the layer-palette
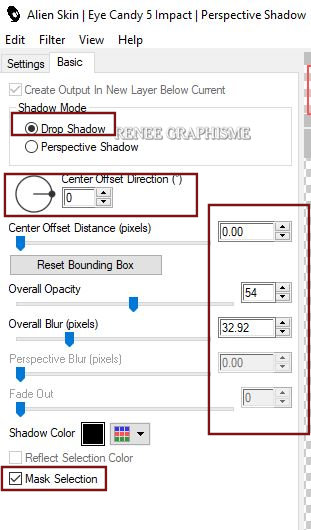
30. Layers- New Raster Layer
- Activate your brush tool and select the brush ’’ Muses ’’ (brush is already the right size). Stamp with the foreground color white

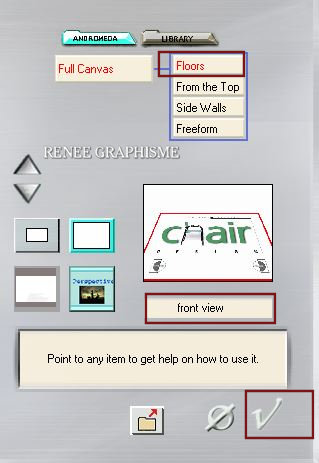
31. Effects – Plugins – Andromeda – Perspective with these settings
If the filter does not work, you will find an image in the folder
32. Objects – Align
- Center in Canvas
33. Objects –
Align- Bottom
34. Effects- 3D Effects- Drop Shadow with these settings: 1/1/100/1 Color Black
35. Layers-Properties-Set the Blend Mode to " Dodge "
36. Open the tube ’’Les-Muses-Image 3’’ -Edit - Copy- Activate your work -Edit - Paste as a new layer
37. Objects –
Align- Top /or with a tool
37a. Pick Tool: (K) on your keyboard -Enter these parameters on the toolbar
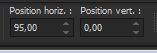 95/0
95/0
-Press ( M ) to close the Pick Tool
38. Layers- New Raster Layer
39. Selections –load/save selection –load selection from disc and select my selection:’’ Les-Muses 2’’
40. Flood Fill Tool
-
Fill the selection with the foreground color=3
41. Effects- 3D Effects- Drop Shadow with these settings: 1/1/100/2 Color Black
- Color Palette-Foreground color remains white=3 -Set your background color to color #005e88=1
- Set your foreground color to a Foreground/Background Gradient, style Radial configured like this
42. Layers- New Raster Layer
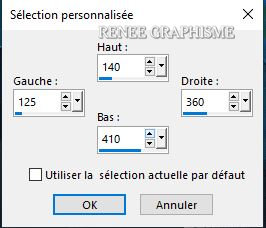
43. Activate Selection Tool -Custom Selection (S) -Rectangle with these setting

44. Flood Fill Tool
–
Opacity 50%
- Fill the selection with the gradient
Set the opacity of the colors to 100%
45. Effects –Plugins-
Unlimited 2.0- &<Bkg Designers sf10 IV> - @ Instant Tile
with these settings : 224/116
- Repeat this filter with the same settings
KEEP SELECTION
46. Layers- Duplicate
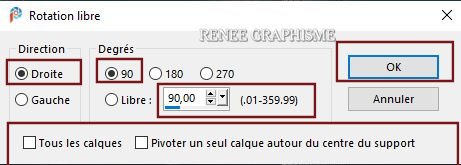
47. Image - Free Rotate -Right 90 degrees
48. Layers-Properties-Change the Blend Mode to " Luminance "
49. Layers- Merge- Merge Down
50. Repeat : Activate Selection Tool -Custom Selection (S) -Rectangle with the same settings
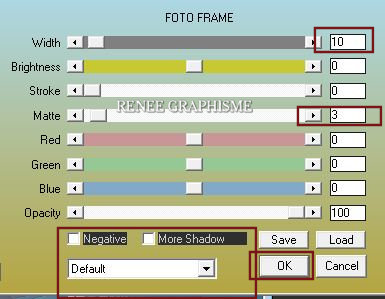
51. Effects – Plugins– AAA Frame – Foto Frame use the settings below
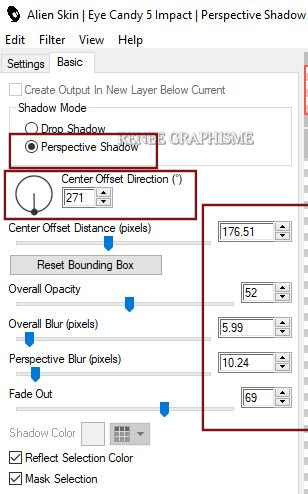
52. Effects – Plugins - Alien Skin EyeCandy 5 Impact- Perspective
Shadow-Tab-Settings-User Settings and select my file- Preset : ‘’Muses-Shadow’’
or set the settings manually see screen
53. Layers- Duplicate
54.Image - Mirror - Mirror Horizontal (Image - Mirror in older versions of PSP)
55. Activate -Selection Tool (S) Selection type -Rectangle
-Draw this selection in the first frame
56. Layers- New Raster Layer -Activate a ''muse tube of your choice'' -Edit - Copy- Activate your work -Edit - Paste into selection
57. Do the same selection again in the second frame
58. Layers- New Raster Layer
59. Open the second tube "Muse" -Edit - Copy- Activate your work -Edit - Paste into selection
- On the two layers of the tubes (muses)
60. Effects – Plugins - Alien Skin
EyeCandy 5 Impact- Perspective Shadow use the settings below
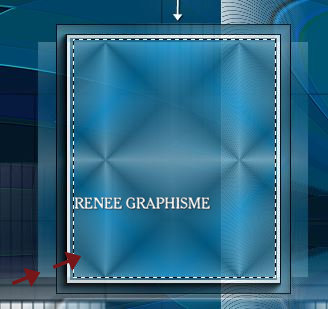
Your work and Layer Palette look like this now-You should have this result
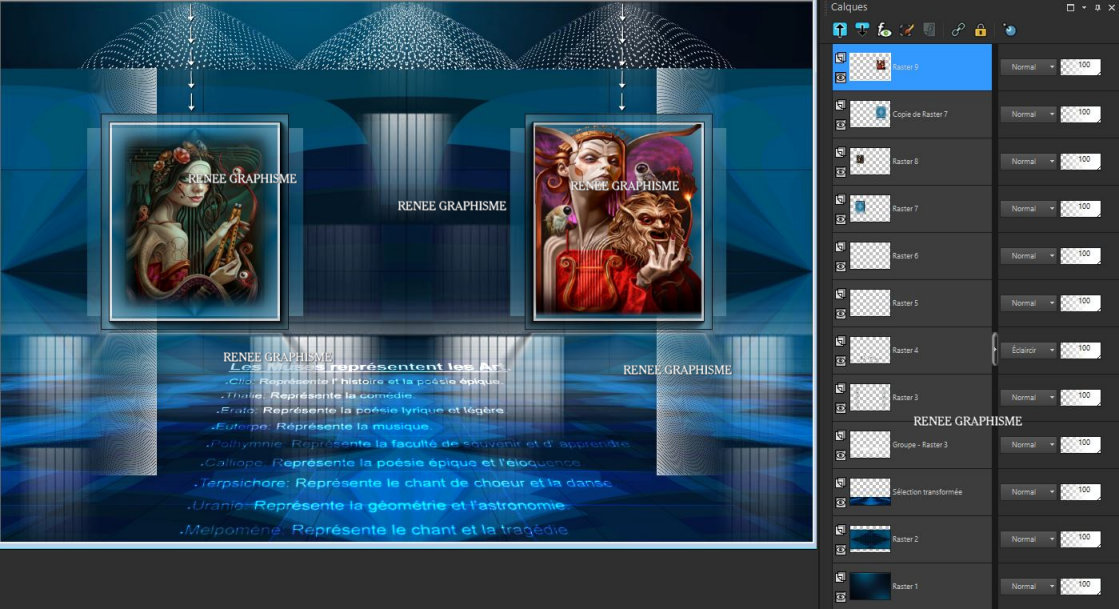
- Layer palette – Make Raster 6 active
61. Open the tube ‘’Les-Muses-Image
temple’’ -Edit - Copy- Activate your work -Edit - Paste as a new layer
62. Pick Tool: (K) on your keyboard -Enter these parameters on the toolbar
 253/0 253/0
- Press ( M ) to close the Pick Tool
63. Effects – Edge Effects- Enhance
- To replace the top of the layer-palette
64. Open the tube ‘’Les-Muses-Image 2’’ -Edit - Copy- Activate your work -Edit - Paste as a new layer
- Do not move it is in the right place
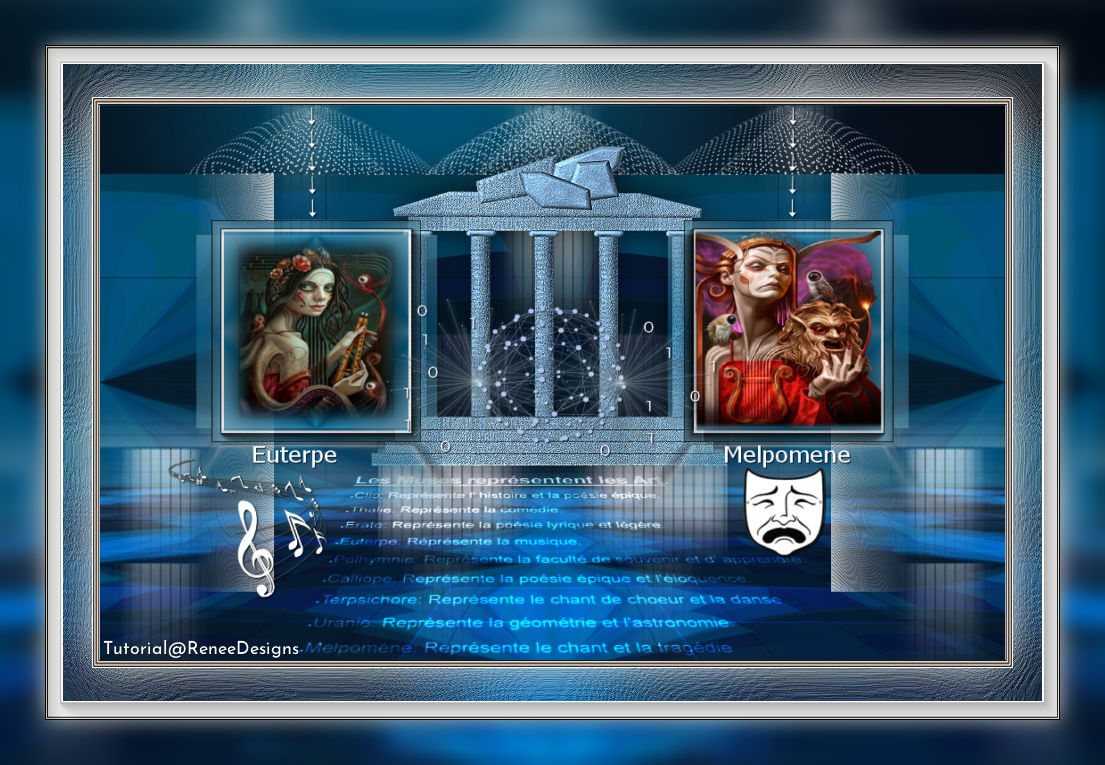
65. Text tool- with font of your choice -Renée chose the font ''Tahoma'' with 28 Pixels -Write both names "Euterpe and Melpomene" with the white color .
-Put the names under the respective frames (see preview image )
66. Open both tubes with symbols and paste them as a new layer
For Renée -With the name Melpomene comes the tube ''Renee-Les-Muses-symbol-theatre'' and ''with the name Euterpe - comes the tube-" Renee-Les-Muses-symbol-Musique''
-Place the symbols in the right place (see preview image )
67. Layers- Merge - Merge Visible
68. Edit-Copy !!!
69. Open the tube ‘’Cadre’’ in your Psp
70. Edit - Paste into Selection (Image is still in your PSP memory)
Save as JPG
That's it - Thank you / I hope you enjoyed this lesson
Renée
This lesson was written by Renée 07/07/2021
and put in place
in 2021
*
Any resemblance with an existing lesson is a coincidence
* Do not forget to thank the people who work with us and for us -I have appointed the tubeurs and translators
Thanks
*
|
 Translations