|
Let's start the lesson.
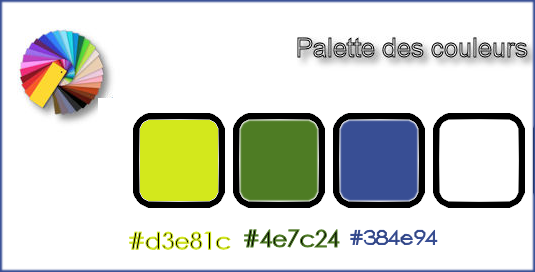
Used Colors
Preparation:
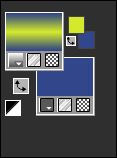
Color Palette:Set your Foreground color to #384e94 -Set your Background color to #d3e81c
1.
File - New - Open a new transparent image 1005 x 665 pixels
2.
Activate Flood Fill Tool and fill the layer with the foreground color #384e94 
3.
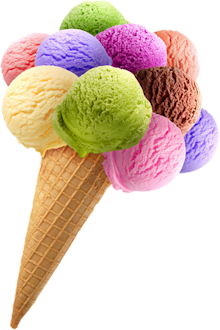
Open your tube ‘’Renee_tube_maglace’’
-
Edit - Copy- Activate your work -Edit - Paste as a new layer
4.
Effects- Image Effects- Seamless Tiling using the default settings
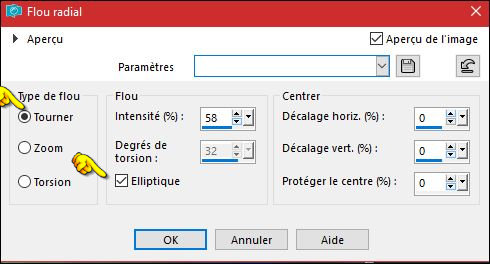
5.
Adjust- Blur- Radial Blur using the settings below
6.
Layers- Duplicate
7.
Adjust- Blur- Gaussian Blur:Radius 45
8.
Effects –Plugins– L& K’s – Sanne
0/149
9.
Image- Resize to 55% all layers not checked
10.
Effects –Plugins–Medhi – Weaver
11.
Effects –Plugins - Simple -Left Right
Wrap
12.
Effects- Edge Effects- Enhance More
13. Layers- Duplicate
-
Activate the layer underneath = ( Copy of Raster 2 )
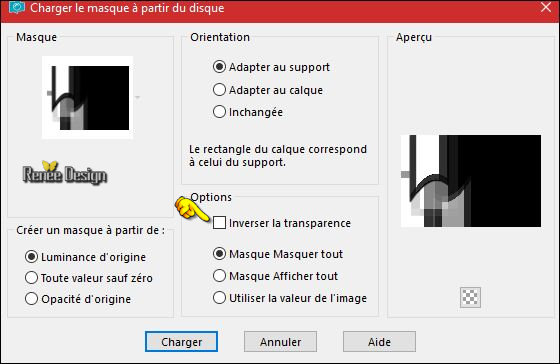
14.
Layers- Layers-load/save Maske Load Mask from Disk and select Mask: ‘’ Monaiekje mask
32 ‘’
-
Layers- Merge- Merge Group
15. Effects-Edge Effects-Enhance More ( you can see nothing, but that's normal )
-
Activate the layer above = ( Copy 2 of Raster 2 )
16.
Layers- Layers-load/save Maske Load Mask from Disk and select Mask: ‘’ Monaiekje mask
32 ‘’
-
Layers- Merge- Merge Group
17.
Image - Mirror - Mirror Horizontal (Image - Mirror in older versions of PSP)
18. Effects-Edge Effects-Enhance More
19.
Layers- Merge- Merge Down
20. Layers-Properties-Set the Blend Mode to " Screen "
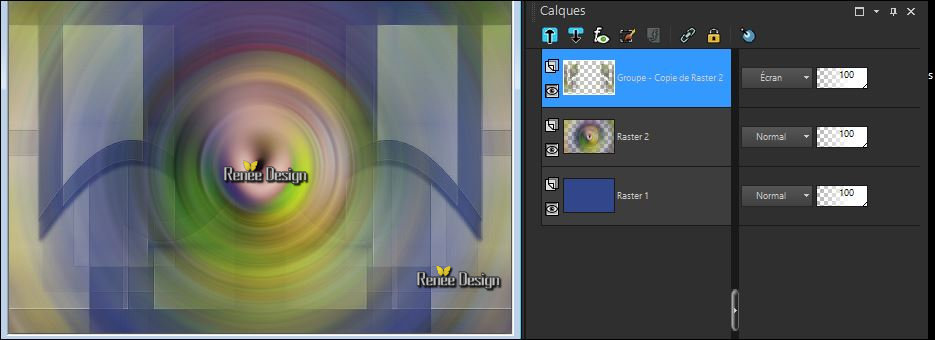
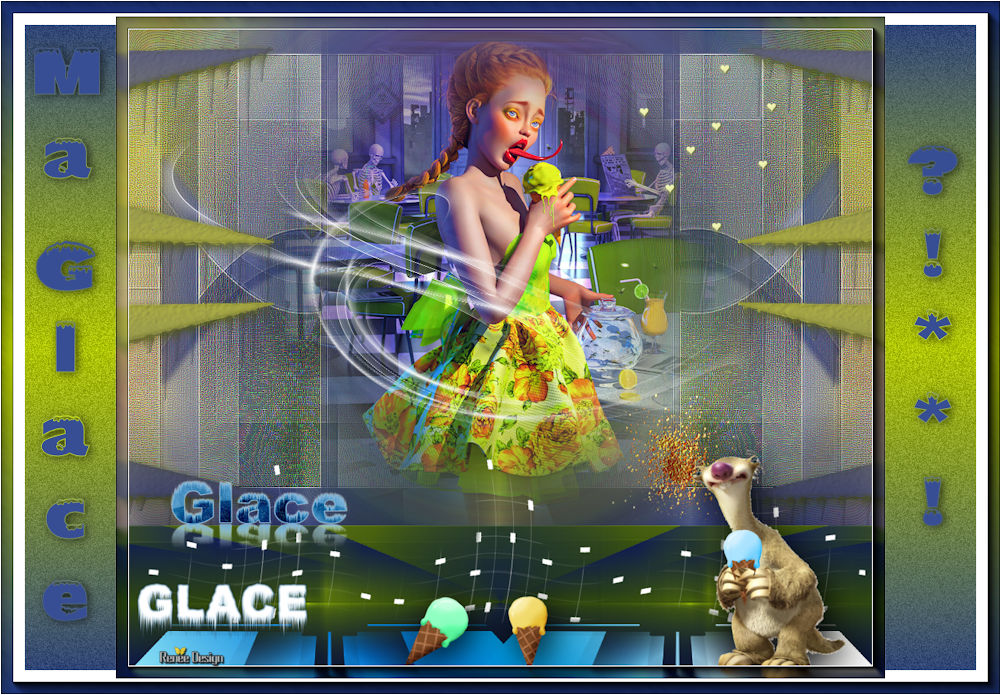
Your work and Layer Palette look like this now-You should have this result
21. Layers- Duplicate
22.
Image - Mirror - Mirror vertical ( Image - Flip in older versions of PSP)
23.
Layers-Properties-Set the Blend Mode to " Hard Light "
24.
Open your tube ‘’ ’Renee_tube_maglace’’
-
Image Resize to 65 %
-
Edit - Copy- Activate your work -Edit - Paste as a new layer (do not move it is in the right place)
25.
Open your tube ‘’ Ma_Glace_image1’’
-
Edit - Copy- Activate your work -Edit - Paste as a new layer
-
Activate your Move Tool (M) place it in the right place (see finished image)
26.
Effects – User Defined Filter – Emboss 3 using the default settings
27.
Open your tube ‘’ Ma_Glace_image 2’’
-
Edit - Copy- Activate your work -Edit - Paste as a new layer
-
Activate Move Tool (M) move it the right place at the top of your image (see screen)
28. Effects
–Plugins- Unlimited - &<Bkg Designer sf10 III>-SE Shiver
27/22
29. Effects
–3D Effects – Drop Shadow with these settings 1/1/85/1 black
30. Open your tube ‘’
’ Ma_Glace_image
3’’
-
Edit - Copy- Activate your work -Edit - Paste as a new layer
-
Do not move !!!
-
Layers- Duplicate
31.
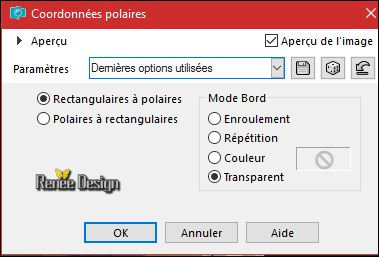
Effects- Distortions Effects-Polar Coordinates-Rectangular to Polar
- Layers- Merge- Merge Down
- Swap your materials, so the blue color is on the bottom
- Set your Foregroundcolor to foreground-background linear gradient,configured like this.
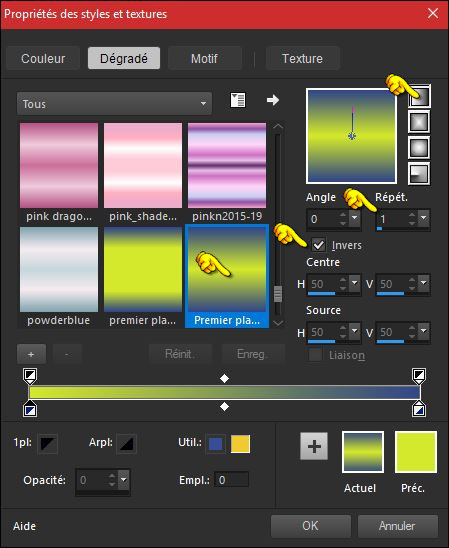 
32. Layers- New Raster Layer
33. Selections –load/save selection –load selection from disc and select my selection: ‘’ ma_glace_1’
34. Activate Flood Fill Tool and fill the selection with the gradient
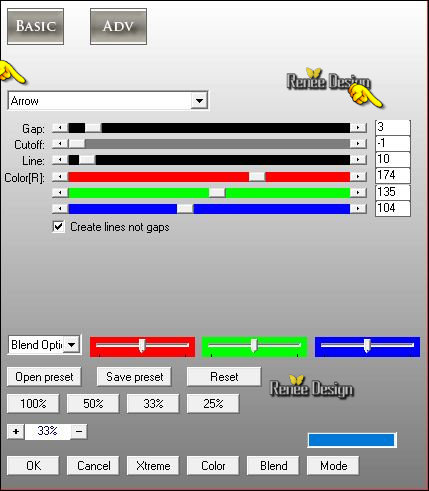
35. Effects
-Plugins – AP [Lines] Silverling using the settings below
Selections- Deselect All
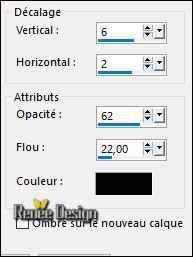
36. Effects- 3D Effects- Drop Shadow using the settings below
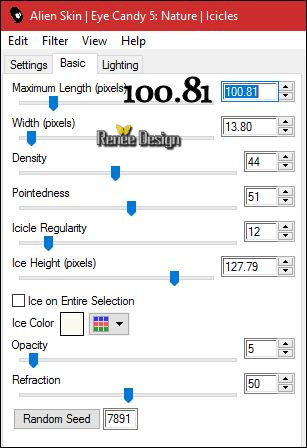
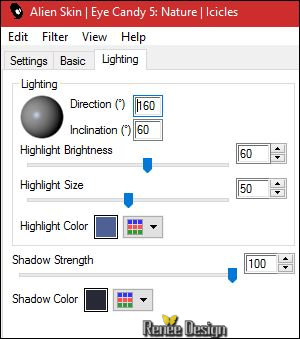
37. Effects
–Plugins – EyeCandy 5 – Nature – Icicles-tab Settings/User settings choose my / Preset ‘’
Ma_glace_Icicles’’
Or manual settings as shown in the example below
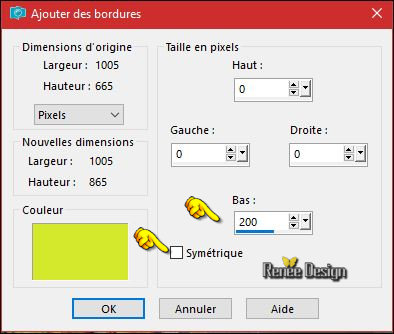
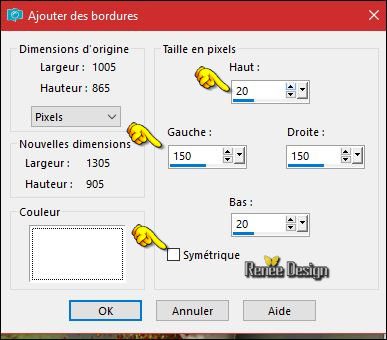
38. Image - Add borders-Asymmetric checked using the settings below #d3e81c
39. Activate the Magic Wand and select the green part
40. Layers- New Raster Layer
41. Set foregroundcolor to gradient//Activate Flood Fill Tool and fill the selection with the gradient (As previous)
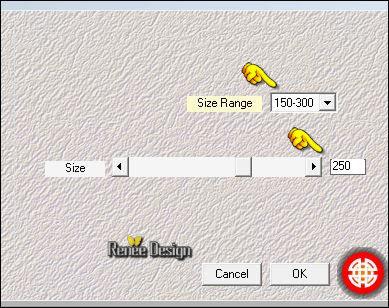
42. Effects
–Plugins -VM Toolbox – Zoom blur 94/
175
43. Layers-Duplicate
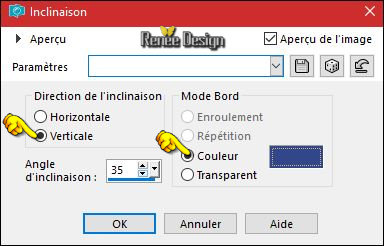
44. Effects- Geometric Effects- Skew use the settings below / #384e94
Selections- Deselect All
45.
Layers-Properties-Set the Blend Mode to "Multiply"
46.
Effects –Plugins- Unlimited -&<Bkg Designer sf10 I>- Cruncher
126/0
47. Effects – User Defined Filter – Emboss 3 using the default settings
48. Effects
–Plugins– Medhi – Weaver
49. Open your tube ‘’ ’
Ma_Glace_image 4’’
-
Edit - Copy- Activate your work -Edit - Paste as a new layer
-
Move Tool / place your tube to the bottom of your image
50. Open your tube
‘’ Renee_tube_glace_personnage’’
-Edit - Copy- Activate your work -Edit - Paste as a new layer //.Move Tool / place your tube to the bottom right corner of your image
51.
Open your tube ‘’ Renee_tube_double titre
_glace’’
-
Edit - Copy- Activate your work -Edit - Paste as a new layer//Move Tool / place your tube to the bottom left of your image
52.
Layers-Merge- Merge Visible
53.
Selections - Select All
54.
Image - Add borders-Asymmetric checked use settings below :#ffffff
55.
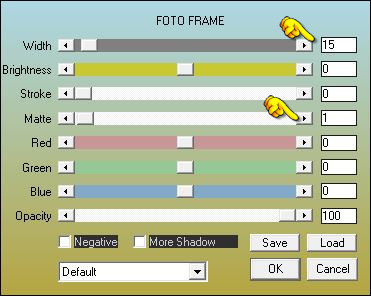
Effects –Plugins- Externes AAA Frame- Foto
Frame use the settings below
56. Selections -
Invert
57.
Layers- New Raster Layer
58.
Activate Flood Fill Tool and fill the selection with the gradient (As previous)
59.
Effects-Plugins - VM Toolbox- Brightness
Noise... 159/26
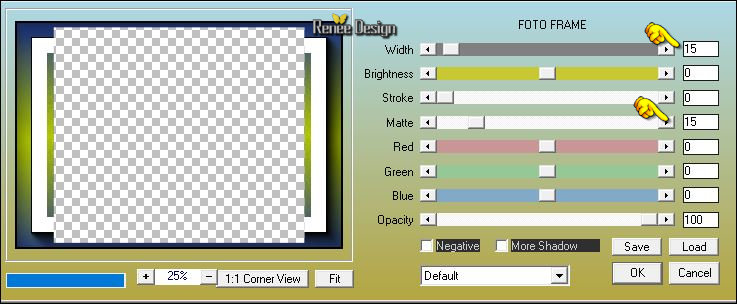
60. Effects –Plugins– AAA Frame- Foto frame use the settings below
Selections- Deselect All
61. Activate your Text Tool -Font Chilled /Size 96 Pixels// To the left side: write: "Ma glace "//type to the right side of your image:
question mark,exclamation mark,
asterisk and exclamation mark (see finished image)

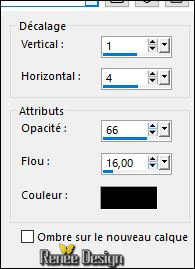
62. Effects
-3D Effects -Drop Shadow using the settings below
63. Image - Add borders-Symmetric checked: 1 pixel #ffffff
64. Image
Resize to 999 pixels width.
Save as JPG
I hope you enjoyed this lesson
Renée
This lesson was written by Renée 11/03/2017
Edited and Update
2017
*
Any resemblance with an existing lesson is a coincidence
* Do not forget to thank the people who work with us and for us I have appointed the tubeurs and translators
Thanks Renée *
*
| 

 Translations


 If a plugin supplied appears with this icon it must necessarily be imported into Unlimited *

 All rights reserved