|
Let's start the lesson
Magie d’hiver

- Preparation
-Material Properties: Set your foreground color to color #ffffff =1 Set your background color to color #c3d5e5 =2

1. Open the Background Image
‘’Fond-Magie-Hiver’’- Promote Background Layer =Raster 1
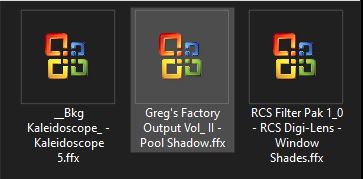
2. Effects –Plugins-
Unlimited 2.0 - &<Bkg Kaleidoscope> -Kaleidoscope 5 with these settings:
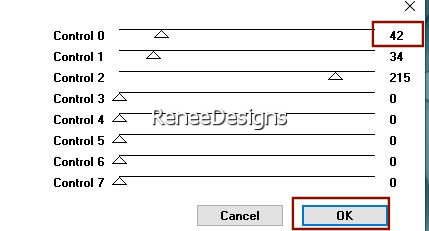
166/0
3. Layers- Duplicate
4. Effects –
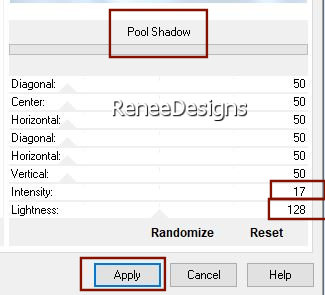
Plugins-Unlimited 2.0 - Greg's Factory Output Vol. II- Pool
Shadow use the settings below
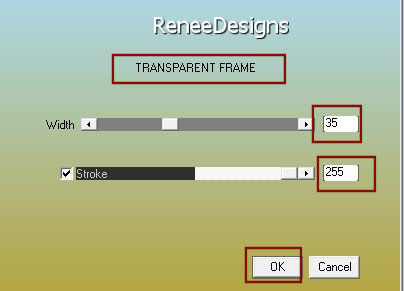
5. Effects – Plugins– AAA Frames- Transparent Frame use the settings below
6. Image -Resize 80 %- Resize all layers NOT checked
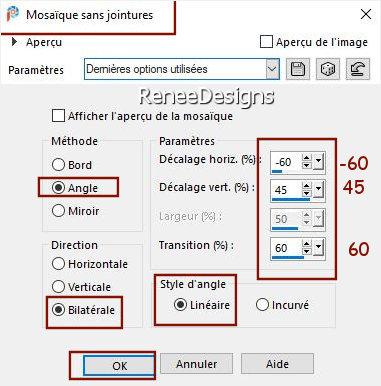
7. Effects- Image Effects- Seamless Tiling use the settings below
8. Effects – Reflection Effects– Rotating Mirror use the settings below

9. Effects- 3D-Effects – Drop Shadow with these settings: 10/-10/100/50 Color Black
10. Effects –Plugins-
Unlimited 2.0 - RCS Filter Pak 1.0 - RCS Digi-Lens -
Window Shades : 68
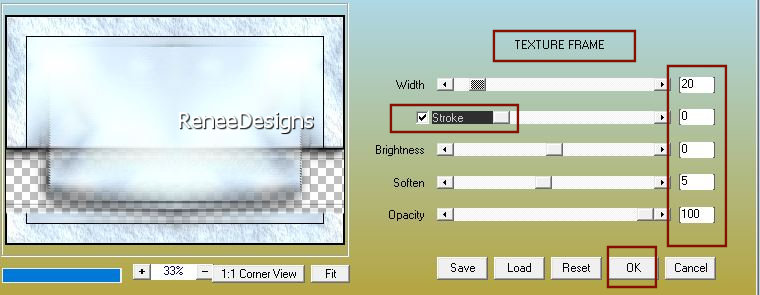
11. Effects – Plugins –AAA Frames – Texture Frame use the settings below
12. Image -Resize 90 %- Resize all layers NOT checked
13. Layers- Merge- Merge Visible
- Material Properties: Set your foreground color to color #c3d5e5 =2- Set your background color to color #143954 =
3
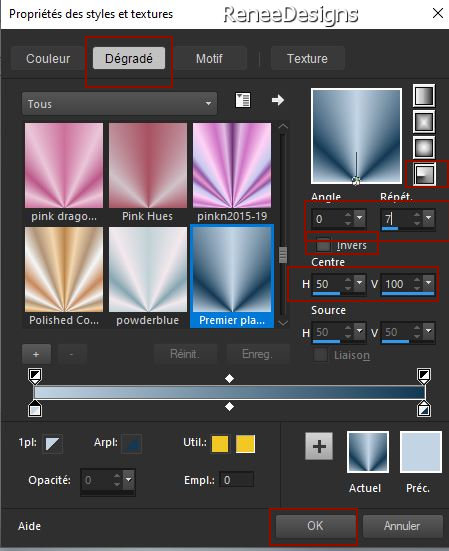
- Prepare a foreground/background radial gradient configured like this
14. Layers- New Raster Layer
15. Flood Fill Tool
 – fill the layer with the gradient – fill the layer with the gradient
16. Effects- Image Effects- Seamless Tiling use the settings below
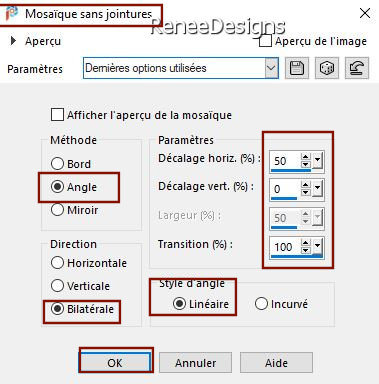
- Repeat ! - Effects- Image Effects- Seamless Tiling with the same settings
Attention! Be careful to reset the default values of the tool before setting your configurations

17. Effects- Illumination Effects-Lights- and select my file-Preset : ‘’Preset_Lights_Renee-Magie-hiver’’
(Place the Preset into the Presets folder of PSP)

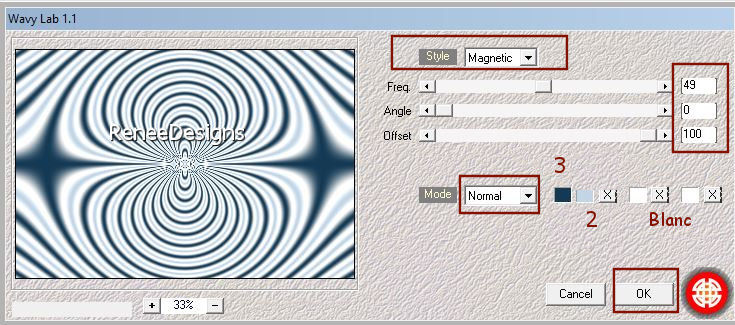
18. Effects – Plugins– Medhi – Wavy Lab 1.1 use the settings below
19. Effects – Plugins- MuRa’s Filter Meister – Pole Transform 2. 1 use the settings below
20. Effects- Illumination Effects-Lights- and select my file -Preset : ‘’Preset_Lights_Renee-Magie-hiver-1’’
21. Effects- 3D-Effects – Drop Shadow with the same settings
22. Layers- New Raster Layer
23. Selections –load/save selection –load selection from disc and select my selection: ‘’Magie-Hiver-1’’
24. Flood Fill Tool
- Fill the selection with the background color #143954 = 3
Keep selected
25. Adjust-Blur-Gaussian Blur: Radius 100
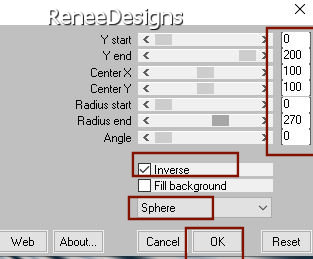
26.Effects- Distortion Effects -Spiky Halo with these settings
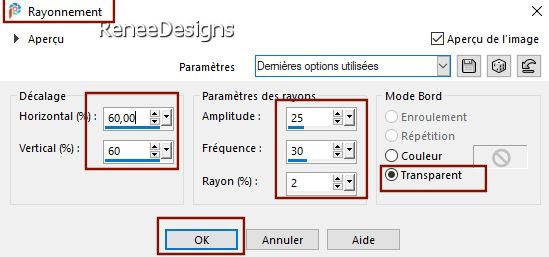
27. Selections-Promote selection to layer
 
28. Effects-
3D-Effects- Drop Shadow with these settings: 1/1/100/2 Color Black
- Repeat: Effects- 3D-Effects- Drop Shadow with the same settings
29. Effects – Plugins – Alpha Works- Vertical Fadeout : 104
- Activate the layer underneath= (Raster 2)
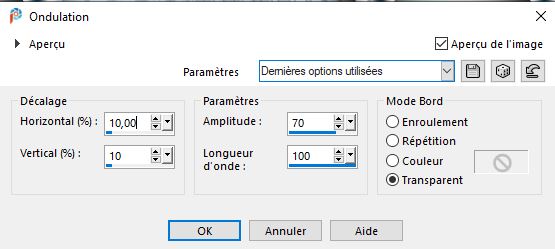
30. Effects- Distortion Effects -Ripple with these settings
31. Effects – Plugins - AlphaWorks- Vertical Fadeout : 90
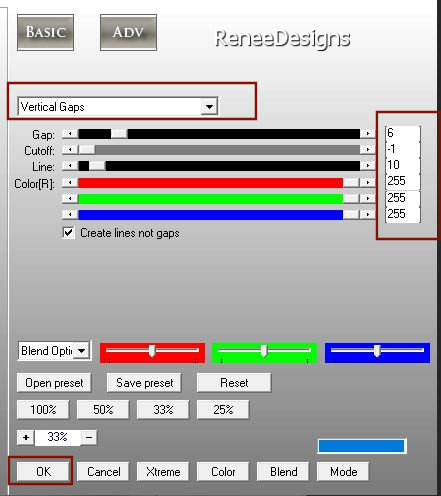
32. Effects – Plugins- AP[Lines] Lines – Silverlining use the settings below
- Activate the bottom of the Layer Palette (Merged Layer)
33. Open the tube ‘’ Renee-TUBES-Magie-Hiver-1’’ -Edit - Copy- Activate your work -Edit-Paste as a new layer
34. Objects –Align-
Bottom
35. Effects - Plugins- Alien Skin EyeCandy 5 - Impact –Perspective
Shadow-Tab-Settings-User Settings and select my file-Preset :‘’Magie-Hiver-Shadow’’
- To replace the top of the layer-palette
36. Open the tube ‘’ Renee-TUBES-Magie-Hiver-2’’ -Edit - Copy- Activate your work -Edit-Paste as a new layer
37. Objects –Align-
Top
- Activate the bottom of the Layer Palette (Merged Layer)
38. Open the tube ’’ SvB Winters 23
misted’’ -Edit - Copy- Activate your work -Edit-Paste as a new layer
39. Image -Resize 75 %- Resize all layers NOT checked
40. Pick Tool: (K) on your keyboard -Enter these parameters on the toolbar
 -143
/ 255 -143
/ 255
-Press ( M ) to close the Pick Tool
41. Layers- New Raster Layer
42. Selections –load/save selection –load selection from disc and select my selection: ‘’Magie-Hiver-2’’
43. Color Palette-Set your foreground color to # ffffff=1
Flood Fill Tool
– Fill the selection with #ffffff=1
44. Selections -
Modify - Contract with 5 Pixels

45. Flood Fill Tool – Fill the selection with the background color = 3 (
if you change the colors then take a dark color)
46. Selections -
Modify - Contract with 5 Pixels
47. Selections -
Select All – Selection Float –Selection Defloat
48. Effects - Plugins - Alien Skin EyeCandy 5 - Impact - Glass -Tab-Settings-User Settings and select my file-
Preset : ‘’Magie-Hiver- Glass’’
49. Layers- New Raster Layer
50. Selections –load/save selection –load selection from disc and select my selection: ‘’Magie-Hiver-3’’
51. Open the tube ’’ Renee-TUBES-Magie-Hiver-4’’ -Edit - Copy- Activate your work -Edit - Paste into selection
52. Layers- New Raster Layer
53. Effects-Plugins - Alien Skin EyeCandy 5 - Impact - Glass-Tab-Settings-User Settings and select my file-Preset
–’Magie-Hiver- Glass’’
54. Layers- Merge- Merge Down
55. Layers- Arrange- Move Up
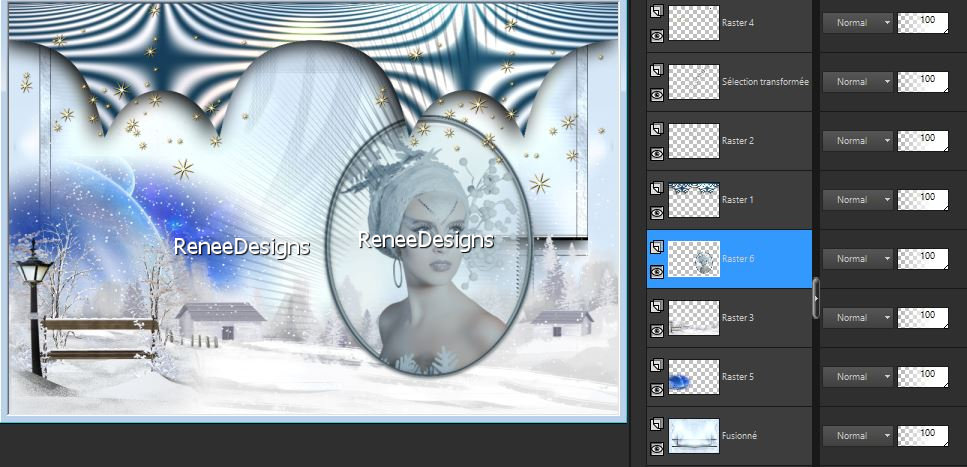
-
Your work and Layer Palette look like this now-You should have this result
56. Open the tube
‘’ Renee_tubes-Pour-tuto- Magie-Hiver’’
- Choose a couple of tubes
- Renée chose the bird and the snow tube– ''neige and oiseaux ''
-Edit - Copy- Activate your work -Edit-Paste as a new layer- Place to your liking
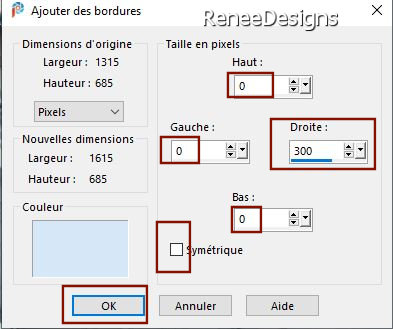
57. Image - Add borders-Symmetric NOT checked use the settings below :Color#d6e7f7=4 (try to choose a light color in the background of your work if you change the colors)
58. Promote Background Layer =Raster 1
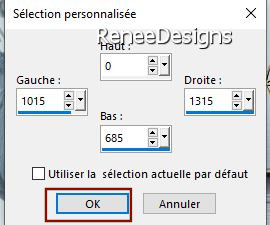
59. Activate Selection Tool -Custom Selection (S) -Rectangle with these settings 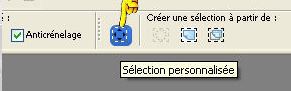
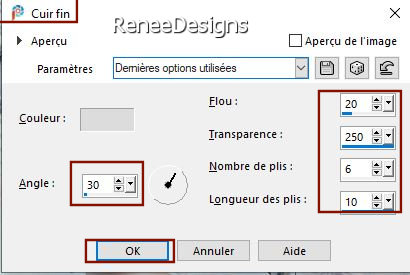
60. Effects- Texture Effects - Fine Leather use the settings below
61. Effects- Plugins - [AFS IMPORT] -sqborder2 use the settings below
62. Open the tube ‘’Renee-TUBES-Magie-Hiver-5’’ -Edit - Copy- Activate your work -Edit-Paste as a new layer
- Place on the right side
63. Open the tube ‘’Renee-TUBES-Magie-Hiver-3’’ -Edit - Copy- Activate your work -Edit-Paste as a new layer
- Place to your liking
64. Image - Add borders-Symmetric checked: 2 Pixels Color #143954=3
65. Image - Add borders-Symmetric checked: 50 Pixels Color #ffffff=1
66
Open the tube ’’Perles-Cadre’’ -Edit - Copy- Activate your work -Edit-Paste as a new layer, do not move it is in the right place
- Paste the author's watermark on your work and your own watermark
67. Layers- Merge-Merge All
68. Image-
Resize 1015 Pixels width
Save as JPG
PS: I have added the letters separately if you want to write another title.
That's it - Thank you / I hope you enjoyed this lesson
Renée
This lesson was written by Renée 10/10/2021
Edited and Update
in 2021
*
Any resemblance with an existing lesson is a coincidence
* Do not forget to thank the people who work with us and for us -I have appointed the tubeurs and translators
Thanks
*
|


 Translations