|
Let's start the lesson.
You can use additional tubes for this tutorial
Here


- Preparation
- Material Properties: Set your foreground color to color # a7c2ec = 1 – Set your background color to color #e4e0df= 3
1. Open the BG-Image ‘’
Fond de Magritte a Dali’’ – Promote Background Layer =Raster 1
2. Effects – Plugins– Mirror rave- Quadrant Flip using the default settings
3. Effects –Plugins-
Unlimited 2.0 - &<Bkg Designer sf10 I>- Cruncher 20/20
4. Effects- Edge Effects- Enhance More
- Repeat : Effects- Edge Effects- Enhance More
5. Effects – Plugins -Simple – Diamonds
6. Effects –Plugins-
Unlimited – ICNETFILTERS - Buttons & Frames –
Rectangular Button 157/83/88 / check Outline
7. Effects- Image Effects- Seamless Tiling use the settings below

8. Adjust- Blur Radial Blur use the settings below
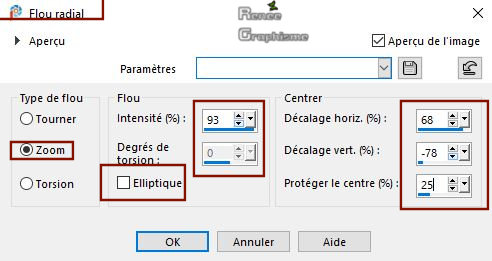
9. Layers- Duplicate
10. Effects – Plugins – AP[Distort] Distort – Wavy City use the settings below
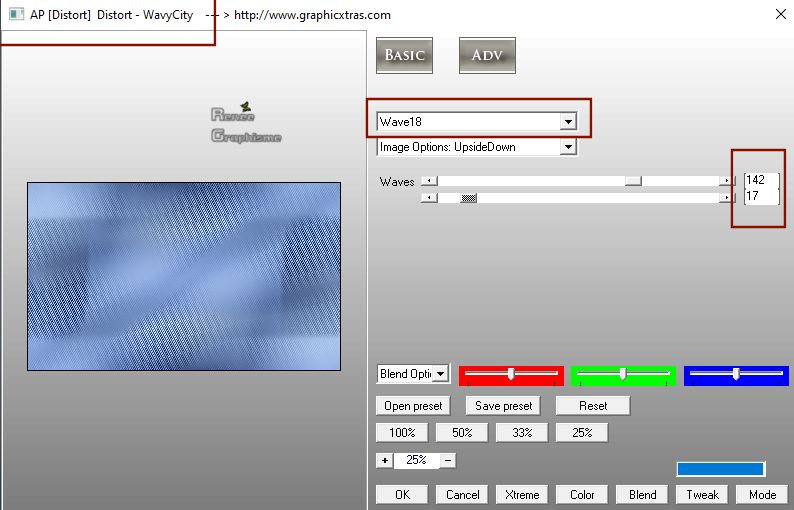
11. Lower the Opacity of this Layer to 69%
12. Adjust- Sharpness- Sharpen More
13. Layers- Merge- Merge Down
14. Open the tube ‘’Magrite-a-Dali-Image 1’’ -Edit - Copy- Activate your work -Edit - Paste as a new layer
15. Objects – Align
–Bottom
- Activate the bottom of the Layer-Palette = Raster 1
16. Activate Selection Tool -Custom Selection (S) -Rectangle with these settings
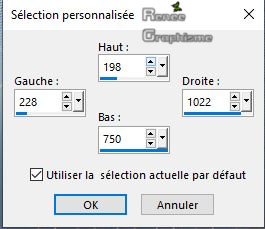
17. Selections-
Invert
18. Layers- Duplicate
19. Effects –Plugins-
Unlimited 2.0 - Distortion Filters – Smelter 2 setting at 65
20. Selections
-Invert
- Activate Raster 2 in the Layer-Palette
21. Effects – 3D Effects –Drop Shadow with these settings : 0/0/65/38 Color Black
Selections- Deselect All
Your work and Layer Palette look like this now-You should have this result

- Activate the bottom of the Layer-Palette = Raster 1
Do not add layer !!!!! We use Raster 1
- Activate the mask in your Psp ’’Masque_magritte-dali ‘’
22. Layers- New Maske Layer- From Image and select Mask
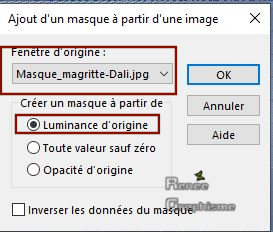
- Layers- Merge- Merge Group
23. Layers- Arrange- Bring to Top
24. Effects – 3D Effects –Drop Shadow with these settings: 0/0/65/42 Color Black
25. Selections –load/save selection –load selection from disc and select my selection: ‘’Magritte-a-Dali 1’’
DELETE
 (several times until the effect on the image fades) (several times until the effect on the image fades)

26. Layers- New Raster Layer
27. Selections –load/save selection –load selection from disc and select my selection: ‘’Magritte-a-Dali 2’’
28. Flood Fill Tool
 – Opacity at 48%- Fill the selection with the background color=3 ( 3 clics) – Opacity at 48%- Fill the selection with the background color=3 ( 3 clics)
Selections- Deselect All
29. Layers- Duplicate
30. Effects –Plugins-
Unlimited 2. 0 &<BKg Designer sf10 II> - Diamonds
31. Selections –load/save selection –load selection from disc and select my selection: ‘’Magritte-a-Dali 3’’
DELETE
Selections- Deselect All
32. Layers-Properties-Change the Blend Mode to " Soft Light "
- Material Properties: Set your foreground color to color #364b74 =2 – Set your background color to color #a7c2ec= 1
- Set your Foregroundcolor to Foreground-Background Rectangular gradient configured like this
(attention invert checked )

33. Layers- New Raster Layer
34. Selections –load/save selection –load selection from disc and select my selection: ‘’Magritte-a-Dali 4’’
35. Flood Fill Tool
 – Opacity at 100% - Fill the selection with the gradient – Opacity at 100% - Fill the selection with the gradient
36. Adjust- Blur Gaussian Blur -Radius 68
Selections- Deselect All
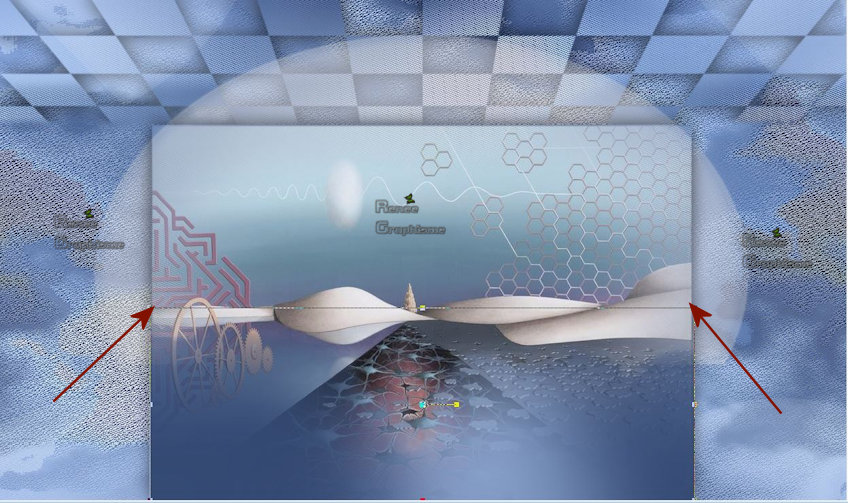
37. Activate your Pick Tool (K) - Stretch slightly on the sides as shown in the example below
38. Layers-Properties-Change the Blend Mode to " Darken " and Lower the Opacity to 75%
39. Layers- New Raster Layer
40. Selections –load/save selection –load selection from disc and select my selection: ‘’Magritte-a-Dali 5’’
41. Flood Fill Tool
 – Opacity at 60%- Fill the selections with the Foreground color = 2 – Opacity at 60%- Fill the selections with the Foreground color = 2
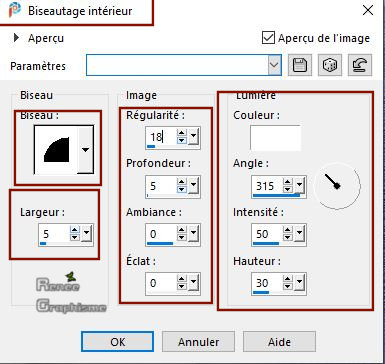
42. Effects – 3D Effects –Inner Bevel use the settings below
Selections- Deselect All
43. Layers- Duplicate
44. Effects-Distortion Effects-Wind/Winddirection From Right 100°
45. Layers- Arrange- Move Down
46. Layers-Properties-Change the Blend Mode to " Screen "
- To replace the top of the Layer-Palette
47. Open the tube ‘’
Magrite-a-Dali-Image 2’’ -Edit - Copy- Activate your work -Edit - Paste as a new layer
48. Pick Tool: (K) on your keyboard -Enter these parameters for the X: 605,00 and Y: 198,00 positions on the Toolbar

-Press ( M ) to close the Pick Tool
- Activate the bottom of the Layer-Palette = (Copy of Raster
1)
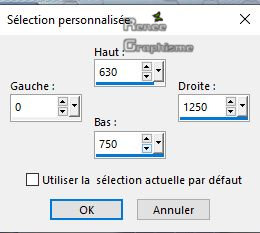
49. Activate Selection Tool -Custom Selection (S) -Rectangle with these settings
50. Selections- Promote Selection To Layer
51. Effects –Plugins-
Unlimited 2.0 - Mura’s Seamless- Checks with
Gradation...using the default settings
52. Adjust-Blur- Gaussian Blur-Radius 5%
53. Effects – Plugins– Mura’s Meister – Perspective Tiling using the default settings
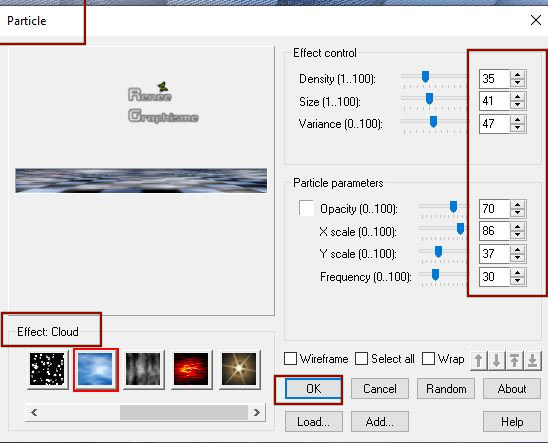
54. Effects – Plugins – Ulead Effect - Particle
- Effect Cloud -use the settings below
Selections- Deselect All
55. Selections –load/save selection –load selection from disc and select my selection: ‘’Magritte-a-Dali 6’’
DELETE
Selections- Deselect All
- To replace the top of the Layer-Palette
56. Layers- New Raster Layer
57. Selections –load/save selection –load selection from disc and select my selection: ‘’Magritte-a-Dali 7’’
58. Color Palette-Set your Foreground color to color #e4e0b6=3
-Flood Fill Tool -
Opacity at 36% – Fill the selection with the Foreground color = 3
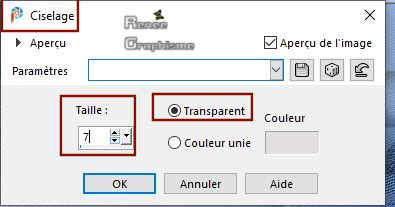
59. Effects –3D Effects – Chisel with these settings-Color #e4e0b6=3
Selections- Deselect All
- Move slightly to the left
60. Open the tube ‘’ titre-projet " -Edit - Copy- Activate your work -Edit - Paste as a new layer and move-
61. Open the tube ‘’Renee-Tubes-Tutoriel- Magritte – Dali’’ - Edit - Copy- Activate your work -Edit - Paste as a new layer and move
- Move the tube slightly down
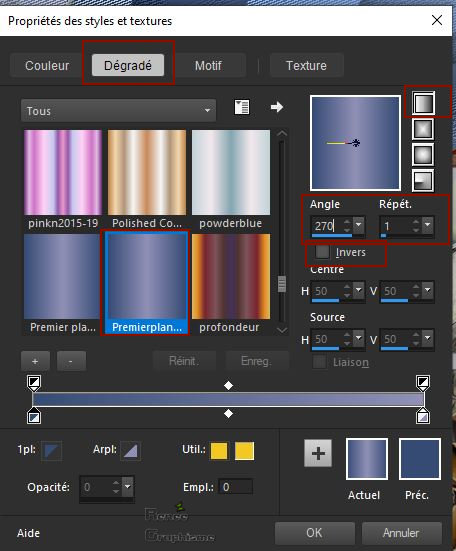
- Material Properties-Set your Foreground color to color #364b74=2 – Set your Background color to color #9090b6= 4
- Set your Foregroundcolor to Foreground-Background linear gradient configured like this
62. Layers- New Raster Layer
63. Flood Fill Tool
 - Opacity at 100% - Fill the layer with the gradient
64. To install the filter Vizros
- Unzip and install the filter
- Starting the PSP and open a picture.
Go to Filter - Click to Register.Please indicate the number and click again to Register. Now the filter is ready for use (If you're lucky, they must set it only once Sign up./Bad luck then you need to enter it when you want to use the filter every time.)
Effects-Plugins – Vizros 4 – Cylinder use the settings below

65. Activate the Magic Wand with these settings – Select the white part

66. Selections –
Modify – Expand by 3 Pixels
DELETE

Selections- Deselect All
67. Image
Resize 2 times at 68%
- Edit - Copy- Activate your work -Edit - Paste as a new layer and move ( see finished image )
Do you have problems with this- PNG image is into the zipfile and paste as a new layer on your working area and move
68. Open the tube ‘’
Renee-Tubes-Tutoriel- Magritte - Dali- Chat’’ -Edit - Copy- Activate your work -Edit - Paste as a new layer and move
- Activate your Move Tool (M) place it in the right place (see finished image )
69. Layers- New Raster Layer
70. Set your Foreground color to color Black
Flood Fill Tool
 – Fill the Layer with Black – Fill the Layer with Black
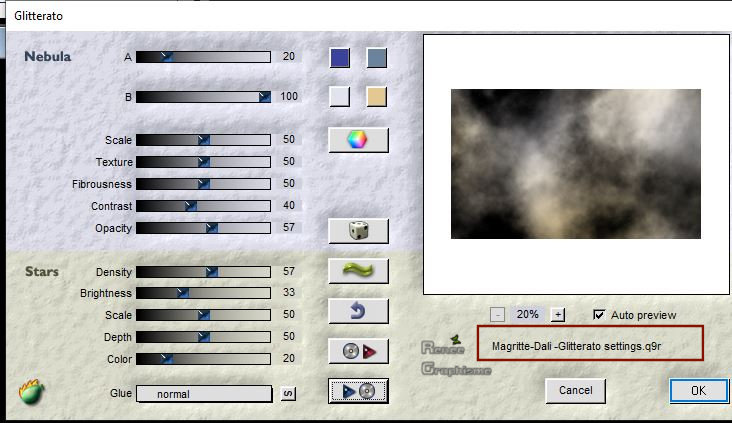
71. Effects – Plugins – Flaming Pear – Glitterato -click on the red arrow>>–select my file - Preset :Magritte-Dali
–Glitterato
(can be used in any folder of your choice by clicking it. - Open it will be OK in your filter)
Color: 2 - 1
3 - 4
72. Layers-Properties-Change the Blend Mode to " Overlay "
73. Layers- Merge-Merge Visible
74. Image -
Resize by 80 %- (Resize all layers checked)
75. Image - Add borders-Symmetric checked: 10 Pixels Color #364b74=2
76. Image - Add borders-Symmetric checked: 2 Pixels Color #a7c2ec=1
77. Image - Add borders-Symmetric checked: 60 Pixels Color #ffffff=6
78. Selections -
Select-All
79. Selections -
Modify - Contract by 25 Pixels
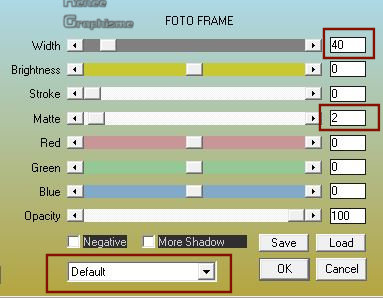
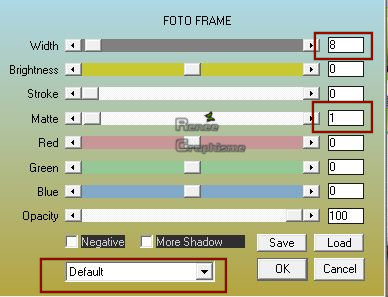
80. Effects – Plugins- AAA Frame – Foto Frame use the settings below
81. Effects – 3D Effects –Drop Shadow with these settings: 5/ - 5 /85 /36 Color Black
82. Effects – Plugins- AAA Frame – Foto Frame use the settings below
Selections- Deselect All
Save as JPG
I hope you enjoyed this lesson
Renée
This lesson was written by Renée
16-02-2020
Edited and Update
2020
*
Any resemblance with an existing lesson is a coincidence
*
Do not forget to thank the people who work with us and for us I have appointed the tubeurs and translators
Thanks
*
|
 Translations


 (several times until the effect on the image fades)


