|
Let's start the lesson.

-
Preparation
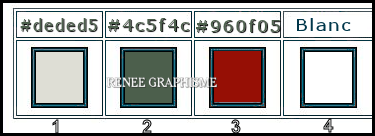
- Material Properties: Set your foreground color to color #deded5= 1 – Set your background color to color #4c5f4c =2
1. File- Open a new transparent Image of 1005 x 625 Pixels
2.Flood Fill Tool
 -
Fill the layer with the Foreground color =1 -
Fill the layer with the Foreground color =1
- Selections- Select All
3. Open the tube ’’ no-flying-lesso’’ -Edit - Copy- Activate your work -Edit - Paste into Selection
Selections- Deselect All
4. Adjust -Blur- Motion Blur use the settings below
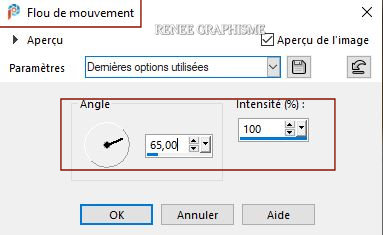
- Repeat: Adjust-Blur -Motion Blur with the same settings
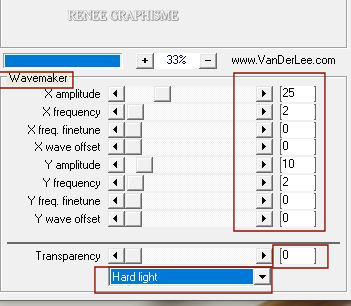
5. Effects – Plugins – Vanderlee Unplugged X- Wavemaker use the settings below
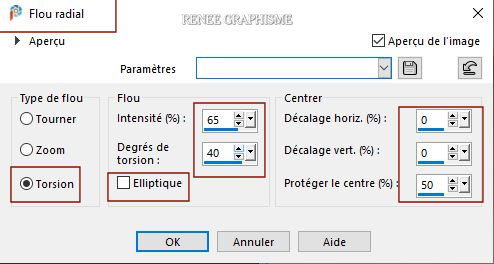
6. Adjust- Blur- Radial Blur use the settings below
7. Layers- Duplicate
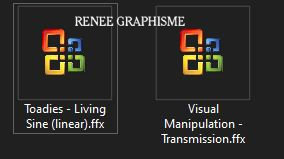
8. Effects –Plugins-
Unlimited 2.0 - Visual Manipulation –Transmission with these settings:
129/87/0
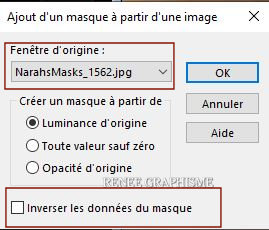
9.Layers- New Mask Layer-From Image and select Mask ‘’
NarahsMasks_1562.’’
- Layers- Merge- Merge Group
10. Effects – Edge Effects– Enhance
11. Layers-Properties-Change the Blend Mode to " Multiply "
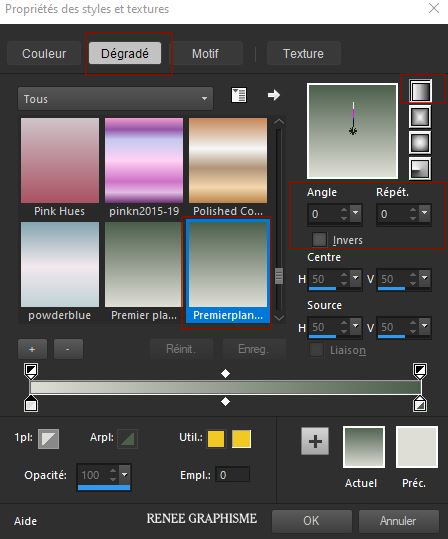
-Material Properties: Set your Foregroundcolor to foreground-background linear gradient configured like this
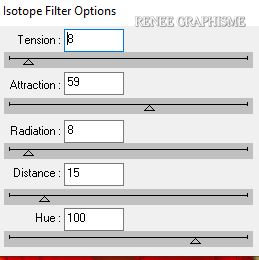
12. Layers- New Raster Layer
13.Flood Fill Tool
-
Fill the layer with the gradient
14. Effects- Plugins – PhotoshopfunII - Kylie with these settings: 46/0
15. Effects – Reflection Effects – Kaleidoscope use the settings below

16. Effects –Plugins-
Unlimited 2.0 - Toadies - Living Sine (linear) with these settings:
87/ 244/ 100 / 255
17. Effects – Reflection Effects – Rotating Mirror use the settings below
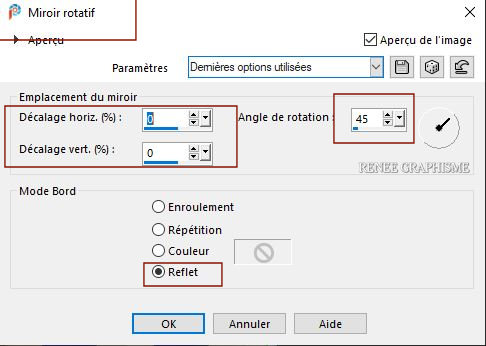
18.
Image - Mirror - Mirror Horizontal (Image - Mirror in older versions of PSP)
19. Effects – Reflection Effects – Rotating Mirror (same settings )
20. Layers-Properties-Set the Blend Mode to " Overlay "
- Activate the bottom layer in the Layer Palette= Raster 1
21. Layers- Duplicate
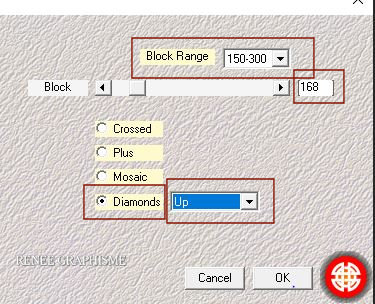
22. Effects – Plugins – Medhi – Sorting Tile use the settings below
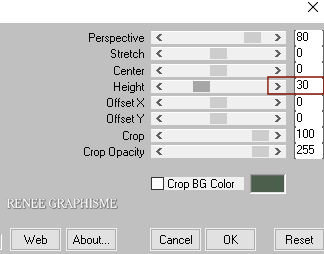
23. Effects – Plugins - Mura’s Meister – Perspective Tiling use the settings below
- Activate the top of the layer palette
24. Open the tube ‘’mardi gras ‘’ -Edit - Copy- Activate your work -Edit - Paste as a new layer
- Move Tool: Place in the top left corner
25. Open the tube ‘’Mardi-gras- Image 1
-Renee " -Edit - Copy- Activate your work -Edit - Paste as a new layer
- Pick Tool: (K) on your keyboard -Enter these parameters for the X and the Y positions on the Toolbar
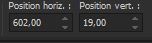 602 / 19
26. Layers- New Raster Layer
27. Effects – Plugins – Dsb Flux- Isotop use the settings below
28.
Selections –load/save selection –load selection from disc and select my selection:
‘’Mardi-Gras1’’
29.SELECTIONS-
INVERT
DELETE

Selections- Deselect All
30. Image -
Resize 30% - Resize all layers not checked
31. Effects – Plugins – Alien Skin Eye Candy 5 Impact – Glass ––Tab- Settings- User/Settings and select my file -
Preset : Mardi-Gras-Glass’’
32. Pick Tool: (K) on your keyboard -Enter these parameters for the X and the Y positions on the Toolbar
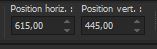 615
/ 445 615
/ 445
Press ( M ) to close the Pick Tool
33. Open the tube
‘’
Mardi-gras-Image 2’’ --Edit - Copy- Activate your work -Edit - Paste as a new layer
34. Pick Tool: (K) on your keyboard -Enter these parameters for the X and the Y positions on the Toolbar
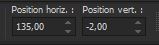 135
/ - 2 135
/ - 2
Press ( M ) to close the Pick Tool
35. Layers- New Raster Layer
36.
Selections –load/save selection –load selection from disc and select my selection:
‘’Mardi-Gras2’’
37.Color Palette Set your Foreground color to color #ffffff=4
Flood Fill Tool – Fill the selection with the Foreground color =4
Selections- Deselect All
38.
Open the tube ‘’
Mardi-gras-Image 3’’ -Edit - Copy- Activate your work -Edit - Paste as a new layer
- Place of your choice
39. Open the tube ‘’
Lima Junior (9)’
-
Image - Mirror - Mirror Horizontal (Image - Mirror in older versions of PSP)(delete the signature)
- Image Resize 75%
- Edit - Copy- Activate your work -Edit - Paste as a new layer and move
40. Effects - Plugins - Alien Skin EyeCandy5
Impact Perspective Shadow /Preset : Drop Shadow Blury
41. Layers- Merge- Merge Visible
- Edit- Copy !!!!
42. Open the tube " Cadre Mardi Gras "
-
With your Magic Wand,(add shift) select the inside of that frame.
-Selections-Modify-Expand with 4 Pixels
– Edit- Paste Into Selection (Image is still in your PSP memory)
Selections- Deselect All
43. Layers- Merge - Merge All (Flatten)
44.Image – Resize - 1005 Pixels Width
Save as JPG
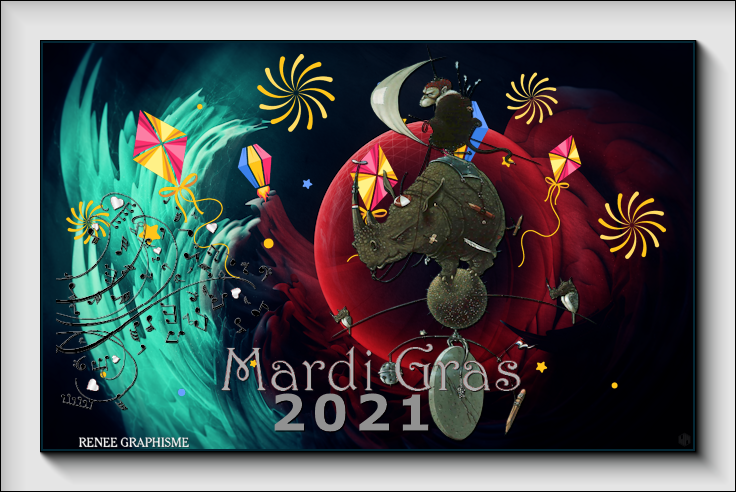
I hope you enjoyed this lesson
Renée
This lesson was written by Renée 23/01/2021
Edited and Update
in 2021
*
Any resemblance with an existing lesson is a coincidence
* Do not forget to thank the people who work with us and for us
I have appointed the tubeurs and translators
Thanks
*
|
 Translations