|
Properties background:-Set your background color to:#000000

1.
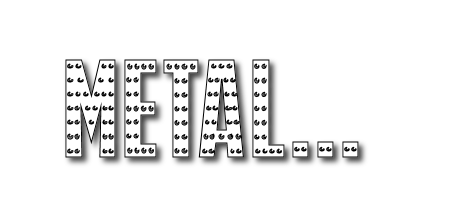
Open the background image‘’fond_metal’’/ Window - Duplicate (or shift+D) - Close the original and proceed on the copy -Promote Background Layer =Raster 1
2.
Layers- Duplicate
3.
Selections- Select All
4.
Selections- Modify-Contract 30
Pixels
5.
Effects-3D Effects-Cutout with these settings
6.
Selections- Modify-Contract 5 pixels
Hit the Delete Key of your Keyboard 
Selections- Deselect All
-
Activate the bottom of the layer palette =Raster 1
7.
Adjust-Blur-Gaussian Blur: Radius: 50
8.
Effects- Plugins- Teph’s tricks – Offset Warp
135/ 180
9.
Effects- Plugins – Unlimited - Teph’s tricks - Slide
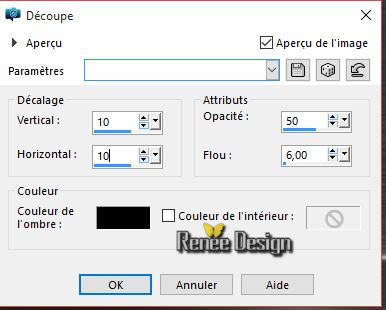
Y 50
10.
Layers- Duplicate
11.
Selections –load/save selection –load selection from disc and select my selection: ‘’ metal_select_1’’
12. Effects-3D Effects-Cutout with these settings

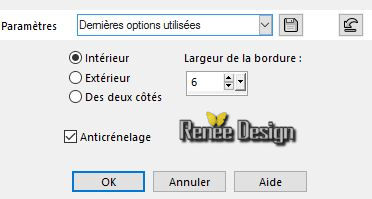
13.
Selections-Modify-Select Selection Borders with these settings-Inside
-. Activate the bottom of the layer palette =Raster 1
14.
Selections-Promote selection to Layer
Selections- Deselect All
15. Layer reorganize - Place the top of the stack
16. Effects- Edge Effects-Enhance More
17. Layers- Duplicate
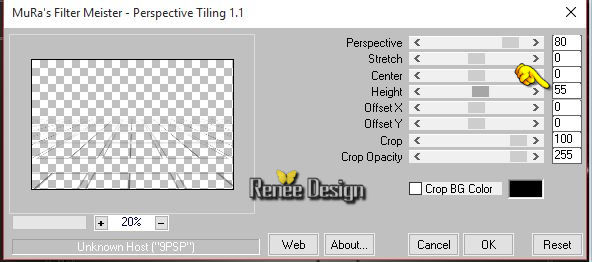
18. Effects-Plugins – Simple – Zoom out and flip
19. Effects-Plugins – Mura’s Meister /Perspective
tilling use settings as shown below
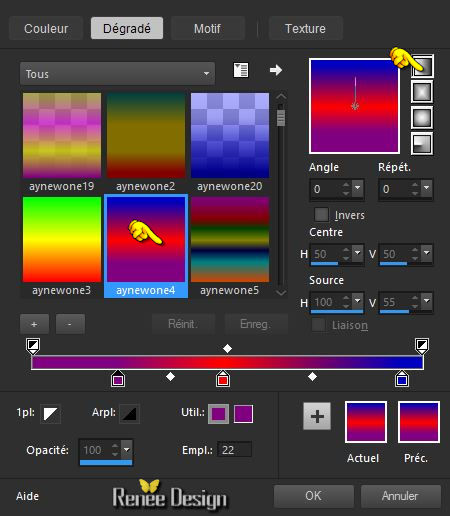
Properties foreground: - Change foreground material into gradient and select :’’anywone_4 »
Put your foreground on the linear gradient with settings below
20. Layers- New Raster Layer
21.Selections –load/save selection –load selection from disc and select my selection:
‘’metal_select_1’’
22. Pot of Paint: Change the opacity of the color at 50%- Flood Fill Tool : Fill the selection with the gradient
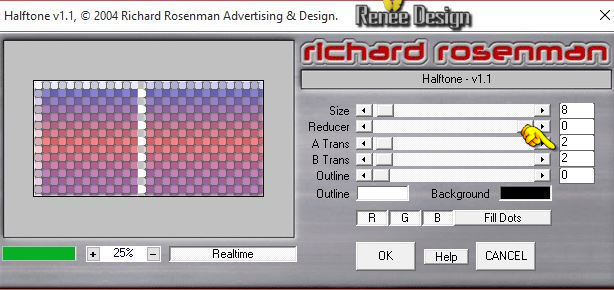
23.
Effects- Plugins –Richard Rosenman-
Halftone use settings as shown below
24.
Selections- Modify-Contract 50 pixels
25. Effects-Plugins – Tramage – Wee scrathes a
255
26. Effects- 3 D Effects- Drop Shadow with these settings 1/1/100/10 black
Selections- Deselect All
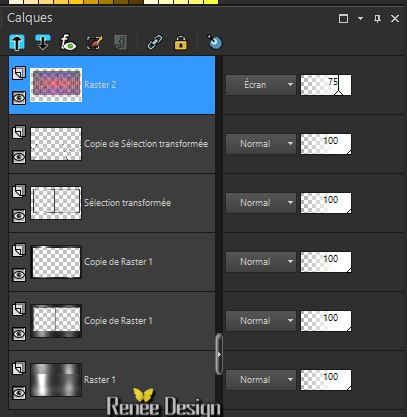
27.Double click on this Layer and set the Blend Mode to "Screen " -Set the layer opacity of this layer to 75%
- Activate the bottom of the layer palette =Raster 1
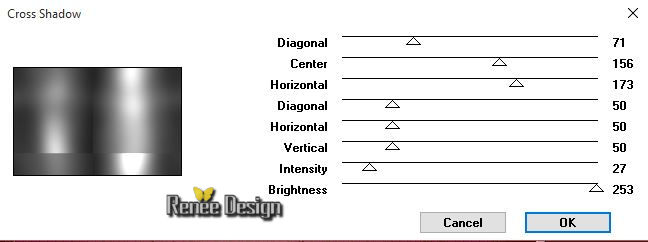
28. Effects-Plugins – Graphic plus - Cross shadow use settings as shown below
- To replace the top of the layers palette
- Your Layer palette look like this now-You should have this result
 0 0
- Activate the tube ‘’ Metal_tubes_des_decos’’
Do not close we need it later for the rest of the work (some are hidden layers to lighten the weight of the tube simply open)
29. Activate layer ‘’metal_1’of the tube
- Edit/ Copy-Edit - Paste as new layer on your working image
30. Effects- Image Effects- Offset with these settings H = -273 and V =
5/ transparent checked
31. Double click and set the Blend Mode to "Soft Light "
32. Layers- New Raster Layer
33.
Selections –load/save selection –load selection from disc and select my selection:‘’ metal_select_2’’
34. Pot of Paint: Change the opacity of the color at 100% - Flood Fill Tool: Fill the selection with the background color black
35. Double click and set the Blend Mode to "Hard Light "
Selections- Deselect All
36. Layers- New Raster Layer
37.
Selections –load/save selection –load selection from disc and select my selection: ‘’ metal_select_3’’
- Properties foreground: Close the gradient, set your foregroundcolor to White
38. Activate Flood Fill Tool and fill the selection with the foreground color white
Selections- Deselect All
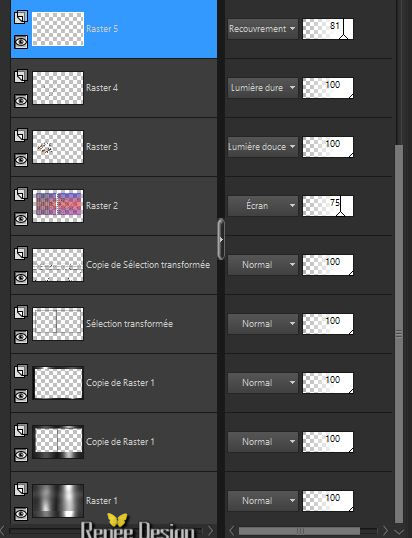
39. Double click on this Layer and set the Blend Mode to "Overlay " -Set the layer opacity of this layer to 81%
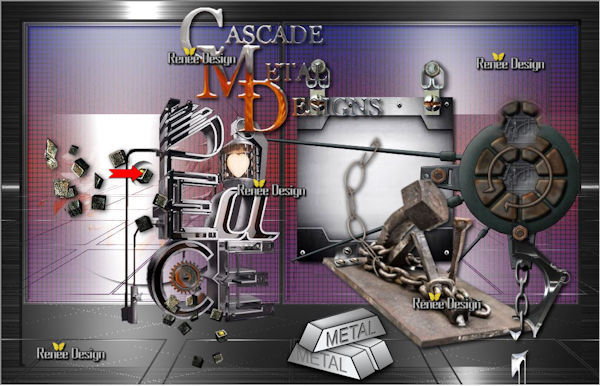
- Your Layer palette look like this now-You should have this result
- Back on the tube '' deco''
40. Activate the layer ‘’metal_4’
- Edit/ Copy-Edit - Paste as new layer on your working image
41. Effects- Image Effects- Offset with these settings : H = 126 and V = 23
42. Effects- 3 D Effects- Drop Shadow with these settings 4/4/75/8 black
.In the folder 'scrap' you have the equipment Manola link above his website)
-Turn fasteners and screws and similar work see screenshot below.
Here we consider that the light comes from the top left corner of the work.Give a drop shadow
When you create your bindings
Well placed as catching
-
Layers -Fusionner layers screws + clips (in 1 layer)
43. Effects- 3 D Effects- Drop Shadow with these settings 4/4/75/8 black
44. Open the tube ‘’ pngtubesno (68)’’
- Be placed on the raster layer 3
- Edit/ Copy-Edit - Paste as new layer on your working image
45. Effects- Image Effects-Offset with these settings: H = 180 and V = -15
- Back on the tube ''deco''
46. Activate the layer ‘’boulon_ecrou’ ’
(Attention harmonize with the colors of your tubes if you choose other screws tubes ...)
- Edit/ Copy-Edit - Paste as new layer on your working image
- Put like this 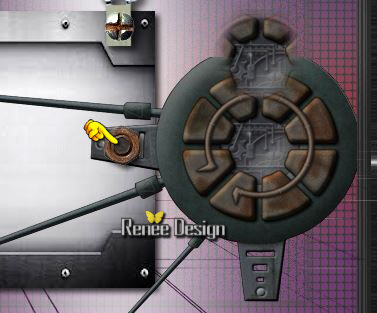
-
Effects- 3 D Effects- Drop Shadow with these settings 4/4/75/8 black
47. Open the tube ‘’ manola_prisonnier’’
- Be placed on the layer ‘’ modifie pour le tuto ‘
- Edit/ Copy-Edit - Paste as new layer on your working image
-If you choose other tubes you give the correct orientation to match your work -
- Activate the tube » »Metal-tubes_des_ decos »
48. Be placed on the layer‘’attache ‘’ - Edit/ Copy-Edit - Paste as new layer on your working image and move to the right place
(If your choice is another type of attachment must also properly match)
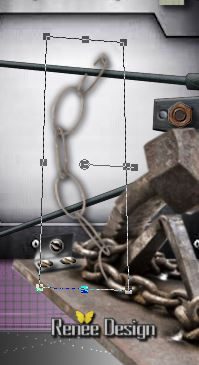
49. Activate layer ‘’metal_5’’ (chaine)
- Edit/ Copy-Edit - Paste as new layer on your working image
Activate the Pick Tool- (K) Mode Perspective-(set so as to give a good appearance like this)
- On the tube '' deco''
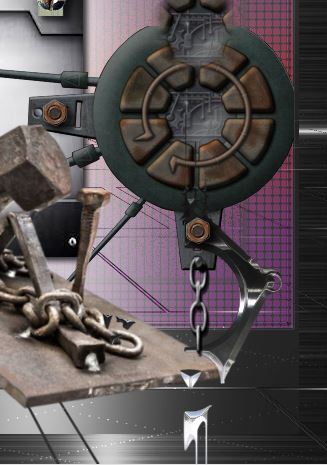
50. Activate the layer ‘’metal_3’’
- Edit/ Copy-Edit - Paste as new layer on your working image
- With the Move Tool, move it in the right place (see finished image)
51. Effects- 3 D Effects- Drop Shadow with these settings 4/4/75/8 black
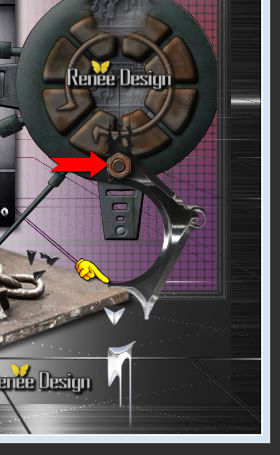
-. In your '' scrap '' Enable a screw or rivet to attach and apply shadow still scope in memory
You have this as a result (it will be placed against the side of the tube plate of see screenshot)
52. Open the tube ‘’maillonchainette’’
- Edit/ Copy-Edit - Paste as new layer on your working image
- Activate Pick Tool (K) Put like this (note the precise placement)
Before going further you can save the layers in your 3D object construction in PNG if you want to use it later
- It will add your signature on a metal bottom and attach to the establishment like this to get this result
We continue with the tutorial
- Back on the tube ''deco''
52. Activate the layer ‘’metal_6 ‘’ (lingots)
- Edit/ Copy-Edit - Paste as new layer on your working image
- Activate Move Tool (M) move it in the right place (see completed)
- Back on the tube ''deco''
53. Activate the layer ‘’metal_7 » (texte )
- Edit/ Copy-Edit - Paste as new layer on your working image
-Activate Move Tool (M) Place the top (see over)
54. Effects- 3 D Effects- Drop Shadow with these settings 2/2/75/4 black
- Back on the tube ''deco''
55. Activate layer ‘’metal_8 »( my creations in 3 D )
If you want to create a personal version of this installation. I added a few creative lettering on the hit "Matrix for deco tube" and writes policies for such created
- You have to create a taste write '' METAL '' or another word "
- Edit/ Copy-Edit - Paste as new layer on your working image-(my creation)
''metal 8''(PEACE)
56. Effects- 3 D Effects- Drop Shadow with these settings 5/5/75/10 black
57. Layers- Arrange- Move Down
- To replace the top of the layers palette
- Back on the tube ''deco''
58. Activate layer ’’metal_9’’ of this tube
- Edit/ Copy-Edit - Paste as new layer on your working image
Move tool / place your tube on the left side of your image
59. Effects- 3 D Effects- Drop Shadow with these settings 2/3/65/12 black
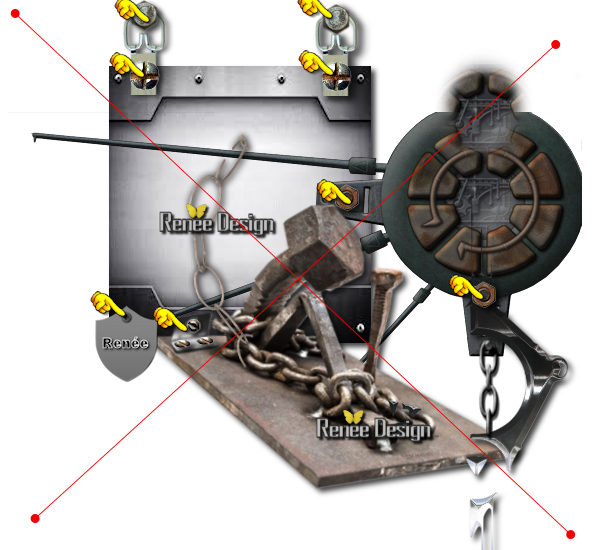
You should have this result as shown in the print screen below
60. Layer- Merge- Merge Visible
61. Edit-Copy
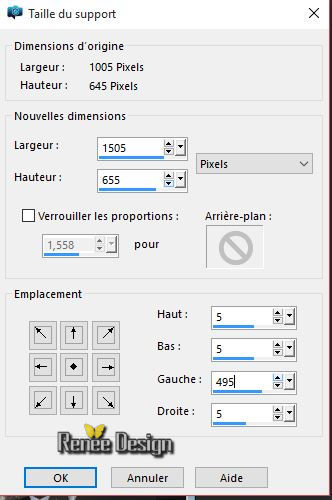
62. Image Canvas Size with these settings
63. Layers- New Raster Layer
64.
Selections- Select All
-Edit Paste into selection (Image is still in your PSP memory)
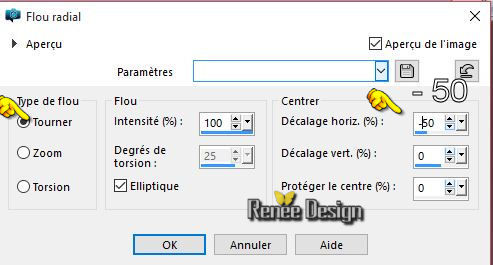
65. Adjust-Blur- Radial Blur use settings as shown below
Selections- Deselect All
66. Layers-Arrange- Move Down
67. Adjust-Blur-Gaussian Blur: Radius: 25
68.
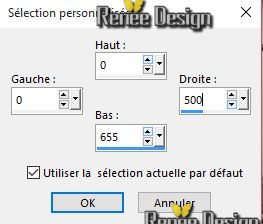
Selection Tool ( S ) Custom selection use settings below
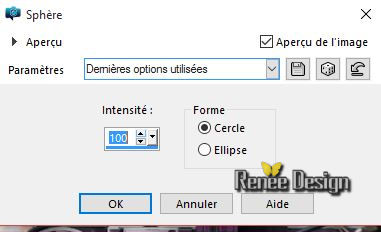
69. Effects- Geometric Effects- Spherize use settings as show below
Selections- Deselect All
70. Layers- New Raster Layer
71.
Selections –load/save selection –load selection from disc and select my selection: ‘’
metal_select_4’’
72. Pot of Paint: Change the opacity of the color at 60%- Activate Flood Fill Tool and fill the selection with the foreground color white
Selections- Deselect All
73.Effects- Distortion Effects- Wave use settings below

74. Adjust-Blur- Gaussian Blur: Radius: 25
Considerate place at the top of the layers palette
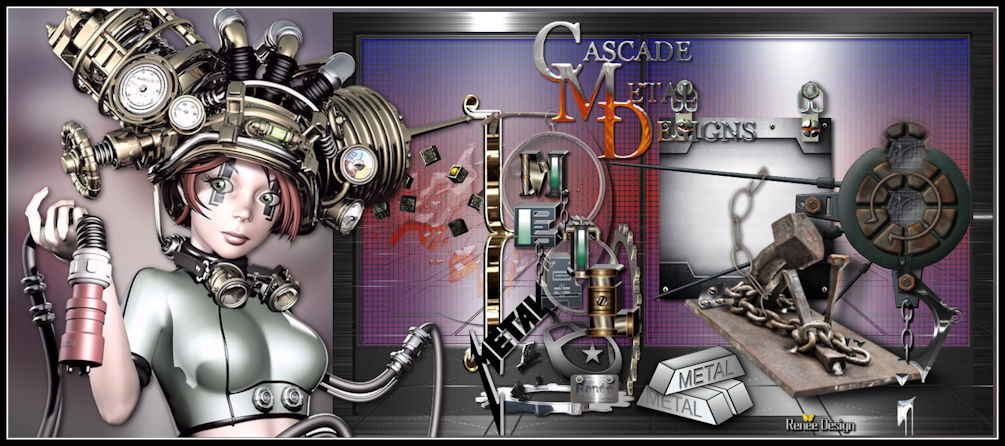
75. Open the tube ‘’
Renee_tube_fillette_steampunk.pspimage’’
76. Image Resize to 655 pixels high
- Edit/ Copy-Edit - Paste as new layer on your working image
- Move tool / place your tube on the left side of your image
76.
Activate your Pick Tool (K)Stretch against the edge if necessary (see finished image)
77. Effects- 3 D Effects- Drop Shadow with the same settings
78. Image - Add borders-Symmetric checked:2 pixels white
79. Image - Add borders-Symmetric checked:10 pixels black
80. Image Resize to 1005 pixels width.
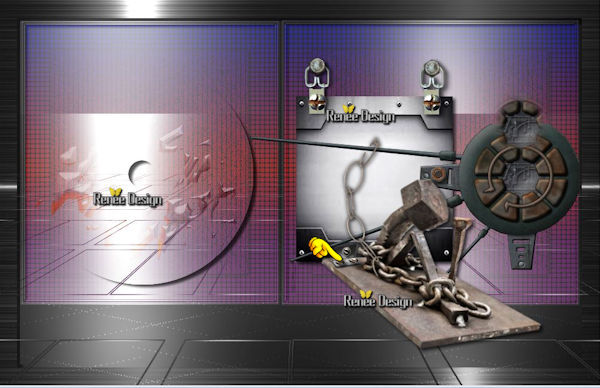
Save as JPG
I hope you enjoyed this lesson
Renée
This lesson was written by Renée 18/11/2015
Edited and Update
2015
*
Any resemblance with an existing lesson is a coincidence
*
Do not forget to thank the people who work with us and for us I have appointed the tubeurs and translators
Thanks
Renée.
| 
 Translations


 When you see this logo the filter is imported in Unlimited

 All rights reserved