|
Let's start the lesson. Open the Color-Palette
-
-Material Properties:Foreground color to this color
#611c01 Background color to this color#7c8b60
-
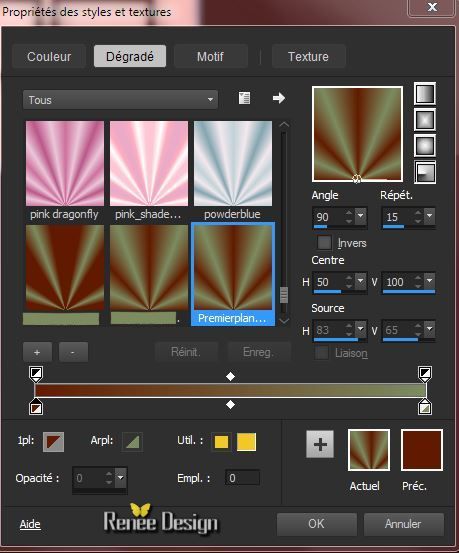
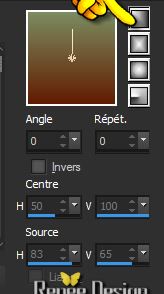
Prepare a radial gradient configured like this.
1.
File - New - New Transparent Image: 1015 x 625 pixels
2.
Activate Flood Fill Tool and fill the layer with the gradient
3.
Adjust-Blur-Gaussian Blur :Radius 35%
4.
Layers-Duplicate
5.
Effects- Plugins - Unlimited 2.0 - Andrews Fiter 6 (ou Andrew's
Filter collection 56 )- - Blurred Bits & Pieces
using the default settings
6.
Effects-Edge Effects- Enhance
7.
Effects- Distortion Effects- Pinch - 100
8. Effects- Plugins- Unlimited 2.0 -
Willy- Takinami Bamboo Web 150/55
9.
Layer Palette -Double click on this layer and set the Blendmode to Hard Light
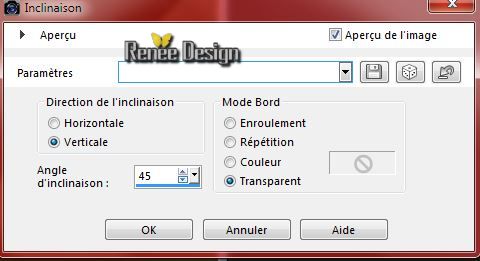
10.
Effects- Geometric Effects-Skew with these settings
11.
Effects - 3D Effects - Drop shadow with these settings: 0/0/80/40 black
12. Effects- Plugins - Simple 4 -Way Average
13.
Layers- Merge- Merge Down
14.
Layers- New raster layer
15.
Selections - load/save selection - load selection from disk and choose my selection: "MF_selection_1"
16.
Pot of Paint: Change the opacity of the color to 70% - Activate Flood Fill Tool and fill the selection with the foreground color
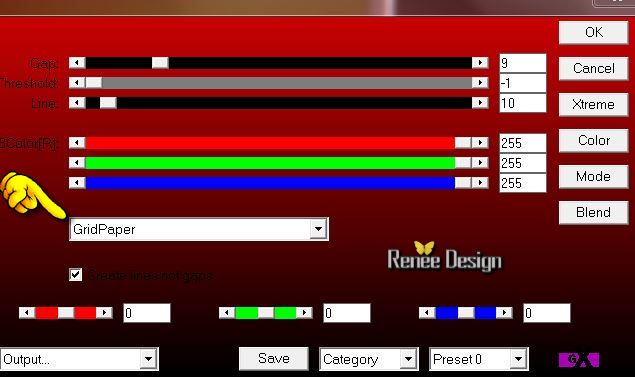
Selections- Deselect All
17.Effects- Plugins -AP01( Innovations) Line
Silverling with these settings
18.
Effects - 3D Effects - Drop shadow with these settings: 0/0/20/21 black
19.
Layers- Duplicate
-Image Mirror -Image Flip
20.
Layers- Merge- Merge Down
21.
Layers-Duplicate
22.
Effects- Plugins -Simple -Blintz
23.
Layers- Merge- Merge Down
24.Effects- Plugins -Toadies - What are you 10/10
25.
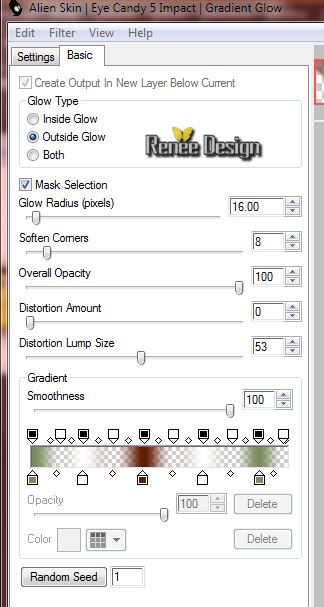
Layer Palette -Double click on this layer and set the Blendmode to Overlay -and set the layer opacity of this layer to 73%
26.Effects- Plugins - Eyecandy5 Impact -Gradient
Glow- tab Settings/User settings choose my preset:''MF_gradientglow" Or manual settings below
27.
Layers- New raster layer
28.
Selections - load/save selection - load selection from disk and choose my selection: " MF_selection_2''
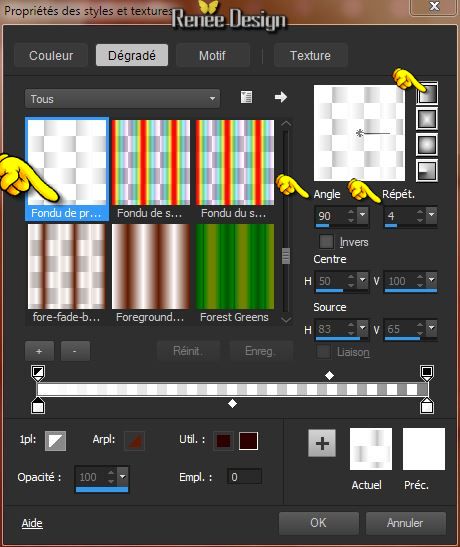
-
Foreground Properties: Change the gradient into a linear gradient with these settings
29.
Pot of Paint: Change the opacity of the color to 100% -Activate Flood Fill Tool and fill the selection with the gradient
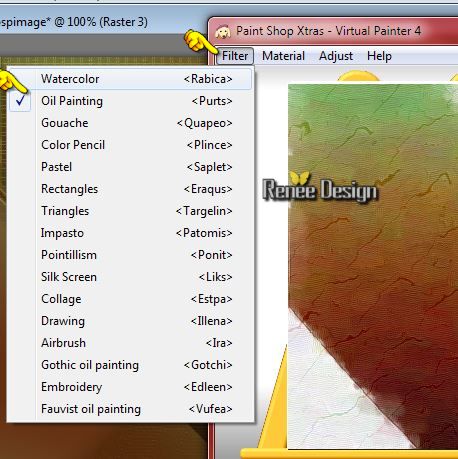
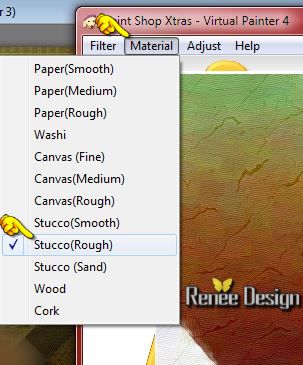
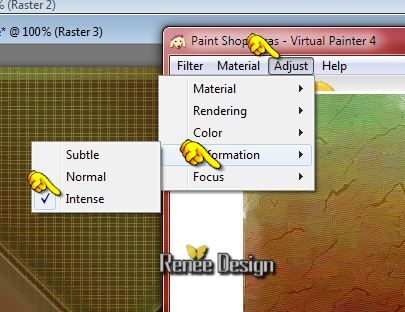
30.Effects- Plugins - Virtual Painting with these settings
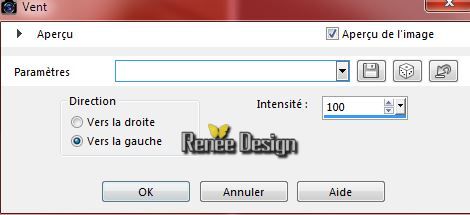
Selections- Deselect All
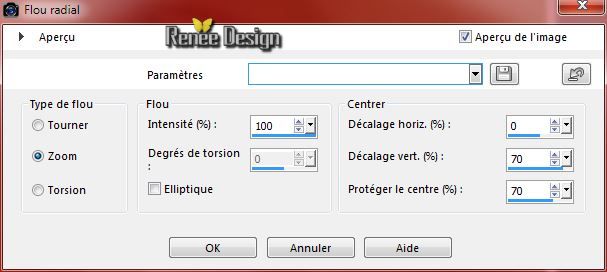
31.
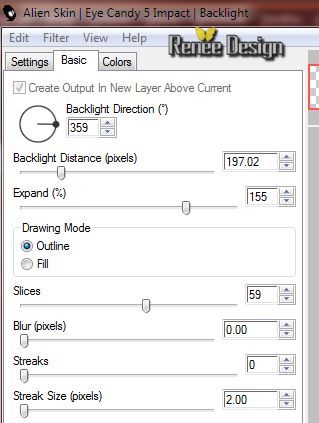
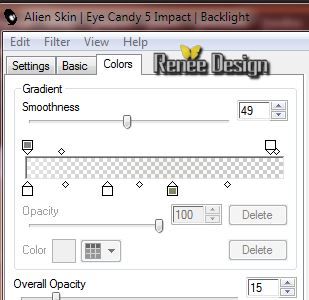
Effects- Plugins - VM Stylize- Zoom Blur 39/159
32.
Reduce the opacity of this layer to 51%
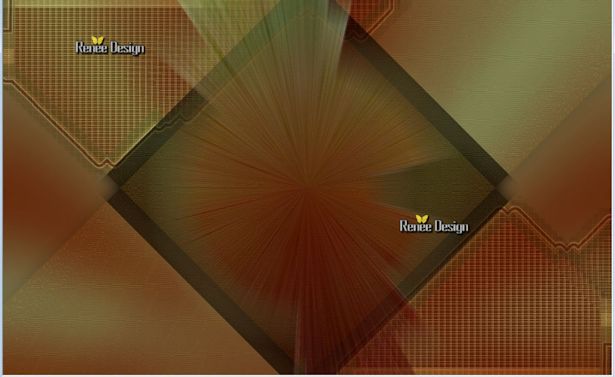
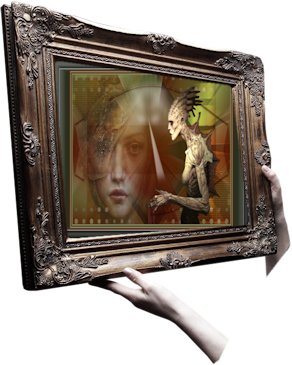
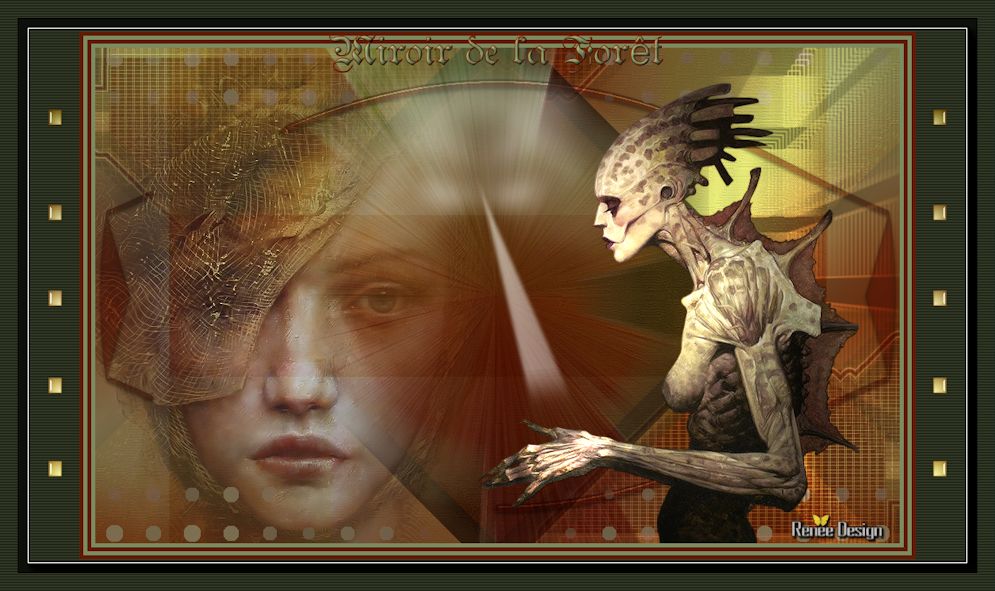
-The result
33.
Activate this tube ''
Renee_tube_visage_femme_rousse.pspimage''
-
Edit/copy-Edit paste as a new layer on your working area
-
Aktivate Move Tool (M) place to the left side
34.
Layers- Arrange Move Down
- Activate the top of the Layer Palette
35.
Layers- New raster layer
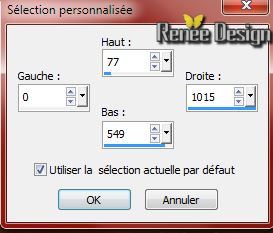
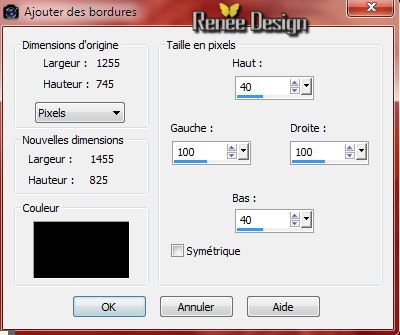
36.Selections Tool (S)-Custom -Selections-with these settings
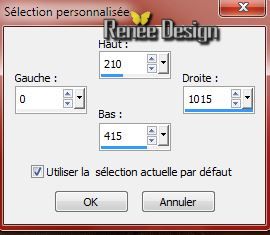
37.
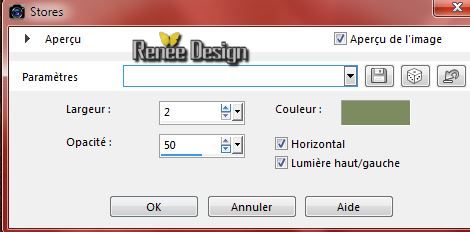
Activate Flood Fill Tool and fill the selection with the gradient
Selections- Deselect All
38.Effects- Plugins - Simple -Blintz
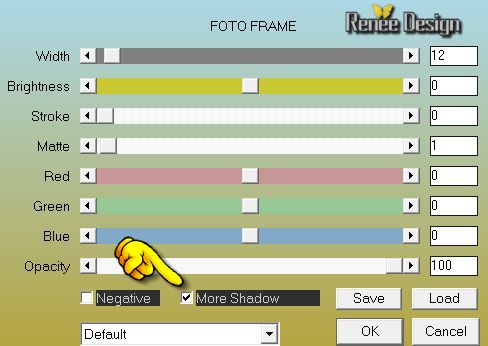
39.Effects- Plugins - Simple- 4 Way Average
40.
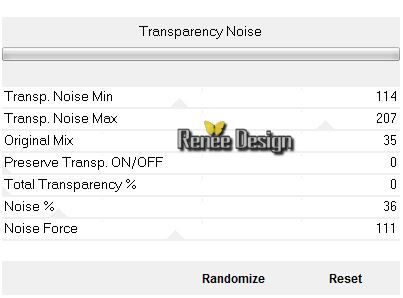
Effects- Plugins - Unlimited 2.0 - Krusty's FX vol.I.1.0-
Transparency Noise
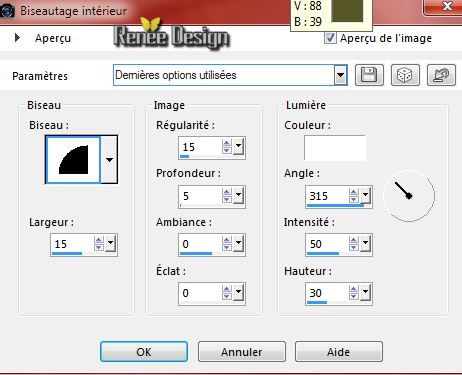
41.
Layer Palette -Double click on this layer and set the Blendmode to Soft Light
42.
Layers- New raster layer
43.Selections Tool (S)-Custom -Selections-with these settings

44.
Pot of Paint: Change the opacity of the color to 100% /Activate Flood Fill Tool and fill the selection with the foregroundcolor
45.
Selections-Modify-Contract 6 pixels
-
DELETE

-Selections- Deselect All
46.Effects- Plugins - Simple Blintz
47.
Layers-Duplicate
48.
Image Mirror
49.
Layers- Merge- Merge Down
50. Effects- Plugins - Simple -Pizza Slice Mirror
51.
Effects- Distortion Effects-Warp with these settings
52. Effects- Plugins -EyeCandy5 Impact - Glass -Tab Settings-Preset " Clear"
53.
Layer Palette -Double click on this layer and set the Blendmode to Overlay -and set the layer opacity of this layer to 51%.
54.
Layers- New raster layer
55.
Selections - load/save selection - load selection from disk and choose my selection: '' MF_selection_3''
56.
Material Properties: Foreground color to color white
--Activate Flood fill tool and fill the selection with color white (Click 1x in the selection )
57.
Layers- New raster layer
58.
Selections-Select All
59.
Activate this tube ''MV_AlienLady_18-02-2011.psp''(do not close we use it again )
-
Edit/copy-Edit paste into selection
-
Selections- Deselect All
60.
Effects-Image Effects-Seamless Tiling using the default settings
61. Adjust-Blur-Radial Blur with these settings
62.Effects- Plugins -VM Extravanga - Vasarely
63.
Layer Palette -Double click on this layer and set the Blendmode to Lighten
64. Effects- Plugins -Unlimited 2.0
-&<BKg Kaleidoscope>-4QFlip ZBottomL
65.Selections Tool (S)-Custom -Selections-with these settings
-
DELETE
-
Selections- Deselect All
66.
Layers- New raster layer
67.
Selections - load/save selection - load selection from disk and choose my selection: "MF_selection_4''
68.
Properties Foreground: foreground to gradient and choose "Fading white" gradient -Linear with these settings
69.
Activate Flood Fill Tool and fill the selection with the gradient
Selections- Deselect All
70.
Effects- Distortion Effects-Wind-Left 100
71.
Layer Palette -Double click on this layer and set the Blendmode to Overlay and the opacity to 100%
72. Effects- Plugins - Eyecandy 5 Impact - Black Light -
tab Settings/User settings choose my preset:''
MF_blacklight ''
73.
Activate the tube
''MV_AlienLady_18-02-2011.psp''
-
Edit/copy-Edit paste as a new layer on your working area
-
With your move tool place it to the right side
74.Effects- Plugins - Graphic plus - Cross Shadow-using the default settings
75.
Layers- New raster layer
76.
Selections - load/save selection - load selection from disk and choose my selection: ''MF_selection_5"
77.
Pot of Paint: Change the opacity of the color to 65%
-
Properties Foreground: Foreground to "Fade White"-Linear
but repeats 1
-Activate Flood Fill Tool and fill the selection with the gradient
Selections- Deselect All
78.
Layer Palette: activate the layer underneath (tube Alien)
79.
Selections - load/save selection - load selection from disk and choose my selection: ''MF_selection_6''
80.Effects- Plugins - Graphic plus - Cross Shadow using the default settings
Selections- Deselect All
81.
Layers- Merge- Merge Visible
82.
-Material Properties:Foreground color to this color
#611c01 Background color to this color: #7c8b60
83.
Image - Add borders-Symmetric checked: 5 pixels BG-Color
84.
Image - Add borders-Symmetric checked: 5 pixels FG-Color
85.
Image - Add borders-Symmetric checked: 5 pixels BG-Color
86.
Image - Add borders-Symmetric checked: 5 pixels FG-Color
87.
Selections- Select All
88.
Image - Add borders-Asymmetric-with these settings- Black
89.
Selections- Invert
90.
Effects- Texture Effects- Blinds-BG-Color
91.
Selections-Select All
92.
Selections-Modify-Contract 22 pixels
93.
Effects- Plugins - AAA Frame - Foto Frame with these settings
-
Selections- Deselect All
94.
Activate the tube ''deco_MF"- Edit-Copy-Edit-Paste as a new layer on your working area /With your move tool place it to the left side
95.
Layers-Duplicate -Image Mirror
96.
Write your own text ( Font ''teutonic1'' included into the zipfile) Size 48
97.
Effects- 3D Effects-Inner Bevel with these settings-BG-Color
98.
Layers- Merge- Merge All ( flatten)
99.
Image Resize to 995 pixels Width
Save as JPG
I hope you enjoyed this lesson
Renée
This lesson was written by Renée 5/12/2014
Placing
.01/2015
*
Any resemblance with an existing lesson is merely a coincidence *
* Don't forget to thank the people who work for us and with us. I named the tubeurs - Testers and the translators.
Thanks Renée.
*
|
 Translations


 All rights reserved