|
Let's start the lesson -
I love wool
La vie c’est comme un tricot,
Elle nous donne la laine et les aiguilles.
Et nous dit : "Tricote de ton mieux".
Une maille est une journée sur l'aiguille du temps.
Dans un mois, 30 ou 31 mailles.
Dans dix ans, 3650 mailles.
Quelques-unes sont à l'endroit, d’autres sont à
l'envers.
Il y a aussi les mailles échappées, mais on peut les
reprendre.
Que de mailles manquées ……………mais on peut les rattraper
---------
Life is like knitting,
It gives us the wool and the needles.
And tells us, "Knit as best you can.
One stitch is one day on the needle of time.
In one month, 30 or 31 stitches.
In ten years, 3650 stitches.
Some stitches are right, some stitches are wrong.
There are also stitches that you dropped, but you can
pick them up again.
How many stitches have been missed ............... but
can be made up.
-
Preparation
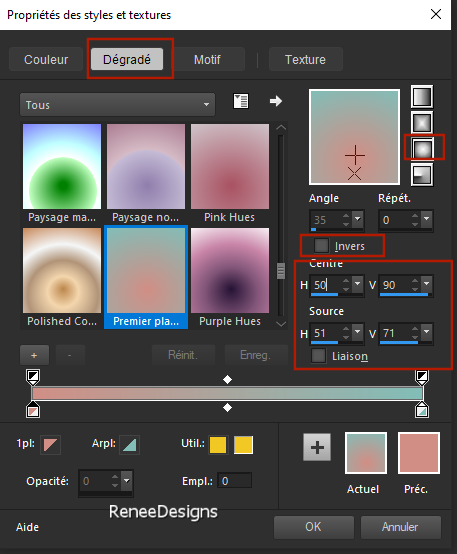
-Material Properties: Set the color of your Foreground
to color 1 – Set the color of your Background to color 2
-Replace
your foreground color with a Foreground/Background
Sunburst gradient with the following settings
1.
File-Open a New Transparent Image in this size : 1050 x 750 Pixels
2.
Flood Fill Tool
 –
Fill the layer with the gradient –
Fill the layer with the gradient
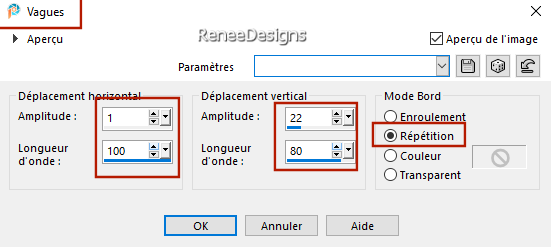
3.
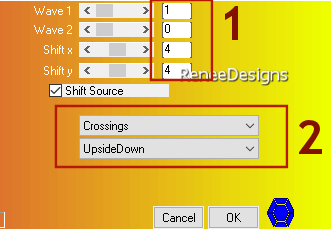
Effects- Distortion Effects- Wave use the settings below
4.
Selections –load/save selection –load selection from
disc and select my selection: ‘Aime-la-laine 1’’
5.
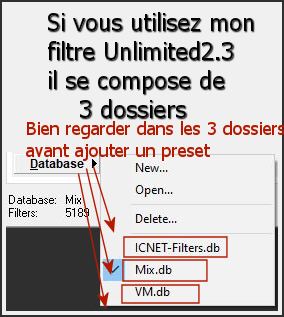
Effects- Plugins - Filters in Unlimited 2.0 -
Plugins AB 06 -Warping Warposity... using the
default settings

-
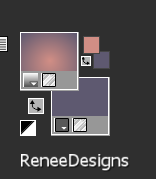
Material Properties: - Change the background color to
No.3 (Same gradient)
6.
Layers- New Raster Layer
7.
Flood Fill Tool
–
Fill the layer with the gradient
8.
Image - Resize - to 45% - Resize all layers unchecked
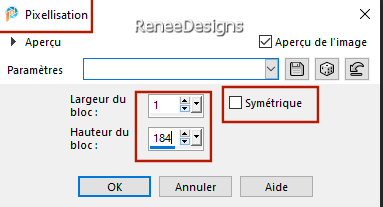
9.
Effects- Distortion Effects- Pixelate use the settings
below
10.
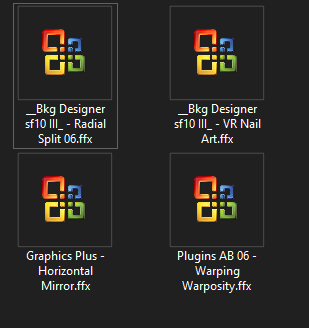
Effects- Plugins - Filters in Unlimited 2.0 –
Graphic Plus – Horizontal Mirror : 150/ 0
11.
Effects- Image Effects- Seamless Tiling use the settings
below

12.
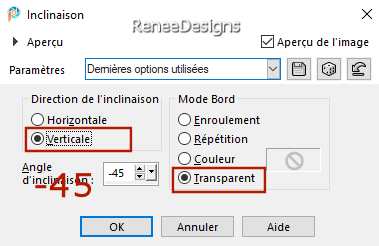
Effects- Geometric Effects- Skew use the settings below
13.
Effects- 3D- Effects- Drop Shadow with these settings: 18 / 0 / 58 / 30
Color black
14.
Layers- Duplicate
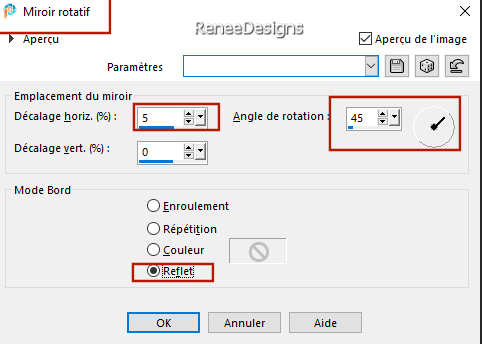
15.
Effects- Reflection Effects- Rotating Mirror use the
settings below
16.
Effects Reflection Effects–Rotating
Mirror
-But
Rotation angle 135
17.
Effects- Plugins – Vanderlee- Unplugged X –
Defocus with these settings

18.
Layers-Properties-Set the Blend Mode to " Difference" –
Reduce the opacity of this layer to 46%
19.
Layers- Merge- Merge Down
20.
Effects – Plugins – Flaming Pear – Flexify2 use the
settings below

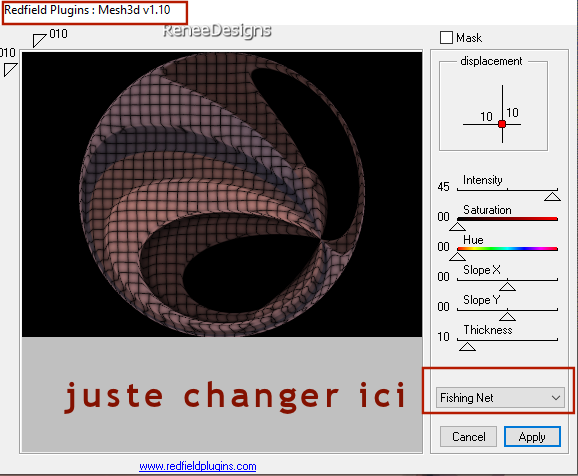
21.
Effets – Plugins – Redfield – Mesh 3D-Fishing Net and
Apply
22.
Image - Resize - to 35% - Resize all layers unchecked
23.
Layers- Duplicate
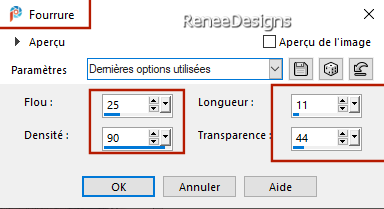
24.
Effects – Texture Effects – Fur use the settings
below
25.
Layers-Properties-Set the Blend Mode to " Dissolve" –
Reduce the opacity of this layer to 53%
26.
Effects- Edge Effects- Enhance More
27.
Layers- Merge- Merge Down
28.
Activate - Color changer Tool (F)- Apply color 1 ( your
choise)
29. Pick Tool: (K) on your keyboard -
Enter the following parameters on the toolbar
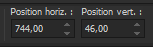 744
/ 46 744
/ 46
Press ( M ) to close the Tool
30.
Layers- New Raster Layer
31.
Selections –load/save selection –load selection from
disc and select my selection: ‘Aime-la-laine 2’’
32.
Flood Fill Tool – Fill the selection with
the gradient
33.
Effects- 3D- Effects- Drop Shadow with these settings:
18/0/58/30 Color black
34.
Effects- Plugins - Filters in Unlimited 2.0 - &<Bkg
Designer sf10 III> -
VR Nail Art use the settings below
(Play
with the filter sliders to get a color in harmony with
your work.)

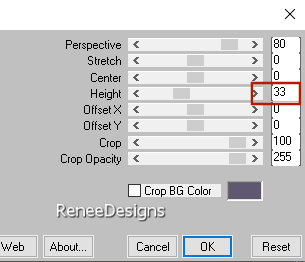
35.
Effets – Plugins – Mura’s Meister – Perspective
Tiling-Height 33
36.
Selections –load/save selection –load selection from
disc and select my selection: ‘Aime-la-laine 3’’
 2 to 3 times
37.
Open the Tube ‘’
jaime-laine-image0.’’
-Edit
- Copy- Activate your work -Edit - Paste as new layer -
Place at bottom left
38.
Layers- New Raster Layer
39.
Selections –load/save selection –load selection from
disc and select my selection: ‘Aime-la-laine 4’’
-
Material Properties: - Color foreground No. 2 and Color
background No.3
40.
Flood Fill Tool –
Opacity 40%
– Fill the selection with color No.2
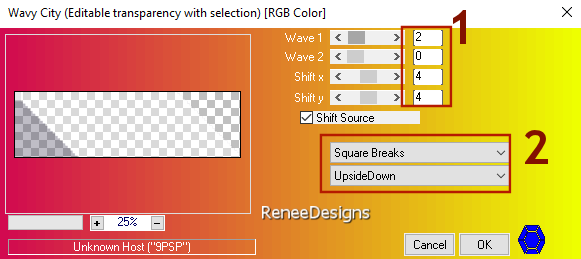
41.Effects –
Plugins – Innovations 1.5 - Wave city use the
settings below
42.
Effects- Edge Effects- Enhance
43.
Effets – Plugins – Innovations 1.5 - Wave city use the
settings below
44.
Effects- Edge Effects- Enhance More
45.
Effects- 3D- Effects- Drop Shadow with these settings: 8 / -7 /58 /22
Color black
46.
Open the tube ‘’ jaime-laine-image1’’
-Edit
- Copy- Activate your work -Edit - Paste as new layer –
Place at the top of the work(see finished image)
47.
Layers- New Raster Layer
48.
Selections –load/save selection –load selection from
disc and select my selection: ‘Aime-la-laine 5’’
49.
Flood Fill Tool –
Opacity 40 %
– Fill the selection with color No. 5
50.
Open the tube ‘Renee-TUBES-Septembre-2024-28’’
-Image - Mirror - Mirror Horizontal (Image - Mirror in
older versions of PSP)
-
Image Resize to 38 %
-
Edit - Copy- Activate your work -Edit - Paste as new
layer
-
Slide the tube into the selection
51.
Selections – Invert
52.
Calques - Nouveau calque raster
53.
Selections –load/save selection –load selection from
disc and select my selection: ‘Aime-la-laine 6’’ (it
will cancel the previous one)
54.
Flood Fill Tool –
Opacity 100% –
Fill the selection with color No.
6
55.
Selections
–load/save selection –load selection from disc and
select my selection: ‘Aime-la-laine 7’’
56.
Adjust- Hue and Saturation -Colorize (choose in harmony
with your tube )
-
Hue 177 and Saturation 91
57.
Effects- Plugins - Filters
in Unlimited 2.0 - &<Bkg Designer sf10 III> - Radial Split
06 : 37
58.
Effects- Edge Effects- Enhance
59.
Effects- Plugins - Alien Skin EyeCandy 5 -
Impact – Glass –Tab- Settings- User Settings and select
my file- Preset : ‘’Aime-laine-glass’’
60.
Open the tube ‘’
jaime-laine-image2’’
-Edit
- Copy- Activate your work -Edit - Paste as new layer
61. Pick Tool: (K) on your keyboard -
Enter the following parameters on the toolbar
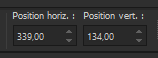 339
/ 134 339
/ 134
-Press ( M ) to close the Tool
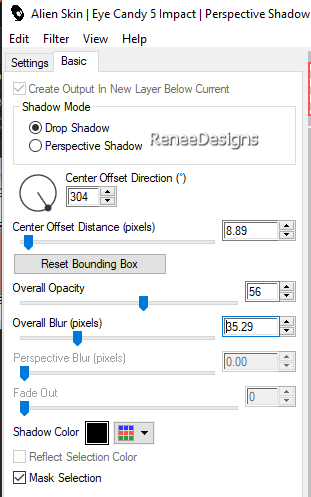
62. Effects- Plugins - Alien
Skin EyeCandy 5-Impact –Perspective Shadow use the
settings below
63.Open the tube: ‘’ jaime-laine-image3’’
-
Edit - Copy- Activate your work -Edit -Paste in place as
new layer see finished
64. Open the tube
‘’jaime-laine-image4’’
(stairs
and the bird )-Edit - Copy- Activate
your work - Edit - Paste in place as new layer see
finished
65.
Effects- Plugins - Alien Skin EyeCandy5 -
Impact –Perspective Shadow with the same settings
66.
Open the tube : ‘’jaime-laine-image 5’’ -Edit
- Copy- Activate your work -Edit - Paste as new layer
67. Pick Tool: (K) on your keyboard -
Enter the following parameters on the toolbar
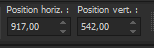 917
/ 542 917
/ 542
- Press ( M ) to close the Tool
68.
This image comes above
the layer with the stairs and the bird
69.
Activate the top of the Layers palette
70. Image - Add Borders-Symmetric checked:
1 Pixels -Color No. 3
71. Image - Add Borders-Symmetric checked:
10 Pixels -Color white
72. Selections - Select All
73. Image - Add Borders-Symmetric checked: 1
Pixel -Color No.2
74. Image - Add Borders-Symmetric checked:
40 Pixels -Color white
75. Effects- 3D- Effects- Drop Shadow
with these settings: 0/ 0/ 58/ 22 Color black
76. Paste the author's watermark on your
work and your own watermark
77. Layers- Merge- Merge All ( flatten)
78.
Image - Resize - to
90% - Resize all layers- Checked
Save as JPG

I hope you enjoyed this
lesson
Renée
This lesson was written by
Renée 27/05/2024
Edited and Update
in 2024
*
Any resemblance with an
existing lesson is a coincidence
* Do not forget to thank the people who work with us and
for us - I have appointed the tubeurs and translators
Thanks
*
|


 Translations