Let's begin
1. Open a transparent image - 1025 x 685 pixels
2. Color palette - Change the foreground to #dfedf9 and
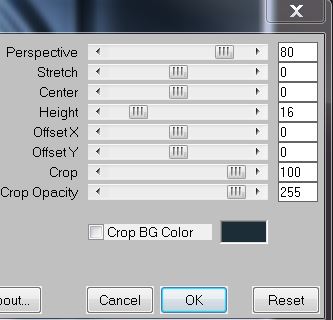
the background to #1c2d37
3. Prepare a sunburst gradient configured like this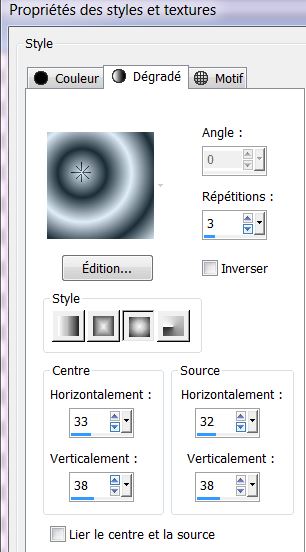
4. Fill the layer with the gradient
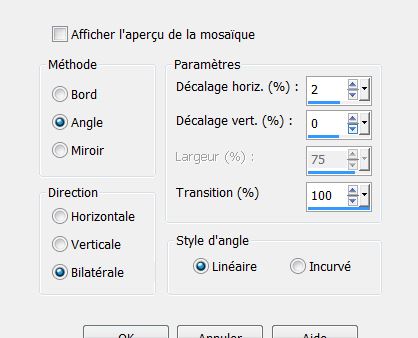
5. Effects - image effects - seamless tiling
6. Layers - duplicate
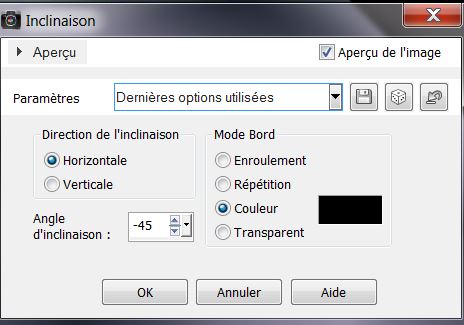
7. Effects - geometric - skew
8. Effects - image effects - seamless tiling - as
above on line 5
9. Effects - Distortion effects - Punch set at 100
10. Layers - change the mode to Overlay
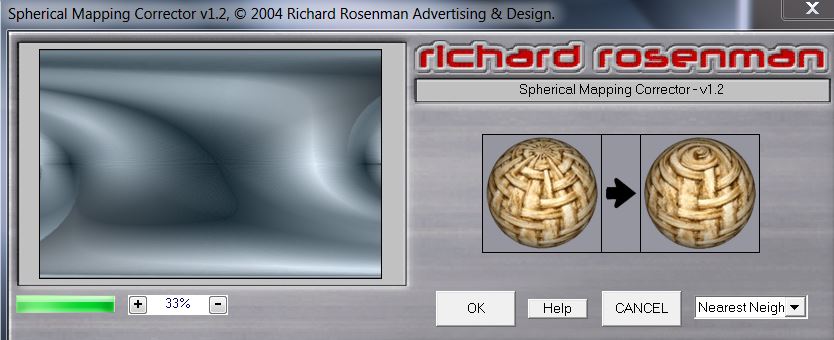
11. Effects - Richard Roseman - spherical mapping
corrector
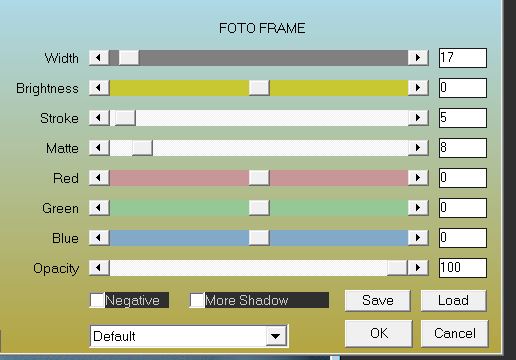
12. Effects - AAA Frames - Foto frame
13. Image - Free rotate - 90 ° right
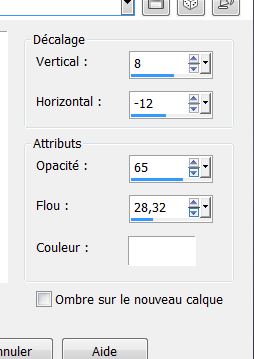
14. Effects - 3D effects - drop shadow
15. Effects - Simple - pizza slice mirror
16. Layers - Duplicate - Effects - Simple - half wrap
17. Change this layer mode to hard light
18. Click on and activate the bottom layer (raster 1)
19. Selections - Load selection from disk
"monsieur_hiver_1"
20. Selections - promote selection to layer
21. Effects - 3D effects - inner bevel

22. Selections - select none
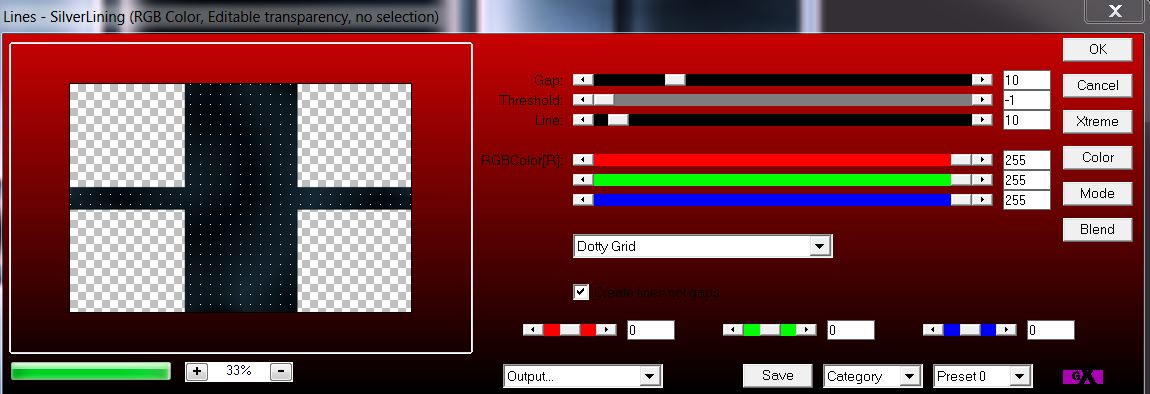
23. Effects - AP01 - Lines/ silverlining
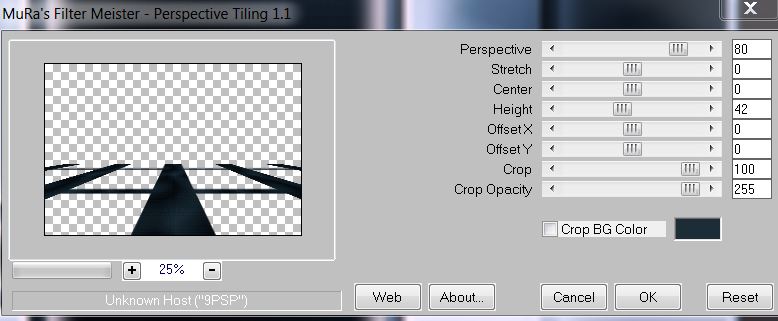
24. Effects - Mura's Meister - perpsective Tiling
25. Effects - 3D effects - drop shadow (still in memory)
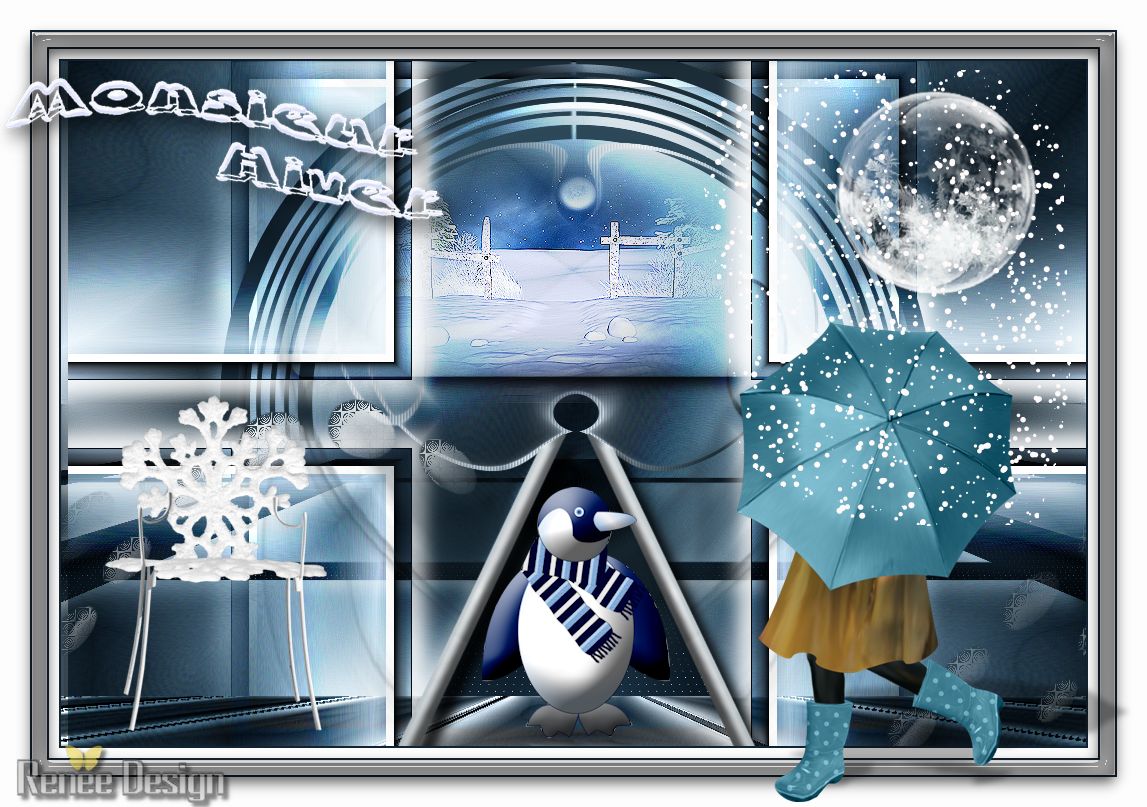
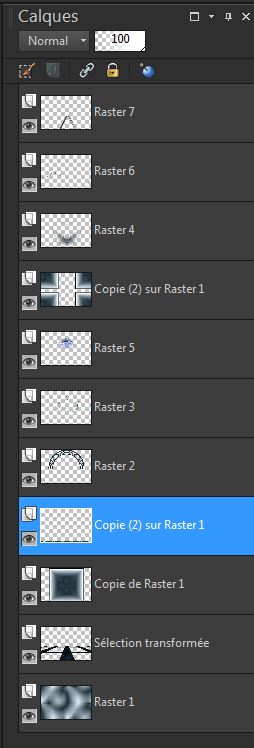
This is what you should have now
26. Layers - new raster layer
27. Selections - Load selection from disk
"monsieur_hiver_2"
28. Fill with the background color
29. Selections - select none
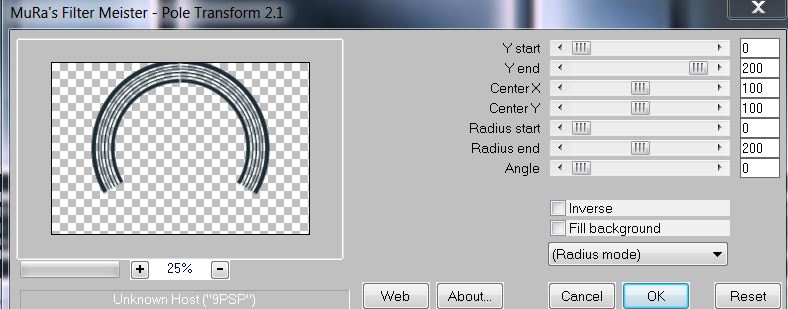
30. Effects - Mura's meister - pole transformation
31. With the selection tool (S) draw a rectangle like
this
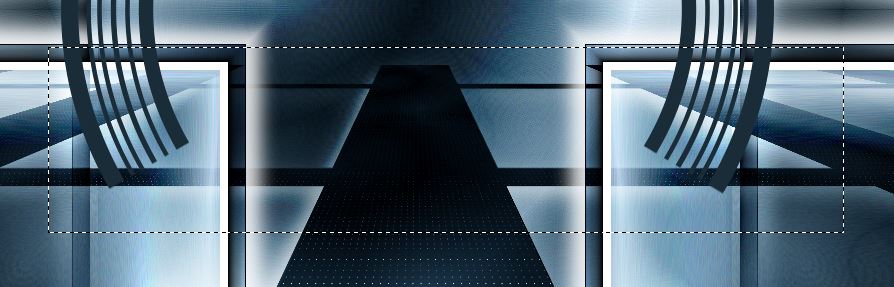
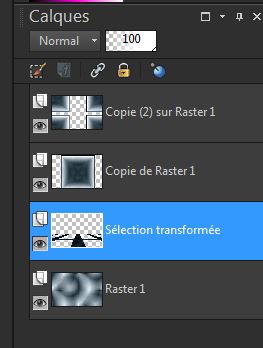
32. Delete - Layers - Arrange - Move down
You are here
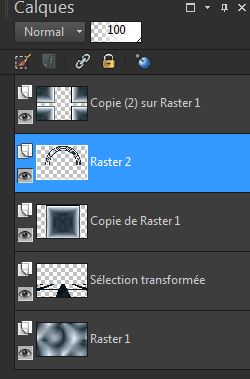
33. Remain on Raster 2
34. Layers - Add a new raster layer
35. Selections - load the selection "monsieur_hiver_3''
/ fill with the sunburst gradient - (click 4 times with
the fill tool)
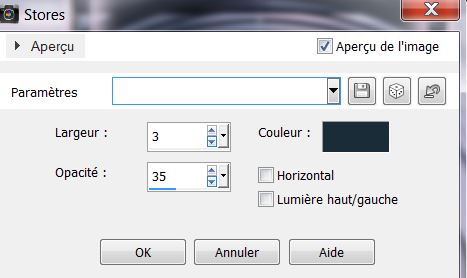
36. Effects - texture effects - Blinds / background
color selected
37. Selections - select none
38. Open the tube "image_hiver1" - paste as a new layer
- image - resize 35% - all layers unchecked
39. Effects - edge effects - enhance
40. With the select tool (K) move up and place like this
41. Click to activate the top layer
42. Layers - new raster layer - open the brush
"pinceau_hiver_1"

place
the tip of the brush here a click with the foreground
color

43. Layers - duplicate - image - mirror - Layers - merge
down
44. Layers - new raster layer
45. Selections - Load selection from disk
"monsieur_hiver_4" - fill with the background color
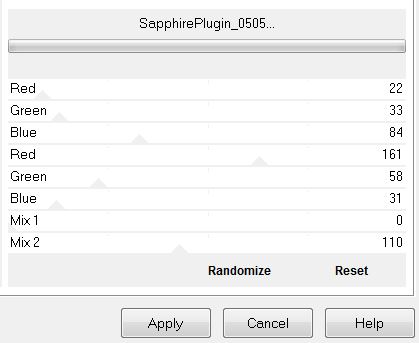
46. Effects Filters unlimited2.0 - Sapphire filters 06 -
Sapphire plugins_0505
47. Selections - select none
48. Effects - Filters unlimited2.0 - Funhouse - moire
mirror - 17
49. Open the tube "hiver_2barres" - paste as a new layer
- move down into place as shown in finished image
50. Click to activate "copy raster1" - Layers -
Duplicate - change to normal mode
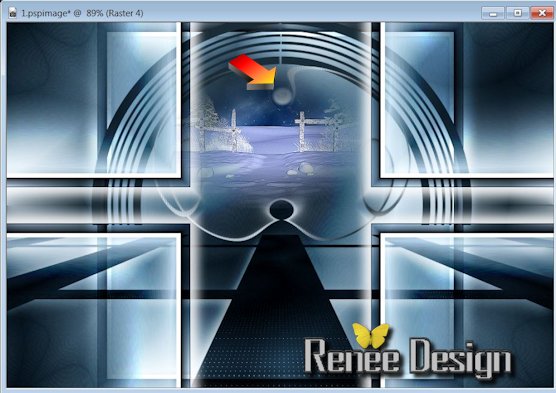
51. Effects - Mura's meister - perspective tiling
Move this layer slightly down places see finished
drawing
You are there in your work
52. Effects - User defined filters - emboss3 - Standard
53. Click to activate the top layer
54. Open the tube "monsieur_hiver_pingouin" - paste as a
new layer - Effects - Eye Candy5 impact - perspective
shadow - reflection in front
55. Layers - new raster layer
56. Selections - Load selection from disk
"monsieur_hiver_5" (this selection is out of the frame
but that is normal)
Colour palette - Change foreground color to #fdfdfd -
with your flood fill tool/ Opacity lowered to 40 - fill
the selection
57. Effects - eye Candy5 impact - glass - preset "monsieur_
hiver_glass"
58. Selections - select none - change the mode to
overlay
59. Open the tube "monsieur_hiver_lune" - paste as a new
layer
60. Open the tube "monsieur_hiver_chaisse" - paste as a
new layer
61. Layers - Merge visible layers
Colour palette -
change the foreground color to #122332 and background
color to #fdfdfd
Load the script from the materials file into your psp
files if you haven't already done so
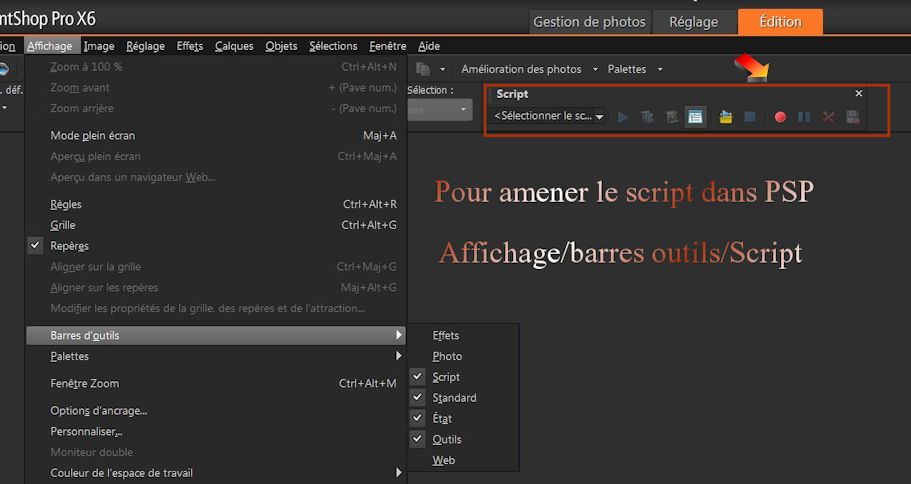
62. Open your script toolbar - locate the script "monsieur_hiver_cadre"
click on the blue arrow and let it run
 (FOR
OTHER VERSIONS Psp /if you
receive an error message, please
disregard it and click ok. (FOR
OTHER VERSIONS Psp /if you
receive an error message, please
disregard it and click ok.
Things should work fine
* With the magic wand select the middle frame - Effects
EyeCandy 5/Impact - Glass / Preset "monsieur_hiver_glass"
* Selections - select none
63. Open the tube '' AD_I_walk_in_the_rain'' Image -
mirror copy and paste as a new layer
64 Layers - add a new raster layer - Selections - load
selection ''monsieur_hiver_6''
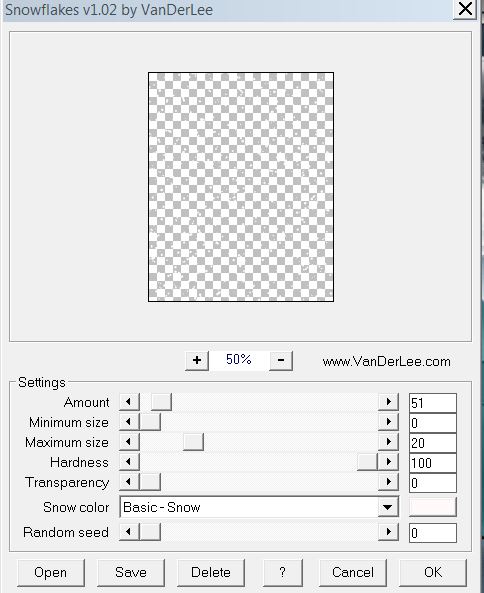
65. Effects - VDL VanDerLee - snowflakes
66. Selections - select none
67. Paste the tube "titre" in place
Lesson over
Thanks Sally
This lesson was written by Renée 21/10/2013
in
place
the 3/11/2013
*
Any resemblance with an existing lesson is merely a
coincidence
*
Don't forget to thank the people who work for us and with us.
I named the tubeurs - Testers and the translators
Thank you
*
|