|
My
computer ....seven
Let's start the lesson.
-
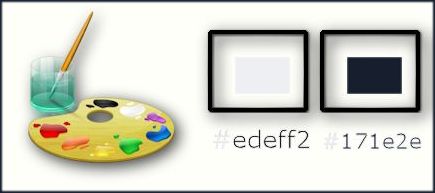
Material Properties: Foreground color to :#edeff2
Background color to : #171e2e
1.
Open the Background image : ''fond_monseven''- Promote Background Layer =Raster 1
2.
Layers- New raster layer
- Activate Flood Fill Tool and fill the layer with the foregroundcolor
3.
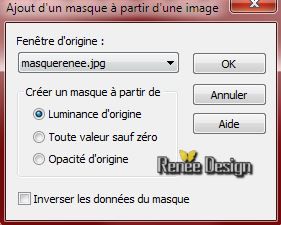
Layers- New Mask layer from Image and select Mask''masquerenee''
-
Layers- Merge- Merge- Group
4.
Effects-3D effects-Drop Shadow using the default settings
5.
Double click on this layer and set the Blendmode to Overlay
-
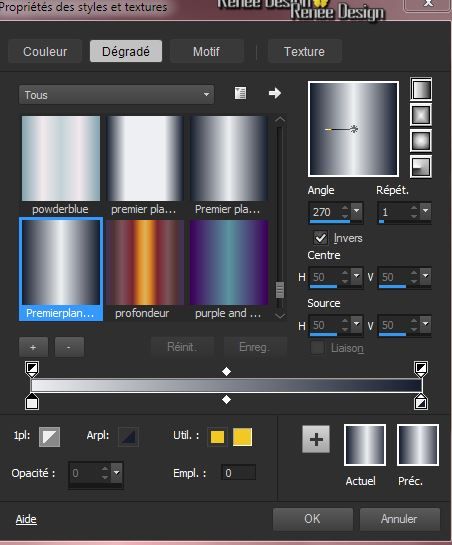
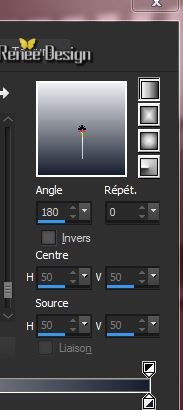
Prepare a linear gradient configured like this.
6.
Layers- New raster layer
7.
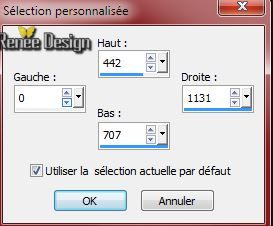
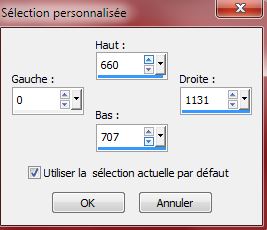
Selection Tool ( S ) Custom selection use settings below
-
Activate Flood Fill Tool and fill the selection with the gradient
Selections- Deselect All
8.
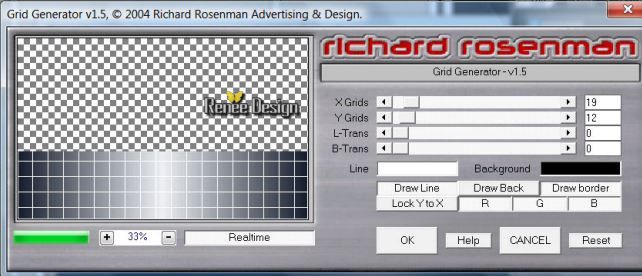
Effects- Plugins -Richard Rosenman -Grid
Generator with these settings
ATTENTION
Backgroundcolor /click 1 x Line /1 x Back/1 x Line and 1 x
Border and OK
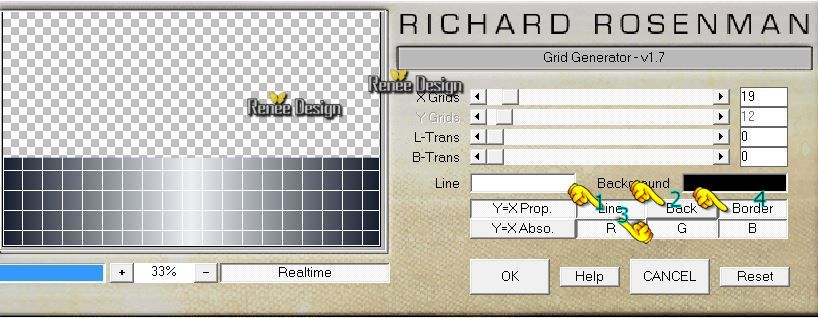
for version 1.5 they are the same settings -Draw
Line-Draw-Back-Draw -Border
9.
Effects- Plugins - Transparency -Eliminate
Black
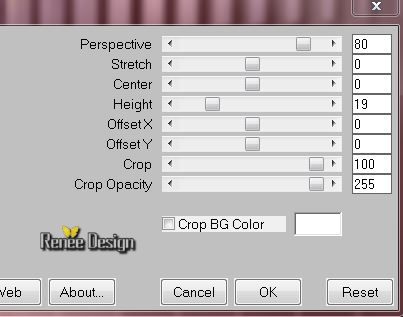
10.
Effects- Plugins -Mura's Meister - Perspective
Tilling with these settings
11. Layers- New raster layer
12.
Selections - load/save selection - load selection from disk and choose my selection: ''Renee_my_seven"
-Activate Flood Fill Tool and fill the selection with the gradient
Selections- Deselect All
13.
Effects- Plugins-EyeCandy 5 Impact –Glass –tab Settings/User settings choose my preset:"Renee_myseven_glass’’
14.
Effects- Plugins -EyeCandy 5 Perpsective shadow -tab Settings/User settings choose my preset:''myseven_shadow''
15. Activate the tube '' monseven_image_1''-
Edit -Copy-Edit - Paste as new layer on your working area and move (place next to the text)
16.
Effects- Plugins -EyeCandy 5 Impact Perspective Shadow
-tab Settings/User settings choose my preset: ''myseven_shadow1''
17.
Activate the tube ''My_seven_iPhones''
-Edit -Copy-Edit - Paste as new layer on your working area
/With your move tool:move to the bottom right corner
Double click on this layer and set the Blendmode to Luminance Legacy and set the layer opacity of this layer to 73%
18. Layers- New raster layer
19.
Selection Tool ( S ) Custom selection use settings below
- Color palette - change the settings of the linear gradient as shown in the example
- Flood Fill Tool: fill the selection with the gradient
Selections- Deselect All
20.
Effects- Plugins - EyeCandy 5 Impact -Black light
–tab Settings/User settings choose my preset:''myseven_blacklight''
21.Layers- Duplicate
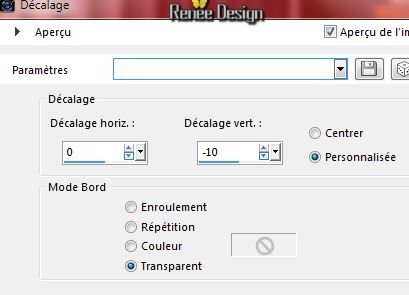
22. Effects- Image Effects- Offset with these settings
23. Layers- Merge- Merge Down
-Activate the bottom of the layer palette=Raster 1
24. Activate the tube ''myseven_main_phone''- Edit -Copy-Edit - Paste as new layer on your working area and move
25. Double click on this layer and set the Blendmode to Luminance
Activate the top of the layer palette
26. Layers- New raster layer
27.
Selections - load/save selection - load selection from disk and choose my selection: ‘’
Renee_my_seven_3’’
28. Flood Fill Tool: fill the selection with the gradient
Selections- Deselect All
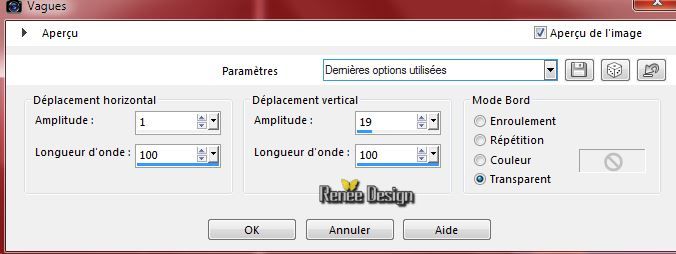
29. Effects- Distortion Effects- Wave with these settings
30. Effects-Distortion Effects-Wind/Winddirection From right 100

31. Layers- New raster layer
32. Selection Tool-Rounded Rectangle
draw a
selection as shown in the example below
33. Flood Fill Tool: fill the selection with the gradient
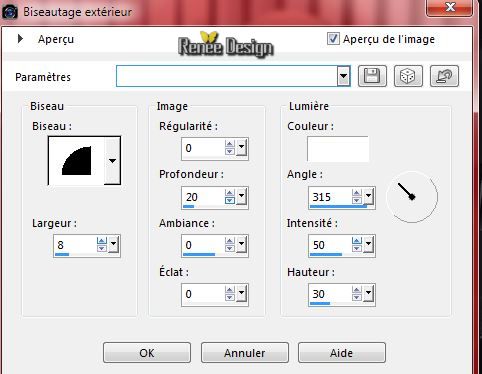
34. Effects- 3D Effects- Outer Bevel with these settings
Selections- Deselect All
35.
Effects-3D effects-Drop Shadow with these settings:0/1/62/5 black
36. Double click on this layer and set the Blendmode to Hard Light
37.Open the Text Tool and write the word ''Search.." With your move tool move to the bottom left side .
We will decorate our work
Activate the
tube "élément déco"
-I have different logo, s
-but you can create others if you wish(see what is best for you ! )
38. Open the tube "Elements _deco_myseven" (You can create your own logo)
- Edit/ Copy-Edit - Paste as new layer on your working area and move
To all elements: Effects- Eyecandy5 Glass -Tab Settings -Clear
(select the elements , place them one by one on your work and merge the layers(you have one layer with elements)
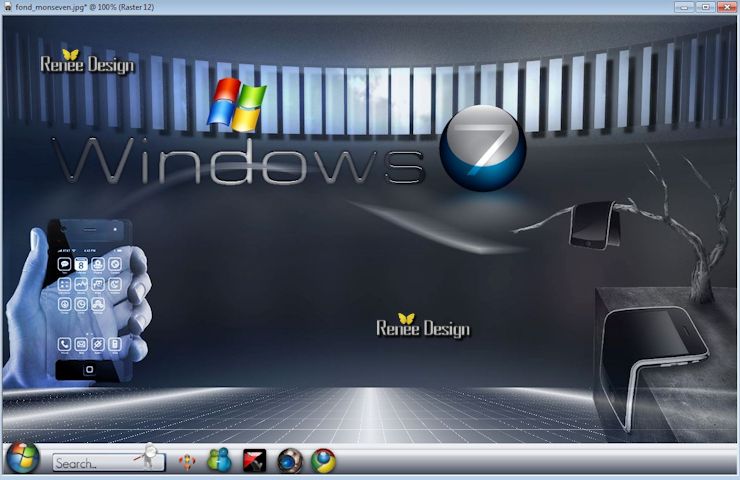
you should have this result:
- Activate the top of the layer palette
39. Layers- New raster layer
40.
Selections - load/save selection - load selection from disk and choose my selection:
''Renee_my_seven_1''
41. Flood Fill -Opacity to 100%
- Activate Flood Fill Tool and fill the selection with the backgroundcolor #171e2e (click 3 times in the selection)
42. Layers- New raster layer
Color palette - foreground color to #edeff2
43. Activate Flood Fill Tool and fill the selection with the foregroundcolor (click 3 times in the selection)
Selections- Deselect All
44. Layers- Merge- Merge Down
- Double click on this layer and set the Blendmode to Multiply
45.
Activate the tube ''my_seven-tablettes''
Edit -Copy-Edit - Paste as new layer on your working area and place in the middle of your work
46. Layers- Arrange- Move Down
-Activate the top of the layer Palette
47. Layers- New raster layer
48.
Selections - load/save selection - load selection from disk and choose my selection: "Renee_my_seven_2"
49. Activate Flood Fill Tool and fill the selection with the backgroundcolor #171e2e (1 click) / Activate Flood Fill Tool and fill the selection with the foregroundcolor
#edeff2 (1 click)
Selections- Deselect All
50. Activate the bottom of the layer palette=(Raster1)
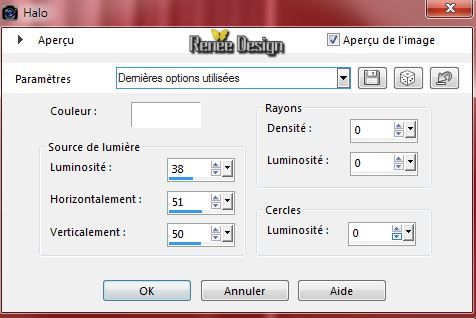
51.Effects-Illumination Effects- Sunburst with these settings
- In the layer palette activate Raster 5 ( My_seven_iPhones)
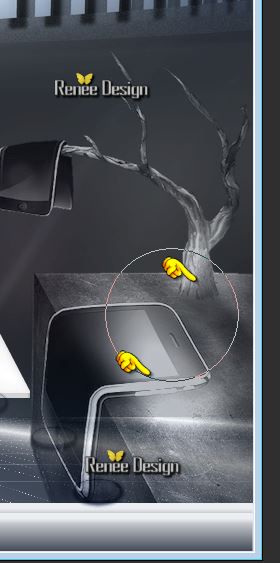
52. Activate the Lighten/Darken Brush with these settings

Then click with the right mousebutton on to the tube as shown on the print screen below
- Place the cursor at the second location/downward movement as shown on the print screen below
53. Activate
my tube ''capture'' ore create your own( This is a screenshot of my computer)
Edit/ Copy-Edit - Paste as new layer on your working area .With your move tool move to the bottom right side
54. Layers- Merge- Merge Visible
55. Activate the tube ''Image16Little Ms Tough It_LR.pspimage''
-Edit/ Copy-Edit - Paste as new layer on your working area and move
56. Layer Palette -Double click on this layer and set the Blendmode to Luminance-Legacy
57. Layers- Duplicate (for a stronger effect)
58. Layers- Merge- Merge Down
59. Effects- Plugins -Eyecandy 5 Impact - Perspective shadow-Tab-Settings -Drop
shadow blury using the default settings
60. Create an image on the theme or use one of mine (there are 3 into the zipfile(images to vizros)
- Activate an image in psp (make the images not too large)
To install the filter Vizros
- Unzip and install the filter
- Starting the PSP and open a picture.
Go to Filter - Click to Register.Please indicate the number and click again to Register. Now the filter is ready for use(If you're lucky, they must set it only once Sign up./Bad luck then you need to enter it when you want to use the filter every time.)
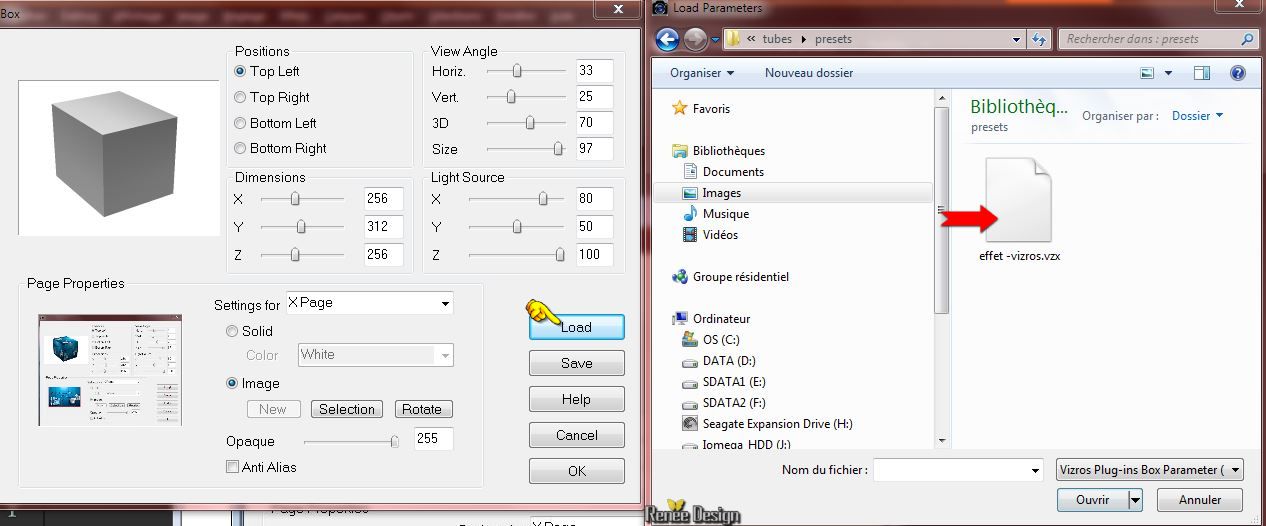
61. Effects- Plugins -Vizros-and select my file-preset ''effetvizros"
Click on
Load -and select preset ''effetvizros" /Or manual settings as shown in the example below
56.
With the magic wand -select the white part

62.
Selections- Modify-Expand 1 pixel - Hit the Delete Key of your Keyboard
63. Image
Resize with 38 %
-Edit -Copy-Edit - Paste as new layer on your working area and move
(If your filter Vizros does not give the same result (The effect is included with the material)
64.
Effects- Plugins -Eye Candy 5 -perpsective
shadow-
tab Settings/User settings choose my preset: ''myseven-visroz_shadow''
65. Activate the tube ''myseven-internet-marketing"
Edit -Copy-Edit - Paste as new layer on your working area and move
Everything is in the right place
66.Layers- Merge- Merge Visible
67. Image - Add borders-Symmetric checked:2 pixels FG-Color
68. Image - Add borders-Symmetric checked:20 pixels BG-Color
-
You may minimize your working area for a moment, but do not close, we will need it again soon
69. Activate the Background image " second_fond_myseven"
70.
Effects- Image Effects- Seamless Tiling-Side by Side
- Activate your minimized image
71. Image
Resize with 68%
-Edit -Copy-Edit - Paste as new layer on your working area - (do not move it is in the right place)
72. Activate the tube ''logo _de _deco_2''
Edit/Copy - Edit paste all the Elements as a new layer
on your working area and move
73. Image - Add borders-Symmetric checked:2 pixels FG-Color
74. Image - Add borders-Symmetric checked:2 pixels BG-Color
75. Image - Add borders-Symmetric checked:30 pixels FG-Color
76. Open the text/ Edit/copy-Edit paste as a new layer on your working area .Ore write your own text
77. Image - Add borders-Symmetric checked:2 pixels BG-Color
74. Image - Add borders-Symmetric checked:20 pixels FG-Color
I hope you enjoyed this lesson
Renée
This lesson was written by Renée 09/01/2015
Created the
2015
Any resemblance with an existing lesson is merely a coincidence *
* Don't forget to thank the people who work for us and with us. I named the tubeurs - Testers and the translators.
Thanks Renée.
*
| 
 Translations


 When you see this logo the filter is imported in Unlimited *
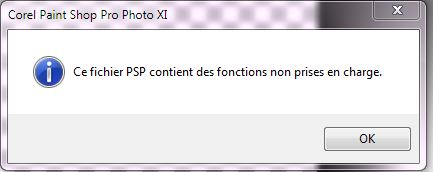

 All rights reserved